Page 2019 of 2057
Perform the leak test, by closing the hand valves
on the gauge set, switching off the service unit
vacuum pump and observing the low pressure
gauge.
10. N O T E : This step is only necessary if the
pressure increase exceeds 20 mbar.
Locate and rectify any leaks in the A/C
refrigerant circuit using a leak tester.
General Equipment: UV Leak Detector
General Equipment: Electronic Leak Detector
General Equipment: Automatic Calibration Halogen Leak Detector
11 . Add refrigerant oil to the air conditioning system.
Refer to: Specifications (412-00 Climate Control
System - General Information, Specifications).
Refer to: Refrigerant Oil Adding (412-00 Climate
Control System - General Information, General
Procedures).
12. Fill the air conditioning system with liquid
through the high-pressure connection.
Refer to: Specifications (412-00 Climate Control
System - General Information, Specifications).
13. Open the shut-off valve on the high-pressure
side.
1.
2. Switch the service unit to "Fill" mode and fill
the system with the specified quantity of
liquid refrigerant (R134a).
14. Fill the air conditioning system with gas through
the low-pressure connection.
Refer to: Specifications (412-00 Climate Control
System - General Information, Specifications).
15. Open the shut-off valve on the low-pressure
side.
1.
2. Switch the service unit to "Fill" mode and fill
the system with the specified quantity of
gaseous refrigerant.
3. Add the remaining amount of refrigerant with the air conditioning switched on. To do so
run the engine at about 1200-1500 rev/min.
Set the air conditioning system to full cooling
power and fresh air mode. Set the blower
motor to the highest setting. Fill with the
remainder of the specified fill capacity.
16. Disconnect the service unit. 17.
Close the shut-off valve.
1.
2. Switch off the service unit.
3. Disconnect the service unit lines from the
filling connections of the air conditioning
system.
4. Screw the protective caps onto the charging connections.
18. Install all components in reverse order.
G1022208en2008.50 Kuga8/2011
412-00- 8
Climate Control System - General Information
412-00- 8
GENERAL PROCEDURES
TO MODEL INDEX
BACK TO CHAPTER INDEX
FORD KUGA 2011.0MY WORKSHOP REPAIR MANUAL
Page 2020 of 2057
Spring Lock Coupling
Special Tool(s)412-026
Disconnect Tool, Spring Lock
Coupling (3/8" red)
23023A
412-027
Disconnect Tool, Spring Lock
Coupling (1/2" blue)
34001
412-038
Disconnect Tool, Spring Lock
Coupling (5/8" black)
34003
412-069
Disconnect Tool, Spring Lock
Coupling (3/4" white)
34002
Materials
Specification
Name
WSH-M1C231-B /
6U7J-M1C231-AA
Compressor Oil - Air
Conditioning 1.
Refer to: Air Conditioning (A/C) System Health
and Safety Precautions (100-00 General
Information, Description and Operation).
2. NOTE: Choose the special tool according to the
line diameter.
Special Tool(s): 412-026, 412-027, 412-038,
412-069
E68499
3.
E68500
4. CAUTION: Make sure that all openings are sealed.
E68501
G549834en2008.50 Kuga8/2011
412-00- 9
Climate Control System - General Information
412-00- 9
GENERAL PROCEDURES
TO MODEL INDEX
BACK TO CHAPTER INDEX
FORD KUGA 2011.0MY WORKSHOP REPAIR MANUAL
Page 2021 of 2057
5. CAUTION: Make sure that all openingsare sealed.
• Check the locking spring for damage.
• Carefully remove damaged locking springswith a thin wire, and renew them.
E68502
6.Install new refrigerant line O-rings.
E68523
7. CAUTION: Never lubricate connections
and O-rings with mineral oil.
Coat the O-rings for the refrigerant line with
clean refrigerant oil.
Material: Compressor Oil - Air Conditioning(WSH-M1C231-B / 6U7J-M1C231-AA)
refrigerant oil
8.
E68503
G549834en2008.50 Kuga8/2011
412-00- 10
Climate Control System - General Information
412-00- 10
GENERAL PROCEDURES
TO MODEL INDEX
BACK TO CHAPTER INDEX
FORD KUGA 2011.0MY WORKSHOP REPAIR MANUAL
Page 2051 of 2057
permitted, the high-pressure switch turns off the
refrigerant compressor.
The compressor on-off cycle is controlled by the
dual pressure switch depending on the pressure
in the refrigerant accumulator. The dual pressure
switch turns the refrigerant compressor off
permanently if the pressure falls below a permitted
value (e.g. if there is a leak).
Component Description
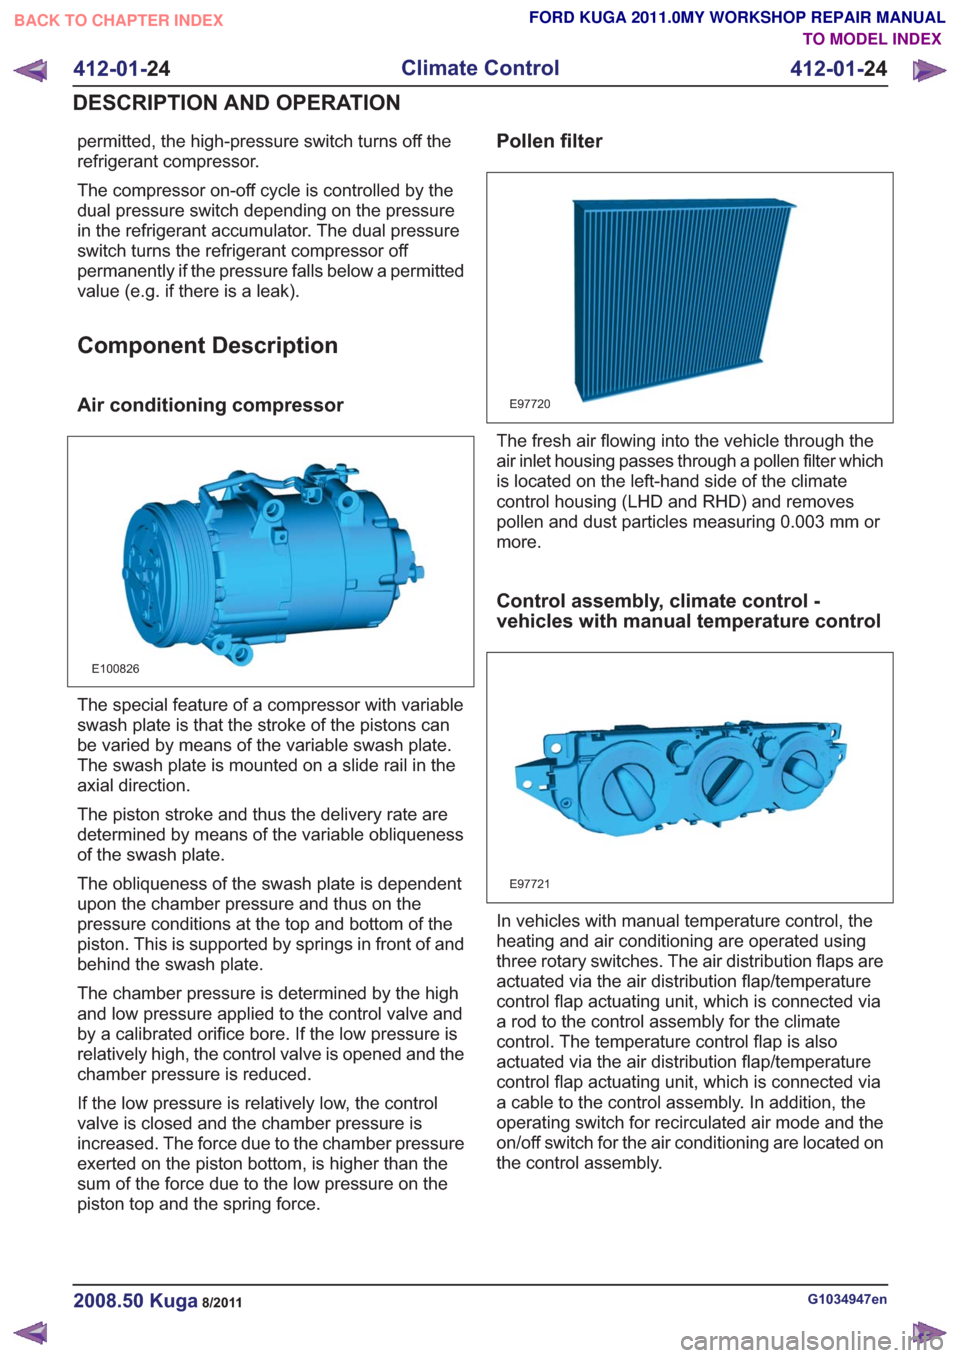
Air conditioning compressor
E100826
The special feature of a compressor with variable
swash plate is that the stroke of the pistons can
be varied by means of the variable swash plate.
The swash plate is mounted on a slide rail in the
axial direction.
The piston stroke and thus the delivery rate are
determined by means of the variable obliqueness
of the swash plate.
The obliqueness of the swash plate is dependent
upon the chamber pressure and thus on the
pressure conditions at the top and bottom of the
piston. This is supported by springs in front of and
behind the swash plate.
The chamber pressure is determined by the high
and low pressure applied to the control valve and
by a calibrated orifice bore. If the low pressure is
relatively high, the control valve is opened and the
chamber pressure is reduced.
If the low pressure is relatively low, the control
valve is closed and the chamber pressure is
increased. The force due to the chamber pressure
exerted on the piston bottom, is higher than the
sum of the force due to the low pressure on the
piston top and the spring force.
Pollen filter
E97720
The fresh air flowing into the vehicle through the
air inlet housing passes through a pollen filter which
is located on the left-hand side of the climate
control housing (LHD and RHD) and removes
pollen and dust particles measuring 0.003 mm or
more.
Control assembly, climate control -
vehicles with manual temperature control
E97721
In vehicles with manual temperature control, the
heating and air conditioning are operated using
three rotary switches. The air distribution flaps are
actuated via the air distribution flap/temperature
control flap actuating unit, which is connected via
a rod to the control assembly for the climate
control. The temperature control flap is also
actuated via the air distribution flap/temperature
control flap actuating unit, which is connected via
a cable to the control assembly. In addition, the
operating switch for recirculated air mode and the
on/off switch for the air conditioning are located on
the control assembly.
G1034947en2008.50 Kuga8/2011
412-01-24
Climate Control
412-01- 24
DESCRIPTION AND OPERATION
TO MODEL INDEX
BACK TO CHAPTER INDEX
FORD KUGA 2011.0MY WORKSHOP REPAIR MANUAL
Page 2055 of 2057
Air Conditioning (A/C) Compressor — 2.5L Duratec(147kW/200PS) - VI5(34 626 4)
Materials
Specification
Name
WSH-M1C231-B /
6U7J-M1C231-AA
Compressor Oil - Air
Conditioning
Removal
NOTE:
Removal steps in this procedure may
contain installation details. 1.
Refer to: Air Conditioning (A/C) System
Recovery, Evacuation and Charging (412-00
Climate Control System - General Information,
General Procedures).
2. Refer to: Air Conditioning (A/C) Compressor
Belt (303-05 Accessory Drive - 2.5L Duratec
(147kW/200PS) - VI5, Removal and
Installation).
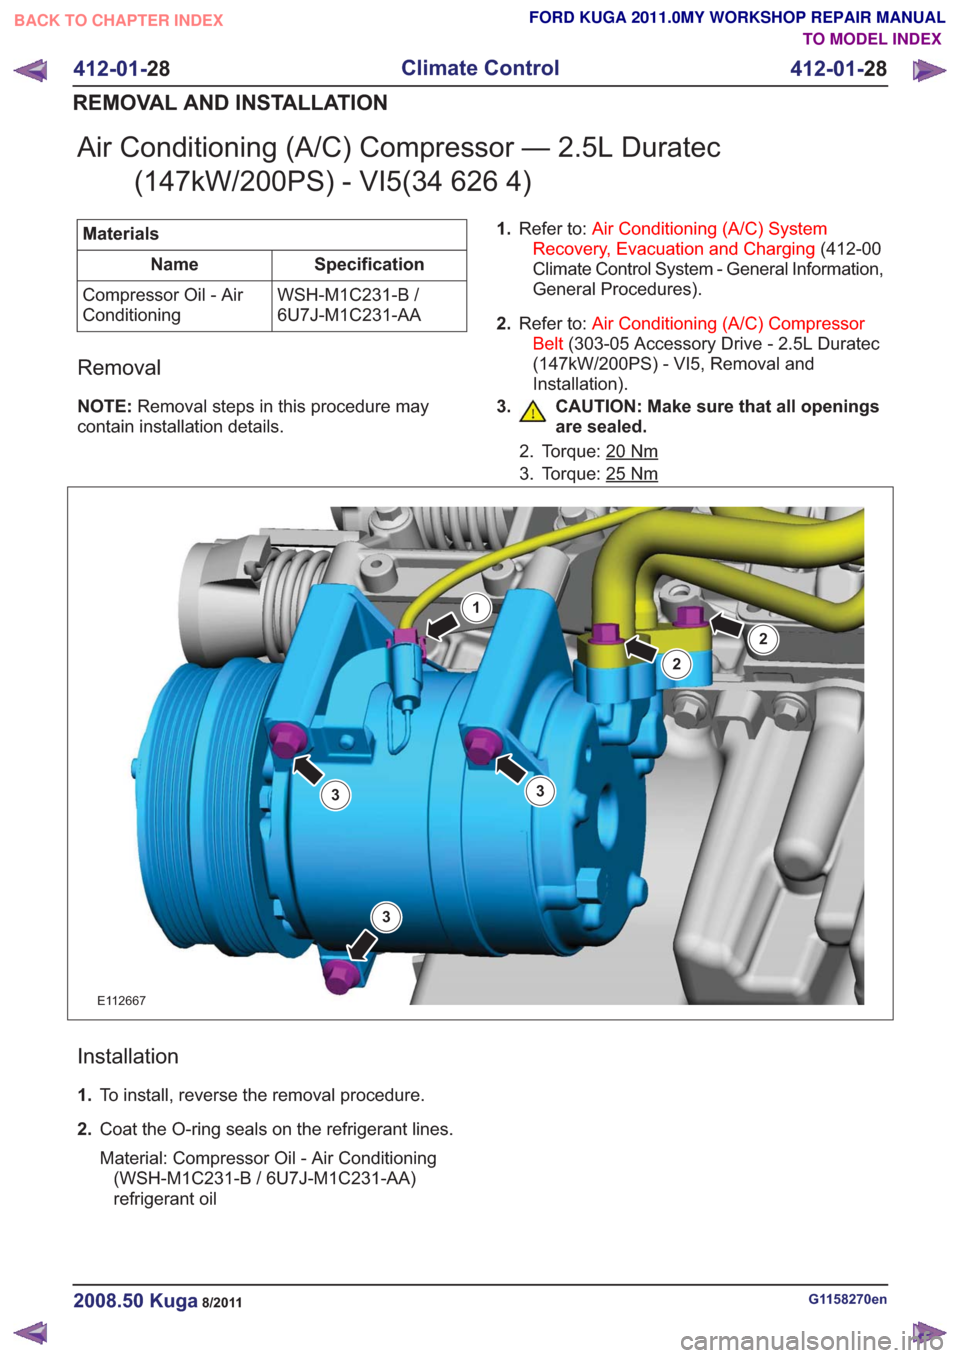
3. CAUTION: Make sure that all openings are sealed.
2. Torque: 20Nm
3. Torque: 25Nm
E112667
1
2
3
2
33
Installation
1.To install, reverse the removal procedure.
2. Coat the O-ring seals on the refrigerant lines.
Material: Compressor Oil - Air Conditioning
(WSH-M1C231-B / 6U7J-M1C231-AA)
refrigerant oil
G1158270en2008.50 Kuga8/2011
412-01- 28
Climate Control
412-01- 28
REMOVAL AND INSTALLATION
TO MODEL INDEX
BACK TO CHAPTER INDEX
FORD KUGA 2011.0MY WORKSHOP REPAIR MANUAL
Page 2056 of 2057
Air Conditioning (A/C) Compressor to Condenser Discharge Line
MaterialsSpecification
Name
WSH-M1C231-B /
6U7J-M1C231-AA
Compressor Oil - Air
Conditioning
Removal
NOTE:
Removal steps in this procedure may
contain installation details.
1. Refer to: Air Conditioning (A/C) System
Recovery, Evacuation and Charging (412-00
Climate Control System - General Information,
General Procedures).
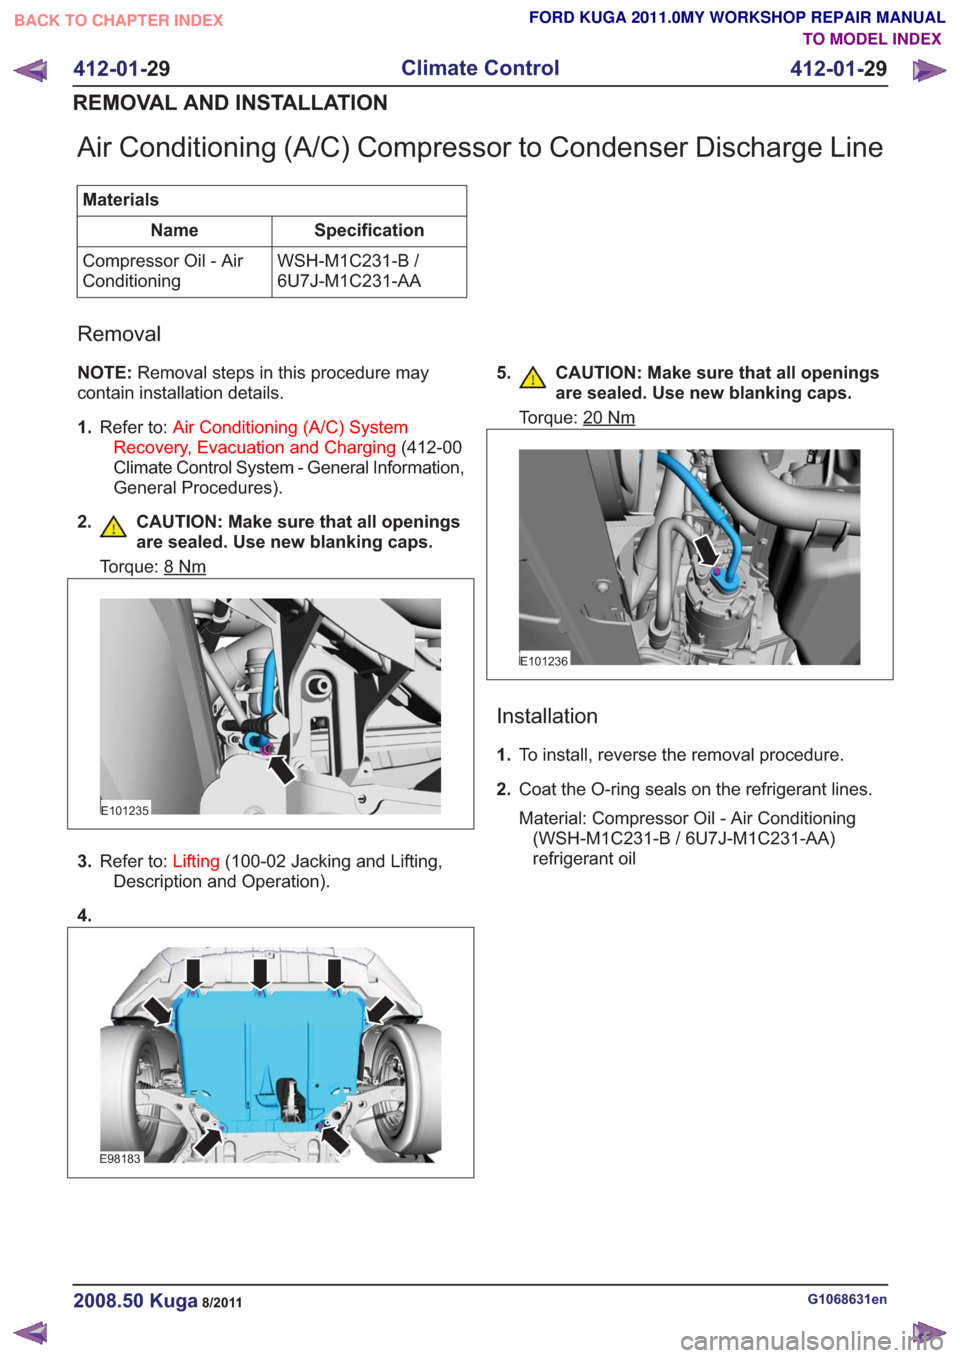
2. CAUTION: Make sure that all openings are sealed. Use new blanking caps.
Torque: 8Nm
E101235
3.Refer to: Lifting(100-02 Jacking and Lifting,
Description and Operation).
4.
E98183
5. CAUTION: Make sure that all openings are sealed. Use new blanking caps.
Torque: 20Nm
E101236
Installation
1.To install, reverse the removal procedure.
2. Coat the O-ring seals on the refrigerant lines.
Material: Compressor Oil - Air Conditioning
(WSH-M1C231-B / 6U7J-M1C231-AA)
refrigerant oil
G1068631en2008.50 Kuga8/2011
412-01- 29
Climate Control
412-01- 29
REMOVAL AND INSTALLATION
TO MODEL INDEX
BACK TO CHAPTER INDEX
FORD KUGA 2011.0MY WORKSHOP REPAIR MANUAL
Page 2057 of 2057
Air Conditioning (A/C) Compressor to Condenser Discharge Line— 2.5L Duratec (147kW/200PS) - VI5
Materials
Specification
Name
WSH-M1C231-B /
6U7J-M1C231-AA
Compressor Oil - Air
Conditioning
Removal
NOTE:
Removal steps in this procedure may
contain installation details.
1. Refer to: Air Conditioning (A/C) System
Recovery, Evacuation and Charging (412-00
Climate Control System - General Information,
General Procedures).
2. CAUTION: Make sure that all openings are sealed.
Torque: 8Nm
E112729
3.Refer to: Lifting(100-02 Jacking and Lifting,
Description and Operation).
4.
E98183
5. CAUTION: Make sure that all openings are sealed.
Torque: 20Nm
E112730
Installation
1.To install, reverse the removal procedure.
2. Coat the O-ring seals on the refrigerant lines.
Material: Compressor Oil - Air Conditioning
(WSH-M1C231-B / 6U7J-M1C231-AA)
refrigerant oil
G1158276en2008.50 Kuga8/2011
412-01- 30
Climate Control
412-01- 30
REMOVAL AND INSTALLATION
TO MODEL INDEX
BACK TO CHAPTER INDEX
FORD KUGA 2011.0MY WORKSHOP REPAIR MANUAL