2011 FORD KUGA ECT
[x] Cancel search: ECTPage 167 of 2057

reprogrammed. However, if the engine hasn't been
run since the last programmed start, the fuel-fired
booster heater will not start up the second time so
as to prevent the battery from being discharged.
The length of time required to pre-heat the vehicle
is calculated in the control unit of the fuel-fired
booster heater and is based on two temperature
values:
• Ambient air temperature: this message is taken
from the GEM via the CAN bus.
• Coolant temperature: this is determined via an internal sensor in the fuel-fired booster heater.
The maximum heating time is 30 minutes at an
outside air temperature of -10 °C or lower. The
heating time decreases proportionally with
increasing ambient temperature until the ambient
temperature is between +15 °C and +20 °C. Then
the minimum heating time is 10 minutes. The
parking heater is deactivated at temperatures
above +20 °C.
The sequence for a programmed start of the
booster heater is as follows:
• Two minutes before the start of the maximum heating time the driver information
system/instrument cluster sends an activation
message to the fuel-fired booster heater via the
CAN bus.
• The fuel-fired booster heater calculates the required heating time and, if necessary, sends
a delay request on the CAN bus.
• At the calculated time, the fuel-fired booster heater starts up. The conditions for start-up are:
engine not running and amount of fuel in the
fuel tank is above 14% of maximum.
• When the coolant temperature reaches +30 °C, the control unit of the fuel-fired booster heater
sends a request to switch on the passenger
compartment blower.
• Eight minutes after the programmed switch-off time, the booster heater stops heating mode
and starts a run-on operation to clean the
system's spark plugs.
• Ten minutes after the switch-off time, the post-cleaning operation is complete. The
additional ten minutes run-on time provides
some leeway in case the driver is late arriving.
After a programmed start-up of the booster heater
it is switched off again after the heating time has
elapsed (or if the fuel level in the fuel tank drops
below 8%). The booster heater stops within 2 minutes of the engine starting. This leaves enough
time to check whether the switch-on conditions for
boost heat mode have been met, thus preventing
the booster heater from having to switch off and
switch back on again. The heater can be switched
off manually at any time from the menu.
Whilst the fuel-fired booster heater is in additional
heating mode and/or parking heating mode, the
instrument cluster receives a fuel consumption
signal; this is used to re-calculate the vehicle's
remaining range and fuel consumption data.
Emergency shutoff
In the event of an accident in which the airbags
are deployed, the control unit of the fuel-fired
booster heater receives a message on the CAN
bus from the restraints control module (RCM).
When this message is received, the booster heater
system switches off immediately.
The booster heater control module deactivates the
system and does not respond to further messages
on the CAN bus. The booster heater control module
needs to be activated with WDS.
Component Description
Electric Booster Heater
The electric booster heater consists of three
individual heating elements, which are incorporated
into a single housing. It is controlled by the generic
electronic module (GEM), taking into account the
following factors:
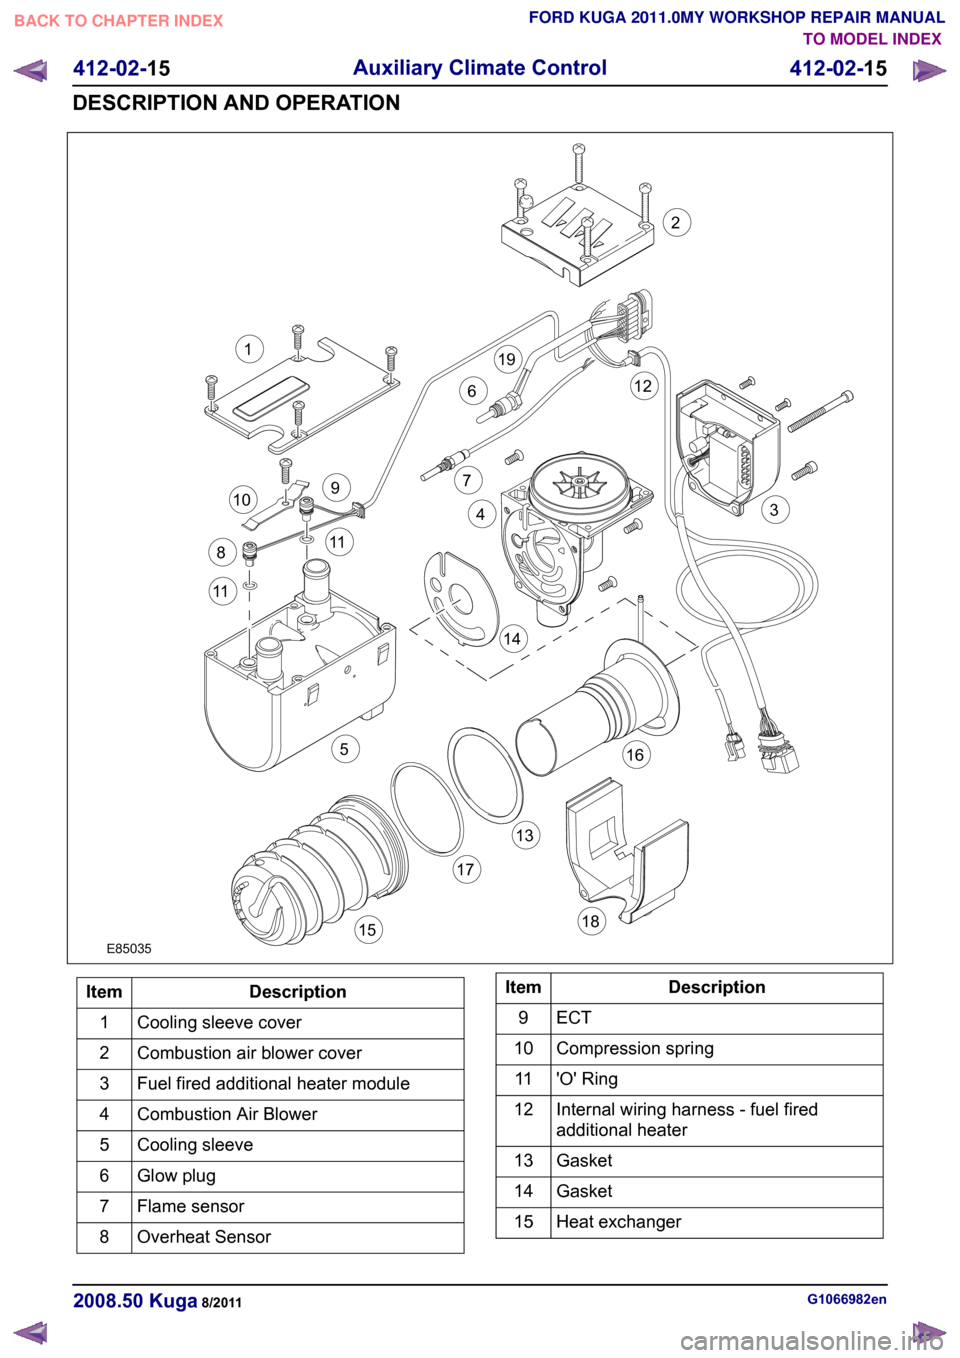
Detailed illustration of fuel-fired heater
G1066982en
2008.50 Kuga 8/2011 412-02-14
Auxiliary Climate Control
412-02-14
DESCRIPTION AND OPERATIONTO MODEL INDEX
BACK TO CHAPTER INDEX
FORD KUGA 2011.0MY WORKSHOP REPAIR MANUALE97621
Page 168 of 2057

Description
Item
Cooling sleeve cover
1
Combustion air blower cover
2
Fuel fired additional heater module
3
Combustion Air Blower
4
Cooling sleeve
5
Glow plug
6
Flame sensor
7
Overheat Sensor
8 Description
Item
ECT9
Compression spring
10
'O' Ring
11
Internal wiring harness - fuel fired
additional heater
12
Gasket
13
Gasket
14
Heat exchanger
15 G1066982en
2008.50 Kuga 8/2011 412-02-15
Auxiliary Climate Control
412-02-15
DESCRIPTION AND OPERATIONTO MODEL INDEX
BACK TO CHAPTER INDEX
FORD KUGA 2011.0MY WORKSHOP REPAIR MANUALE850351132126791011115144316171518198
Page 169 of 2057

Description
Item
Combustion chamber
16
'O' Ring
17 Description
Item
Combustion blower motor cover
18
Glow plug wiring harness
19
Flame sensor
If the flame goes out independently during
operation of the booster heater, a restart is carried
out. If the booster heater does not ignite within 90
seconds of fuel delivery or if the flame goes out
within 15 minutes of starting, a lockout will be
implemented by the flame sensor.
Lockout can be cancelled by switching the booster
heater off then on again, although this may only
be repeated at most 2 times.
Overheat Sensor
The overheating sensor enables the fuel-fired
booster heater module to determine the coolant
temperature, protecting the heater from
overheating. The overheating sensor is installed
next to the coolant temperature sensor under a
cover on the top of the fuel-fired heater.
In the event of overheating (lack of water, poorly
ventilated coolant circuit), the fuel supply to the
heater is interrupted and a lockout occurs. After
the cause of the overheating has been eliminated,
the heater can be restarted by switching it off and
on again, if the coolant temperature is below 70°C.
If the heater overheats ten times in a row, the
control unit is locked.
ECT
The fuel-fired booster heater module uses the
temperature sensor to determine the coolant
temperature, which it then uses to set the starting
and stopping time. The coolant temperature sensor
is installed next to the overheating sensor under a
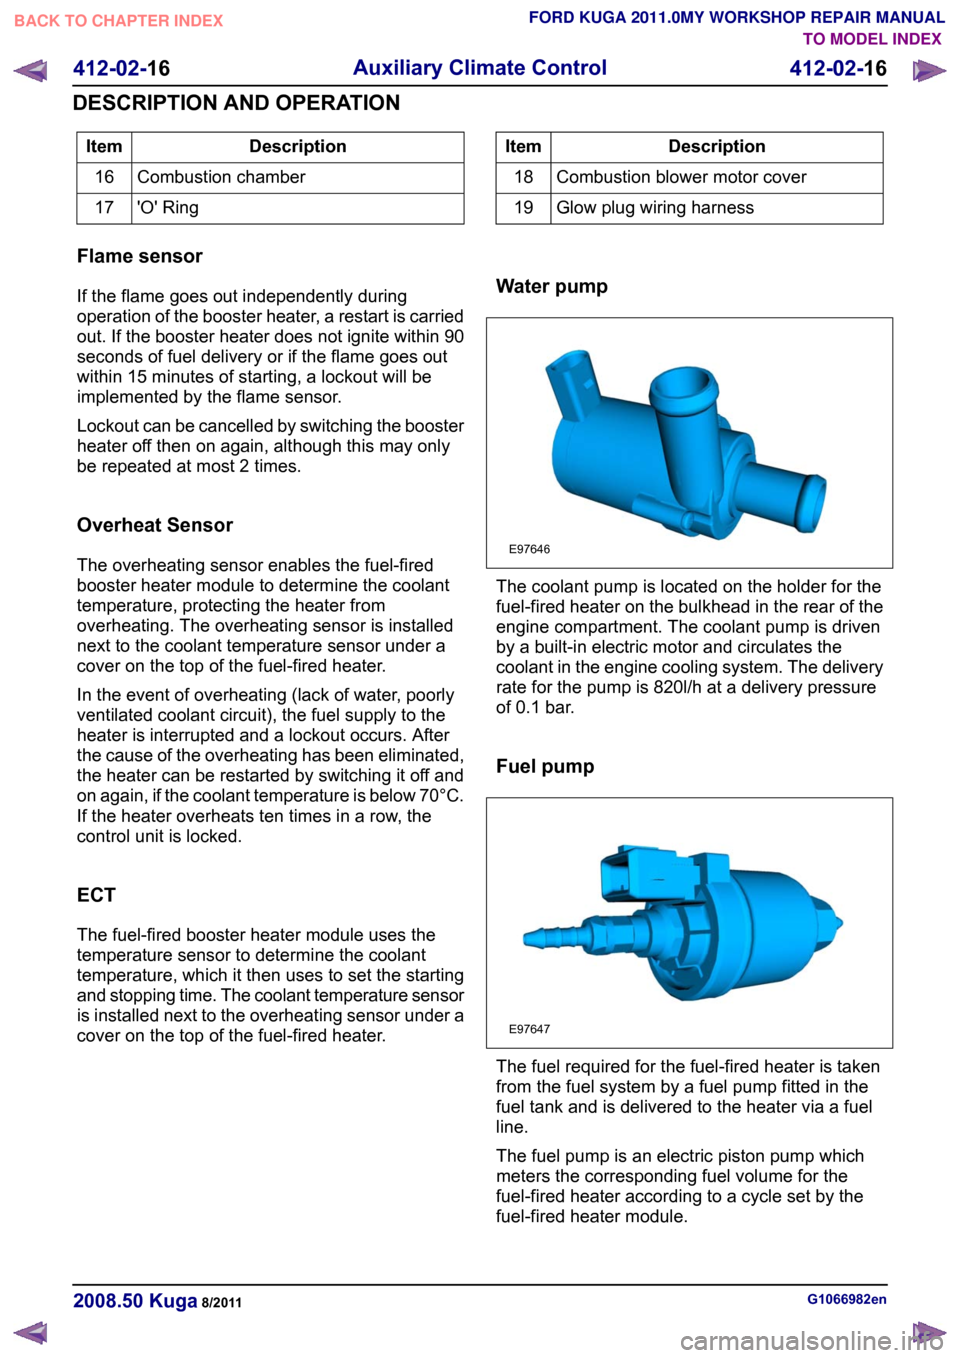
cover on the top of the fuel-fired heater. Water pump The coolant pump is located on the holder for the
fuel-fired heater on the bulkhead in the rear of the
engine compartment. The coolant pump is driven
by a built-in electric motor and circulates the
coolant in the engine cooling system. The delivery
rate for the pump is 820l/h at a delivery pressure
of 0.1 bar.
Fuel pump
The fuel required for the fuel-fired heater is taken
from the fuel system by a fuel pump fitted in the
fuel tank and is delivered to the heater via a fuel
line.
The fuel pump is an electric piston pump which
meters the corresponding fuel volume for the
fuel-fired heater according to a cycle set by the
fuel-fired heater module.
G1066982en
2008.50 Kuga 8/2011 412-02-16
Auxiliary Climate Control
412-02-16
DESCRIPTION AND OPERATIONTO MODEL INDEX
BACK TO CHAPTER INDEX
FORD KUGA 2011.0MY WORKSHOP REPAIR MANUALE97646 E97647
Page 171 of 2057

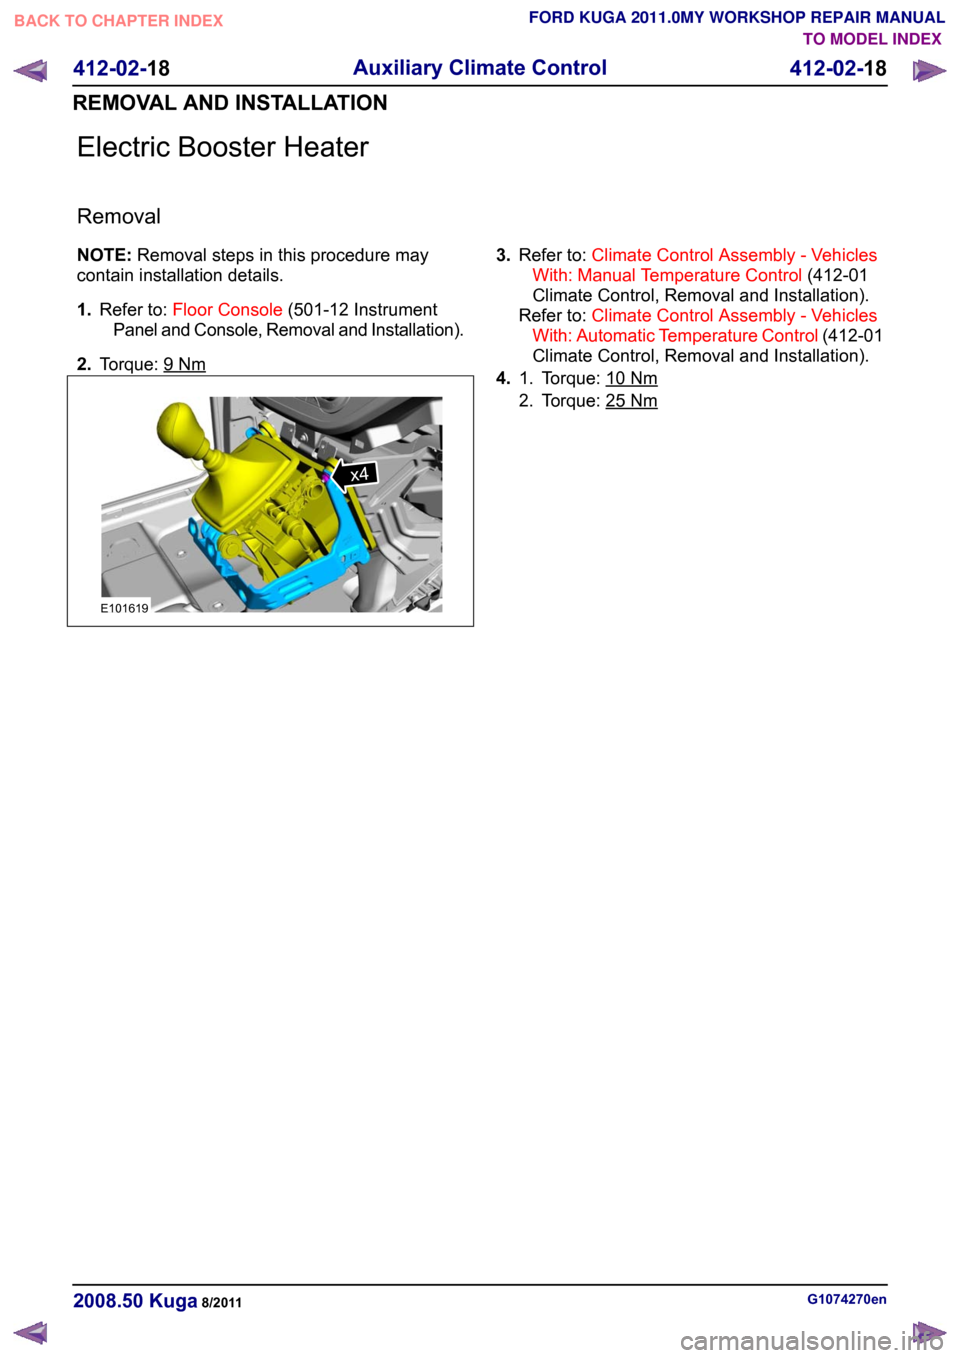
Electric Booster Heater
Removal
NOTE:
Removal steps in this procedure may
contain installation details.
1. Refer to: Floor Console (501-12 Instrument
Panel and Console, Removal and Installation).
2. Torque: 9 Nm 3.
Refer to: Climate Control Assembly - Vehicles
With: Manual Temperature Control (412-01
Climate Control, Removal and Installation).
Refer to: Climate Control Assembly - Vehicles
With: Automatic Temperature Control (412-01
Climate Control, Removal and Installation).
4. Torque: 10 Nm1.
2. Torque: 25
Nm
G1074270en
2008.50 Kuga 8/2011 412-02-18
Auxiliary Climate Control
412-02-18
REMOVAL AND INSTALLATIONTO MODEL INDEX
BACK TO CHAPTER INDEX
FORD KUGA 2011.0MY WORKSHOP REPAIR MANUALx4E101619
Page 182 of 2057

SECTION 413-00 Instrument Cluster and Panel
Illumination
VEHICLE APPLICATION:
2008.50 Kuga
PAGE
CONTENTS
DIAGNOSIS AND TESTING
413-00-2
Instrument Cluster and Panel Illumination..........................................................................
413-00-2
Principles of Operation.......................................................................................................
413-00-2
Instrument Cluster and Dimmable Backlighting ................................................................
413-00-2
Inspection and Verification.................................................................................................. 413-00-1
Instrument Cluster and Panel Illumination
413-00-1
.TO MODEL INDEX
BACK TO CHAPTER INDEX
FORD KUGA 2011.0MY WORKSHOP REPAIR MANUAL
Page 183 of 2057

Instrument Cluster and Panel Illumination
Refer to
Wiring Diagrams Section 413-00, for
schematic and connector information.
Principles of Operation
NOTE: A new instrument cluster must be
configured.
The instrument cluster and panel illumination
consists of dimmable and non-dimmable
illumination. The dimmable panel illumination is
controlled by the panel illumination switch (part of
the headlamp switch), which allows the brightness
level of the backlights to be adjusted dependent
on the customer preference. When the headlamp
switch is in the parking lamps ON or headlamps
ON position, the intensity of the backlighting can
be adjusted using the panel dimmer switch. The
non dimmable illumination allows for full intensity
dependant on the ignition switch position.
Instrument Cluster and Dimmable
Backlighting A.
Tachometer
B. Engine coolant temperature gauge
C. Fuel gauge
D. Speedometer
E. Information display
The dimmable illumination utilizes light emitting
diodes (LEDs) and bulb(s). The following dimmable
components are backlight using LEDs only:
• ashtray
• cigar lighter
• transmission control lever
• heater control panel
• audio unit • navigation system display module
• instrument cluster
• climate control module
• hazard switch
• traction control system disable switch
• right-hand and left-hand heated front seat
switch(es)
Inspection and Verification
1. Verify the customer concern.
2. Visually inspect for obvious signs of mechanical
or electrical damage.
Visual Inspection Chart Electrical
Mechanical
– Fuse(s)
– Loose or corrodedconnector(s)
– Instrument cluster
– Wiring Harness
– Circuit
– LED(s)
– Bulb(s)
– Engine/engine
compartment or
underbody compon-
ents
– Fluid levels
– Accessory installa- tion
3. If an obvious cause for an observed or reported concern is found, correct the cause (if possible)
before proceeding to the next step.
4. If the cause is not visually evident, verify the symptom and refer to the diagnostic tab within
the Ford approved diagnostic tool. G1054961en
2008.50 Kuga 8/2011 413-00-2
Instrument Cluster and Panel Illumination
413-00-2
DIAGNOSIS AND TESTINGTO MODEL INDEX
BACK TO CHAPTER INDEX
FORD KUGA 2011.0MY WORKSHOP REPAIR MANUALE98738ABCED
Page 184 of 2057

SECTION 413-01 Instrument Cluster
VEHICLE APPLICATION:
2008.50 Kuga
PAGE
CONTENTS
DESCRIPTION AND OPERATION
413-01-2
Instrument Cluster (Overview)............................................................................................
413-01-2
Replacing the instrument cluster........................................................................................
413-01-2
Self-diagnostic mode..........................................................................................................
413-01-3
Instrument Cluster (System Operation and Component Description)................................
413-01-3
System Diagram.................................................................................................................
413-01-4
System Operation...............................................................................................................
413-01-4
Instrument Cluster..........................................................................................................
413-01-4
Message center..............................................................................................................
413-01-5
Component Description......................................................................................................
413-01-5
Vehicles with low series instrument cluster.....................................................................
413-01-6
Vehicles with high series instrument cluster...................................................................
DIAGNOSIS AND TESTING 413-01-7
Instrument Cluster..............................................................................................................
413-01-7
Inspection and Verification..................................................................................................
413-01-7
Configuration of the Instrument Cluster..............................................................................
REMOVAL AND INSTALLATION 413-01-9
Instrument Cluster.............................................................................................................. 413-01-1
Instrument Cluster
413-01-1
.TO MODEL INDEX
BACK TO CHAPTER INDEX
FORD KUGA 2011.0MY WORKSHOP REPAIR MANUAL
Page 185 of 2057

Instrument Cluster – Overview
Replacing the instrument cluster
When installing a new instrument cluster, the Ford
diagnostics device must be connected before
dismantling the instrument cluster, in order to load
the configuration data of the defective instrument
cluster using the "Installation of programmable
modules" routine. In addition, the value on the
odometer of the defective instrument cluster must
be noted, as this is required for configuration of the
new instrument cluster. If the odometer value
cannot be obtained from the instrument cluster
(display failure), the customer should supply the
approximate value.
When installing a new instrument cluster, the Ford
diagnostics device must be connected after
installation in order to download the configuration
data of the defective instrument cluster into the
new instrument cluster using the "Installation of
programmable modules" routine, and to configure
the newly installed instrument cluster to the PATS
system.
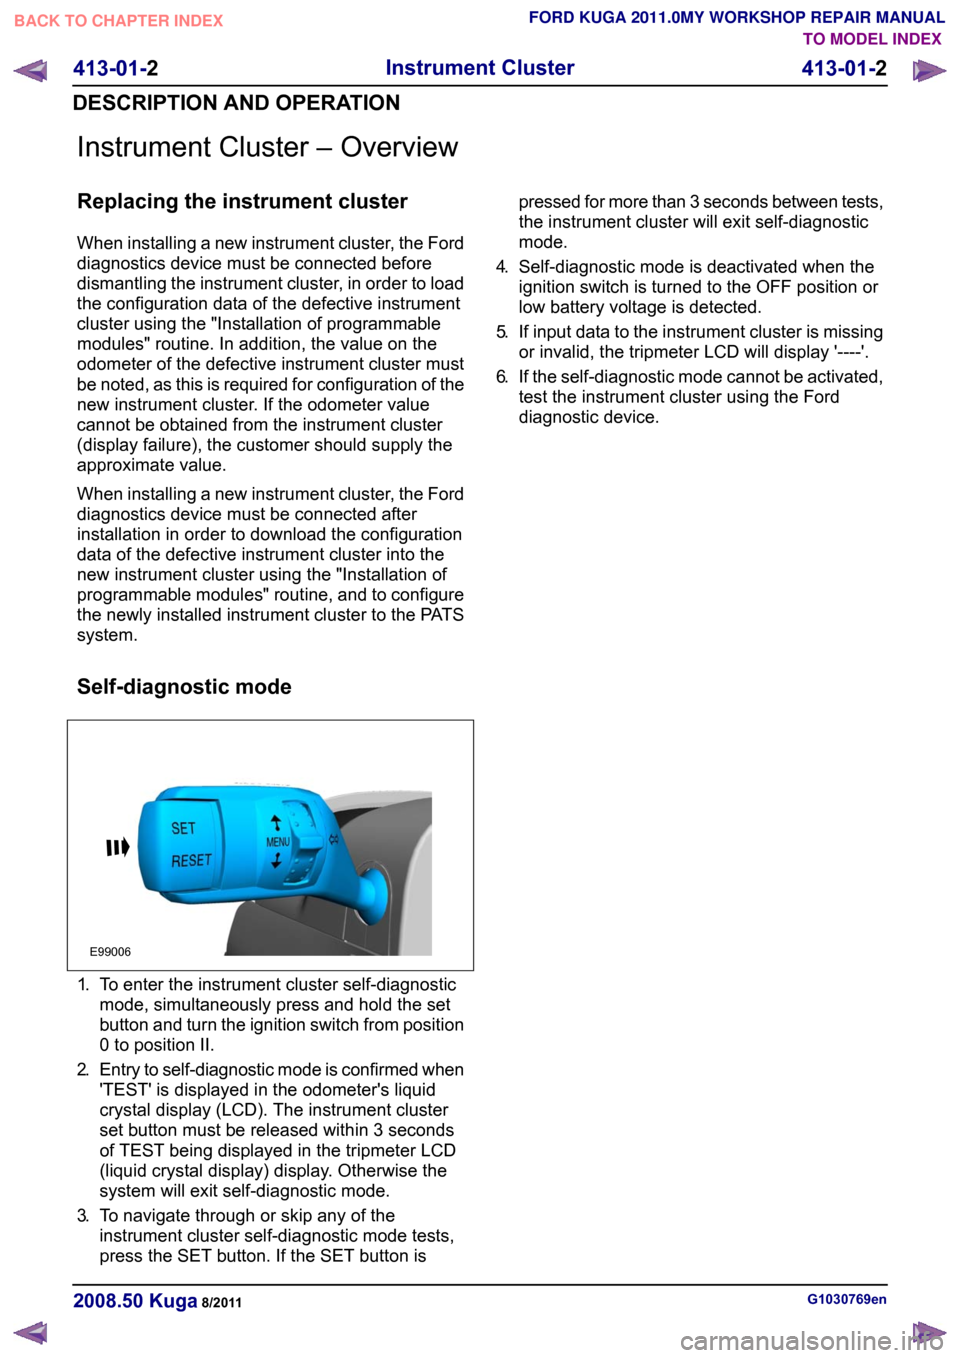
Self-diagnostic mode
1.
To enter the instrument cluster self-diagnostic
mode, simultaneously press and hold the set
button and turn the ignition switch from position
0 to position II.
2. Entry to self-diagnostic mode is confirmed when
'TEST' is displayed in the odometer's liquid
crystal display (LCD). The instrument cluster
set button must be released within 3 seconds
of TEST being displayed in the tripmeter LCD
(liquid crystal display) display. Otherwise the
system will exit self-diagnostic mode.
3. To navigate through or skip any of the
instrument cluster self-diagnostic mode tests,
press the SET button. If the SET button is pressed for more than 3 seconds between tests,
the instrument cluster will exit self-diagnostic
mode.
4. Self-diagnostic mode is deactivated when the
ignition switch is turned to the OFF position or
low battery voltage is detected.
5. If input data to the instrument cluster is missing
or invalid, the tripmeter LCD will display '----'.
6. If the self-diagnostic mode cannot be activated,
test the instrument cluster using the Ford
diagnostic device. G1030769en
2008.50 Kuga 8/2011 413-01-2
Instrument Cluster
413-01-2
DESCRIPTION AND OPERATIONTO MODEL INDEX
BACK TO CHAPTER INDEX
FORD KUGA 2011.0MY WORKSHOP REPAIR MANUALE99006