2011 FORD EXPEDITION seats
[x] Cancel search: seatsPage 6 of 395

Do not add friction modifier compounds or special break-in oils since
these additives may prevent piston ring seating. SeeEngine oilin the
Maintenance and Specificationschapter for more information on oil
usage.
SPECIAL NOTICES
New Vehicle Limited Warranty
For a detailed description of what is covered and what is not covered by
your vehicle’s New Vehicle Limited Warranty, refer to theWarranty
Guidethat is provided to you along with your Owner’s Guide.
Special instructions
For your added safety, your vehicle is fitted with sophisticated electronic
controls.
WARNING:Please read the sectionAirbag Supplemental
Restraint System (SRS)in theSeating and Safety Restraints
chapter. Failure to follow the specific warnings and instructions could
result in personal injury.
WARNING:Front seat mounted rear-facing child or infant seats
shouldNEVERbe placed in front of an active passenger airbag.
Notice to owners of pickup trucks and utility type vehicles
WARNING:Utility vehicles have a significantly higher rollover
rate than other types of vehicles.
Before you drive your vehicle, please read this Owner’s Guide carefully.
Your vehicle is not a passenger car. As with other vehicles of this type,
failure to operate this vehicle correctly may result in loss of vehicle
control, vehicle rollover, personal injury or death.
Using your vehicle with a snowplow
Do not use this vehicle for snowplowing.
Your vehicle is not equipped with a snowplowing package.
Introduction
6
2011 Expedition(exd)
Owners Guide, 1st Printing
USA(fus)
Page 63 of 395
Operating tips
•To reduce fog build-up on the windshield during humid weather, place
the air flow selector in the
position.
•To reduce humidity build-up inside the vehicle: do not drive with the
air flow selector in the O (off) or (in cold weather) MAX A/C position.
•Under normal weather conditions, do not leave the air flow selector in
MAX A/C or O (off) when the vehicle is parked. This allows the
vehicle to “breathe” using the outside air inlet vents.
•To improve the A/C cool down, drive with the windows slightly open
for 2-3 minutes after start up or until the vehicle has been “aired out”.
•During extreme high ambient temperatures when idling stationary for
extended periods of time in gear, it is recommended to run the A/C in
the MAX A/C position, turn off the rear A/C unit, reduce blower fan
speed from the highest setting and put the vehicle’s transmission into
the P (Park) position to continue to receive cool air from your A/C
system.
•Do not put objects under the front seats that will interfere with the
airflow to the back seats.
•Remove any snow, ice or leaves from the air intake area at the base of
the windshield.
•A small amount of air may be felt from the floor vent regardless of the
air distribution setting that is selected.
To aid in side window defogging/demisting in cold weather:
1. Select
.
2. Select A/C.
3. Adjust the temperature control to maintain comfort.
4. Set the fan speed to the highest setting.
5. Direct the outer instrument panel vents towards the side windows.
To increase airflow to the outer instrument panel vents, close the vents
located in the middle of the instrument panel.
Climate Controls
63
2011 Expedition(exd)
Owners Guide, 1st Printing
USA(fus)
Page 66 of 395
17.EXT:Press to display the outside temperature. Press again to display
the cabin temperature settings.Note:Exterior readings are more
accurate when the vehicle is moving.
18.REAR:Press to enable the control located in the rear of the floor
console. Press again to turn the auxiliary system off. When the REAR
button is pressed, the display will show only the rear cabin settings.
After the rear setting changes are completed on the front control, the
display will automatically show all climate settings.
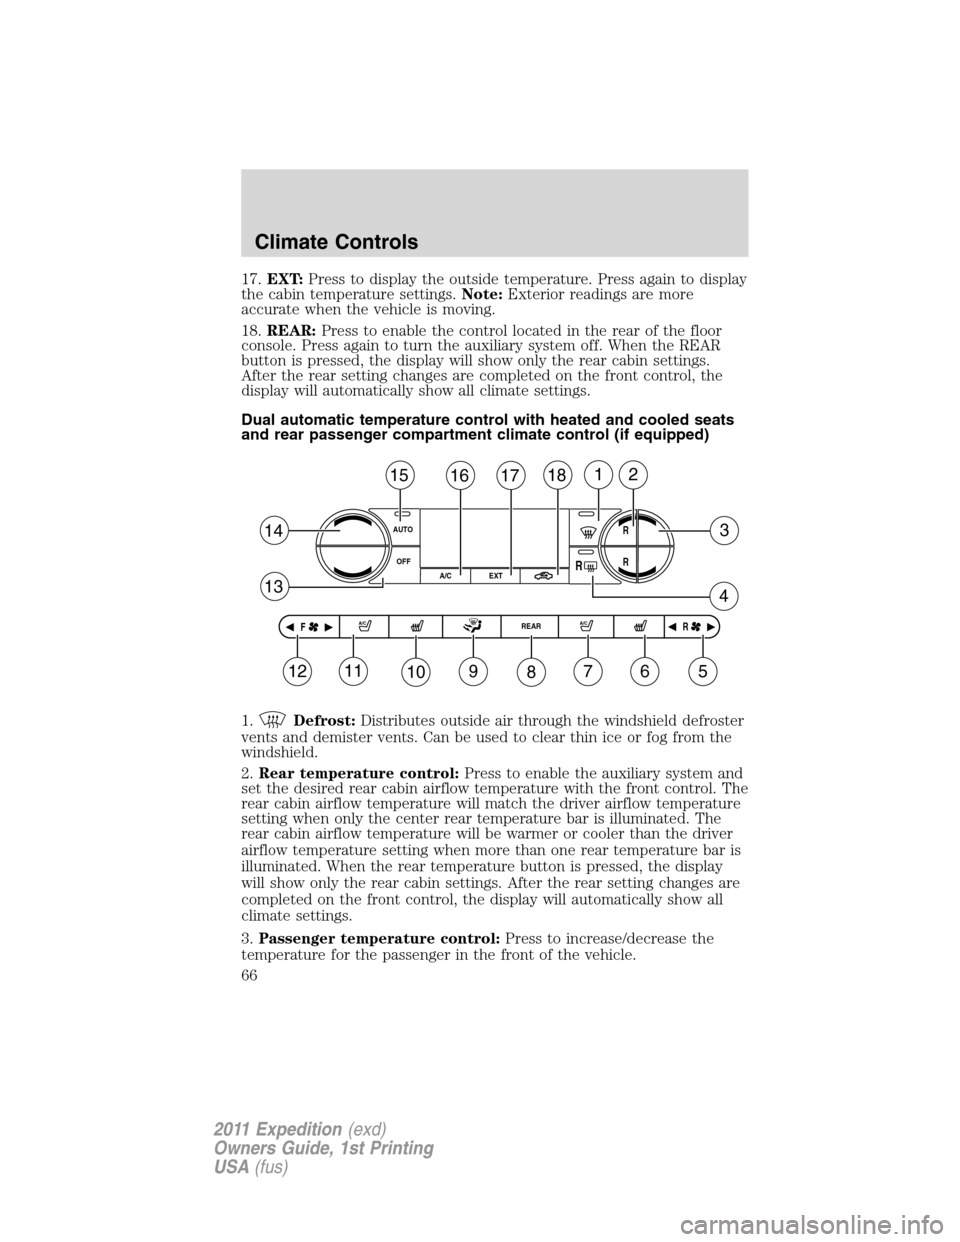
Dual automatic temperature control with heated and cooled seats
and rear passenger compartment climate control (if equipped)
1.
Defrost:Distributes outside air through the windshield defroster
vents and demister vents. Can be used to clear thin ice or fog from the
windshield.
2.Rear temperature control:Press to enable the auxiliary system and
set the desired rear cabin airflow temperature with the front control. The
rear cabin airflow temperature will match the driver airflow temperature
setting when only the center rear temperature bar is illuminated. The
rear cabin airflow temperature will be warmer or cooler than the driver
airflow temperature setting when more than one rear temperature bar is
illuminated. When the rear temperature button is pressed, the display
will show only the rear cabin settings. After the rear setting changes are
completed on the front control, the display will automatically show all
climate settings.
3.Passenger temperature control:Press to increase/decrease the
temperature for the passenger in the front of the vehicle.
AUTO
OFF
151
3
4
14
13
R
18
EXT
11109876
RF
512
R
R
REAR A/C
17162
A/C
A/C
Climate Controls
66
2011 Expedition(exd)
Owners Guide, 1st Printing
USA(fus)
Page 67 of 395
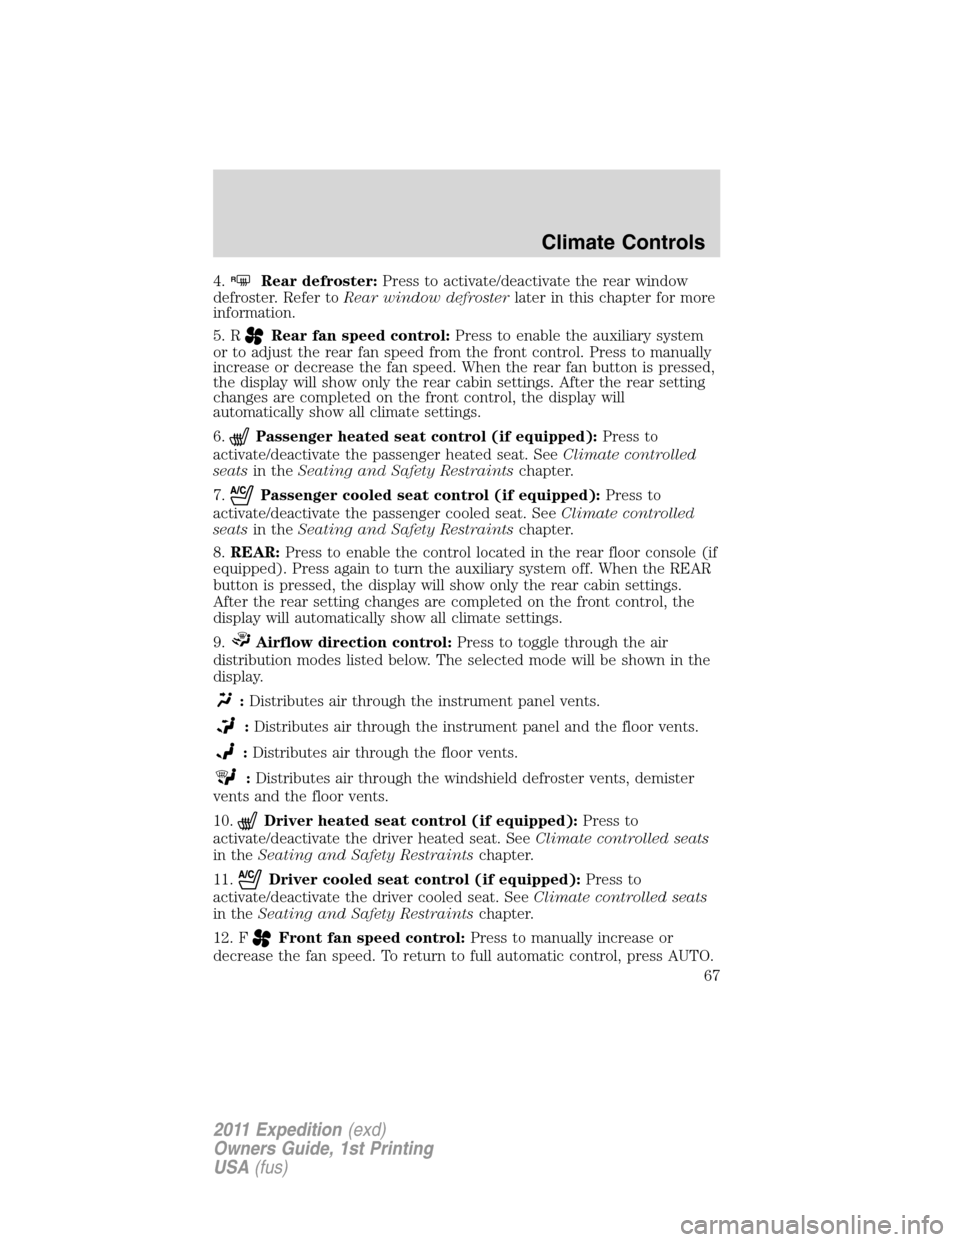
4.RRear defroster:Press to activate/deactivate the rear window
defroster. Refer toRear window defrosterlater in this chapter for more
information.
5. R
Rear fan speed control:Press to enable the auxiliary system
or to adjust the rear fan speed from the front control. Press to manually
increase or decrease the fan speed. When the rear fan button is pressed,
the display will show only the rear cabin settings. After the rear setting
changes are completed on the front control, the display will
automatically show all climate settings.
6.
Passenger heated seat control (if equipped):Press to
activate/deactivate the passenger heated seat. SeeClimate controlled
seatsin theSeating and Safety Restraintschapter.
7.
Passenger cooled seat control (if equipped):Press to
activate/deactivate the passenger cooled seat. SeeClimate controlled
seatsin theSeating and Safety Restraintschapter.
8.REAR:Press to enable the control located in the rear floor console (if
equipped). Press again to turn the auxiliary system off. When the REAR
button is pressed, the display will show only the rear cabin settings.
After the rear setting changes are completed on the front control, the
display will automatically show all climate settings.
9.
Airflow direction control:Press to toggle through the air
distribution modes listed below. The selected mode will be shown in the
display.
:Distributes air through the instrument panel vents.
:Distributes air through the instrument panel and the floor vents.
:Distributes air through the floor vents.
:Distributes air through the windshield defroster vents, demister
vents and the floor vents.
10.
Driver heated seat control (if equipped):Press to
activate/deactivate the driver heated seat. SeeClimate controlled seats
in theSeating and Safety Restraintschapter.
11.
Driver cooled seat control (if equipped):Press to
activate/deactivate the driver cooled seat. SeeClimate controlled seats
in theSeating and Safety Restraintschapter.
12. F
Front fan speed control:Press to manually increase or
decrease the fan speed. To return to full automatic control, press AUTO.
Climate Controls
67
2011 Expedition(exd)
Owners Guide, 1st Printing
USA(fus)
Page 68 of 395
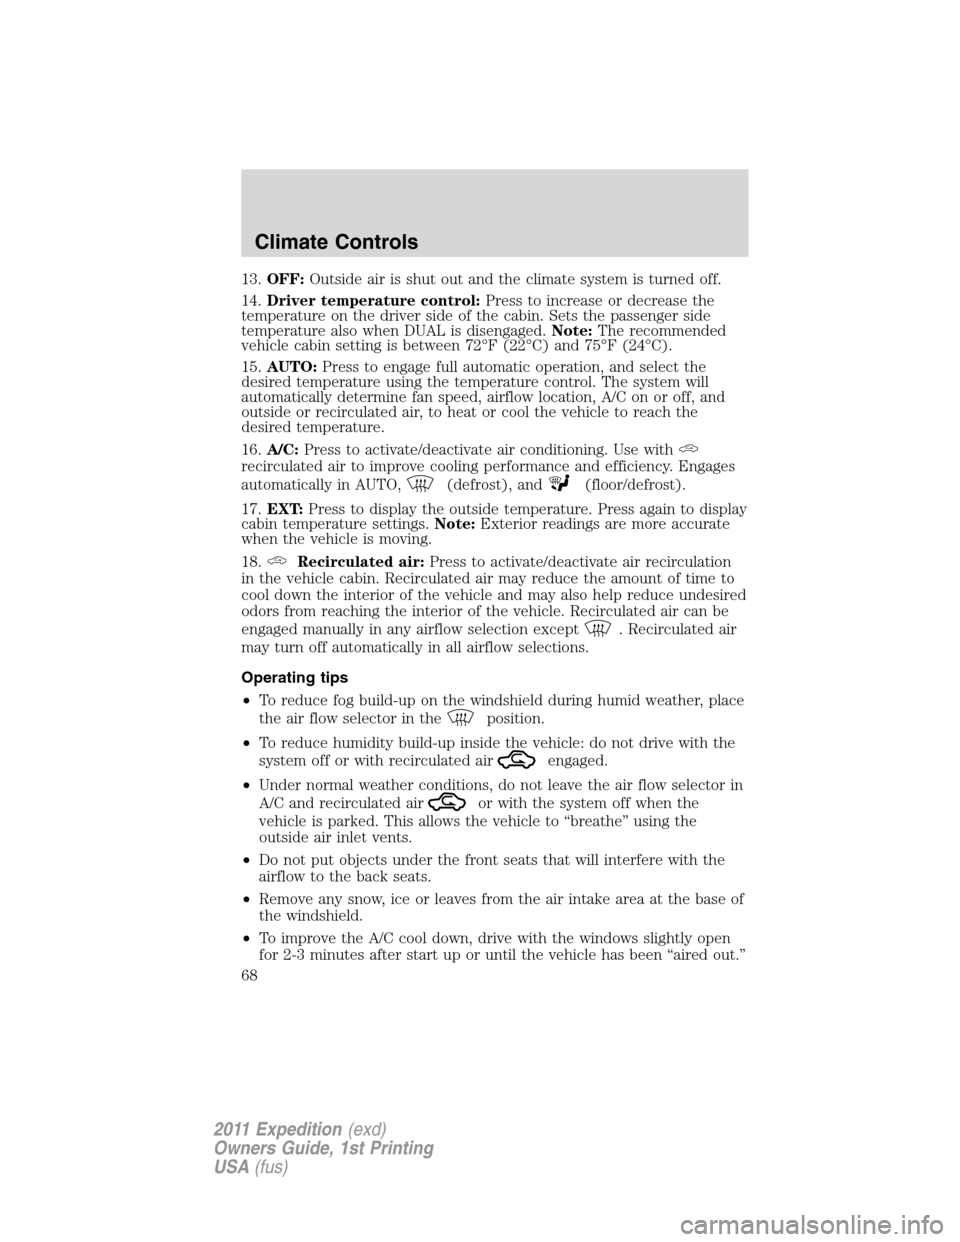
13.OFF:Outside air is shut out and the climate system is turned off.
14.Driver temperature control:Press to increase or decrease the
temperature on the driver side of the cabin. Sets the passenger side
temperature also when DUAL is disengaged.Note:The recommended
vehicle cabin setting is between 72°F (22°C) and 75°F (24°C).
15.AUTO:Press to engage full automatic operation, and select the
desired temperature using the temperature control. The system will
automatically determine fan speed, airflow location, A/C on or off, and
outside or recirculated air, to heat or cool the vehicle to reach the
desired temperature.
16.A/C:Press to activate/deactivate air conditioning. Use with
recirculated air to improve cooling performance and efficiency. Engages
automatically in AUTO,
(defrost), and(floor/defrost).
17.EXT:Press to display the outside temperature. Press again to display
cabin temperature settings.Note:Exterior readings are more accurate
when the vehicle is moving.
18.
Recirculated air:Press to activate/deactivate air recirculation
in the vehicle cabin. Recirculated air may reduce the amount of time to
cool down the interior of the vehicle and may also help reduce undesired
odors from reaching the interior of the vehicle. Recirculated air can be
engaged manually in any airflow selection except
. Recirculated air
may turn off automatically in all airflow selections.
Operating tips
•To reduce fog build-up on the windshield during humid weather, place
the air flow selector in the
position.
•To reduce humidity build-up inside the vehicle: do not drive with the
system off or with recirculated air
engaged.
•Under normal weather conditions, do not leave the air flow selector in
A/C and recirculated air
or with the system off when the
vehicle is parked. This allows the vehicle to “breathe” using the
outside air inlet vents.
•Do not put objects under the front seats that will interfere with the
airflow to the back seats.
•Remove any snow, ice or leaves from the air intake area at the base of
the windshield.
•To improve the A/C cool down, drive with the windows slightly open
for 2-3 minutes after start up or until the vehicle has been “aired out.”
Climate Controls
68
2011 Expedition(exd)
Owners Guide, 1st Printing
USA(fus)
Page 75 of 395
INTERIOR LAMPS
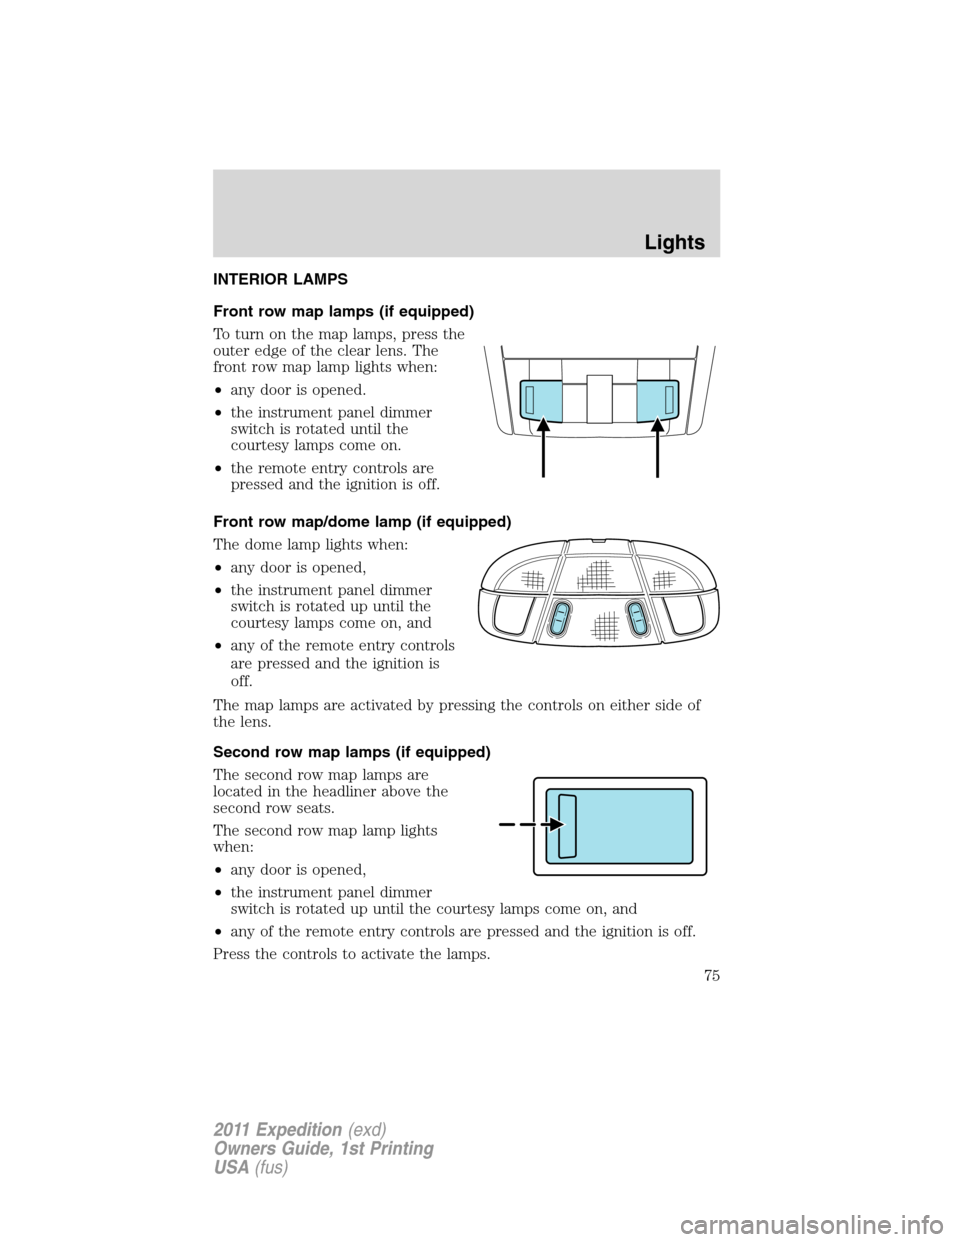
Front row map lamps (if equipped)
To turn on the map lamps, press the
outer edge of the clear lens. The
front row map lamp lights when:
•any door is opened.
•the instrument panel dimmer
switch is rotated until the
courtesy lamps come on.
•the remote entry controls are
pressed and the ignition is off.
Front row map/dome lamp (if equipped)
The dome lamp lights when:
•any door is opened,
•the instrument panel dimmer
switch is rotated up until the
courtesy lamps come on, and
•any of the remote entry controls
are pressed and the ignition is
off.
The map lamps are activated by pressing the controls on either side of
the lens.
Second row map lamps (if equipped)
The second row map lamps are
located in the headliner above the
second row seats.
The second row map lamp lights
when:
•any door is opened,
•the instrument panel dimmer
switch is rotated up until the courtesy lamps come on, and
•any of the remote entry controls are pressed and the ignition is off.
Press the controls to activate the lamps.
Lights
75
2011 Expedition(exd)
Owners Guide, 1st Printing
USA(fus)
Page 87 of 395
AUXILIARY POWER POINT (12V DC)
Power outlets are designed for accessory plugs only. Do not insert
any other object in the power outlet as this will damage the
outlet and blow the fuse. Do not hang any type of accessory or
accessory bracket from the plug. Improper use of the power
outlet can cause damage not covered by your warranty.
Auxiliary power points can be found in the following locations:
•On the instrument panel
•On the rear of the center console, accessible from the rear seats
•On the right rear quarter panel, accessible from the liftgate or the
third row seat
Do not use the power point for operating the cigarette lighter element (if
equipped).
To prevent the fuse from being blown, do not use the power point(s)
over the vehicle capacity of 12V DC/180W. If the power point or cigar
lighter socket is not working, a fuse may have blown. Refer toFuses and
relaysin theRoadside Emergencieschapter for information on
checking and replacing fuses.
To have full capacity usage of your power point, the engine is required to
be running to avoid unintentional discharge of the battery. To prevent
the battery from being discharged:
•do not use the power point longer than necessary when the engine is
not running,
•do not leave battery chargers, video game adapters, computers and
other devices plugged in overnight or when the vehicle is parked for
extended periods.
Always keep the power point caps closed when not being used.
Driver Controls
87
2011 Expedition(exd)
Owners Guide, 1st Printing
USA(fus)
Page 144 of 395
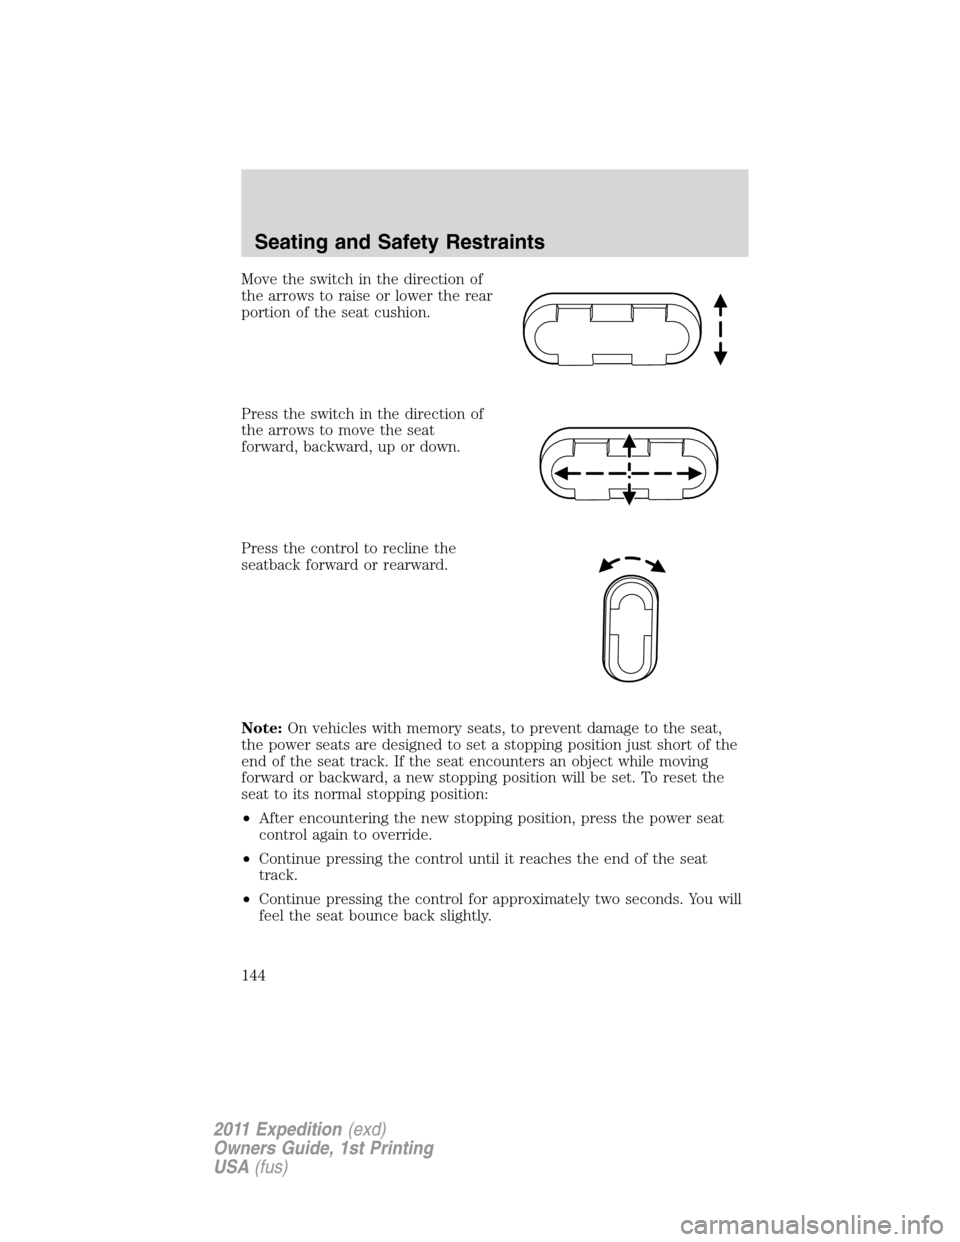
Move the switch in the direction of
the arrows to raise or lower the rear
portion of the seat cushion.
Press the switch in the direction of
the arrows to move the seat
forward, backward, up or down.
Press the control to recline the
seatback forward or rearward.
Note:On vehicles with memory seats, to prevent damage to the seat,
the power seats are designed to set a stopping position just short of the
end of the seat track. If the seat encounters an object while moving
forward or backward, a new stopping position will be set. To reset the
seat to its normal stopping position:
•After encountering the new stopping position, press the power seat
control again to override.
•Continue pressing the control until it reaches the end of the seat
track.
•Continue pressing the control for approximately two seconds. You will
feel the seat bounce back slightly.
Seating and Safety Restraints
144
2011 Expedition(exd)
Owners Guide, 1st Printing
USA(fus)