Page 194 of 395

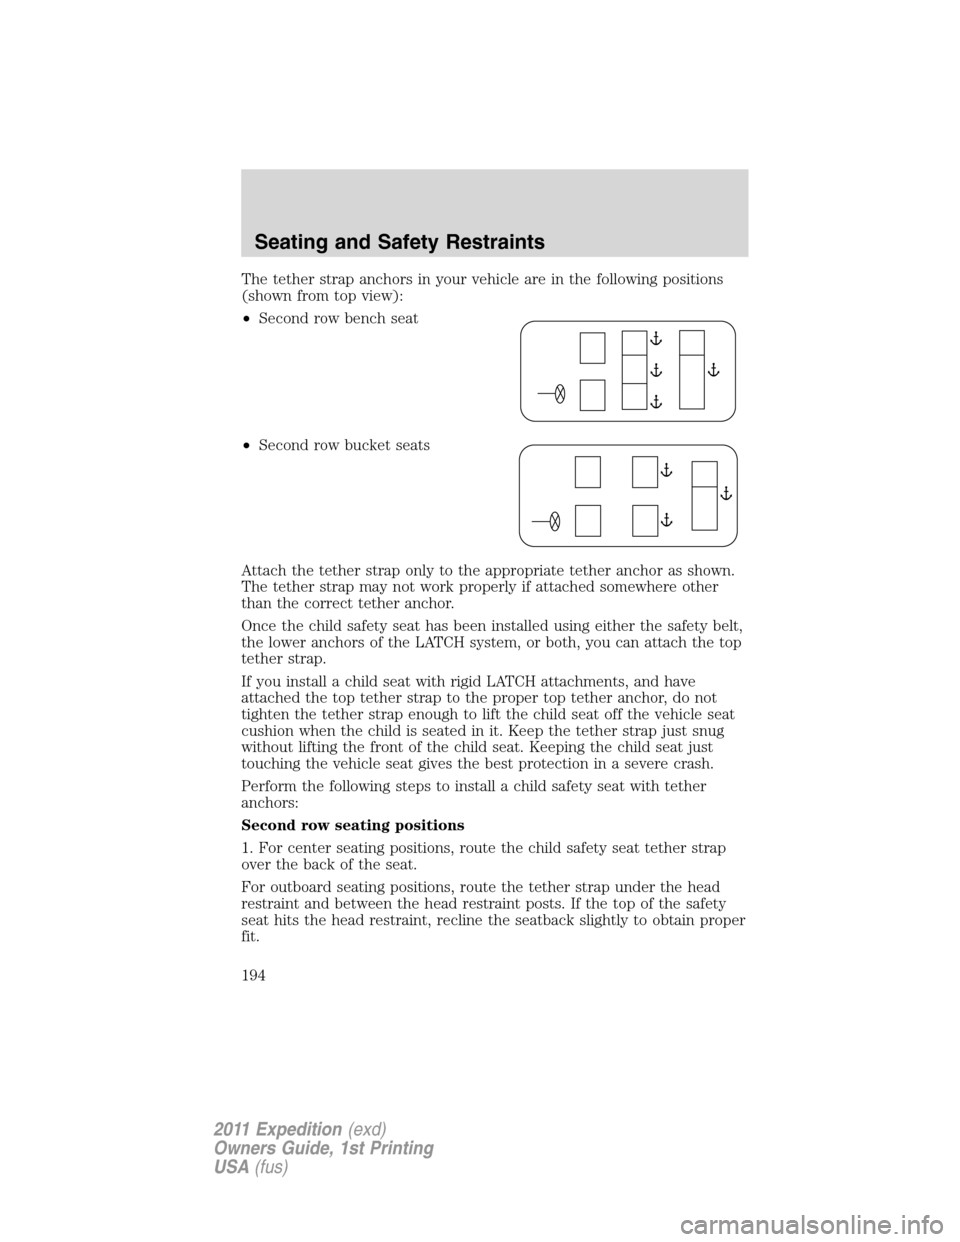
The tether strap anchors in your vehicle are in the following positions
(shown from top view):
•Second row bench seat
•Second row bucket seats
Attach the tether strap only to the appropriate tether anchor as shown.
The tether strap may not work properly if attached somewhere other
than the correct tether anchor.
Once the child safety seat has been installed using either the safety belt,
the lower anchors of the LATCH system, or both, you can attach the top
tether strap.
If you install a child seat with rigid LATCH attachments, and have
attached the top tether strap to the proper top tether anchor, do not
tighten the tether strap enough to lift the child seat off the vehicle seat
cushion when the child is seated in it. Keep the tether strap just snug
without lifting the front of the child seat. Keeping the child seat just
touching the vehicle seat gives the best protection in a severe crash.
Perform the following steps to install a child safety seat with tether
anchors:
Second row seating positions
1. For center seating positions, route the child safety seat tether strap
over the back of the seat.
For outboard seating positions, route the tether strap under the head
restraint and between the head restraint posts. If the top of the safety
seat hits the head restraint, recline the seatback slightly to obtain proper
fit.
Seating and Safety Restraints
194
2011 Expedition(exd)
Owners Guide, 1st Printing
USA(fus)
Page 197 of 395

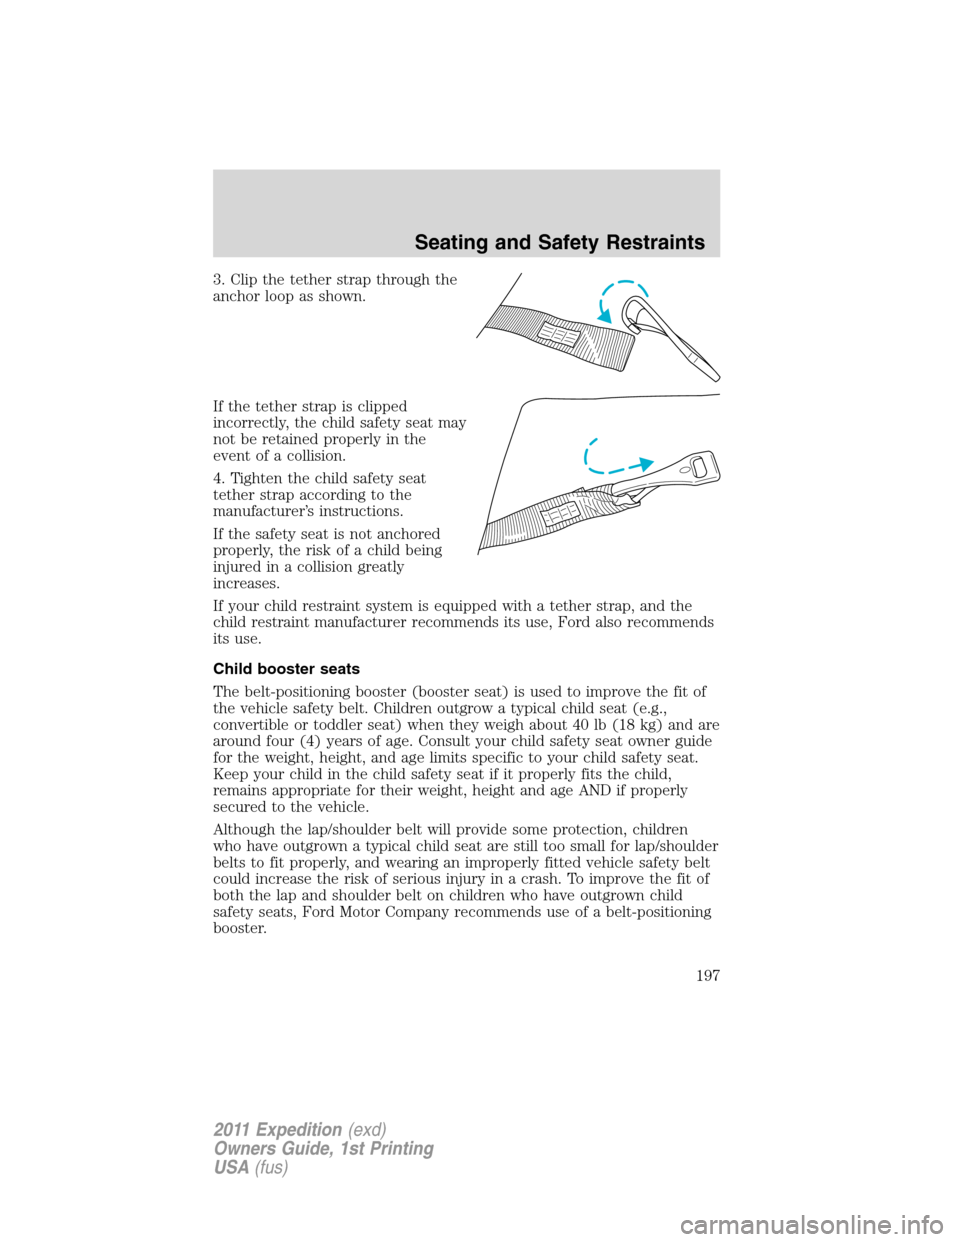
3. Clip the tether strap through the
anchor loop as shown.
If the tether strap is clipped
incorrectly, the child safety seat may
not be retained properly in the
event of a collision.
4. Tighten the child safety seat
tether strap according to the
manufacturer’s instructions.
If the safety seat is not anchored
properly, the risk of a child being
injured in a collision greatly
increases.
If your child restraint system is equipped with a tether strap, and the
child restraint manufacturer recommends its use, Ford also recommends
its use.
Child booster seats
The belt-positioning booster (booster seat) is used to improve the fit of
the vehicle safety belt. Children outgrow a typical child seat (e.g.,
convertible or toddler seat) when they weigh about 40 lb (18 kg) and are
around four (4) years of age. Consult your child safety seat owner guide
for the weight, height, and age limits specific to your child safety seat.
Keep your child in the child safety seat if it properly fits the child,
remains appropriate for their weight, height and age AND if properly
secured to the vehicle.
Although the lap/shoulder belt will provide some protection, children
who have outgrown a typical child seat are still too small for lap/shoulder
belts to fit properly, and wearing an improperly fitted vehicle safety belt
could increase the risk of serious injury in a crash. To improve the fit of
both the lap and shoulder belt on children who have outgrown child
safety seats, Ford Motor Company recommends use of a belt-positioning
booster.
Seating and Safety Restraints
197
2011 Expedition(exd)
Owners Guide, 1st Printing
USA(fus)
Page 198 of 395

Booster seats position a child so that vehicle lap/shoulder safety belts fit
better. They lift the child up so that the lap belt rests low across the hips
and the knees bend comfortably at the edge of the cushion, while
minimizing slouching. Booster seats may also make the shoulder belt fit
better and more comfortably. Try to keep the belt near the middle of the
shoulder and across the center of the chest. Moving the child closer (a
few centimeters or inches) to the center of the vehicle, but remaining in
the same seating position, may help provide a good shoulder belt fit.
When children should use booster seats
Children need to use booster seats from the time they outgrow the
toddler seat until they are big enough for the vehicle seat and
lap/shoulder belt to fit properly. Generally this is when they reach a
height of at least 4 feet 9 inches (1.45 meters) tall (around age eight to
age twelve and between 40 lb (18 kg) and 80 lb (36 kg) or upward to
100 lb (45 kg) if recommended by your child restraint manufacturer).
Many state and provincial laws require that children use approved
booster seats until they reach age eight, a height of 4 feet 9 inches
(1.45 meters) tall, or 80 lb (36 kg).
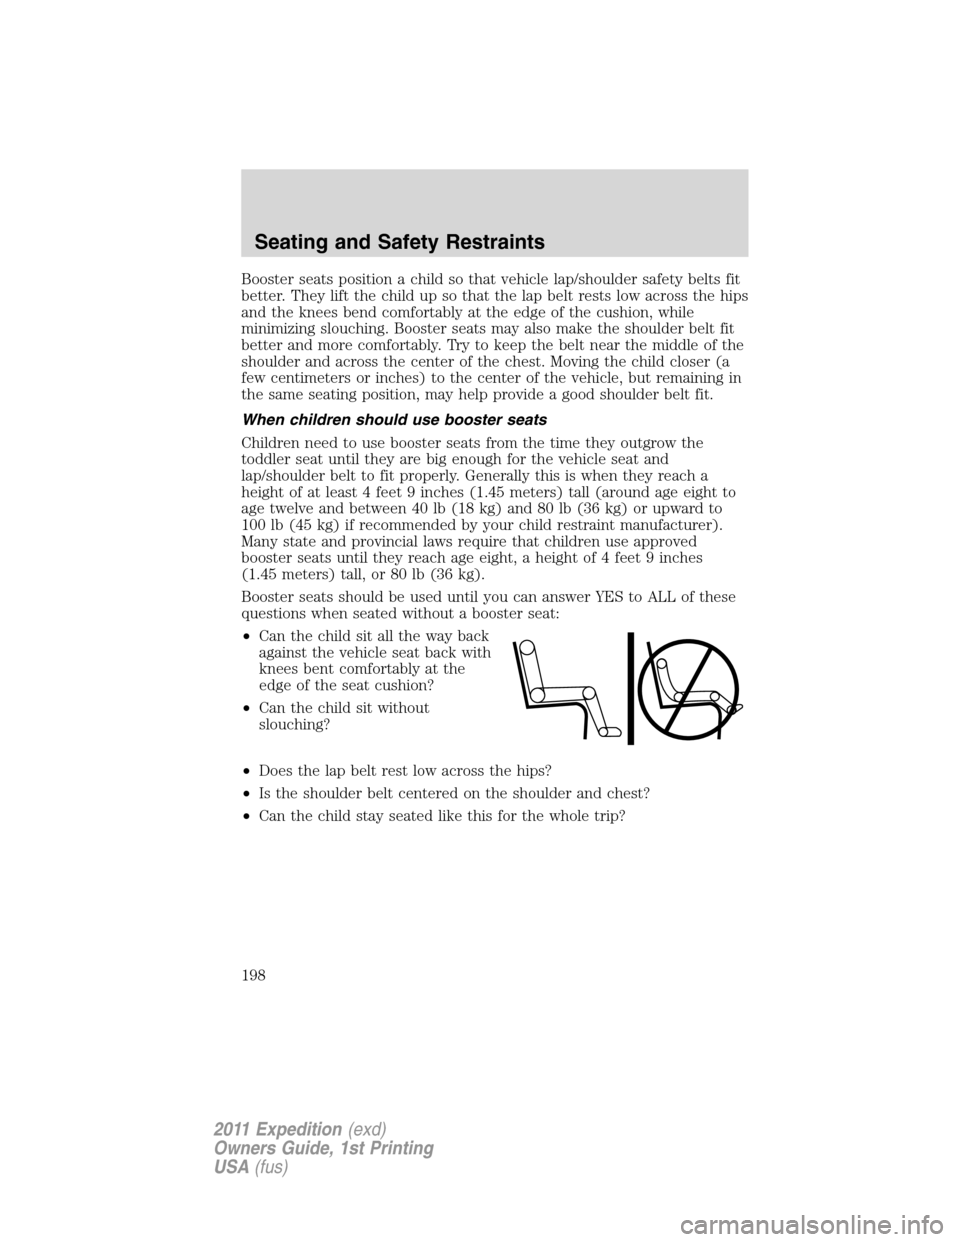
Booster seats should be used until you can answer YES to ALL of these
questions when seated without a booster seat:
•Can the child sit all the way back
against the vehicle seat back with
knees bent comfortably at the
edge of the seat cushion?
•Can the child sit without
slouching?
•Does the lap belt rest low across the hips?
•Is the shoulder belt centered on the shoulder and chest?
•Can the child stay seated like this for the whole trip?
Seating and Safety Restraints
198
2011 Expedition(exd)
Owners Guide, 1st Printing
USA(fus)
Page 199 of 395
Types of booster seats
There are generally two types of belt-positioning booster seats: backless
and high back. Always use booster seats in conjunction with the vehicle
lap/shoulder belt.
•Backless booster seats
If your backless booster seat has a
removable shield, remove the
shield. If a vehicle seating position
has a low seat back or no head
restraint, a backless booster seat
may place your child’s head (as
measured at the tops of the ears)
above the top of the seat. In this
case, move the backless booster
to another seating position with a
higher seat back or head restraint and lap/shoulder belts, or consider
using a high back booster seat.
•High back booster seats
If, with a backless booster seat,
you cannot find a seating position
that adequately supports your
child’s head, a high back booster
seat would be a better choice.
Seating and Safety Restraints
199
2011 Expedition(exd)
Owners Guide, 1st Printing
USA(fus)
Page 200 of 395

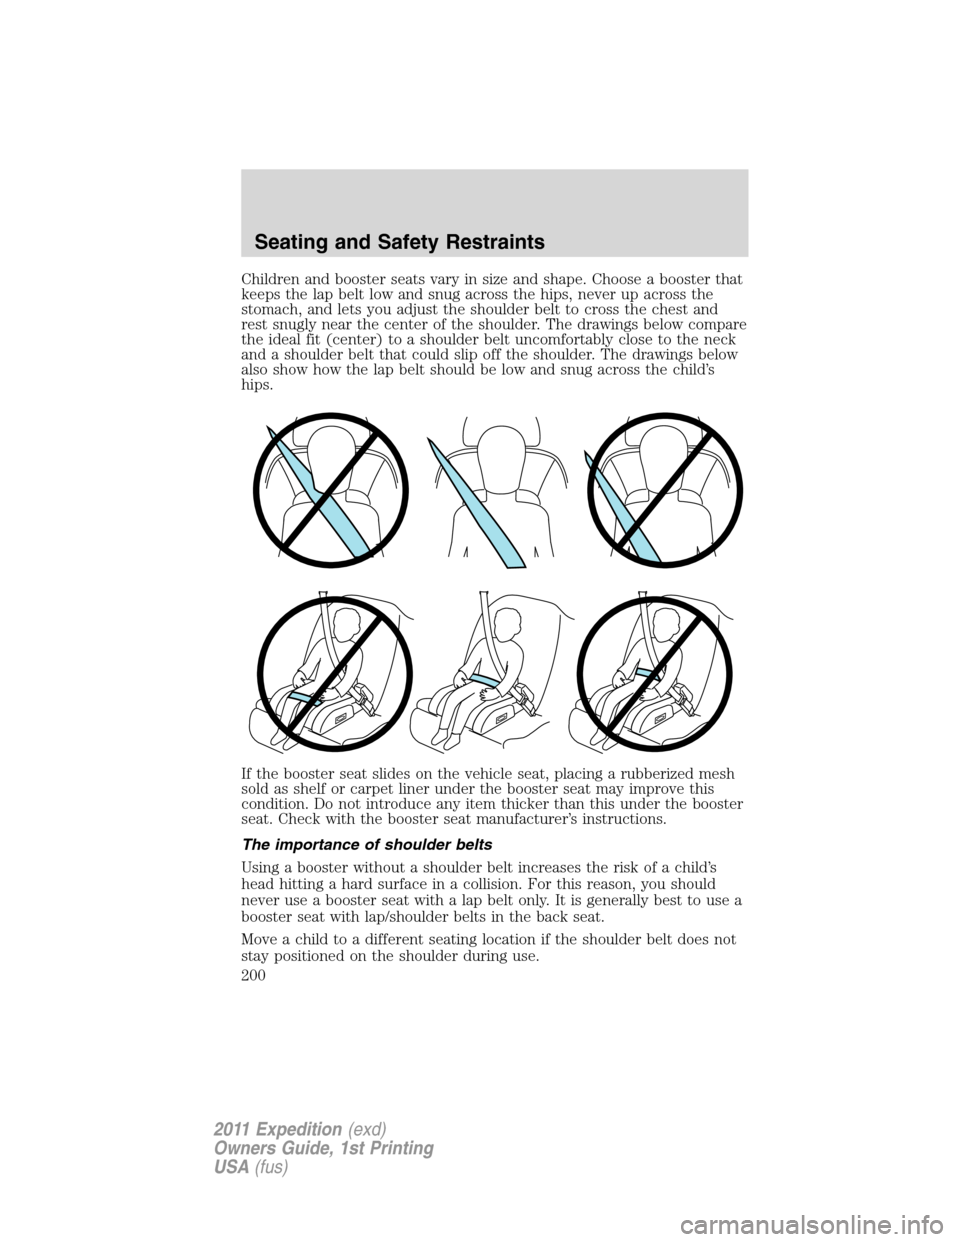
Children and booster seats vary in size and shape. Choose a booster that
keeps the lap belt low and snug across the hips, never up across the
stomach, and lets you adjust the shoulder belt to cross the chest and
rest snugly near the center of the shoulder. The drawings below compare
the ideal fit (center) to a shoulder belt uncomfortably close to the neck
and a shoulder belt that could slip off the shoulder. The drawings below
also show how the lap belt should be low and snug across the child’s
hips.
If the booster seat slides on the vehicle seat, placing a rubberized mesh
sold as shelf or carpet liner under the booster seat may improve this
condition. Do not introduce any item thicker than this under the booster
seat. Check with the booster seat manufacturer’s instructions.
The importance of shoulder belts
Using a booster without a shoulder belt increases the risk of a child’s
head hitting a hard surface in a collision. For this reason, you should
never use a booster seat with a lap belt only. It is generally best to use a
booster seat with lap/shoulder belts in the back seat.
Move a child to a different seating location if the shoulder belt does not
stay positioned on the shoulder during use.
Seating and Safety Restraints
200
2011 Expedition(exd)
Owners Guide, 1st Printing
USA(fus)
Page 246 of 395

Pull the release lever to release the
brake. Driving with the parking
brake on will cause the brakes to
wear out quickly and reduce fuel
economy.
ADVANCETRAC�WITH ROLL STABILITY CONTROL™ (RSC�)
STABILITY ENHANCEMENT SYSTEM (IF EQUIPPED)
The AdvanceTrac�with RSC�system provides the following stability
enhancement features for certain driving situations:
•Traction control system (TCS), which functions to help avoid
drive-wheel spin and loss of traction.
•Electronic stability control (ESC), which functions to help avoid skids
or lateral slides.
•Roll Stability Control™ (RSC�), which functions to help avoid a
vehicle roll-over.
WARNING:Vehicle modifications involving braking system,
aftermarket roof racks, suspension, steering system, tire
construction and/or wheel/tire size may change the handling
characteristics of the vehicle and may adversely affect the performance
of the AdvanceTrac�with RSC�system. In addition, installing any
stereo loudspeakers may interfere with and adversely affect the
AdvanceTrac�with RSC�system. Install any aftermarket stereo
loudspeaker as far as possible from the front center console, the
tunnel, and the front seats in order to minimize the risk of interfering
with the AdvanceTrac�with RSC�sensors. Reducing the effectiveness
of the AdvanceTrac�with RSC�system could lead to an increased risk
of loss of vehicle control, vehicle rollover, personal injury and death.
B
R
A
K
E
Driving
246
2011 Expedition(exd)
Owners Guide, 1st Printing
USA(fus)
Page 280 of 395
The fuses are coded as follows:
Fuse/Relay
LocationFuse Amp
RatingProtected Circuits
1 30A Driver window
2 15A Driver side memory module
3 15A Audio rear seat controls, Satellite
radio, SYNC�
4 30A Not used (spare)
5 10A Keypad illumination, 3rd row seat
enable, Brake shift interlock
(BSI), Smart fuse panel logic
power
6 20A Turn signals
7 10A Low beam headlamps (left)
8 10A Low beam headlamps (right)
9 15A Interior lights
10 15A Switch backlighting, Puddle lamps
11 10A Not used (spare)
12 7.5A Power mirrors, Driver seat
memory switch
13 5A Not used (spare)
14 10A Power liftgate module – keep-alive
power
15 10A Climate control, Global positioning
satellite module
16 15A Not used (spare)
17 20A Door locks, Liftgate release,
Liftglass release
18 20A Second row heated seats
19 25A Rear wiper
20 15A Adjustable pedals, Datalink
21 15A Fog lamps
22 15A Park lamps
23 15A High beam headlamps
Roadside Emergencies
280
2011 Expedition(exd)
Owners Guide, 1st Printing
USA(fus)
Page 281 of 395
Fuse/Relay
LocationFuse Amp
RatingProtected Circuits
24 20A Horn
25 10A Demand lamps, Glovebox, Visor
26 10A Instrument panel cluster
27 20A Ignition switch
28 5A Radio
29 5A Instrument panel cluster
30 5A Not used (spare)
31 10A Not used (spare)
32 10A Airbag module
33 10A Not used (spare)
34 5A Not used (spare)
35 10A Rear park assist, 4x4, rear video
camera, 2nd row heated seats
36 5A Passive anti-theft system
37 10A Climate control
38 20A Subwoofer
39 20A Radio
40 20A Navigation amplifier
41 15A Power windows, Power vents,
Power moon roof, Auto dimming
rear view mirror, 110V AC power
point
42 10A Not used (spare)
43 10A Rear wiper logic, Rain sensor
44 10A Trailer tow battery charge relay
coil
45 5A Front wiper logic
46 7.5A Climate control, Auxiliary relay
control
47 30A Circuit
BreakerPower windows, Moon roof
48 — Delayed accessory relay
Roadside Emergencies
281
2011 Expedition(exd)
Owners Guide, 1st Printing
USA(fus)