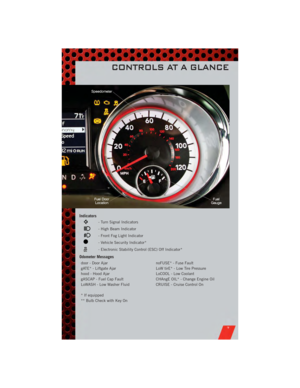
Page 25 of 100
FUEL ECONOMY (ECON) MODE
• The Fuel Economy (ECON) mode can improve the vehicle’s overall fuel economyduring normal driving conditions.
• Press the “econ” switch in the center stack of the instrument panel and a green light will indicate the ECON mode is engaged.
• When the Fuel Economy (ECON) Mode is engaged, the vehicle control systems will be able to change the following:
• The transmission will upshift sooner and downshift later.
• The transmission will skip select gears during shifts to allow the engine to
operate at lower speeds.
• The torque converter clutch will engage sooner (lower engine rpm’s) and remain on longer.
• The engine idle speed will be lower.
• The overall driving performance will be more conservative.
MANUAL CLIMATE CONTROLS
Air Recirculation
• Use recirculation for maximum A/C operation.
• For window defogging, turn the recirculation button off.
• Recirculation is not allowed in defrost, floor, defrost/floor (mix) modes.
OPERATING YOUR VEHICLE
23
Page 26 of 100
THREE ZONE MANUAL CLIMATE CONTROLS
Air Recirculation
• Use recirculation for maximum A/C operation.
• For window defogging, turn the recirculation button off.
• Recirculation is not allowed in defrost, floor, defrost/floor (mix) modes.
Rear Window Defroster
• Pressing the rear window defroster button will turn on the defroster forapproximately 10 minutes. An indicator in the button will illuminate when the rear
window defroster is on. For an additional five minutes of operation, press the
button a second time.
Activating Rear Passenger Climate Controls
• Rotate the rear blower control, located on the main climate control in theinstrument panel, to the “REAR” position. This enables the rear passenger climate
controls located in the headliner above the second row seats.
OPERATING YOUR VEHICLE
24
Page 27 of 100

Automatic Operation
• Push the AUTO mode button to activate the ATC system.
• Select the desired temperature by rotating the temperature controls fo")
THREE ZONE AUTOMATIC TEMPERATURE
CONTROLS (ATC)
Automatic Operation
• Push the AUTO mode button to activate the ATC system.
• Select the desired temperature by rotating the temperature controls for the driveror passenger.
• The system will maintain the set temperature automatically.
Air Conditioning (A/C)
• If the A/C button is pushed while in AUTO mode, the indicator light may flash three times to indicate the air conditioning is being controlled automatically.
SYNC Temperature Button
• Push the SYNC button once to control driver and passenger temperaturessimultaneously. Push the SYNC button a second time to control the temperatures
individually.
Air Recirculation
• Use recirculation for maximum A/C operation.
• For window defogging, turn the recirculation button off.
• If the recirculation button is pushed while in the AUTO mode, the indicator lightmay flash three times to indicate the cabin air is being controlled automatically.
Rear Window Defroster
• Pressing the rear window defroster button will turn on the defroster forapproximately 10 minutes. An indicator in the button will illuminate when the rear
window defroster is on. For an additional five minutes of operation, press the
button a second time.
OPERATING YOUR VEHICLE
25
Page 28 of 100

Activating Rear Automatic Temperature Control
• Pressing the REAR LOCK button for the Rear ATC System from the front lower ATCpanel, illuminates a LOCK symbol in the rear display. The rear temperature and air
source are controlled from the front lower ATC panel.
• Rear second row occupants can only adjust the rear ATC control when the REAR LOCK button is turned off.
• The Rear ATC System is located in the headliner, near the center of the vehicle.
PARKSENSE®REAR PARK ASSIST
• If an object is detected behind the rear bumper while the vehicle is in REVERSE, a warning will display in the instrument cluster and a tone, that changes speed
depending on the distance of the object from the bumper, will sound.
• When the Instrument Cluster reads either “Clean Sensor” or “Blinded”, clean off the bumper sensors to see if the condition is corrected.
PARKVIEW®REAR BACK-UP CAMERA
• You can see an on-screen image of the rear of your vehicle whenever the shift leveris put into REVERSE. The ParkView®Rear Back-Up Camera image will be
displayed on the radio display screen, located on the center stack of the
instrument panel.
• If the radio display screen appears foggy, clean the camera lens located on the liftgate.
WARNING!
Drivers must be careful when backing up even when using the ParkView®Rear
Back-Up Camera. Always check carefully behind your vehicle, and be sure to
check for pedestrians, animals, other vehicles, obstructions, or blind spots
before backing up. You must continue to pay attention while backing up.
Failure to do so can result in serious injury or death.
OPERATING YOUR VEHICLE
26
Page 29 of 100
 system uses two radar-based sensors, locatedinside the rear bumper fascia, to detect Highway licensable vehicles (automob")
REAR CROSS PATH WITH BLIND SPOT
MONITORING
• The Blind Spot Monitoring (BSM) system uses two radar-based sensors, locatedinside the rear bumper fascia, to detect Highway licensable vehicles (automobiles,
trucks, motorcycles etc.) that enter the blind spot zones from the rear/front/side of
the vehicle.
• The Blind Spot Monitoring (BSM) system warning light, located in the outside mirrors, will illuminate if a vehicle moves into a blind spot zone.
• The BSM system can also be configured to sound an audible (chime) alert and mute the radio to notify you of objects that have entered the detection zones.
• Refer to your owner's manual on the DVD for further details.
POWER SLIDING SIDE DOORS
Automatic/Manual Operation
• The power sliding door may be opened or closed manually or by using the buttons on the Key Fob, overhead console switch, or rear door switch.
• Pulling the inside or outside powersliding door handle will also power
open the power sliding doors.
Sliding Side Door Child Protection Lock
• When this system is engaged, theinside manual door handle will not
open the sliding door even though the
inside door lock is in the unlocked
position.
• To engage the Child Protection Door Lock, open the sliding side door. Slide
the child protection door lock control,
located on the rear of the sliding door,
inward (toward the vehicle) to engage.
• Repeat these steps on the opposite sliding door.
OPERATING YOUR VEHICLE
27
Page 30 of 100
STOW 'N GO®SEATING
• On vehicles equipped with Stow 'n Go®
seats, the seats will fold and tumble in
one motion.
Second Row Stow 'n Go
®
• Move the front seat fully forward.
• Recline the front seatback fully forward.
• Raise the armrests on the second row seat.
NOTE: Seat will not stow in the storage bin
unless the armrests are raised.
• Slide the storage bin lockingmechanism to the “LOCK” position
and then pull up on the storage bin
latch to open the cover.
• Pull upward on the seatback recliner lever located on the outboard side of
the seat.
• The non-adjustable head restraint and seatback will fold automatically during
the seat tumble.
• The seat will automatically tumble into position for easy storage.
• Push the seat into the storage bin and close the storage bin cover.
OPERATING YOUR VEHICLE
28
Page 31 of 100

CAUTION!
The storage bin cover must be locked and flat to avoid damage from contact
with the front seat tracks, which have minimal clearance to the cover.
WARNING!
In a collision, serious injury could result if the seat storage bin covers are not
properly latched.
• Do not drive the vehicle with the storage bin covers open.
• Keep the storage bin covers closed and latched while the vehicle is inmotion.
• Do not use a storage bin latch as a tie down.
THIRD ROW POWER RECLINER
• The power recline feature, located on the side of the seat cushion, adjusts the seatback angle forward/rearward for occupant comfort.
Third Row Power Seat Switch
• A one-touch power folding seat switch is located in the left rear trim panel as
part of a switch bank.
• Left and right third row seats can be folded individually or together. The
third row power folding seats adjust to
multiple positions.
• The switch is only functional when the liftgate is open and the vehicle is in
PARK.
NOTE:
• Disconnect the center shoulder belt from the small buckle and lower the head restraints before attempting to fold/stow the power third row seats.
• To abort seat operation while the seat is in motion, press a different seat position selector switch to stop the seat. Once the seat stops moving, then the desired
position can be selected.
• The third row power seat system includes obstacle detection for safe operation. When the system detects an obstacle, the motors will stop and reverse the motion a short
distance to move the seat away from the obstacle. Should this occur, remove the
obstacle and press the button again for the desired position.
• Refer to your Owner's Manual on the DVD for manual third row seat foldinginstructions.
OPERATING YOUR VEHICLE
29
Page 32 of 100

POWER LIFTGATE
• The power liftgate may be opened and closed by pressing the button located on theoverhead console. Press the button once to open, and a second time to close the
power liftgate.
• The power liftgate may also be opened and closed by pressing the button on the Key Fob. Press the button twice to open, and twice to close the power liftgate.
• The power liftgate may be closed by the button, located in the upper left trim in the liftgate opening. Pressing once will only close the liftgate. This button cannot
be used to open the liftgate.
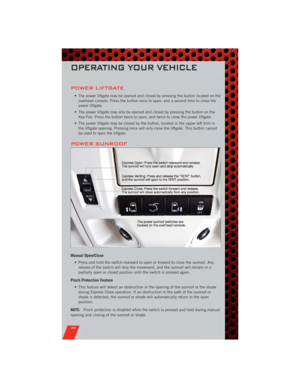
POWER SUNROOF
Manual Open/Close
• Press and hold the switch rearward to open or forward to close the sunroof. Anyrelease of the switch will stop the movement, and the sunroof will remain in a
partially open or closed position until the switch is pressed again.
Pinch Protection Feature
• This feature will detect an obstruction in the opening of the sunroof or the shadeduring Express Close operation. If an obstruction in the path of the sunroof or
shade is detected, the sunroof or shade will automatically return to the open
position.
NOTE: Pinch protection is disabled while the switch is pressed and held during manual
opening and closing of the sunroof or shade.
OPERATING YOUR VEHICLE
30


 MODE
• The Fuel Economy (ECON) mode can improve the vehicle’s overall fuel economyduring normal driving conditions.
• Press the “econ” switch in the center stack of the i")

