2011 CHEVROLET CORVETTE fuse
[x] Cancel search: fusePage 5 of 428

Black plate (5,1)Chevrolet Corvette Owner Manual - 2011
Introduction v
Vehicle Symbol Chart
Here are some additional symbols
that may be found on the vehicle
and what they mean. For more
information on the symbol, refer
to the Index.
9:Airbag Readiness Light
#:Air Conditioning
!:Antilock Brake System (ABS)
g:Audio Steering Wheel Controls
or OnStar®
$: Brake System Warning Light
":Charging System
I:Cruise Control
B: Engine Coolant Temperature
O:Exterior Lamps
#:Fog Lamps
.: Fuel Gauge
+:Fuses
3: Headlamp High/Low-Beam
Changer
j: LATCH System Child
Restraints
*: Malfunction Indicator Lamp
::Oil Pressure
}:Power
/:Remote Vehicle Start
>:Safety Belt Reminders
7:Tire Pressure Monitor
F:Traction Control
M:Windshield Washer Fluid
Page 9 of 428

Black plate (3,1)Chevrolet Corvette Owner Manual - 2011
In Brief 1-3
A.Air Vents on page 8‑6.
B. Head-Up Display (HUD) on
page 5‑31 (If Equipped).
C. Turn and Lane‐Change Lever. See Turn and Lane-Change
Signals (Auto Signal) on
page 6‑4.
Cruise Control on page 9‑44.
Fog Lamps on page 6‑5.
Exterior Lamp Controls on
page 6‑1.
D. Manual Shift Paddles (If Equipped). See Automatic
Transmission on page 9‑28.
E. Driver Information Center (DIC)
on page 5‑25.
F. Instrument Cluster on page 5‑9.
G. Windshield Wiper/Washer on
page 5‑4.
H. Driver Information Center (DIC) Buttons. See Driver Information
Center (DIC) on page 5‑25.
I. Hazard Warning Flashers on
page 6‑4. J.
AM-FM Radio on page 7‑5.
K. Dual Automatic Climate Control
System on page 8‑1.
L. Fuel Door Release Button. See Filling the Tank on page 9‑51.
Hatch/Trunk Release Button.
See “Hatch/Trunk Lid Release”
under Hatch on page 2‑10.
M. Instrument Panel Illumination
Control on page 6‑5.
N. Data Link Connector (DLC). See Malfunction Indicator Lamp
on page 5‑18.
O. Power Folding Top Switch (If Equipped). See Convertible
Top on page 2‑22.
P. Bluetooth on page 7‑18
(If Equipped).
Steering Wheel Controls on
page 5‑3 (If Equipped).
Q. Steering Wheel Adjustment on
page 5‑2.
R. Horn on page 5‑4. S. Telescopic Wheel Button
(If Equipped). See Steering
Wheel Adjustment on page 5‑2.
T. Ignition Positions on page 9‑20.
U. Heated Front Seats on page 3‑8
(If Equipped).
V. Shift Lever (Automatic Shown). See Automatic Transmission on
page 9‑28 orManual
Transmission on page 9‑32.
W. Active Handling System on
page 9‑37.
X. Power Outlets on page 5‑6.
Y. Selective Ride Control on
page 9‑42.
Z. Cupholders on page 4‑1.
AA. Ashtrays on page 5‑8.
Cigarette Lighter on page 5‑7.
AB. Parking Brake on page 9‑35.
AC. Glove Box on page 4‑1.
AD. Instrument Panel Fuse Block on
page 10‑55.
Page 45 of 428

Black plate (13,1)Chevrolet Corvette Owner Manual - 2011
Keys, Doors and Windows 2-13
Arming the System
To arm the system:
.PressQon the keyless access
transmitter.
.Open the door and lock the
door with the power door lock
switch. The security light should
flash. Remove the keyless
access transmitter from inside
the vehicle and close the door.
The security light stops flashing
and stays on. After 30 seconds,
the light should turn off.
The vehicle can be programmed
to automatically lock the doors
and arm the theft-deterrent
system when you exit the
vehicle. See Vehicle
Personalization on page 5‑55.
If a door or the hatch/trunk is
opened without using the keyless
access transmitter, the alarm
goes off. The horn sounds for
two minutes, then goes off to save battery power. The vehicle will not
start without a keyless access
transmitter present.
The theft-deterrent system does not
arm if the driver door is locked with
the power door lock switch after the
doors are closed.
If the keyless access transmitter is
removed from the vehicle while a
passenger is in it, have them lock
the doors after they are closed.
The alarm will not arm, so the
passenger will not set it off.
Testing the Alarm
To test the system:
1. Make sure the trunk lid/hatch is
latched.
2. Lower the window on the driver door.
3. Manually arm the system.
4. Close the doors and wait 30 seconds. 5. Reach through the open window
and manually pull the release
lever on the floor.
6. Press the unlock button on the transmitter to turn off the alarm.
If the alarm does not sound, check
to see if the horn works. The horn
fuse may be blown. See Fuses and
Circuit Breakers on page 10‑51.
If the horn works, but the alarm
does not go off, see your dealer.
Disarming the System
Press the unlock button on the
keyless access transmitter or
squeeze the door handle sensor
while the transmitter is near the
vehicle to unlock a door. Unlocking
a door any other way sets off the
alarm. If the alarm sounds, press
the unlock button on the keyless
access transmitter to disarm it.
Do not leave the key or device that
disarms or deactivates the theft
deterrent system in the vehicle.
Page 46 of 428

Black plate (14,1)Chevrolet Corvette Owner Manual - 2011
2-14 Keys, Doors and Windows
Immobilizer
SeeRadio Frequency Statement on
page 13‑19 for information
regarding Part 15 of the Federal
Communications Commission
(FCC) rules and Industry Canada
Standards RSS-210/220/310.
Immobilizer Operation
The vehicle has a passive
theft-deterrent system.
The system is automatically armed
when the ignition is turned off.
The immobilization system is
disarmed when the ignition is turned
to OFF/ACCESSORY or START and
a valid transmitter is found in the
vehicle.
You do not have to manually arm or
disarm the system.
The security light comes on if
there is a problem with arming
or disarming the theft-deterrent
system. The system has one or more
keyless access transmitters that are
matched to an immobilizer control
unit in the vehicle. Only a correctly
matched keyless access transmitter
starts the vehicle. The vehicle may
not start if the keyless access
transmitter is damaged.
If the engine does not start and the
security light comes on, there may
be a problem with the immobilizer
system. Press the START button
again.
If the vehicle does not start and
the keyless access transmitter
appears to be undamaged, try
another keyless access transmitter.
Or, place the transmitter in the
transmitter pocket. See
“NO FOBS
DETECTED” underKey and Lock
Messages on page 5‑42 for
additional information. Check the fuse. See
Fuses and Circuit
Breakers on page 10‑51. If the
engine still does not start with the
other transmitter, the vehicle needs
service. If the engine does start,
the first transmitter may be faulty.
See your dealer or have a new
keyless access transmitter
programmed to the vehicle.
The immobilizer system can
learn new or replacement keyless
access transmitters. Up to four
keyless access transmitters can
be programmed for the vehicle.
To program additional transmitters,
see “Matching transmitter(s) to Your
Vehicle” underRemote Keyless
Entry (RKE) System Operation on
page 2‑3.
Do not leave the key or device that
disarms or deactivates the theft
deterrent system in the vehicle.
Page 66 of 428

Black plate (2,1)Chevrolet Corvette Owner Manual - 2011
3-2 Seats and Restraints
Head Restraints
The vehicle's front seats have head
restraints in the outboard seating
positions that cannot be adjusted.
The front seat outboard head
restraints are not designed to be
removed.
Front Seats
Seat Adjustment
Manual Seats
{WARNING
You can lose control of the
vehicle if you try to adjust a
manual driver seat while the
vehicle is moving. The sudden
movement could startle and
confuse you, or make you push
a pedal when you do not want to.
Adjust the driver seat only when
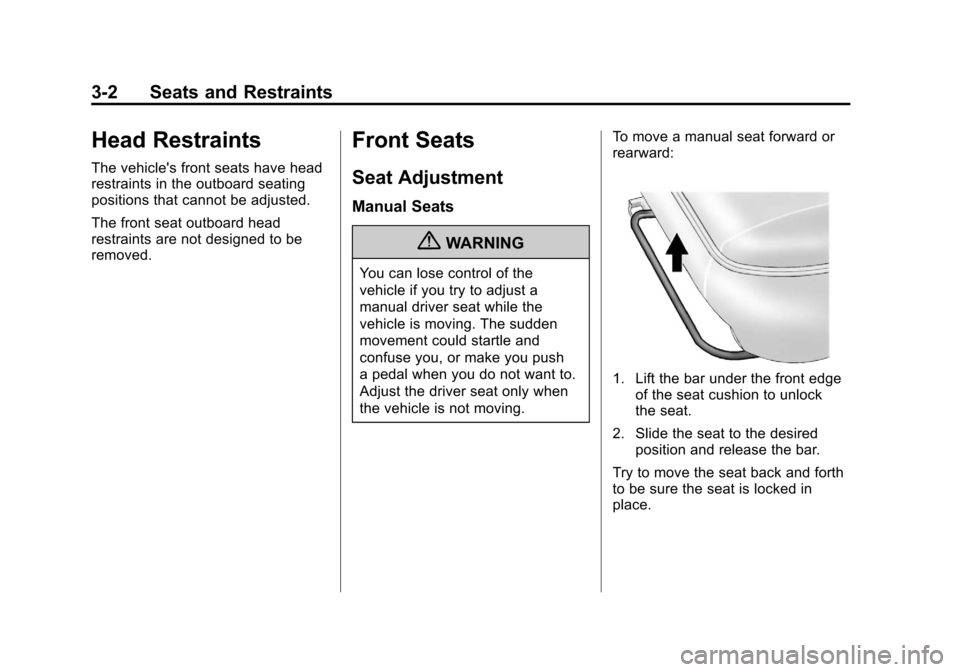
the vehicle is not moving.To move a manual seat forward or
rearward:
1. Lift the bar under the front edge
of the seat cushion to unlock
the seat.
2. Slide the seat to the desired position and release the bar.
Try to move the seat back and forth
to be sure the seat is locked in
place.
Page 70 of 428

Black plate (6,1)Chevrolet Corvette Owner Manual - 2011
3-6 Seats and Restraints
Lumbar Adjustment
Power Lumbar and Side
Bolsters
On vehicles with power lumbar and
side bolsters, the controls are on the
outboard side of the seat.
To adjust the support:
.Move (A) forward or rearward to
adjust lumbar support.
.Move (B) up or down to adjust
the side bolsters.
Reclining Seatbacks
{WARNING
You can lose control of the
vehicle if you try to adjust a
manual driver seat while the
vehicle is moving. The sudden
movement could startle and
confuse you, or make you push a
pedal when you do not want to.
Adjust the driver seat only when
the vehicle is not moving.
{WARNING
If either seatback is not locked, it
could move forward in a sudden
stop or crash. That could cause
injury to the person sitting there.
Always push and pull on the
seatbacks to be sure they are
locked.The seats have manual reclining
seatbacks. The lever used to
operate them is on the outboard
side of the seats.
To recline the seatback:
1. Lift the lever.
2. Move the seatback to the
desired position, and then
release the lever to lock the
seatback in place.
3. Push and pull on the seatback to make sure it is locked.
Page 127 of 428

Black plate (7,1)Chevrolet Corvette Owner Manual - 2011
Instruments and Controls 5-7
{WARNING
Power is always supplied to the
outlets. Do not leave electrical
equipment plugged in when the
vehicle is not in use because the
vehicle could catch fire and cause
injury or death.
Notice: Leaving electrical
equipment plugged in for an
extended period of time while
the vehicle is off will drain the
battery. Always unplug electrical
equipment when not in use and
do not plug in equipment that
exceeds the maximum 20 ampere
rating. Certain electrical accessories
may not be compatible with the
accessory power outlet and could
overload vehicle or adapter fuses.
If a problem is experienced, see
your dealer.
When adding electrical equipment,
be sure to follow the proper
installation instructions included
with the equipment. See
Add-On
Electrical Equipment on page 9‑54.
It is recommended that a qualified
technician or dealer be seen for
the proper installation of your
equipment.
Notice: Hanging heavy
equipment from the power
outlet can cause damage not
covered by the vehicle warranty.
The power outlets are designed
for accessory power plugs only,
such as cell phone charge cords.
Cigarette Lighter
To use the cigarette lighter, push it
in all the way and let go. When it is
ready, it will pop back out by itself.
Notice: Holding a cigarette lighter
in while it is heating does not let
the lighter back away from the
heating element when it is hot.
Damage from overheating can
occur to the lighter or heating
element, or a fuse could be
blown. Do not hold a cigarette
lighter in while it is heating.
Page 155 of 428

Black plate (35,1)Chevrolet Corvette Owner Manual - 2011
Instruments and Controls 5-35
If the ignition is on and the HUD
image cannot be seen, check to
see if:
.Something is covering the
HUD unit.
.The HUD dimmer control is
adjusted properly.
.The HUD image is adjusted to
the proper height.
.Ambient light is low, in the
direction the vehicle is facing.
.A fuse is blown. SeeFuses and
Circuit Breakers on page 10‑51.
Keep in mind that the windshield
is part of the HUD system.
See Windshield Replacement on
page 10‑47.
Vehicle Messages
Messages displayed on the DIC
indicate the status of the vehicle
or some action may be needed
to correct a condition. Multiple
messages may appear one after
another.
The messages that do not
require immediate action can be
acknowledged and cleared by
pressing the RESET button.
The messages that require
immediate action cannot be
cleared until that action is
performed. All messages should
be taken seriously and clearing
the messages does not correct
the problem.
Battery Voltage and
Charging Messages
BATTERY SAVER ACTIVE
This message displays when the
vehicle has detected that the battery
voltage is dropping beyond a
reasonable point. The battery saver
system starts reducing certain
features of the vehicle that you may
be able to notice. At the point that
features are disabled, this message
is displayed. It means that the
vehicle is trying to save the charge
in the battery. Turn off unnecessary
accessories to allow the battery to
recharge.
BATTERY VOLTAGE HIGH
See Voltmeter Gauge on page 5‑15.
BATTERY VOLTAGE LOW
SeeVoltmeter Gauge on page 5‑15.