Page 336 of 428
Black plate (52,1)Chevrolet Corvette Owner Manual - 2011
10-52 Vehicle Care
Engine Compartment
Fuse Block
There is one fuse block in the
engine compartment located on
the passenger side of the vehicle.
SeeEngine Compartment Overview
on page 10‑10 for more information
on location.
Notice: Spilling liquid on any
electrical component on the
vehicle may damage it. Always
keep the covers on any electrical
component.
For ZR1 models, the Fuel System
fuse is located at the battery.
The vehicle may not be equipped
with all of the fuses and features
shown. Fuse Usage
1 Transmission
Control Module/
Transmission
2 Horn, Alternator
Sense
3 Antilock Braking
System (ABS)/Real
Time Damping
Page 337 of 428
Black plate (53,1)Chevrolet Corvette Owner Manual - 2011
Vehicle Care 10-53
FuseUsage
4 Wiper
5 Stoplamps/
Back-Up Lamps
6 Oxygen Sensor
7 Battery Main 5
8 Parking Lamps
9 Powertrain Relay
Input/Electronic
Throttle Control
10 Manual
Transmission
Solenoids
11 Antilock Braking
System Fuse
Usage
12 Odd Numbered
Fuel Injectors
13 Electronic
Suspension
Control (Option)
14 Canister Purge
Solenoid, Mass Air
Flow Sensor
15 Air Conditioner
Compressor
16 Even Numbered
Fuel Injectors
17 Windshield Washer
18 Headlamp Washer
19 Passenger Side
Low-Beam
Headlamp Fuse
Usage
20 Fuel Pump
(except ZR1)
21 Driver Side
Low-Beam
Headlamp
22 Front Fog Lamp
23 Passenger Side
High-Beam
Headlamp
24 Driver Side
High-Beam
Headlamp
56 Engine Control
Module (ECM)/
Transmission
Control
Module (TCM)/
Easy Key Module
Page 338 of 428
Black plate (54,1)Chevrolet Corvette Owner Manual - 2011
10-54 Vehicle Care
J-StyleFuses Usage
25 Cooling Fan
26 Battery Main 3
27 Antilock Brake
System
28 Heating/Ventilation/
Air Conditioning
Blower
29 Battery Main 2
30 Starter
31 Audio Amplifier
32 Intercooler Pump
33 Battery Main 1
Micro-Relays Usage 34 Horn
35 Air
Conditioning
Compressor
36 Windshield
Washer Micro-Relays Usage
37 Parking
Lamps,
Foglamps
38 Front
Fog Lamp
39 High-Beam
Headlamp
46 Headlamp
Washer
55 Fuel Pump
(except ZR1)
Mini-Relays Usage 40 Rear Defog
41 Windshield Wiper
High/Low
42 Windshield Wiper
Run/Accessory
43 Crank
44 Powertrain
Ignition 1 Mini-Relays Usage
45 Windshield Wiper
On/Off
47 Low-Beam
Headlamp
Spare Fuses Usage 48 Spare
49 Spare
50 Spare
51 Spare
52 Spare
53 Spare
54 Fuse Puller
Diodes Usage § Diode 1
§ Wiper
§ Diode 2
Page 339 of 428
Black plate (55,1)Chevrolet Corvette Owner Manual - 2011
Vehicle Care 10-55
Instrument Panel Fuse
Block
The instrument panel fuse block is
located on the passenger side of the
vehicle, under the instrument panel
and under the toe-board.
Remove the carpet and toe-board
covering to access the fuse block by
pulling at the top of each corner of
the panel. Open the fuse block
cover to access the fuses.
You can remove fuses using the
fuse puller.
The vehicle may not be equipped
with all of the fuses, relays, and
features shown.Fuses Usage
BCK/
UP LAMP Reverse Lamps
BLANK Not Used
BLANK Not Used Fuses Usage
BTSI SOL/
STR
WHL LCK Brake
Transmission
Shift Interlock,
Steering Wheel
Column Lock
CLSTR/HUD Cluster, Heads‐Up
Display
Page 340 of 428

Black plate (56,1)Chevrolet Corvette Owner Manual - 2011
10-56 Vehicle Care
FusesUsage
CRUISE
SWITCH Cruise Control
Switch
CTSY/LAMP Courtesy Lamp
DR LCK Door Locks
DRIV DR
SWITCH Driver Door Switch
ECM Engine Control
Module (ECM)
EXH MDL Exhaust Module
(Z06 & ZR1),
Spare (Coupe and
Convertible)
GM LAN
RUN/CRNK GM LAN Devices
HTD SEAT/
WPR RLY Heated Seat,
Wiper Relays Fuses
Usage
HVAC/
PWR SND Heating.
Ventilation/Air
Conditioning,
Power Sounder
IGN SWTCH/
INTR SNSR Ignition Switch,
Intrusion Sensor
ISRVM/HVAC Electric Inside
Rearview Mirror,
Heating,
Ventilation,
Air Conditioning
ONSTAR OnStar
®
(if equipped)
RDO/
S‐BAND Radio, S‐Band
REAR FOG/
ALDL/TOP
SWTCH Rear Fog Lamp,
Assembly Line
Diagnostic Link
Connector,
Convertible Top
Switch Fuses Usage
REVERSE
LAMPS Reverse Lamps
RUN CRNK Run/Crank Relay
SDM/AOS
SWTCH
AIRBAG Sensing and
Diagnostic Module,
Automatic
Occupant Sensing
Module, Airbag
SPARE Spare
SPARE Spare
SPARE Spare
SPARE Spare
STOP LAMP Stop Lamp
SWC DM Steering Wheel
Dimming
TELE
SWTCH/
MSM Telescope Switch,
Memory Seat
Module
Page 341 of 428
Black plate (57,1)Chevrolet Corvette Owner Manual - 2011
Vehicle Care 10-57
FusesUsage
TONNEAU
RELSE Tonneau Release
TPA Tonneau Pulldown
Actuator
Fuses Usage
BLANK Blank
BLANK Blank
FUEL DR
RELSE Fuel Door Release
REAR/FOG Rear Fog Lamps
TONNEAU
RELSE Tonneau Release
TRUNK
RELSE Trunk Release Fuses
Usage
AUX PWR Auxiliary Power
BLANK Not Used
BLANK Not Used
BLANK Not Used
BLANK Not Used
BLANK Not Used
BLANK Not Used
BLANK Not Used
DRVR
HTD SEAT Driver Heated Seat
LTR Cigarette Lighter
PASS
HTD SEAT Passenger
Heated Seat Fuses
Usage
PWR
SEATS MSM Power Seats,
Memory Seat
Module
PWR/
WNDWS/
TRUNK/
FUEL RELSE Power Windows,
Trunk, Fuel Door
Release
TRUNK
RELSE Trunk Release
WPR DWELL Wiper Dwell
WPR/WSW Windshield Wiper/
Washer
Page 367 of 428

Black plate (83,1)Chevrolet Corvette Owner Manual - 2011
Vehicle Care 10-83
3. Turn off the ignition on bothvehicles. Unplug unnecessary
accessories plugged into the
cigarette lighter or the accessory
power outlet. Turn off the radio
and all lamps that are not
needed. This will avoid sparks
and help save both batteries.
And it could save the radio!
4. Open the hoods and locate the positive (+) and negative (−)
terminal locations on each
vehicle.
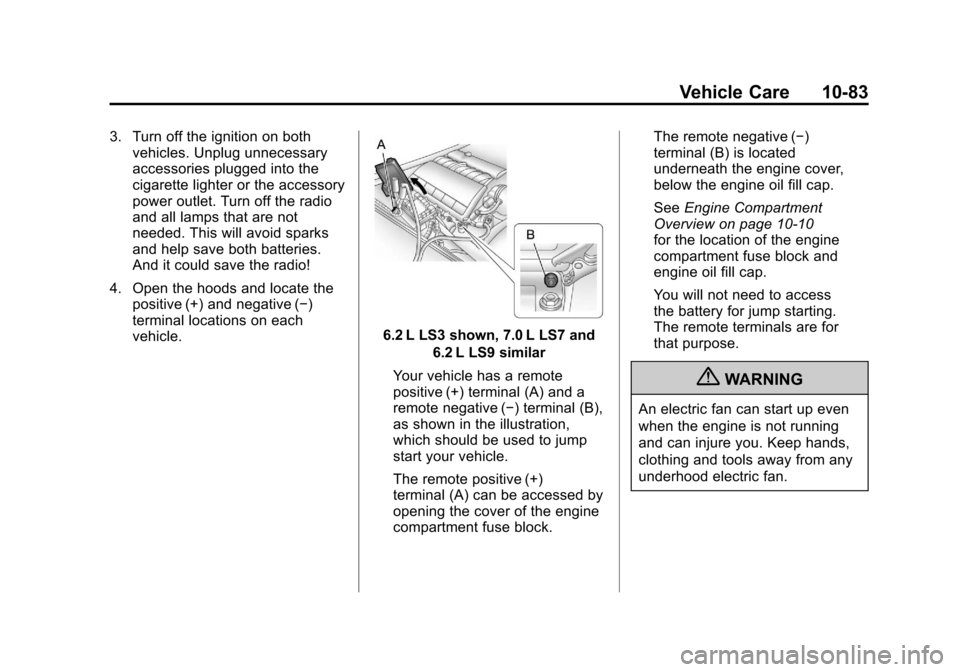
6.2 L LS3 shown, 7.0 L LS7 and
6.2 L LS9 similar
Your vehicle has a remote
positive (+) terminal (A) and a
remote negative (−) terminal (B),
as shown in the illustration,
which should be used to jump
start your vehicle.
The remote positive (+)
terminal (A) can be accessed by
opening the cover of the engine
compartment fuse block. The remote negative (−)
terminal (B) is located
underneath the engine cover,
below the engine oil fill cap.
See
Engine Compartment
Overview on page 10‑10
for the location of the engine
compartment fuse block and
engine oil fill cap.
You will not need to access
the battery for jump starting.
The remote terminals are for
that purpose.
{WARNING
An electric fan can start up even
when the engine is not running
and can injure you. Keep hands,
clothing and tools away from any
underhood electric fan.
Page 369 of 428

Black plate (85,1)Chevrolet Corvette Owner Manual - 2011
Vehicle Care 10-85
to a remote negative (−) terminal
on the vehicle with the dead
battery.
9. Connect the other end of the negative (−) cable at least 45 cm
(18 inches) away from the dead
battery, but not near engine
parts that move. The electrical
connection is just as good there,
and the chance of sparks getting
back to the battery is much less.
Your vehicle has a remote
negative (−) terminal for this
purpose.
10. Now start the vehicle with the good battery and run the
engine for a while.
11. Try to start the vehicle that had the dead battery. If it will
not start after a few tries, it
probably needs service.
Notice: If the jumper cables are
connected or removed in the
wrong order, electrical shorting
may occur and damage the
vehicle. The repairs would not be covered by the vehicle warranty.
Always connect and remove the
jumper cables in the correct
order, making sure that the
cables do not touch each other
or other metal.
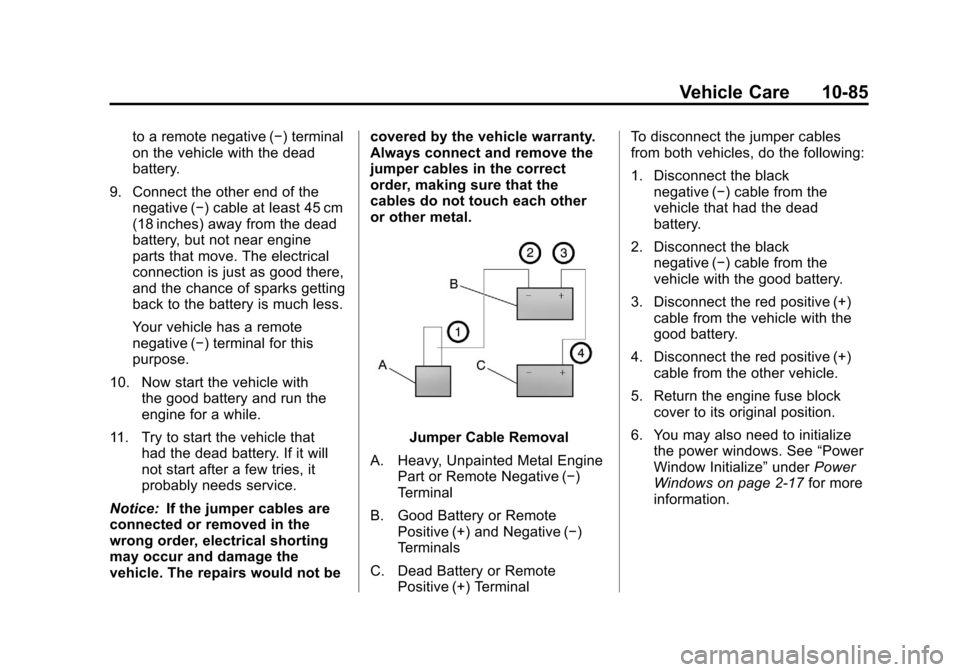
Jumper Cable Removal
A. Heavy, Unpainted Metal Engine Part or Remote Negative (−)
Terminal
B. Good Battery or Remote Positive (+) and Negative (−)
Terminals
C. Dead Battery or Remote Positive (+) Terminal To disconnect the jumper cables
from both vehicles, do the following:
1. Disconnect the black
negative (−) cable from the
vehicle that had the dead
battery.
2. Disconnect the black negative (−) cable from the
vehicle with the good battery.
3. Disconnect the red positive (+) cable from the vehicle with the
good battery.
4. Disconnect the red positive (+) cable from the other vehicle.
5. Return the engine fuse block cover to its original position.
6. You may also need to initialize the power windows. See “Power
Window Initialize” underPower
Windows on page 2‑17 for more
information.