2011 CHEVROLET AVEO high beam
[x] Cancel search: high beamPage 5 of 328

Black plate (5,1)Chevrolet Aveo Owner Manual - 2011
Introduction v
Vehicle Symbol Chart
Here are some additional symbols
that may be found on the vehicle
and what they mean. For more
information on the symbol, refer to
the Index.
9:Airbag Readiness Light
#:Air Conditioning
!:Antilock Brake System (ABS)
g:Audio Steering Wheel Controls
or OnStar®
$: Brake System Warning Light
":Charging System
I:Cruise Control
B: Engine Coolant Temperature
O:Exterior Lamps
#:Fog Lamps
.: Fuel Gauge
+:Fuses
3: Headlamp High/Low-Beam
Changer
j: LATCH System Child
Restraints
*: Malfunction Indicator Lamp
::Oil Pressure
}:Power
/:Remote Vehicle Start
>:Safety Belt Reminders
7:Tire Pressure Monitor
d:Traction Control
M:Windshield Washer Fluid
Page 113 of 328

Black plate (1,1)Chevrolet Aveo Owner Manual - 2011
Instruments and Controls 5-1
Instruments and
Controls
Controls
Steering Wheel Adjustment . . . 5-1
Steering Wheel Controls . . . . . . 5-2
Horn . . . . . . . . . . . . . . . . . . . . . . . . . . 5-3
Windshield Wiper/Washer . . . . . 5-3
Rear Window Wiper/Washer . . . . . . . . . . . . . . . . . . . . . . 5-5
Clock . . . . . . . . . . . . . . . . . . . . . . . . . 5-5
Power Outlets . . . . . . . . . . . . . . . . . 5-5
Cigarette Lighter . . . . . . . . . . . . . . 5-6
Ashtrays . . . . . . . . . . . . . . . . . . . . . . 5-7
Warning Lights, Gauges, and
Indicators
Warning Lights, Gauges, and Indicators . . . . . . . . . . . . . . . . . . . . 5-7
Instrument Cluster . . . . . . . . . . . . 5-8
Speedometer . . . . . . . . . . . . . . . . . 5-9
Odometer . . . . . . . . . . . . . . . . . . . . . 5-9
Trip Odometer . . . . . . . . . . . . . . . . . 5-9
Tachometer . . . . . . . . . . . . . . . . . . . 5-9
Fuel Gauge . . . . . . . . . . . . . . . . . . 5-10 Engine Coolant Temperature
Gauge . . . . . . . . . . . . . . . . . . . . . . 5-11
Safety Belt Reminders . . . . . . . 5-11
Airbag Readiness Light . . . . . . 5-12
Passenger Airbag Status Indicator . . . . . . . . . . . . . . . . . . . . 5-12
Charging System Light . . . . . . 5-13
Malfunction Indicator Lamp . . . . . . . . . . . . . 5-14
Brake System Warning Light . . . . . . . . . . . . . . . . . . . . . . . 5-16
Antilock Brake System (ABS) Warning Light . . . . . . . . . . . . . . 5-17
Up-Shift Light . . . . . . . . . . . . . . . . 5-17
Hold Mode Light . . . . . . . . . . . . . 5-18
Tire Pressure Light . . . . . . . . . . 5-18
Engine Oil Pressure Light . . . . 5-18
Change Engine Oil Light . . . . . 5-19
Low Fuel Warning Light . . . . . . 5-20
High-Beam On Light . . . . . . . . . 5-20
Daytime Running Lamps (DRL) Indicator Light . . . . . . . 5-20
Front Fog Lamp Light . . . . . . . . 5-20
Cruise Control Light . . . . . . . . . 5-21
Door Ajar Light . . . . . . . . . . . . . . 5-21
Trip Computer
Trip Computer (US Only) . . . . 5-21
Controls
Steering Wheel
Adjustment
The lever is located under the
steering column, slightly to the left.
Page 132 of 328
Black plate (20,1)Chevrolet Aveo Owner Manual - 2011
5-20 Instruments and Controls
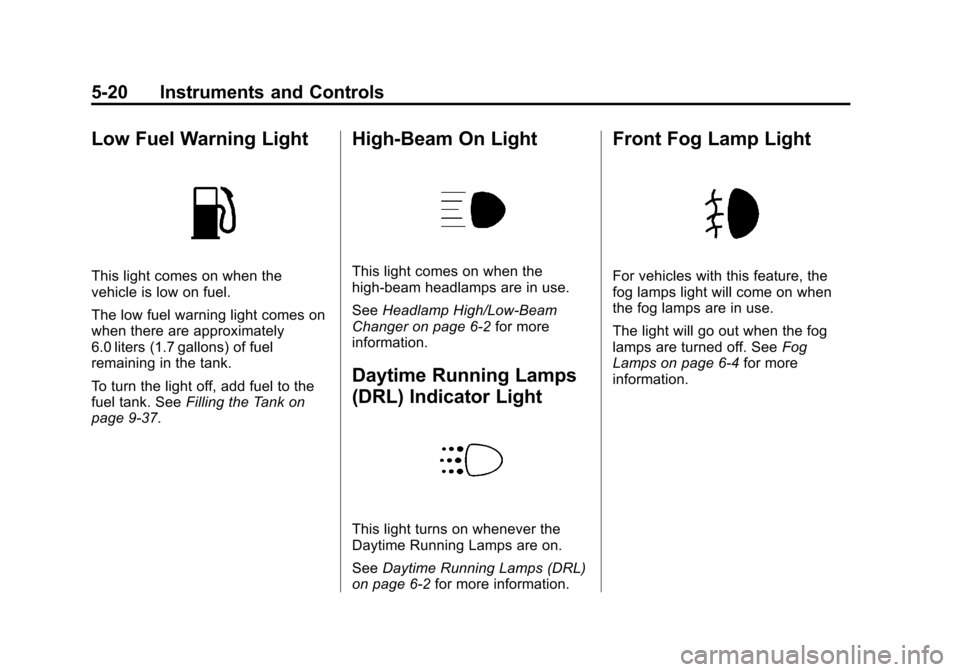
Low Fuel Warning Light
This light comes on when the
vehicle is low on fuel.
The low fuel warning light comes on
when there are approximately
6.0 liters (1.7 gallons) of fuel
remaining in the tank.
To turn the light off, add fuel to the
fuel tank. SeeFilling the Tank on
page 9‑37.
High-Beam On Light
This light comes on when the
high-beam headlamps are in use.
See Headlamp High/Low-Beam
Changer on page 6‑2 for more
information.
Daytime Running Lamps
(DRL) Indicator Light
This light turns on whenever the
Daytime Running Lamps are on.
See Daytime Running Lamps (DRL)
on page 6‑2 for more information.
Front Fog Lamp Light
For vehicles with this feature, the
fog lamps light will come on when
the fog lamps are in use.
The light will go out when the fog
lamps are turned off. See Fog
Lamps on page 6‑4 for more
information.
Page 135 of 328
Black plate (1,1)Chevrolet Aveo Owner Manual - 2011
Lighting 6-1
Lighting
Exterior Lighting
Exterior Lamp Controls . . . . . . . . 6-1
Headlamp High/Low-BeamChanger . . . . . . . . . . . . . . . . . . . . . 6-2
Flash-to-Pass . . . . . . . . . . . . . . . . . 6-2
Daytime Running Lamps (DRL) . . . . . . . . . . . . . . . . 6-2
Hazard Warning Flashers . . . . . 6-3
Turn and Lane-Change Signals . . . . . . . . . . . . . . . . . . . . . . 6-3
Fog Lamps . . . . . . . . . . . . . . . . . . . . 6-4
Interior Lighting
Instrument Panel Illumination Control . . . . . . . . . . . . . . . . . . . . . . 6-4
Dome Lamps . . . . . . . . . . . . . . . . . 6-5
Lighting Features
Inadvertent Power Battery Saver . . . . . . . . . . . . . . . . . . . . . . . . 6-5
Exterior Lighting
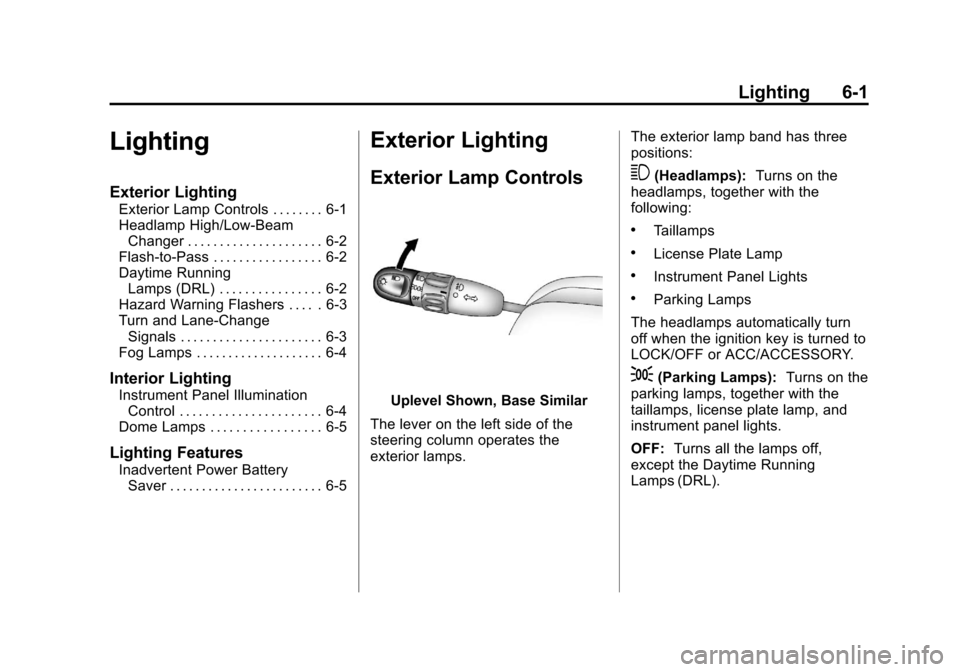
Exterior Lamp Controls
Uplevel Shown, Base Similar
The lever on the left side of the
steering column operates the
exterior lamps. The exterior lamp band has three
positions:
3(Headlamps):
Turns on the
headlamps, together with the
following:
.Taillamps
.License Plate Lamp
.Instrument Panel Lights
.Parking Lamps
The headlamps automatically turn
off when the ignition key is turned to
LOCK/OFF or ACC/ACCESSORY.
;(Parking Lamps): Turns on the
parking lamps, together with the
taillamps, license plate lamp, and
instrument panel lights.
OFF: Turns all the lamps off,
except the Daytime Running
Lamps (DRL).
Page 136 of 328
Black plate (2,1)Chevrolet Aveo Owner Manual - 2011
6-2 Lighting
Headlamp High/
Low-Beam Changer
The headlamps must be on for this
feature to work.
Push the turn signal lever away
from you to turn the high beams on.
The
3light comes on in instrument
panel cluster while the high beams
are on and the ignition is turned to
ON/RUN.
Pull the lever toward you to return to
low beams.
Flash-to-Pass
This feature is used to signal to the
vehicle ahead that you want
to pass.
Pull the turn signal/multifunction
lever toward you until the high-beam
headlamps come on, then release
the lever to turn them off.
Daytime Running
Lamps (DRL)
Daytime Running Lamps (DRL) can
make it easier for others to see the
front of your vehicle during the day.
Fully functional daytime running
lamps are required on all vehicles
first sold in Canada.
The DRL system makes the
headlamps come on when the
following conditions are met:
.The ignition is on.
.The exterior lamp band is in
OFF or in the parking lamp
position.
.The parking brake is released.
An indicator light on instrument
panel cluster comes on when the
DRL system is on. When the DRL system is on, the
taillamps, sidemarker lamps,
parking lamps, and instrument panel
lights do not come on unless the
exterior lamps control is turned to
the parking lamp or headlamp
position.
The DRL system turns off when one
of the following conditions are met:
.The ignition is off.
.The parking brake is on.
.The high-beam headlamps
are on.
.The low-beam headlamps
are on.
.The flash-to-pass feature
is used.
The regular headlamp system
should be used when needed.
Page 138 of 328
Black plate (4,1)Chevrolet Aveo Owner Manual - 2011
6-4 Lighting
Fog Lamps
For vehicles with fog lamps, they
are controlled by the
#band
located on the middle of the turn
signal/multifunction lever.
To use the fog lamps, the ignition
must be turned to ON/RUN and the
low-beam headlamps or parking
lamps must be on.
Turn the band to
#to turn the fog
lamps on. The band automatically
returns to its starting position when
released. The fog lamp indicator
light comes on in the instrument
panel cluster. See Front Fog Lamp
Light on page 5‑20. To turn the fog lamps off, turn the
band to
#again. The fog lamp
indicator light will go off.
The fog lamps will also turn off
when the high-beam headlamps are
turned on. When the high-beam
headlamps are turned off, the fog
lamps will turn on again.
Some localities have laws that
require the headlamps to be on
along with the fog lamps.Interior Lighting
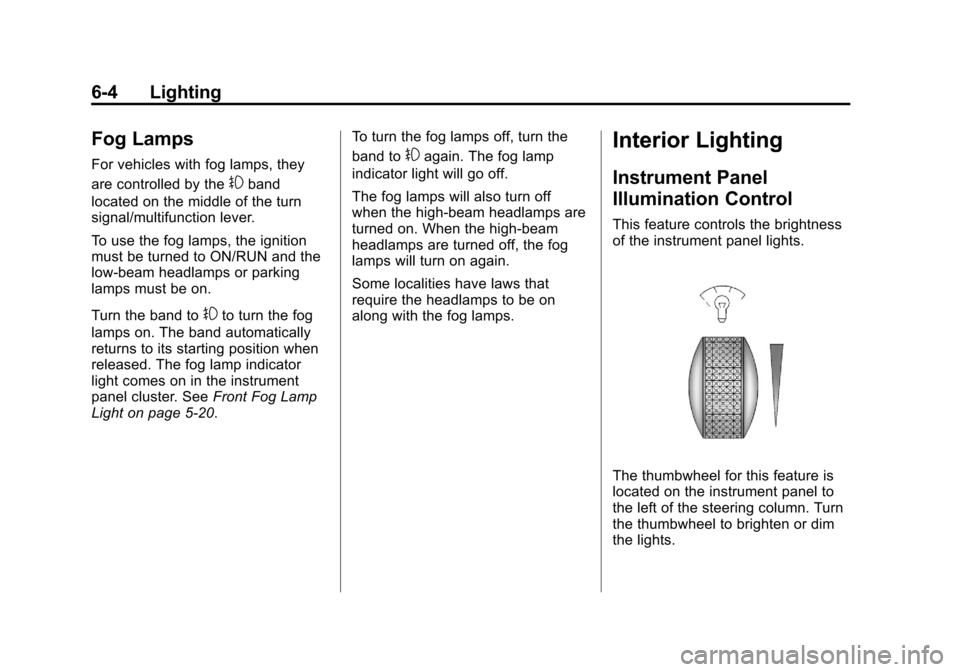
Instrument Panel
Illumination Control
This feature controls the brightness
of the instrument panel lights.
The thumbwheel for this feature is
located on the instrument panel to
the left of the steering column. Turn
the thumbwheel to brighten or dim
the lights.
Page 232 of 328
Black plate (30,1)Chevrolet Aveo Owner Manual - 2011
10-30 Vehicle Care
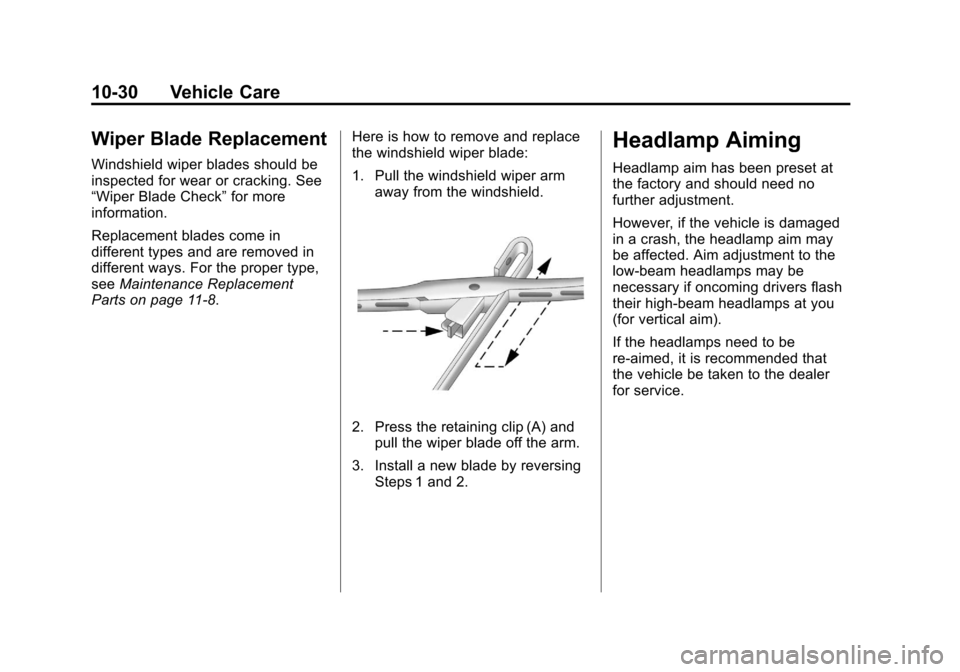
Wiper Blade Replacement
Windshield wiper blades should be
inspected for wear or cracking. See
“Wiper Blade Check”for more
information.
Replacement blades come in
different types and are removed in
different ways. For the proper type,
see Maintenance Replacement
Parts on page 11‑8. Here is how to remove and replace
the windshield wiper blade:
1. Pull the windshield wiper arm
away from the windshield.
2. Press the retaining clip (A) andpull the wiper blade off the arm.
3. Install a new blade by reversing Steps 1 and 2.
Headlamp Aiming
Headlamp aim has been preset at
the factory and should need no
further adjustment.
However, if the vehicle is damaged
in a crash, the headlamp aim may
be affected. Aim adjustment to the
low-beam headlamps may be
necessary if oncoming drivers flash
their high-beam headlamps at you
(for vertical aim).
If the headlamps need to be
re-aimed, it is recommended that
the vehicle be taken to the dealer
for service.
Page 323 of 328

Black plate (5,1)Chevrolet Aveo Owner Manual - 2011
INDEX i-5
General InformationService and Maintenance . . . . . 11-1
Towing . . . . . . . . . . . . . . . . . . . . . . . . 9-39
Vehicle Care . . . . . . . . . . . . . . . . . . 10-3
Glove Box . . . . . . . . . . . . . . . . . . . . . . 4-1
GM Mobility Reimbursement Program . . . . . . . . . . . . . . . . . . . . . . 13-5
H
Halogen Bulbs . . . . . . . . . . . . . . . . 10-31
Hazard Warning Flashers . . . . . . . 6-3
Head Restraints . . . . . . . . . . . . . . . . 3-2
Headlamps . . . . . . . . . . . . . . . . . . . 10-31
Aiming . . . . . . . . . . . . . . . . . . . . . . 10-30
Bulb Replacement . . . . . . . . . . 10-31
Daytime RunningLamps (DRL) . . . . . . . . . . . . . . . . . 6-2
Daytime Running Lamps
(DRL) Indicator Light . . . . . . . . 5-20
Flash-to-Pass . . . . . . . . . . . . . . . . . . 6-2
High-Beam On Light . . . . . . . . . . 5-20
High/Low Beam Changer . . . . . . 6-2
Heated Mirrors . . . . . . . . . . . . . . . . . 2-14
Heater
Engine . . . . . . . . . . . . . . . . . . . . . . . . 9-20 Heating and Air Conditioning . . . 8-1
High-Beam On Light . . . . . . . . . . . 5-20
Highway Hypnosis . . . . . . . . . . . . . . 9-8
Hill and Mountain Roads . . . . . . . . 9-8
Hold Mode Light . . . . . . . . . . . . . . . 5-18
Hood . . . . . . . . . . . . . . . . . . . . . . . . . . 10-6
Horn . . . . . . . . . . . . . . . . . . . . . . . . . . . . 5-3
How to Wear Safety Belts
Properly . . . . . . . . . . . . . . . . . . . . . . 3-14
Hydraulic Clutch . . . . . . . . . . . . . . 10-15
I
Ignition Positions . . . . . . . . . . . . . . 9-17
Ignition Transmission Lock Check . . . . . . . . . . . . . . . . . . . . . . . 10-29
Immobilizer . . . . . . . . . . . . . . . . . . . . 2-12
Inadvertent Power Battery Saver . . . . . . . . . . . . . . . . . . . . . . . . . 6-5
Infants and Young Children, Restraints . . . . . . . . . . . . . . . . . . . . 3-41
Infotainment . . . . . . . . . . . . . . . . . . . . 7-1
Instrument Cluster . . . . . . . . . . . . . . 5-8
Introduction . . . . . . . . . . . . . . . . . . . . . . . iii
J
Jump Starting . . . . . . . . . . . . . . . . . 10-70
K
Keyless Entry Remote (RKE) System . . . . . . . . 2-3
Keys . . . . . . . . . . . . . . . . . . . . . . . . . . . . 2-2
L
Labeling, Tire Sidewall . . . . . . . . 10-42
Lamps Daytime Running (DRL) . . . . . . . 6-2
Dome . . . . . . . . . . . . . . . . . . . . . . . . . . 6-5
Exterior Controls . . . . . . . . . . . . . . . 6-1
License Plate . . . . . . . . . . . . . . . 10-35
Malfunction Indicator . . . . . . . . . 5-14
Lap-Shoulder Belt . . . . . . . . . . . . . 3-20
LATCH System Replacing Parts After aCrash . . . . . . . . . . . . . . . . . . . . . . . 3-55
Latch, Lower Anchors and Tethers for Children . . . . . . . . . . 3-48
Liftgate Carbon Monoxide . . . . . . . . . . . . . . 2-9