2011 CHEVROLET AVEO tow
[x] Cancel search: towPage 1 of 328

Black plate (1,1)Chevrolet Aveo Owner Manual - 2011
2011 Chevrolet Aveo Owner ManualM
In Brief. . . . . . . . . . . . . . . . . . . . . . . . 1-1
Instrument Panel . . . . . . . . . . . . . . 1-2
Initial Drive Information . . . . . . . . 1-3
Vehicle Features . . . . . . . . . . . . . 1-16
Performance and Maintenance . . . . . . . . . . . . . . . . 1-21
Keys, Doors and Windows . . . 2-1
Keys and Locks . . . . . . . . . . . . . . . 2-2
Doors . . . . . . . . . . . . . . . . . . . . . . . . . . 2-7
Vehicle Security . . . . . . . . . . . . . . 2-10
Exterior Mirrors . . . . . . . . . . . . . . . 2-13
Interior Mirrors . . . . . . . . . . . . . . . . 2-14
Windows . . . . . . . . . . . . . . . . . . . . . 2-14
Roof . . . . . . . . . . . . . . . . . . . . . . . . . . 2-16
Seats and Restraints . . . . . . . . . 3-1
Head Restraints . . . . . . . . . . . . . . . 3-2
Front Seats . . . . . . . . . . . . . . . . . . . . 3-3
Rear Seats . . . . . . . . . . . . . . . . . . . . 3-6
Safety Belts . . . . . . . . . . . . . . . . . . 3-11
Airbag System . . . . . . . . . . . . . . . . 3-24
Child Restraints . . . . . . . . . . . . . . 3-38 Storage
. . . . . . . . . . . . . . . . . . . . . . . 4-1
Storage Compartments . . . . . . . . 4-1
Instruments and Controls . . . . 5-1
Controls . . . . . . . . . . . . . . . . . . . . . . . 5-1
Warning Lights, Gauges, and Indicators . . . . . . . . . . . . . . . . . . . . 5-7
Trip Computer . . . . . . . . . . . . . . . . 5-21
Lighting . . . . . . . . . . . . . . . . . . . . . . . 6-1
Exterior Lighting . . . . . . . . . . . . . . . 6-1
Interior Lighting . . . . . . . . . . . . . . . . 6-4
Lighting Features . . . . . . . . . . . . . . 6-5
Infotainment System . . . . . . . . . 7-1
Introduction . . . . . . . . . . . . . . . . . . . . 7-1
Radio . . . . . . . . . . . . . . . . . . . . . . . . . . 7-3
Audio Players . . . . . . . . . . . . . . . . 7-10
Climate Controls . . . . . . . . . . . . . 8-1
Climate Control Systems . . . . . . 8-1
Air Vents . . . . . . . . . . . . . . . . . . . . . . . 8-4
Maintenance . . . . . . . . . . . . . . . . . . . 8-5 Driving and Operating
. . . . . . . . 9-1
Driving Information . . . . . . . . . . . . . 9-2
Starting and Operating . . . . . . . 9-17
Engine Exhaust . . . . . . . . . . . . . . 9-24
Automatic Transmission . . . . . . 9-25
Manual Transmission . . . . . . . . . 9-29
Brakes . . . . . . . . . . . . . . . . . . . . . . . 9-30
Cruise Control . . . . . . . . . . . . . . . . 9-32
Fuel . . . . . . . . . . . . . . . . . . . . . . . . . . 9-34
Towing . . . . . . . . . . . . . . . . . . . . . . . 9-39
Conversions and Add-Ons . . . 9-40
Vehicle Care . . . . . . . . . . . . . . . . . 10-1
General Information . . . . . . . . . . 10-3
Vehicle Checks . . . . . . . . . . . . . . . 10-5
Headlamp Aiming . . . . . . . . . . . 10-30
Bulb Replacement . . . . . . . . . . 10-31
Electrical System . . . . . . . . . . . . 10-36
Wheels and Tires . . . . . . . . . . . 10-42
Jump Starting . . . . . . . . . . . . . . . 10-70
Towing . . . . . . . . . . . . . . . . . . . . . . 10-74
Appearance Care . . . . . . . . . . . 10-76
Page 11 of 328
Black plate (5,1)Chevrolet Aveo Owner Manual - 2011
In Brief 1-5
The LED light (A) on the transmitter
flashes when the buttons on the
transmitter are pressed. If the light
does not flash, the transmitter
battery needs to be replaced.
SeeKeys on page 2‑2 andRemote
Keyless Entry (RKE) System
Operation on page 2‑3.
Door Locks
From the outside, lock or unlock the
door using the key or the Remote
Keyless Entry (RKE) transmitter,
if equipped.
From the inside, all of the doors can
be locked and unlocked by pushing
or pulling the manual door lock on
each door. On vehicles equipped with the
central door unlocking system, lock
or unlock all the doors from the
inside using the driver door lock
switch.
For more information see:
.Door Locks on page 2‑5.
.Central Door Unlocking System
on page 2‑6.
Liftgate
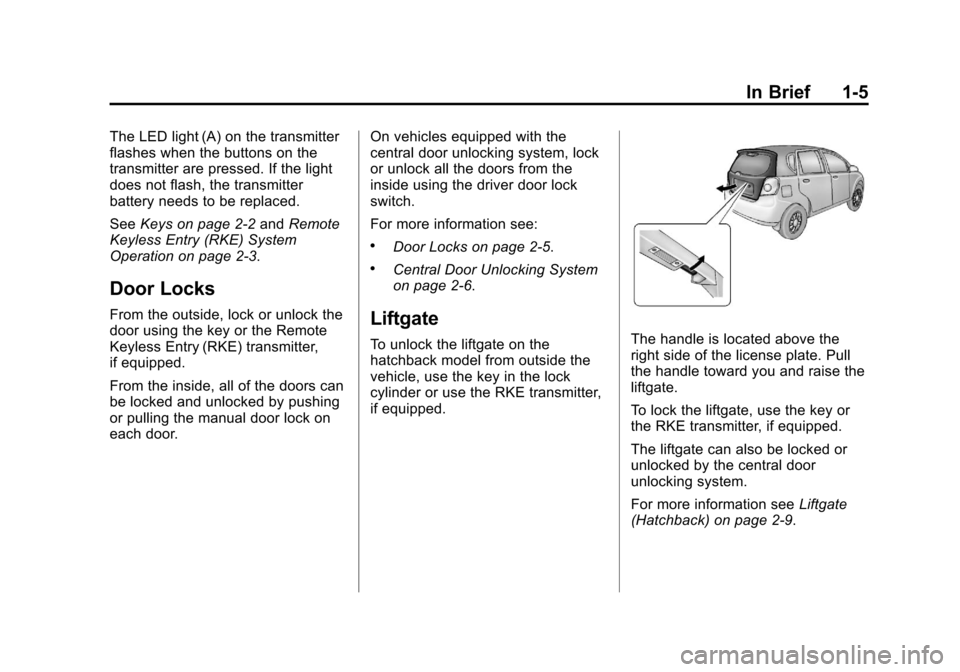
To unlock the liftgate on the
hatchback model from outside the
vehicle, use the key in the lock
cylinder or use the RKE transmitter,
if equipped.The handle is located above the
right side of the license plate. Pull
the handle toward you and raise the
liftgate.
To lock the liftgate, use the key or
the RKE transmitter, if equipped.
The liftgate can also be locked or
unlocked by the central door
unlocking system.
For more information see
Liftgate
(Hatchback) on page 2‑9.
Page 18 of 328
Black plate (12,1)Chevrolet Aveo Owner Manual - 2011
1-12 In Brief
;:Turns on the parking lamps,
together with the taillamps, license
plate lamp, and instrument panel
lights.
OFF: Turns all the lamps off,
except the Daytime Running
Lamps (DRL).
For more information, see:
.Exterior Lamp Controls on
page 6‑1.
.Daytime Running Lamps (DRL)
on page 6‑2.
.Fog Lamps on page 6‑4.
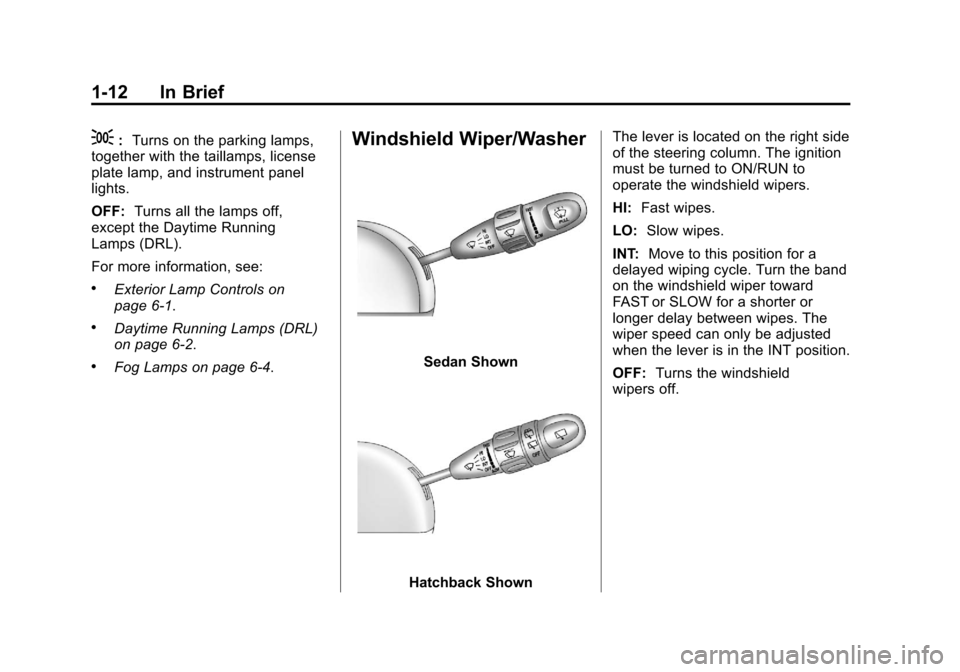
Windshield Wiper/Washer
Sedan Shown
Hatchback Shown The lever is located on the right side
of the steering column. The ignition
must be turned to ON/RUN to
operate the windshield wipers.
HI:
Fast wipes.
LO: Slow wipes.
INT: Move to this position for a
delayed wiping cycle. Turn the band
on the windshield wiper toward
FAST or SLOW for a shorter or
longer delay between wipes. The
wiper speed can only be adjusted
when the lever is in the INT position.
OFF: Turns the windshield
wipers off.
Page 19 of 328
Black plate (13,1)Chevrolet Aveo Owner Manual - 2011
In Brief 1-13
Misting Function
Move the lever toward INT for a
single wiping cycle. Hold it there
until the windshield wipers start;
then let go. For several wipes, hold
the band toward INT longer.
Windshield Washer
Pull the windshield washer/wiper
lever toward you to spray washer
fluid on the windshield.
SeeWindshield Wiper/Washer on
page 5‑3. For vehicles with a Rear
Window Wiper/Washer, see Rear
Window Wiper/Washer on page 5‑5.
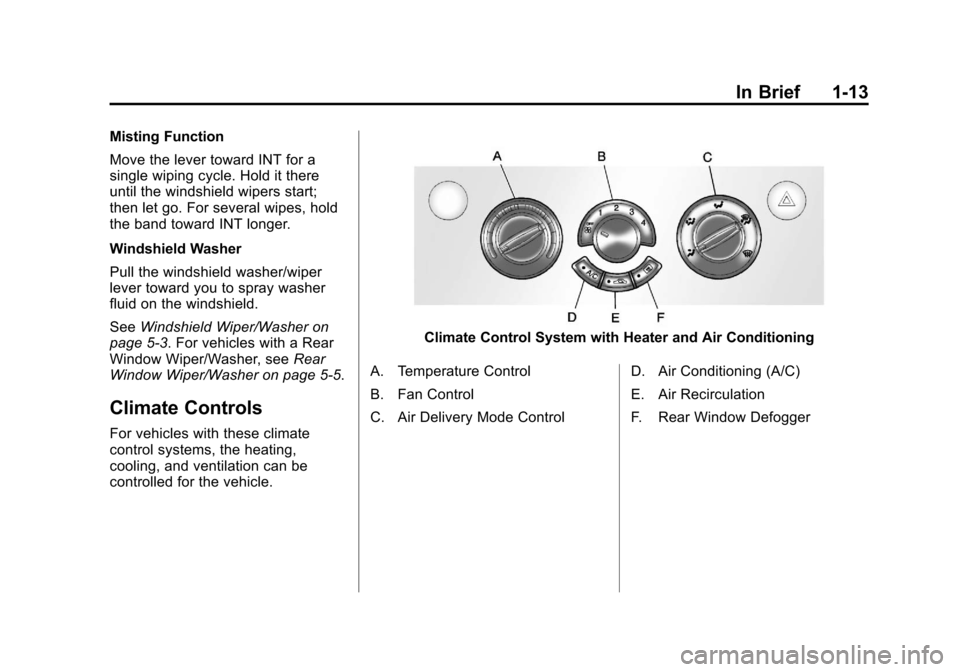
Climate Controls
For vehicles with these climate
control systems, the heating,
cooling, and ventilation can be
controlled for the vehicle.
Climate Control System with Heater and Air Conditioning
A. Temperature Control
B. Fan Control
C. Air Delivery Mode Control D. Air Conditioning (A/C)
E. Air Recirculation
F. Rear Window Defogger
Page 36 of 328
Black plate (4,1)Chevrolet Aveo Owner Manual - 2011
2-4 Keys, Doors and Windows
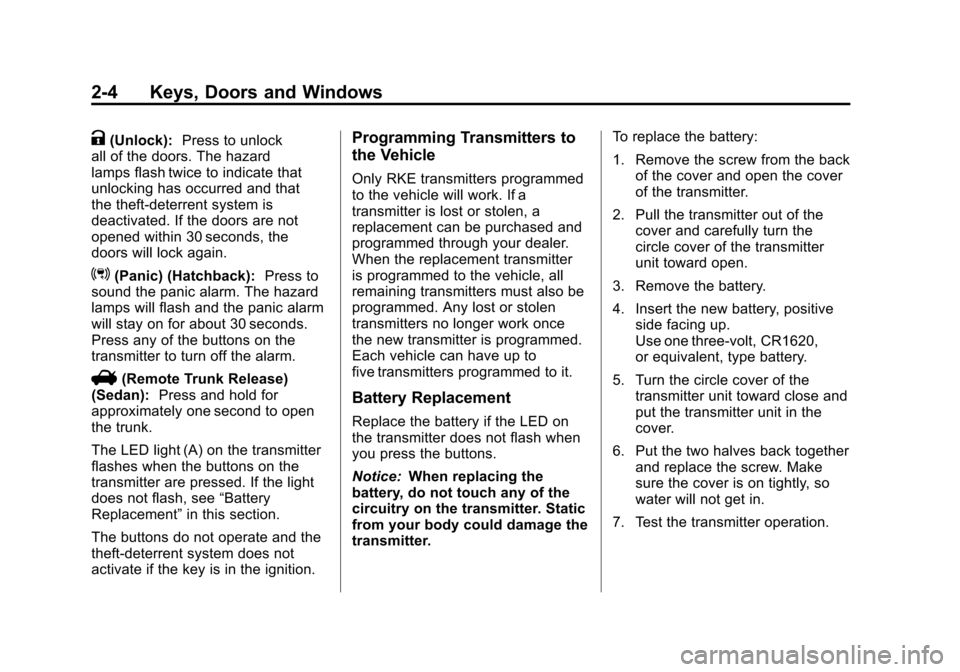
K(Unlock):Press to unlock
all of the doors. The hazard
lamps flash twice to indicate that
unlocking has occurred and that
the theft-deterrent system is
deactivated. If the doors are not
opened within 30 seconds, the
doors will lock again.
3(Panic) (Hatchback): Press to
sound the panic alarm. The hazard
lamps will flash and the panic alarm
will stay on for about 30 seconds.
Press any of the buttons on the
transmitter to turn off the alarm.
V(Remote Trunk Release)
(Sedan): Press and hold for
approximately one second to open
the trunk.
The LED light (A) on the transmitter
flashes when the buttons on the
transmitter are pressed. If the light
does not flash, see “Battery
Replacement” in this section.
The buttons do not operate and the
theft-deterrent system does not
activate if the key is in the ignition.
Programming Transmitters to
the Vehicle
Only RKE transmitters programmed
to the vehicle will work. If a
transmitter is lost or stolen, a
replacement can be purchased and
programmed through your dealer.
When the replacement transmitter
is programmed to the vehicle, all
remaining transmitters must also be
programmed. Any lost or stolen
transmitters no longer work once
the new transmitter is programmed.
Each vehicle can have up to
five transmitters programmed to it.
Battery Replacement
Replace the battery if the LED on
the transmitter does not flash when
you press the buttons.
Notice: When replacing the
battery, do not touch any of the
circuitry on the transmitter. Static
from your body could damage the
transmitter. To replace the battery:
1. Remove the screw from the back
of the cover and open the cover
of the transmitter.
2. Pull the transmitter out of the cover and carefully turn the
circle cover of the transmitter
unit toward open.
3. Remove the battery.
4. Insert the new battery, positive side facing up.
Use one three-volt, CR1620,
or equivalent, type battery.
5. Turn the circle cover of the transmitter unit toward close and
put the transmitter unit in the
cover.
6. Put the two halves back together and replace the screw. Make
sure the cover is on tightly, so
water will not get in.
7. Test the transmitter operation.
Page 41 of 328
Black plate (9,1)Chevrolet Aveo Owner Manual - 2011
Keys, Doors and Windows 2-9
Liftgate (Hatchback)
{WARNING
Exhaust gases can enter the
vehicle if it is driven with the
liftgate, trunk/hatch open, or with
any objects that pass through the
seal between the body and the
trunk/hatch or liftgate. Engine
exhaust contains Carbon
Monoxide (CO) which cannot be
seen or smelled. It can cause
unconsciousness and even death.
If the vehicle must be driven with
the liftgate, or trunk/hatch open:
.Close all of the windows.
.Fully open the air outlets on
or under the instrument
panel.(Continued)
WARNING (Continued)
.Adjust the Climate Control
system to a setting that
brings in only outside air and
set the fan speed to the
highest setting. See Climate
Control System in the Index.
.If the vehicle is equipped with
a power liftgate, disable the
power liftgate function.
For more information about
carbon monoxide, see Engine
Exhaust on page 9‑24. To unlock the liftgate on a
hatchback from outside of the
vehicle, insert the key in the lock
cylinder and turn it counterclockwise
or use the RKE transmitter,
if equipped.
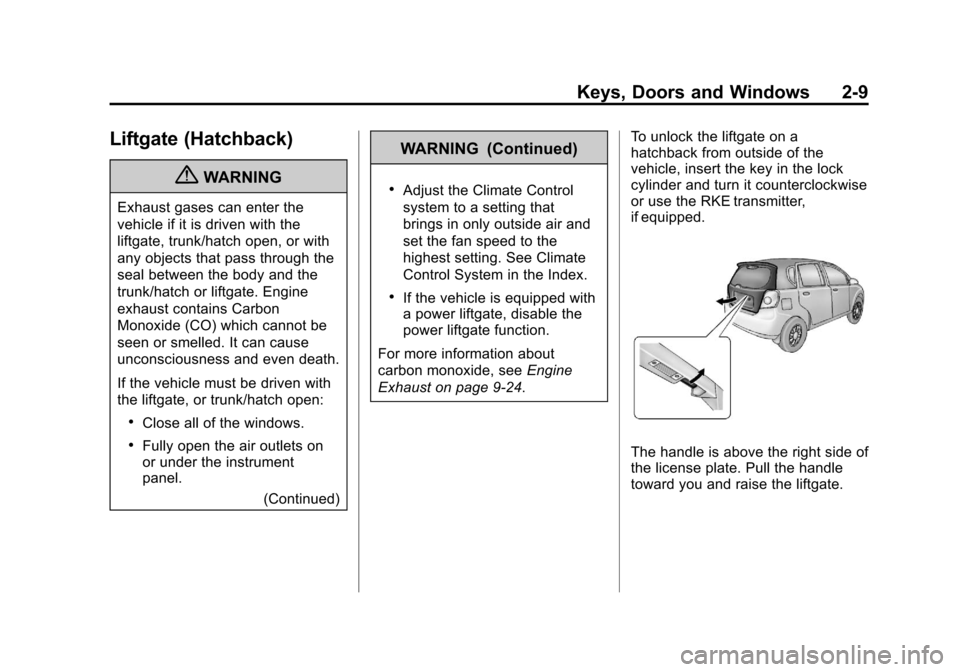
The handle is above the right side of
the license plate. Pull the handle
toward you and raise the liftgate.
Page 45 of 328
Black plate (13,1)Chevrolet Aveo Owner Manual - 2011
Keys, Doors and Windows 2-13
Exterior Mirrors
Convex Mirrors
{WARNING
A convex mirror can make things,
like other vehicles, look farther
away than they really are. If you
cut too sharply into the right lane,
you could hit a vehicle on the
right. Check the inside mirror or
glance over your shoulder before
changing lanes.
The passenger side mirror is convex
shaped. A convex mirror's surface is
curved so more can be seen from
the driver seat.
Manual Mirrors
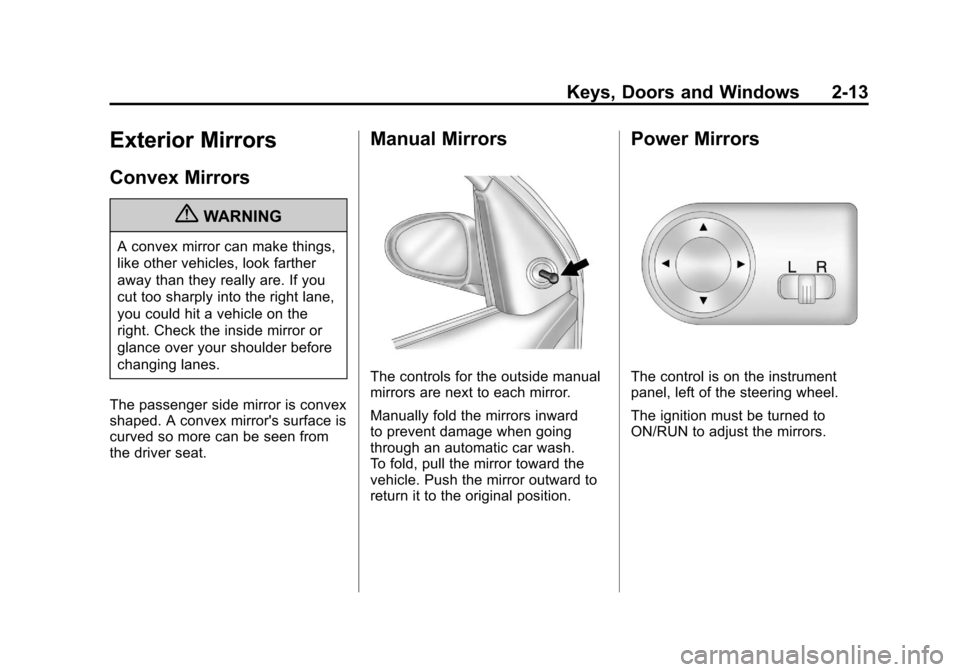
The controls for the outside manual
mirrors are next to each mirror.
Manually fold the mirrors inward
to prevent damage when going
through an automatic car wash.
To fold, pull the mirror toward the
vehicle. Push the mirror outward to
return it to the original position.
Power Mirrors
The control is on the instrument
panel, left of the steering wheel.
The ignition must be turned to
ON/RUN to adjust the mirrors.
Page 46 of 328
Black plate (14,1)Chevrolet Aveo Owner Manual - 2011
2-14 Keys, Doors and Windows
To adjust the mirrors:
1. Select the mirror you want toadjust by moving the selector
switch to L for the driver side
mirror or R for the passenger
side mirror.
2. Press one of the four arrows on the control pad to move the
mirror in the desired direction.
Manually fold the mirrors inward
to prevent damage when going
through an automatic car wash.
To fold, pull the mirror toward the
vehicle. Push the mirror outward, to
return it to its original position.
Heated Mirrors
For vehicles with this feature:
<(Rear Window Defogger):
Press to heat the mirrors. See
“Rear Window and Outside Mirror
Defogger” underClimate Control
Systems on page 8‑1 for more
information.
Interior Mirrors
Manual Rearview Mirror
Hold the inside rearview mirror in
the center to move it for a clearer
view behind your vehicle. Adjust
the mirror to avoid glare from the
headlamps behind you. Push the
tab forward for daytime use and pull
it for nighttime use.
Windows
{WARNING
Leaving children, helpless adults,
or pets in a vehicle with the
windows closed is dangerous.
They can be overcome by
the extreme heat and suffer
permanent injuries or even death
from heat stroke. Never leave a
child, a helpless adult, or a pet
alone in a vehicle, especially with
the windows closed in warm or
hot weather.