Page 437 of 558

Black plate (33,1)Cadillac Escalade/Escalade ESV Owner Manual - 2011
Vehicle Care 10-33
.For All-Wheel-Drive vehicles, the
proper level is from 1.0 mm to
19.0 mm (0.04 in to 0.75 in)
below the bottom of the filler
plug hole, located on the rear
axle. Add only enough fluid to
reach the proper level.
What to Use
Refer toRecommended Fluids
and Lubricants on page 11‑7 to
determine what kind of lubricant
to use.
Starter Switch Check
{WARNING
When you are doing this
inspection, the vehicle could
move suddenly. If the vehicle
moves, you or others could be
injured.
1. Before starting this check, be sure there is enough room
around the vehicle. 2. Firmly apply both the parking
brake and the regular brake.
See Parking Brake on
page 9‑46.
Do not use the accelerator
pedal, and be ready to turn off
the engine immediately if it
starts.
3. Try to start the engine in each gear. The vehicle should start
only in P (Park) or N (Neutral).
If the vehicle starts in any other
position, contact your dealer for
service.
Page 438 of 558

Black plate (34,1)Cadillac Escalade/Escalade ESV Owner Manual - 2011
10-34 Vehicle Care
Automatic Transmission
Shift Lock Control
Function Check
{WARNING
When you are doing this
inspection, the vehicle could
move suddenly. If the vehicle
moves, you or others could be
injured.
1. Before starting this check, be sure there is enough room
around the vehicle. It should
be parked on a level surface. 2. Firmly apply the parking
brake. See Parking Brake on
page 9‑46.
Be ready to apply the regular
brake immediately if the vehicle
begins to move.
3. With the engine off, turn the ignition on, but do not start the
engine. Without applying the
regular brake, try to move the
shift lever out of P (Park) with
normal effort. If the shift lever
moves out of P (Park), contact
your dealer for service.
Ignition Transmission
Lock Check
While parked, and with the parking
brake set, try to turn the ignition
to LOCK/OFF in each shift lever
position.
.The ignition should turn to
LOCK/OFF only when the shift
lever is in P (Park).
.The ignition key should come
out only in LOCK/OFF.
Contact your dealer if service is
required.
Page 439 of 558

Black plate (35,1)Cadillac Escalade/Escalade ESV Owner Manual - 2011
Vehicle Care 10-35
Park Brake and P (Park)
Mechanism Check
{WARNING
When you are doing this check,
the vehicle could begin to move.
You or others could be injured
and property could be damaged.
Make sure there is room in front
of the vehicle in case it begins to
roll. Be ready to apply the regular
brake at once should the vehicle
begin to move.Park on a fairly steep hill, with the
vehicle facing downhill. Keeping
your foot on the regular brake, set
the parking brake.
.To check the parking brake's
holding ability: With the engine
running and the transmission in
N (Neutral), slowly remove foot
pressure from the regular brake
pedal. Do this until the vehicle is
held by the parking brake only.
.To check the P (Park)
mechanism's holding ability:
With the engine running, shift
to P (Park). Then release the
parking brake followed by the
regular brake.
Contact your dealer if service is
required.
Wiper Blade Replacement
Windshield wiper blades should
be inspected for wear or cracking.
See Scheduled Maintenance on
page 11‑2.
Replacement blades come in
different types and are removed
in different ways.
Front Wiper Blade
Replacement
1. Pull the windshield wiper arm connector away from the
windshield.
2. Squeeze the grooved areas on
each side of the blade, and turn
the blade assembly away from
the arm connector.
Page 441 of 558

Black plate (37,1)Cadillac Escalade/Escalade ESV Owner Manual - 2011
Vehicle Care 10-37
Headlamp Aiming
The vehicle has a visual optical
headlamp aiming system. The aim
of the headlamps have been preset
at the factory and should need no
further adjustment.
However, if the vehicle is damaged
in a crash, the aim of the headlamps
may be affected and adjustment
may be necessary.
If oncoming vehicles flash their high
beams at you, this may mean the
vertical aim of the headlamps needs
to be adjusted.
It is recommended that the vehicle
is taken to your dealer for service if
the headlamps need to be adjusted.
It is possible however, to re-aim the
headlamps as described.The vehicle should:.Be placed so the headlamps are
7.6 m (25 ft.) from a light colored
wall or other flat surface.
.Have all four tires on a level
surface which is level all the way
to the wall or other flat surface.
.Be placed so it is perpendicular
to the wall or other flat surface.
.Not have any snow, ice, or mud
on it.
.Be fully assembled and all other
work stopped while headlamp
aiming is being performed.
.Be normally loaded with a full
tank of fuel and one person or
75 kg (160 lbs) sitting on the
driver seat.
.Have the tires properly inflated.
.Have the spare tire is in its
proper location in the vehicle.Headlamp aiming is done with the
vehicle's low-beam headlamps.
The high-beam headlamps will be
correctly aimed if the low-beam
headlamps are aimed properly.
To adjust the vertical aim:
1. Open the hood. See
Hood on
page 10‑5 for more information.2. Locate the center of the
projector lens of the low‐beam
headlamp.
Page 443 of 558

Black plate (39,1)Cadillac Escalade/Escalade ESV Owner Manual - 2011
Vehicle Care 10-39
9. Make sure that the light from theheadlamp is positioned at the
bottom edge of the horizontal
tape line. The lamp on the
left (A) shows the correct
headlamp aim. The lamp
on the right (B) shows the
incorrect headlamp aim.
10. Repeat Steps 7 through 9 for the opposite headlamp.
Bulb Replacement
For the proper type of replacement
bulbs, see Replacement Bulbs on
page 10‑41.
For any bulb‐changing procedure
not listed in this section, contact
your dealer.
High Intensity Discharge
(HID) Lighting
{WARNING
The low beam high intensity
discharge lighting system
operates at a very high voltage.
If you try to service any of the
system components, you could
be seriously injured. Have your
dealer or a qualified technician
service them. The vehicle may have HID
headlamps. After an HID headlamp
bulb has been replaced, you may
notice that the beam is a slightly
different shade than it was originally.
This is normal.
LED Lighting
The vehicle may have LED
headlamps. For replacement of
the LED lighting assembly contact
your dealer.
Page 444 of 558

Black plate (40,1)Cadillac Escalade/Escalade ESV Owner Manual - 2011
10-40 Vehicle Care
Back-Up Lamps
To replace this bulb:
1. Open the liftgate. SeeLiftgate
(Manual) on page 2‑9 orLiftgate
(Power) on page 2‑10 for more
information.
2. Remove the two screws from the
taillamp assembly.
3. Pull the taillamp assembly rearward until the inner pins
on the taillamp assembly
disengage from the vehicle.
4. Press the release tab, if the bulb socket has one, and turn the
socket counterclockwise to
remove it from the taillamp
assembly. 5. Pull the old bulb straight out
from the socket.
6. Press a new bulb into the socket, insert the socket into
the taillamp assembly and turn
the socket clockwise into the
taillamp assembly until it clicks.
7. Reinstall the taillamp assembly. When reinstalling, make sure to
line up the pins on the taillamp
assembly with the vehicle. If the
pins do not line up correctly, the
taillamp assembly will not be
able to be installed properly.
If the taillamp, stoplamp, or turn
signal need to be replaced, see your
dealer for service.
Page 454 of 558

Black plate (50,1)Cadillac Escalade/Escalade ESV Owner Manual - 2011
10-50 Vehicle Care
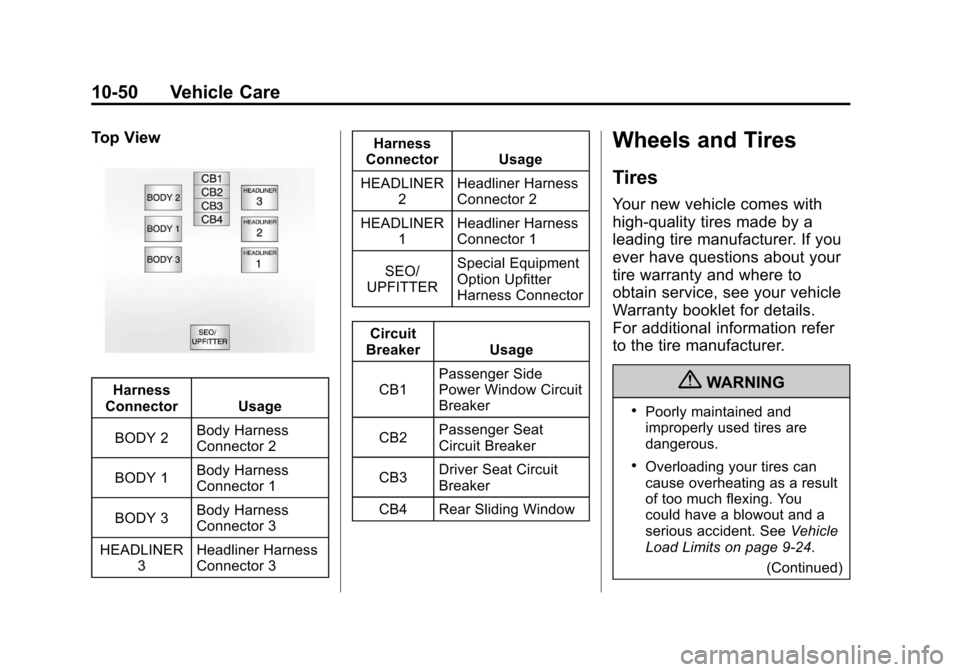
Top View
Harness
Connector Usage
BODY 2 Body Harness
Connector 2
BODY 1 Body Harness
Connector 1
BODY 3 Body Harness
Connector 3
HEADLINER 3 Headliner Harness
Connector 3 Harness
Connector Usage
HEADLINER 2 Headliner Harness
Connector 2
HEADLINER 1 Headliner Harness
Connector 1
SEO/
UPFITTER Special Equipment
Option Upfitter
Harness Connector
Circuit
Breaker Usage
CB1 Passenger Side
Power Window Circuit
Breaker
CB2 Passenger Seat
Circuit Breaker
CB3 Driver Seat Circuit
Breaker
CB4 Rear Sliding Window
Wheels and Tires
Tires
Your new vehicle comes with
high-quality tires made by a
leading tire manufacturer. If you
ever have questions about your
tire warranty and where to
obtain service, see your vehicle
Warranty booklet for details.
For additional information refer
to the tire manufacturer.
{WARNING
.Poorly maintained and
improperly used tires are
dangerous.
.Overloading your tires can
cause overheating as a result
of too much flexing. You
could have a blowout and a
serious accident. See Vehicle
Load Limits on page 9‑24.
(Continued)
Page 455 of 558

Black plate (51,1)Cadillac Escalade/Escalade ESV Owner Manual - 2011
Vehicle Care 10-51
WARNING (Continued)
.Under inflated tires pose the
same danger as overloaded
tires. The resulting crash
could cause serious injury.
Check all tires frequently to
maintain the recommended
pressure. Tire pressure
should be checked when
your tires are cold.
.Over inflated tires are more
likely to be cut, punctured,
or broken by a sudden
impact—such as when you
hit a pothole. Keep tires at
the recommended pressure.
.Worn or old tires can cause a
crash. If your tread is badly
worn, replace them.
.Replace any tires that have
been damaged by impacts
with potholes, curbs, etc.
(Continued)
WARNING (Continued)
.Improperly repaired tires can
cause a crash. Only your
dealer or an authorized tire
service center should repair,
replace, dismount, and mount
the tires.
.Do not spin the tires in
excess of 55 km/h (35 mph)
on slippery surfaces such
as snow, mud, ice, etc.
Excessive spinning may
cause the tires to explode.
See Tire Pressure for High-Speed
Operation on page 10‑58 for
inflation pressure adjustment
for high speed driving.
22‐Inch Tires
If your vehicle has the optional
22‐inch P285/45R22 size tires,
they are classified as touring
tires and are designed for
on‐road use. The low‐profile, wide tread design is not
recommended for off‐road
driving. See
Off-Road Driving on
page 9‑7, for additional
information.
Notice: If the vehicle has
low‐profile tires, they are more
susceptible to damage from
road hazards or curb impact
than standard profile tires.
Tire and/or wheel assembly
damage can occur when
coming into contact with
road hazards like, potholes,
or sharp edged objects,
or when sliding into a curb.
The vehicle warranty does
not cover this type of damage.
Keep tires set to the correct
inflation pressure and, when
possible avoid contact with
curbs, potholes, and other
road hazards.