Page 9 of 244
Page 10 of 244
8 Cockpit
Cockpit
General illustration
Fig. l Cockp it: left sect io n
Fig. 2 Cockp it : ri ght sect io n
Page 11 of 244

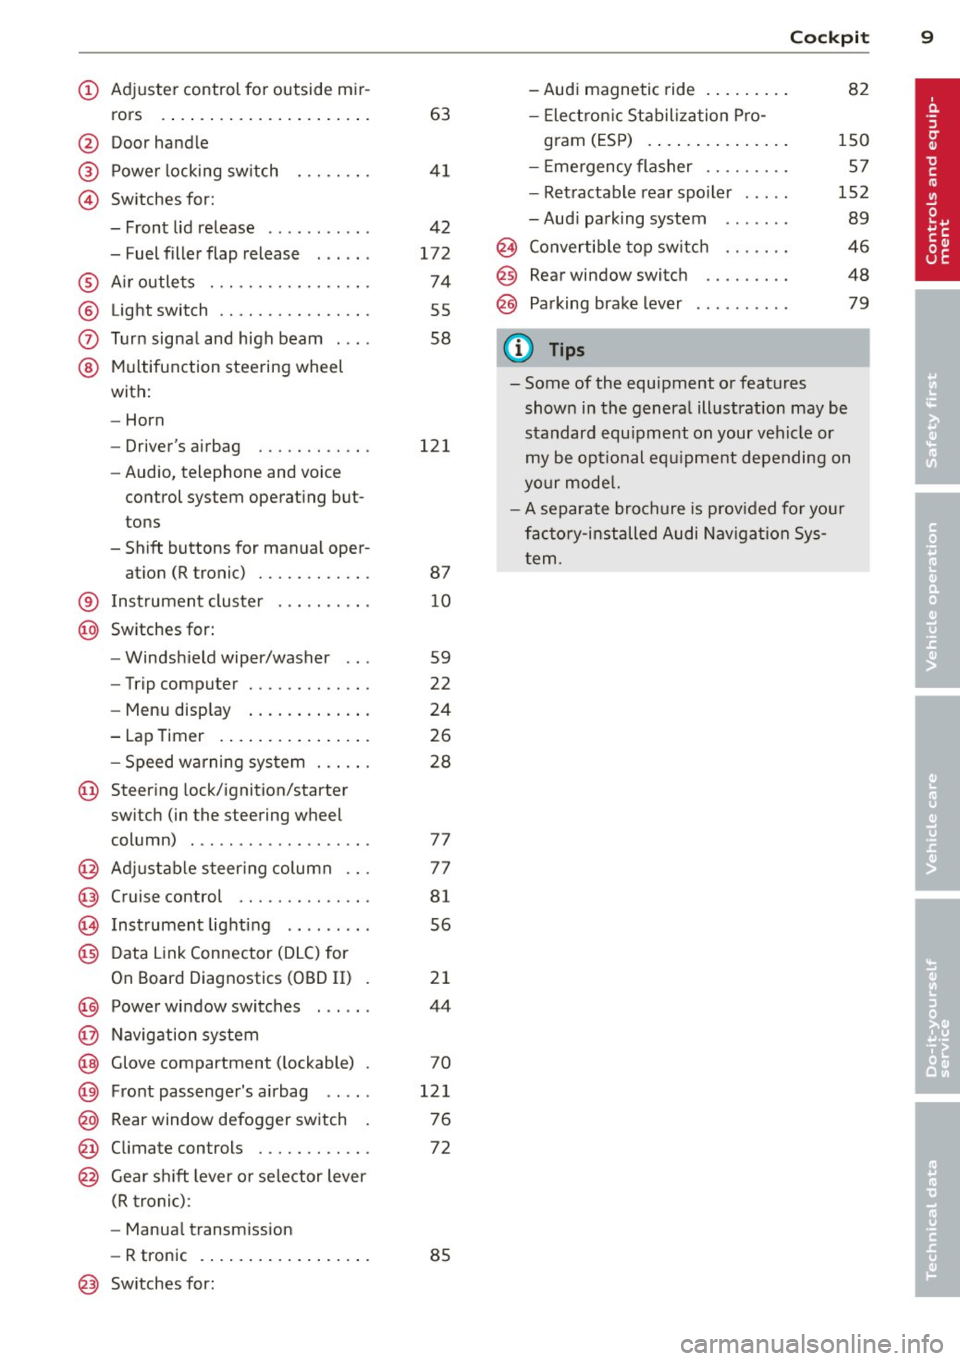
(!) Adjuste r control for outside m ir-
rors .... ..... ..... ... ... . .
@ Door handle
@ Power locking sw itch
© Switches for:
- Front lid release .......... .
- Fuel filler flap release . .. .. .
® A ir outle ts ............ .... .
® Light switch ........... .... .
0 Turn signal and high beam . .. .
@ Mul tifunction steering wheel
with:
- Horn
- Driver's airbag ....... .. .. .
- Audio, telephone and voice
control system operat ing but
tons
- Shift buttons for manual oper- at ion (R tronic) ....... .. .. .
63
4 1
4 2
172
74
55
58
121
87
® I nstrument cluste r . . . . . . . . . . 10
@ Switches for:
- Windsh ield wiper/washer . . . 59
- Trip computer . . . . . . . . . . . . .
22
- Menu disp lay . . . . . . . . . . . . . 24
- Lap Timer . . . . . . . . . . . . . . . . 26
- Speed wa rning sys tem . . . . . . 28
@ Steering lock/ignition/starter
switch (in the steering wheel
column) . . . . . . . . . . . . . . . . . . . 77
@ Adjustable s teer ing column . . . 77
@ Cruise control . . . . . . . . . . . . . . 81
@ Instrument lighting . . . . . . . . . 56
@) Data Link Connector (DLC) for
On Board Diagnostics (OBD II) . 21
@) Power wi ndow switches . . . . . . 44
@ Navig ation system
@ Glove compartment ( lockable) . 70
@ Fro nt passenge r's a irbag . . . . . 121
@ Rear window defogger sw itch . 7 6
@ Climate con trols . . . . . . . . . . . . 72
@ Gear shi ft leve r or selector lever
(R troni c):
- Manua l transm ission
- R tronic . . . . . . . . . . . . . . . . . . 85
@ Sw itches for:
Cockpi t 9
-Audi magnetic ride . ..... .. . 82
- Elect ron ic Stabiliza tion P ro -
gram (ES P) . . . . . . . . . . . . . . . 150
- E mergency flasher . . . . . . . . . 57
- Ret ractable rear spo iler . . . . . 152
- Aud i parking system . . . . . . . 89
@ Convertib le top switch . . . . . . . 46
@ Rear window switch . . . . . . . . . 48
@ Pa rking brake lever . . . . . . . . . . 79
(D Tips
- Some of the equipment or features
shown in the genera l ill ustration may be
standard equ ipment on your vehicle or
my be op tional eq uipme nt depending on
yo ur mode l.
- A separate brochure is p rov ided for yo ur
fac to ry-i nstalled Audi Nav iga tion Sys
t em .
Page 12 of 244

10 Instruments and warning/indicator lights
Instruments and warning/indicator Lights
Instruments
Instrument cluster and controls
The instrument cluster is your central source of information.
Fig. 3 Overview of the inst rumen t cluster
(D Engine oil temperature ...... .
@ Tachometer with time and date
display ................... .
® Warning/indicator lights .. .. .
© Coolant temperature gauge .. .
® Fu el gauge .............. .. .
@ Speedometer with odometer ..
(i) Voltmeter .............. .. .
@ Set/Check button , ... .. .. .. .
® Driver information display . .. .
@ I RESET ! button for trip odome-
ter ....... ............. .. .
10
11, 11 14
11
12
12
13
11, 31 20
12
The illumination for the instrument cluster
lights up whenever you switch on the ignition
with the
vehicle headlights off. The gauges
are also illuminated when the lights are
turned on.
Engine oil temperature display
The engine oil temperature display Q page 10,
fig. 3
only operates with the ignition on. To
prevent engine damage, please observe the
following important points concerning the
temperature ranges.
Cold range
If the needle is at the bottom of the gauge,
the engine oil has not reached operating tem perature yet. Avoid high engine speeds, full
throttle applications and heavy engine loads .
Normal range
The engine has reached operating tempera
ture when the needle moves into the center of
the gauge under normal driving conditions .
The needle may move higher on the gauge
with heavier engine load at high outside tem peratures. This is not a cause for concern as
long as the . indicator light in the display
does not flash.
Warning light.
If the symbol . in the display flashes, ei
ther the engine oil temperature is too high or
the engine oil level is too low
Qpage 180.
If
the needle is well in the upper area of the
gauge, the engine oil temperature is too high .
Stop the vehicle, switch the engine off and
allow it to cool.
If the warning light comes on
again after driving a short distance, contact
an authorized Audi dealer.
Page 13 of 244

Instrument s and warning /indicator lights 11
Tachometer (engine rev counter)
The tachometer indicates the engine RPM
(revolutions per minutes) .
You should shift to the next lowest gear when
the speed is below 1500 RPM. The beg inning
of the red zone in the tachometer indicates
the maximum permiss ible engine speed for
all gears once the eng ine has been broken in
a nd when i t is wa rm. You sho uld shift to the
n ex t hi gher gea r, switc h the R tron ic sport
mode
off or remove your foot from the accel
erator pedal befo re reaching this a rea in the
ga uge.
(D Note
The needle in the tachometer~ page 10,
fig.
3 @ may only be in the red area of the
gauge fo r a short time or the engine could
be damaged. The location whe re the red
zone beg ins va ries depending on the en
g ine.
Digital clock with date display
Your vehicle is equipped with a quartz con
trolled digital clock.
F ig. 4 I n stru ment cl uste r w ith t he d ig ita l cl ock
D ate and time are set using the knob~ fig. 4.
To set the hour
• Pull the knob (hour d isplay flashes) and turn
it to the left o r rig ht.
To set the minutes
• Pull the knob as many times as necessary
u nti l the min ute display flashes .
• Turn the knob to the left or right.
To set the date
• Pull the knob a s many times as necess ary
until the day, month o r year disp lay flashes.
• Tur n the knob to the left or rig ht.
To hide or display the date
• Pull the knob as many t imes as necess ary
until the date di sp lay fla shes.
• Turn the knob to the le ft or rig ht.
Wh en th e date d isp lay s tops blin king, this
means the time and da te have been s uccess
f ully s to red.
Wi th the ig nition
off, push ing or pu lling the
Set/Che ck button
~ pag e 10, fig. 3@ can
tu rn o n the display field light ing for a few sec
on ds.
Engine coolant temperature gauge
The engine coolan t ga uge ~ page 10, fig. 3@
onl y works when t he ig nition is on. To prevent
damage to your engine, please note the fol
lowing important points.
Engine cold
As long as the need le remains a t the left end
of the gauge, the engi ne still has not reac hed
its operating tem perature. Avoid high eng ine
speeds, heavy engine loads and heavy throt
tle.
Normal temperature
When the engine has re ached it s operat ing
temperature, the need le w ill move into the
midd le of the gauge and rema in the re .
If th e
engine is working hard at high outside tem
peratures, the needle may turn further to the
right. This is no cause for concer n as long as
the . warn ing light i n the instrument clus ter
does not illuminate .
Warning light.
When the warning light .starts to flash, this
can mean one of two t hings : either the cool
ant
temperature i s too h igh, or the coolant
l e vel is too low~ page 32 . IIJ,,
Page 14 of 244

12 Instruments and warning /indicator lights
If the needle is well on the right side of the
gauge, the coolant temperature is too high .
Stop the vehicle, switch the engine off and
allow it to cool.
If the warning light comes on
again after driving a short distance, contact
an author ized Audi dealer .
A WARNING
-Always observe the warni ng in
¢ page 175, Working in the engine
compartment before opening the engine
compartment lid an d checking the en
gine coo lant level.
- Never open the engine compartment lid
if yo u see or hear steam, or if you see e n
gine coolant dripping from the engine
compartment . You could burn yourse lf.
Let the engine coo l off first so that you
cannot hear or see any steam or engine
coolant.
(D Note
- Mounting additional lights or accessories
in front of the air inlets red uces the cool
i ng effect of the radiator. At h igh outside
temperatures or high engine load, the
engine could overheat .
- The front spo iler has been designed to
properly distribute the cooling air when
the veh icle is moving. If the spoiler is
damaged, th is could reduce the cooling
effect and the engine could then over
heat. Ask you r autho rized Aud i dealer for
ass istan ce.
Fuel gauge
The fuel gauge works only when the ignition is
on. When the needle reaches the red area, the
warn ing light in the instrument cluster will il
lum inate
c> page 33 (il This means you
have approximately 2.6 gallons (10 liters) of
fuel left in the tank .
Time to refuel!
The total tank capacity of your vehicle is listed
in
Technical data ¢ page 228.
(D Note
Never run the tank completely dry! An ir
regular supply of fuel can cause engine
misfiring and fuel could enter into the ex
haust system . The catalytic converter
could then overheat and be damaged.
· Speedometer with odometer
The speedome ter shows you the vehicle
speed, and the odometer shows you how
many miles (kilometers) you have driven .
Fig. S Speedometer close -up: odome ter d isplay
The distance driven is shown in m iles (USA
models) or in kilometers (Canada mode ls).
Lower odometer
The lower odometer shows the total number
of miles (kilometers) dr iven .
Upper odometer (trip odometer)
The upper odometer shows the total number
of miles (kilometers) dr iven since you last re
set the odometer back to zero . You can use
th is odometer when you want to keep track of
how many m iles (kilometers) yo u have driven
for a single trip or errand. The last dig it ind i
cates 1/10 of a mile (100 meters) . Yo u can se t
the trip odometer back to zero by pressing the
I RESE T! button ¢ fig . 5 .
With the ign ition off, pushing of the Set/
Check button ¢ page 10, fig. 3 @ can turn on
the display field lighting for a few seconds.
Malfunction message
If there is a malfunct ion somewhere in the in-
strument cluster,
dEF will appea r in the trip .,.
Page 15 of 244
Instruments and warning/indicator lights 13
odometer and will stay on. Contact your au
thorized Audi dealer to have the problem cor rected .
Immobilizer
When the ignition is switched on, the data on
the ign ition key are scanned automatically.
I f an unauthorized key was used,
SAFE is dis
p layed cont inuously in the odometer display
f ield. The veh icle cannot be operated
~page 38 .
Voltmeter display
The vo ltmeter shows the voltage in the vehi
cle electrical system. If the reading drops be
low 12 volts with the engine running, you
should have the power supply (battery and
generator) inspected by an authorized Audi
dealer .
Voltage can drop below 8 volts when you
start the engine .
Page 16 of 244

14 Instruments and warning /indicator light s
Warning/indicator lights
Overview
The warning/indicator lights indicate different functions or a possible malfunction.
Fig. 6 Instrument duster w ith warning/indicator lights
(D Warning/ind icator lights in the tachometer
@ Turn signals
c::> page 16
® Warning/indicator lights in the Driver In
formation System
c::> page 30
@ Wa rning/ind icator lights in the speedome
ter
@Warning/indicator lights in the
tachometer
Audi magnet ic r ide
<::>page 15
Tire pressure too low
<::>page 15, c::>page207
Electronic power control
<::>page 15
Convertib le top operation
r::!>page 16
Electronic Stabilizat io n Pro
gram (ESP)
c:>page 16
USA models:
Malfunction Indicator Lamp
( M IL)
¢page22
Canada models :
Malfunction Indicator Lamp
(MIL)
c:>page22
High beam
<::>page 16
Rear spoiler
c:>page 16
@ Warning/indicator lights in the
speedometer
I
•
Elec tron ic Sta biliza tion Pro
gram (ESP)
<::>page 16
USA models:
Cruise control activated
<::>page 17
Canada models :
Cruise control activated
c::> page 17
USA models:
Safety systems
<::>page 17
-----·-