Page 265 of 320

________________________________________________ T_i_re _ s_ a _ n_d_ w_ h_ e_ e_l_s __ _
& WARNING (co ntinued )
• Snow chain s are available in different sizes. Always make sure
to follow the instructions provi ded by the snow chain manufac
turer.
• Wh en driving with snow cha in s never drive fa ster than the
speed permitted for your specific snow chains .
• Always observe local regulations.
0 Note
• Remove snow chains before d riving on roads not cove red w it h
snow to avoid damaging t ires and wearing t he snow chains down
unnecessar ily .
• Snow chains, which come into direct contact wi th the wheel rim,
can scratch or damage it . The refore, make s ure that the snow chai ns
are sui tably covered. Chec k the pos it ion o f the snow cha ins afte r
driving a few yards and correct if necessary . Follow the instructions
from t he snow chain man ufacturer when doing so .
[ i] Tips
• Where snow chains are mandatory on certa in roads, this normally
also app lies to ve hicles wi th A ll W hee l Dr ive.
• If snow chains are installed, the tire p ress ures s houl d not be
sto red in the tire pressure moni to ring system (TPMS) . Otherwise the
system could malfunction ~
page 267. •
Wheel bolts
Wheel bolts must al ways be tight ened to the c orrect
torqu e.
The desig n of whee l bolts is matc he d to the fa ct ory in stalled rims. If
different r ims are fitted, the cor rect wheel bo lts wi th t he r igh t length
and correctly s haped bolt hea ds must be used . Thi s ensures that
Safety first
wheels are fitted securely and that the brake system funct ions
cor rectly .
I n certa in circumstances, yo u may not use wheel bo lts from a
different vehicle -even if it is the same mo del.
& WARNING
Improperly tightened or maintained wheel bolts can be come
loose causing loss of control, a collision and serious personal
injury.
• Always keep the wheel bolts and the threads in the wheel hubs
clean so the wheel bolt s can turn easily and be properly tightened .
• Never grease or oil the wheel bolts and the th reads in the wheel
hub s. They can become loose while driving if greased or oiled, even
if tightened to the specified torque.
• Only use wheel bolt s that belong to the rim being installed .
• Never use different wheels bolts on your vehicle .
• Always maintain the correct tightening torque for the wheel
bolts to reduce the risk of a wheel loss. If the tightening torque of
the wheel bolts is too low, they can loo sen and come out when the
vehicle is moving . If the tightening torque is too high , the wheel
bolt s and thread s can be damaged and the wheel can become
loose.
0 Note
T he specified torq ue for the wheel bo lts is 90 ft lb (120 Nm) with a
t o le rance of ± 7,4 ft lb( ± 10 N m). Tor qu e wheel bo lts diagonally.
After cha nging a wheel, the torque must be checked as soon as
pos sible wi th a t orque w rench -prefer ably by an auth oriz e d Aud i
dealer or qualified workshop .•
Vehicle care Technical data
Page 266 of 320

lffllL-_T.:..:..: ir:....:e~ s=---= a~ n:..:..: d:......: w..:....:.. h:....:e~ e= ls=--------------------------------------------------
Low aspect ratio tires
Your Audi is factory-equipped with low aspect ratio tires. These tires
have been thoroughly tested and been selected specifically for your
model for their superb performance, road feel and handling under a
variety of driving conditions. Ask your authorized Aud i dealer for
more details .
Th e low aspect ratio of these tires is indicated by a numeral of
55 or
less
in the tire's size designation . The numeral represents the ratio of
the tire's sidewall height in relation to its tread width expressed in
percentage. Conventional tires have a height/width ratio of 60 or
more.
The performance of low-aspect-ratio tires is particularly sensitive to
improper inflation pressure. It is therefore important that low
aspect ratio tires are inflated to the specified pressure and that the
inflation pressure is regularly checked and maintained. Tire pres
sures should be checked at least once a month and always before a
long trip~
page 252, "Checking t ire pressure" .
What you can do to avoid tire and rim damage
Low aspect ratio tires can be damaged more easily by impact w ith
potholes, curbs, gullies or ridges on the road, particularly if the tire is
unde rinflated.
In order to minimize the occurrence of impact damage to the tires of
your vehicle , we recomme nd that you observe the following precau
tions:
• Always maintain recommended inflation pressures. Check your
tire pressure every 2,000 miles (3,000 km) and add air if necessary.
• Drive ca refully on roads with potholes, deep gullies or ridges. The
impact from driving through or over such obstacles can damage your
tires. Impact with a curb may also cause damage to your tires .
• After any impact, immediately inspect your tires or have them
inspected by the nearest authorized Audi dealer. Replace a damaged
tire as soon as possible. •
Inspect your tires every 2,000 miles (3,000 km) for damage and
wear . Damage is not always easy to see. Damage can lead to loss of
air and underinflat ion, which could eventually cause tire fa ilure . If
you believe that a tire may have been damaged, replace the tire as
soon as poss ible .
• Th ese tires may wear more quickly than others.
• Please a lso remember that, while these tires deliver responsive
hand ling, they may rid e less comfortably and make more noise than
other choices .
Reduced performance in winter/cold season
conditions
All tires are designed for certain purposes. The low aspect ratio, ultra
high performance t ires originally installed on your vehicle are
intended for maximum dry and wet road perfo rmance and handling.
They are not su itable for cold, snowy or icy weather conditions . If you
drive under those circumstances, you should equip yo ur vehicle with
all-season or w inter tires, which offer better traction under those
conditions . We suggest yo u use the recommended snow or all-season
tires specified for your veh icle, or their equivalent .
Refer to =>
page 261 for more detailed information regard ing winter
tires. •
Tire pressure monitoring system
Applies to veh icles : w it h t ire press ure m onito ring syste m
General notes 1
Each tire, including the spare (if prov ided) , shou ld be checked
month ly when cold and inflated to the inflation pressure recom
mended by the vehicle manufacturer on the vehicle placard or t ire
inf lation pressure label. (If your vehicle has tires of a different size
than the siz e indicated on the vehicle placard or tire inflation pressure
label, you should determine the proper t ire inflation pressure for
those tires.)
~
Page 267 of 320

________________________________________________ T_ i_ re _ s_ a_ n_d_ w_ h_ e_ e_l _s _ ........
As an added safety feature, your vehicle has been equipped with a tire
pressure monitoring system (TPMS) that ill uminates a low tire pres
sure telltale when one or more of your tires is signif icantly under
inflated . Accordingly, when the low tire pressure telltale illuminates,
you should stop and check your tires as soon as possible, and inflate them to the proper pressure. Driving on a significantly under-inflated
ti re causes the tire to overheat and can lead to tire fa ilure. Unde r
inf lation also reduces fuel efficiency and tire tread life, and may
affect the vehicle's handling and stopping ability.
Please note that the TPMS is not a substitute for proper tire mainte
nance, and it is the driver's responsibility to maintain correct tire
pressure, even if under -inflation has not reached the level to trigger
illumination of the TPMS low tire pressure te lltale.
Your vehicle has also been equipped with a TPMS malfunction ind i
cator to indicate when the system is not operating properly. The
TPMS malfunction indicator is combined w ith the low tire pressure
telltale . When the system detects a malfunction, the telltale will
flash for approximate ly one minute and then remain continuously
illuminated. This sequence will continue upon subsequent vehicle
start -ups as long as the malfunction exists.
When the ma lfunction indicator is illum inated, the system may not
be able to detect or signa l low tire pressure as intended. TPMS
ma lfunctions may occur for a var iety of reaso ns, includ ing the instal
lation of replacement or alternate tires or wheels on the vehicle that
prevent the TPMS from functioning properly. Always check the TPMS
malfunction telltale after replacing one or more tires or wheels on
yo ur vehicle to ensure that the replacement or alternate tires and
wheels allow t he TPMS to continue to funct io n properly .•
Vehicle OP-eration
App lies to vehicl es: wi th t ire p ress ure m onit ori ng syst em
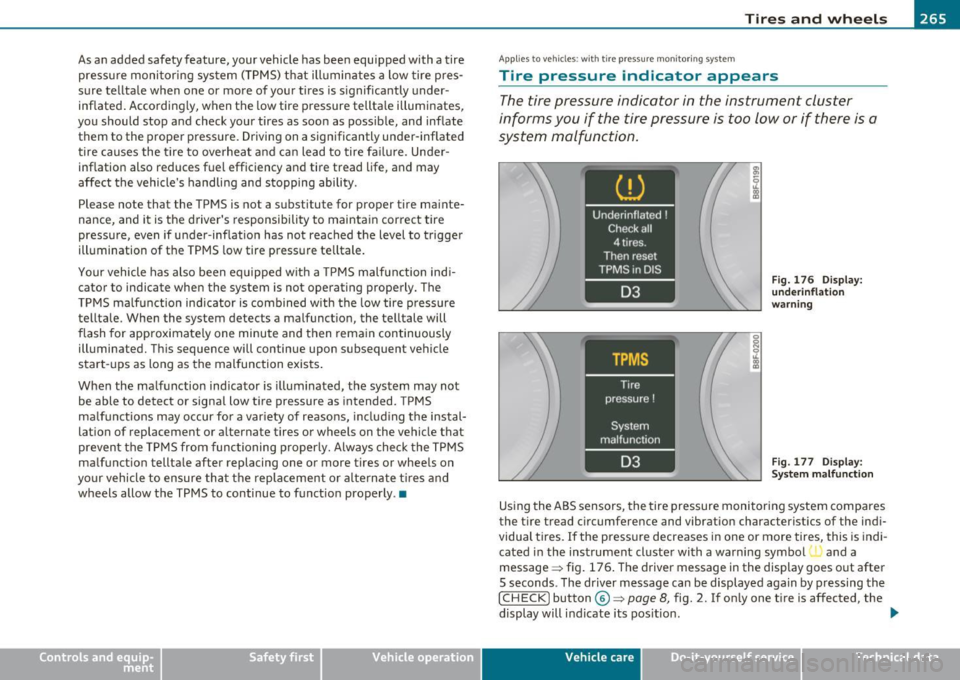
Tire pressure indicator appears
The tire pressure indicator in the instrument cluster
informs you if the tire pressure is too low or if there is a
system malfunction.
Fig. 176 Display:
under inflation
warning
Fig . 17 7 Display:
System malfunction
Using the ABS sensors, the tire pressure monitoring system compares
the tire tread circumference and vibration characteristics of the indi
vidual tires.
If the pressure decreases in one or more tires, this is indi-
cated in the instrument cluster with a warning symbol and a
message ~ fig. 176 . The driver message in the display goes out after
5 seconds . The driver message can be displayed again by pressing the
I CHECK) button©~ page 8, fig. 2. If on ly one tire is affected, the
display will i ndicate its pos it ion. ._
Vehicle care Do-it-yourselt service iTechnical data
Page 268 of 320

-~_T_ ir_e_ s_ a_ n_ d_ w_ h_e_ e_ ls _______________________________________________ _
The ti re pr essure mon itor ing must be reset in the m enu display each
t im e th e pre ssur es a re adjust ed (e .g . w hen sw itching b etwee n parti al
and full load press ure) o r afte r ch angi ng or r eplac ing a tir e on yo ur
vehicle => page
26 7. You ca n find t he recommen ded tire pr essures
for your veh icle o n th e labe l o n the dr ive r's door pillar=> page
249 .
Tire tread circ umference and vibrat ion characterist ics ca n change and
c a us e a tir e pre ssure w arni ng if:
• t he tire pressure in one o r more tires is to o low,
• t he tire has st ru ctu ral damag e,
• the ti re press ure was changed , wh eels ro tate d or r ep laced but the
TPM S was not re set=> page
267 .
Warning symbols
1..1' Loss of p ress ure in at least on e tir e => & . Check th e tir e or tir es
and rep lace or re pair i f necessary. T he in dicator lig ht (• in th e ins tru
men t cluster al so illu mina tes=> page
11. Che ck/co rrect the pre s
sures of a ll four tires an d reset TP MS in t he menu display.
rr :; (T ire Pre ss ure M on itor ing Syst em) Tire pressure! System
malfunction.
I f T ,.;> ap pears a fter swi tc hi ng t he ignition o n or w hile
dr iv ing => page
265 , fig. 177 a nd t he in dic ator lig ht 'in th e i nstr u
m en t clus ter bli nks fo r ap prox ima tely one minute and th en stays o n,
t h ere is a system ma lf u nct io n. S ee your authorized Audi dealer as
soon as poss ible.
& WARNING
• If the tire pressure indicator appears in the instrument cluster
display, one or more of your tires is significantly under-inflated. Reduce your speed immediately and avoid any hard steering or
braking maneuvers. Stop as soon as possible and check the tires
and their pressures . Inflate the tire pressure to the proper pres
sure as indicated on the vehicle's tire pressure label=>
page 249.
Driving on a significantly under-inflated tire causes the tire to
overheat and can lead to tire failure. Under-inflation also is likely
to impair the vehicle's handling and stopping ability.
& WARNING (co ntinued )
• The driver is responsible for maintaining the correct tire pres
sures . You must check the tire pressures regularly .
• Under certain conditions (such as a sporty driving style, winter
conditions or unpaved roads), the pressure monitor indicator may
be delayed.
• Ask your authorized Audi dealer if run-flat tires may be used on
your vehicle. Your vehicle registration becomes invalid if you use
these tires when not permitted. Damage to your vehicle or acci dents could also result.
[ i ] Tips
• Th e tire pressu re monito ring system stops wor king when the re is
a n E SP/ABS malfu nct io n.
• U sin g s now c hains may res ult in a system ma lf u n ct io n.
• Tire s with t he ident ification "AO" or "RO" have been specially
m atched w ith yo ur Audi. We recommend usin g onl y these t ires
b ecause they mee t the hig hest standards regard ing safe ty a nd
dr iving charac ter is ti cs when used cor rec tly . Yo ur au thori ze d Audi
dea ler will g lad ly provi de you wi th mor e info rmation. •
Page 269 of 320

________________________________________________ T_ i_ re _ s_ a_ n_d_ w_ h_ e_ e_l _s _ ....... fflll
Applies to vehicles : with tir e pressure monitor ing syste m
Reset tire pressure monitoring system
(Stepl)
If the tire pressure is adjusted, wheels are rotated or
changed, the TP MS must be reset in the menu display.
Fig. 1 78 Wip er l ev er:
C ont rol s f or the m enu
display
Fi g. 17 9 Disp la y:
Sta rt me nu
[ Reset) button ® and rocke r switch @=> fig. 178 func
tions:
To open the menu
- Press the (Reset] button ® until the menu disp lay
=> fig. 179 appears
Vehicle OP-eration
Selections and settings
-Press the rocker switch @ to reach a menu display. The
swi tch is operated the sa me as the display (up/down).
Entering and confirming
- Press the [ Reset) button®·
Returning to the Start menu
- Press the [Reset) b ut ton longer than 2 seconds to return
f rom any m enu lev el to th e Start menu .
[ i ] Tips
• Before resetting the TPMS, t he cur rent pressures of a ll four tires
must correspond to the specified values. Adjust the tire pressure and
reset the p ressure in the tire pressure mon ito ring system according
to the load you are carrying=>
page 249.
• Do not sto re the ti re press ures if snow chains are i nstalled . Othe r
wise the system could malfunction .•
App lies to vehicles : w ith t ire pressure monitoring system
Reset tire pressure monitoring system
(Step2)
Fig . 18 0 D ispla y: Ti re
p ress ure
Vehicle care Do-it-yourselt service iTechnical data
Page 270 of 320
ffl __ T_ i_ r _e _s_ a_n_ d_ w_ h_ e_e_ l_ s _______________________________________________ _
Fig . 181 Display : T ir e
p res su re
[ Rese t] button @ and rocker switch @=> page 267,
fig. 178 functions:
Storing tire pressures
- Turn on the ignition.
- Select the menu:
>Adjusting *> Tire pressure > Store .
Entering and confirming
- Sele ct t he menu : Store now
- Press the [
Reset] button@.
- Select the menu: Confirm
- Press the [
Reset I button @.
Returning to the Start menu
- Press the [Reset] button longer than 2 seconds to re turn
from a ny menu level to the Start menu .
(I) Tips
Before resetti ng the TPM S, the cur rent pressures of all four tires
must correspond to the specified values . Adjust the tire pressure and reset the pressure i
n the t ire pressure mon itoring system accord ing
t o the loa d you are ca rrying =>
page 249. •
Page 271 of 320
________________________________________________ T_i_re _ s_ a _ n_d_ w_ h_ e_ e_l_s __ _
Safety first Vehicle care Technical data
Page 272 of 320

llffl!l.,___W __ h_a_ t_ d_ o_ I_ d_o_ n_ o_w _ ? _____________________________________________ _
What do I do now?
Jack, tools and spare wheel
Jack and tools
The tools and jack are stored underneath the floor panel
in the luggage compartment.
- Raise the floor panel with the loop.
Fig. 182 Floor panel
hung on the bottom of
the luggage compart·
ment cover
Fig . 183 Vehicle tool
kit and jack
-Hang the Loop on the underside of the Luggage compart-
ment cover=> fig. 182.
- Remove the tool kit or the jack .
The onboard tool k it includes:
• Hook for remov ing whee l covers *
• Plast ic hook to remove wheel bolt covers
• Wheel bolt wrench
• Alignment pin for changing wheels
• Screwdriver with reversible blade
• To wing eye
Before stor ing the jack , make sure it is wound back down as far as it
w ill go .
After use, the jack and tools must be put back in place underneath
the floor panel in the luggage compartment.
Note: some of the on-board items lis ted above are provided on
certain models only or are opt ional extras.
& WARNING
Improper use of the vehicle jack can cause serious personal inju
ries.
• Using a bumper jack to raise the vehicle will damage the
bumper system. The jack may slip, causing injury.
• Never support your vehicle on cinder blocks, bricks or other
objects. These may not be able to support the load and could cause
injury when they fail.
• Never start or run the engine while the vehicle is supported by
the jack.
• If you must work under the vehicle, always use safety stands
specifically designed for this purpose.
• Never try and use the hexagonal socket in the handle of the
screwdriver to loosen or tighten the wheel bolts. _.,