Page 121 of 320

____________________________________________________ T _r_a _n_ s_m _ i_s _s_ i_ o _ n_---J_
& WARNING
Hill D escent Assist cannot overcome physical limitations, so it
m ay not be possible to maint ain a c onstant vehicle speed under all
circum stances . Always be re ady to apply the brakes. •
Applie s to v ehicles: w ith S tron ic ®
tiptronic operation
Tiptronic allows the driver to shift gears manually.
Con tro ls a nd e quip
m en t
Fig . 11 7 Ce nter
con sole : Manual
s hift ing (tiptronic )
Fig. 118 Dis play:
Man ual shifti ng
( tiptr oni c)
Vehicle OP-eration
Switching to manual
-Push t he selector lever to t he righ t from 0 . As t he trans
mission has switc hed ,
6 5 4 3 2 1 appears in the d isplay,
with th e gear that is engaged h ig hligh ted.
Upshifting
-Tap t he se lector lever forward ( in t he t iptronic setting)
~ fig .117 0.
Downshifting
-Tap the sele ctor l ever bac kwar d (in th e tiptr oni c sett ing)
o .
Swi tching to manual can b e ca rried o ut with th e ve hicle sta tionary as
well as mov ing.
Whe n acce le ra ting, the t ransmission shifts into the next gear in gears
1 , 2, 3, 4 and 5 shortly before the maximum perm issib le eng ine
speed is reached.
If you h ave se lect ed a lower ge ar than the c urrent one, the tr ansmis
sion will only shift down when the engine cannot be overspeeded.
If kick-down is ac tua ted, the tra nsmiss io n sh ifts into a lowe r gear
inde pendently of speed and e ng ine rpm .•
Vehicle care Do-it-yourselt service iTechnical data
Page 122 of 320

1111..__T_ r _a_ n_s_ m_ i_ s _s_ i_ o _ n _________________________________________________ _
Applies to veh icles : with S tro nic® and with Tiptron ic controls on the stee ring whee l
Steering wheel with Tiptronic ® controls
The selector paddles allow the driver to keep both hands
on the steering wheel when shifting gears.
Shifting up
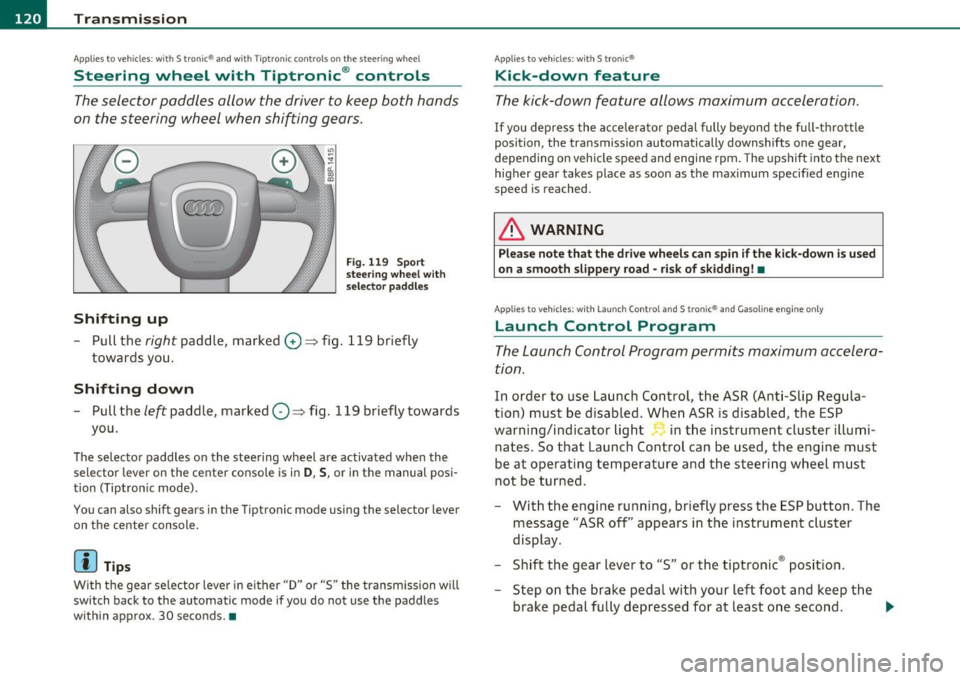
Fig. 119 Sport
steering wheel with
selector paddles
-Pull the right paddle, marked G) => fig. 119 briefly
towards you .
Shifting down
-Pull the left paddle, marked O=> fig. 119 briefly towards
you.
The selector paddles on the steering wheel are activated when the
selector lever on the center console is in
D, S, or in the manual posi
tion (Tiptron ic mode).
You can also shift gears in the Tiptronic mode using the selector lever
on the center console.
[ i ] Tips
With the gear selector lever in either "D" or "S" the transmission will
switch back to the automatic mode if you do not use the paddles
within approx. 30 seconds .•
Applies to veh icles : with S tro nic®
Kick-down feature
The kick -down feature allows maximum acceleration.
If you depress the accelerator pedal fully beyond the full-thrott le
position, the transmission automatically downshifts one gear,
depending on vehicle speed and engine rpm. The upsh ift in to the next
higher gear takes place as soon as the maximum specified engine
speed is reached.
& WARNING
Please note that the drive wheel s can spin if the kick-down is u sed
on a smooth slippery road -risk of skidding! •
Applies to veh icles: w ith Lau nch Control an d S tron ic® and Gasoline engine only
Launch Control Program
The Launch Control Program permits maximum accelera
tion.
In order to use Launch Control, the ASR (Anti-Slip Regula
tion) must be disabled. When ASR is disabled, the ESP
warning/indicator light in the instrument cluster illumi
nates. So that Launch Control can be used, the engine must
be at operating temperature and the steering wheel must
not be turned.
- With the engine running, briefly press the ESP button. The
message "ASR off' appears in the instrument cluster
display.
- Shift the gear lever to "S" or the tiptronic ® posit ion.
- Step on the brake peda l with your left foot and keep the
brake pedal fully depressed for at least one second . _,,,
Page 123 of 320

Transmission -_____________ _.;..____;_~~
-With your ri ght foot, step on the accelerator to the wi de
open t hrottle positio n or Kickdown . The engine speed
settles at about
3,200 rpm.
- Take your left foot o ff the brake.
& WARNING
• Always adapt your driving to the traffic flow.
• Only use Launch Control when road and traffic condition s allow
it and other dri ver s will n ot be endangered or annoyed by your
driving and the acceleration of the vehicle.
• Make sure that ESP remains enabled . With the ESP disabled,
the vehicle could brake awa y, particula rly on a slick and slippery
road -risk of skidding!
• Once a cceleration i s fin ished , switch ASR on again by briefl y
pushing the ESP button. •
Applie s to v ehic le s: wit h S tron ic ®
Back-up program
In the event of a system malfunction, there is an back -up
program.
I n the even t of system ma lfunct ion, the automati c transmis sion
switches to the fail-safe mode. All of the se lector lever posit ion
displays fo r the automat ic transmiss ion are hi ghligh ted with a ligh t
background in the instrument cluster display . In some cases you
canno t drive in the reverse gear a ny mo re.
If the transmiss ion sw itc hes to fa il-safe mode, you should take the
vehicle to an authorized Aud i dealership as soon as possible to have
the cond itio n corrected. •
Contro ls a nd e quip
m en t Vehicle
OP-eration
Applies to veh icles : w ith S t ron ic ®
Emergency release for selector lever
If the vehicle's power supply fails, the selector lever can
be released in an emergency .
Fig. 120 Selector
le ve r: R em ov e se le ct or
l e ve r sleev e
Fig. 12 1 Selector
l e ve r: em ergen cy
relea se fro m the P ark
p os iti on
The em ergency release m echanism is loca ted on th e right
front u nder the se lector lev er shift gate . The re lease p roc e
dure requ ires profess ional dext eri ty. We recommend t hat
you seek assis tance.
Removing the selector Lever boot
- Engage the par king bra ke.
Vehicle care Do-it-yourselt service iTechnical data
Page 124 of 320

-Transmission •m ___________________ _
- Remove the screwdriver from the vehicle tool kit. Use the
flat side of the reversible screwdriver blade=:>
page 2 70.
- Carefully pry the cover out with the screwdriver and pull it
=:>
page 121, fig. 120 toward the shifter knob in the direc
tion of the arrow. The screwdriver must grip at the lower
edge of the cover to loosen it.
Emergency release for selector Lever
- Press the yellow release lever in the direction of the arrow
=:>
page 121, fig. 121 and hold it in that position.
- Press the release button in the selector lever@ and move
the lever into the N position .
- Clip the shift boot back into the shift gate.
If the vehicle has to be pushed or towed if the power supply fails (e.g.
battery is discharged), the selector lever must be moved to the N
position using the emergency locking device.
& WARNING
The selector must only be shifted from the P position if the hand
brake is firmly applied. Otherwise the vehicle would start moving
unexpectedly on a grade when the selector lever is shifted from
the P position -increasing the risk of an accident. •
Page 125 of 320
Transmission -
----------------
Controls and equip
ment Safety first
Vehicle care Technical data
Page 126 of 320

1111 ....... _D_ r_iv _i_ n .... g=-- S_ a_f _e _Ly :,.._ ______________________________________________ _
Driving Safely
General notes
Safe driving habits
Please remember -safety first!
Th is chapter contains important information, t ips, instructions and
warnings that you need to read an d observe fo r you r own safe ty, the
safety of you r passengers and others . We have summarized here
w hat you need to know about sa fety belts, airbags, child restra ints as
we ll as child safety . You r safety is for us
priority number 1. Always
observe the information and warnings in this section -for your own
safety as well as t hat of your passengers.
The informat ion in this section applies to all mode l versions of yo ur
veh icle . Some of the fe atures des cribed in this se ctions m ay be st an
dard equ ipment on some models, or may be optional eq uipment on
others. If you a re not sure, ask your a uth o rized Audi dealer.
& WARNING
• Always make sure that you follow the instructions and heed
the WARNINGS in th is Manual. It is in your interest and in the
intere st of your passengers.
• Always keep the complete Owner's Literatu re in your Audi
when you lend or sell your vehicle so that this important informa
tion will always be available to the driver and passengers .
• Always keep the Owner's literature handy so that you can find
it easily if you have questions . •
Safety equipment
The safety features are part of the occupant restraint
s y stem and wor k together to he lp reduce the ris k of injury
in a wide variety of accident situations.
Your sa fety and t he safety o f yo ur passenge rs shou ld no t be left to
chance . Adva nces in technology have made a variety of features avai l
a b le to help re duce the risk of injury in an a cc ident . The fo llow ing is a
list of jus t a few of the safety features in your Audi:
• sophisticated safety belts for driver and a ll passenger seating
p osi tion s,
• safety belt pretensioners,
• safety belt fo rce lim iters for the fro nt sea ts,
• safety belt he igh t adju stmen t sys tems for the fro nt sea ts,
• automatic safety be lt height adjustment for the rear seats,
• head restraints fo r eac h seating position,
• front airbags,
• side airbags in the fro nt seats a nd outer rear seats*,
• side curtain air bags,
• special LATCH anchorages for child restraints,
• head restraints fo r eac h seating position,
• adjus table stee ring co lumn.
Th ese ind ividual safety features, can work together as a system to
he lp protec t you and yo ur passengers in a wide range of accidents.
Th ese featu res ca nnot work as a syst em if they are not always
correct ly adjusted and cor rect ly used.
Safety is everybody' s re sponsibility! •
Page 127 of 320

Driving Safely ---------------------"~'---
Important things to do before driving
Safety is everybody's job! Vehicle and occupant safety
always depends on the informed and careful driver.
For your safety and the safety of your passengers, before
driving always:
- Make sure that all lights and signals are operating
correctly.
- Make sure that the tire pressure is correct.
- Make sure that all windows are clean and afford good visi-
bility to the outside.
- Secure all luggage and other items carefully::::>
page 91.
-Make sure that nothing can interfere with the pedals.
- Adjust front seat, head restraint and mirrors correctly for your height .
- Instruct passengers to adjust the head restraints according to their height.
- Make sure to use the right child restraint correctly to
protect children ::::,
page 167, "Child Safety".
- Sit properly in your seat and make sure that your passen gers do the same::::,
page 73, "General recommenda
tions".
- Fasten your safety belt and wear it properly. Also instruct
your passengers to fasten their safety belts properly
=:> page 135. •
Controls and equip
ment Safety first Vehicle operation
What impairs driving safety?
Safe driving is directly related to the condition of the
vehicle, the driver as well as the driver's ability to concen
trate on the road without being distracted .
The driver is responsible for the safety of the vehicle and all
of its occupants. If your ability to drive is impaired, safety
risks for everybody in the vehicle increase and you also
become a hazard to everyone else on the road::::,,& . There
fore:
Do not let yourself be distracted by passengers or by using
a cellular telephone.
NEVER drive when your driving ability is impaired (by
medications, alcohol, drugs, etc.).
- Observe all traffic laws, rules of the road and speed limits
and plain common sense .
- ALWAYS adjust your speed to road, traffic and weather
conditions.
- Take frequent breaks on long trips. Do not drive for more than two hours at a stretch.
- Do NOT drive when you are tired, under pressure or when
you are stressed .
& WARNING
Impaired driving safety increases the risk of serious personal
injury and death whenever a vehicle is being used.•
Vehicle care Do-it-yourself service Technical data
Page 128 of 320

• ....__D_ r_iv _i_ n_, g=-- S_ a _ f_e _,Ly _ ______________________________________________ _
Proper occupant seating positions
Proper seating position for the driver
The proper driver seating position is important for safe,
relaxed driving.
Fig. 122 Correct
seating position
For your own safety and to reduce the risk of injury in the
event of an accident, we recommend that you adjust the
driver's seat to the following position:
- Adjust the driver's seat so that you can easily push the
pedals all the way to the floor while keeping your knee(s)
slightly bent~& .
- Adjust the angle of the seatback so that it is in an upright
pos ition so that your back comes in full contact with it
when you drive.
- Adjust the steering wheel so that there is a distance of at least 10 inches (25 cm) between the steering wheel and
your breast bone~ fig . 122. If not possible, see your
authorized Audi dealership about adaptive equipment.
- Adjust the steering wheel so that the steering wheel and airbag cover points at your chest and not at your face. -
Grasp the top of the steering wheel with your elbow(s)
slightly bent.
- Adjust the head restraint so the upper edge is as even as
possible with the top of your head. If that is not possible,
try to adjust the head restraint so that it is as close to this
position as possible.
- Fasten and wear safety belts correctly~
page 139.
-Always keep both feet in the footwell so that you are in
control of the vehicle at all t imes.
F o r deta iled informat ion on how to adjust the d river 's seat, see
=>
page 74 , "Adjusting front seats manually " or => pag e 75,
"Adjus ting the power sea t".
& WARNING
Drivers who are unbelted, out of position or too close to the airbag
can be seriously injured by an airbag as it unfolds. To help reduce
the risk of serious personal injury:
• Always adjust the driver's seat and the steering wheel so that
there are at least 10 inches (25 cm) between your breastbone and
the steering wheel.
• Always hold the steering wheel on the outside of the steering
wheel rim with your hands at the 9 o'clock and 3 o'clock positions
to help reduce the risk of personal injury if the driver's airbag
inflates.
• Never hold the steering wheel at the 12 o'clock position or with
your hands at other positions inside the steering wheel rim or on
the steering wheel hub. Holding the steering wheel the wrong way
can cause serious injuries to the hands, arms and head if the
driver's airbag deploys.
• Pointing the steering wheel toward your face decreases the
ability of the supplemental driver's airbag to protect you in a colli·
sion. .,