Page 217 of 230

7-31
FUEL INJECTION SYSTEM
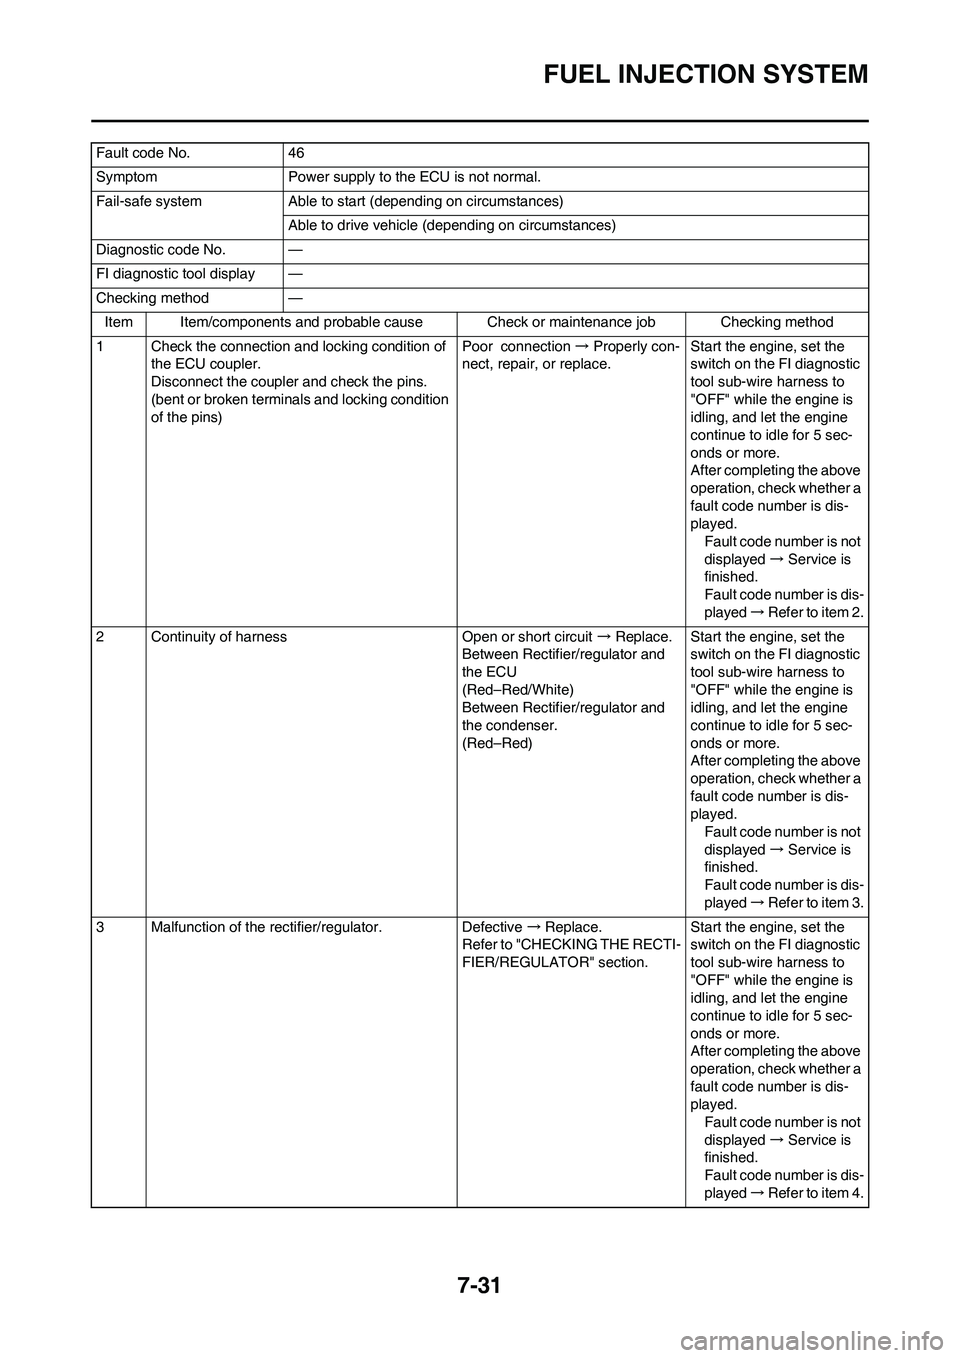
Fault code No. 46
Symptom Power supply to the ECU is not normal.
Fail-safe system Able to start (depending on circumstances)
Able to drive vehicle (depending on circumstances)
Diagnostic code No. —
FI diagnostic tool display —
Checking method —
Item Item/components and probable cause Check or maintenance job Checking method
1 Check the connection and locking condition of
the ECU coupler.
Disconnect the coupler and check the pins.
(bent or broken terminals and locking condition
of the pins)Poor connection → Properly con-
nect, repair, or replace.Start the engine, set the
switch on the FI diagnostic
tool sub-wire harness to
"OFF" while the engine is
idling, and let the engine
continue to idle for 5 sec-
onds or more.
After completing the above
operation, check whether a
fault code number is dis-
played.
Fault code number is not
displayed → Service is
finished.
Fault code number is dis-
played → Refer to item 2.
2 Continuity of harness Open or short circuit → Replace.
Between Rectifier/regulator and
the ECU
(Red–Red/White)
Between Rectifier/regulator and
the condenser.
(Red–Red)Start the engine, set the
switch on the FI diagnostic
tool sub-wire harness to
"OFF" while the engine is
idling, and let the engine
continue to idle for 5 sec-
onds or more.
After completing the above
operation, check whether a
fault code number is dis-
played.
Fault code number is not
displayed → Service is
finished.
Fault code number is dis-
played → Refer to item 3.
3 Malfunction of the rectifier/regulator. Defective → Replace.
Refer to "CHECKING THE RECTI-
FIER/REGULATOR" section.Start the engine, set the
switch on the FI diagnostic
tool sub-wire harness to
"OFF" while the engine is
idling, and let the engine
continue to idle for 5 sec-
onds or more.
After completing the above
operation, check whether a
fault code number is dis-
played.
Fault code number is not
displayed → Service is
finished.
Fault code number is dis-
played → Refer to item 4.
Page 218 of 230

7-32
FUEL INJECTION SYSTEM
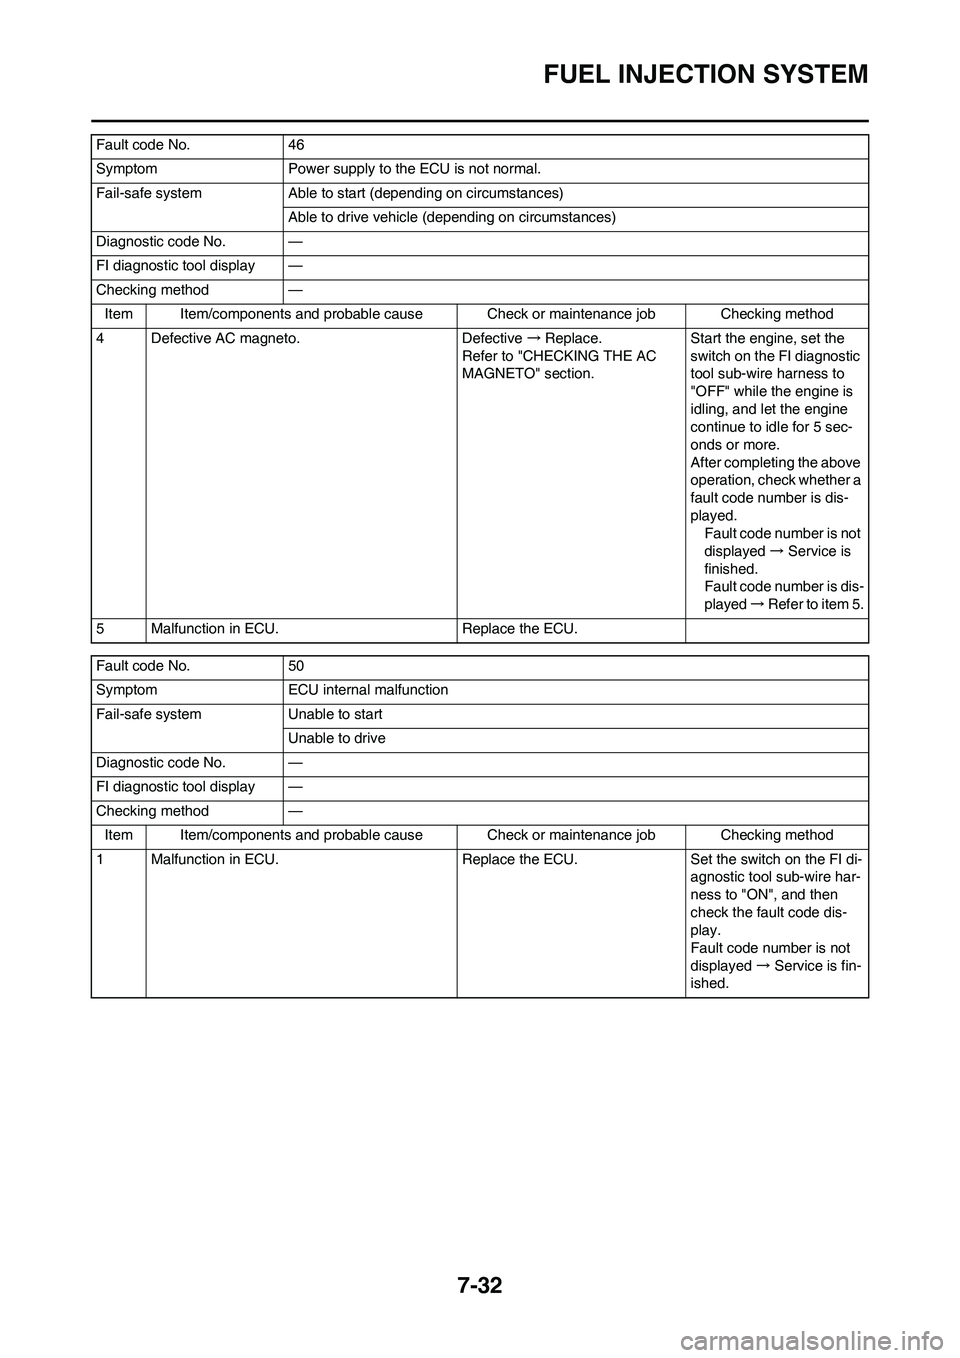
4 Defective AC magneto. Defective → Replace.
Refer to "CHECKING THE AC
MAGNETO" section.Start the engine, set the
switch on the FI diagnostic
tool sub-wire harness to
"OFF" while the engine is
idling, and let the engine
continue to idle for 5 sec-
onds or more.
After completing the above
operation, check whether a
fault code number is dis-
played.
Fault code number is not
displayed → Service is
finished.
Fault code number is dis-
played → Refer to item 5.
5 Malfunction in ECU. Replace the ECU.
Fault code No. 50
Symptom ECU internal malfunction
Fail-safe system Unable to start
Unable to drive
Diagnostic code No. —
FI diagnostic tool display —
Checking method —
Item Item/components and probable cause Check or maintenance job Checking method
1 Malfunction in ECU. Replace the ECU. Set the switch on the FI di-
agnostic tool sub-wire har-
ness to "ON", and then
check the fault code dis-
play.
Fault code number is not
displayed → Service is fin-
ished. Fault code No. 46
Symptom Power supply to the ECU is not normal.
Fail-safe system Able to start (depending on circumstances)
Able to drive vehicle (depending on circumstances)
Diagnostic code No. —
FI diagnostic tool display —
Checking method —
Item Item/components and probable cause Check or maintenance job Checking method
Page 219 of 230

7-33
FUEL INJECTION SYSTEM
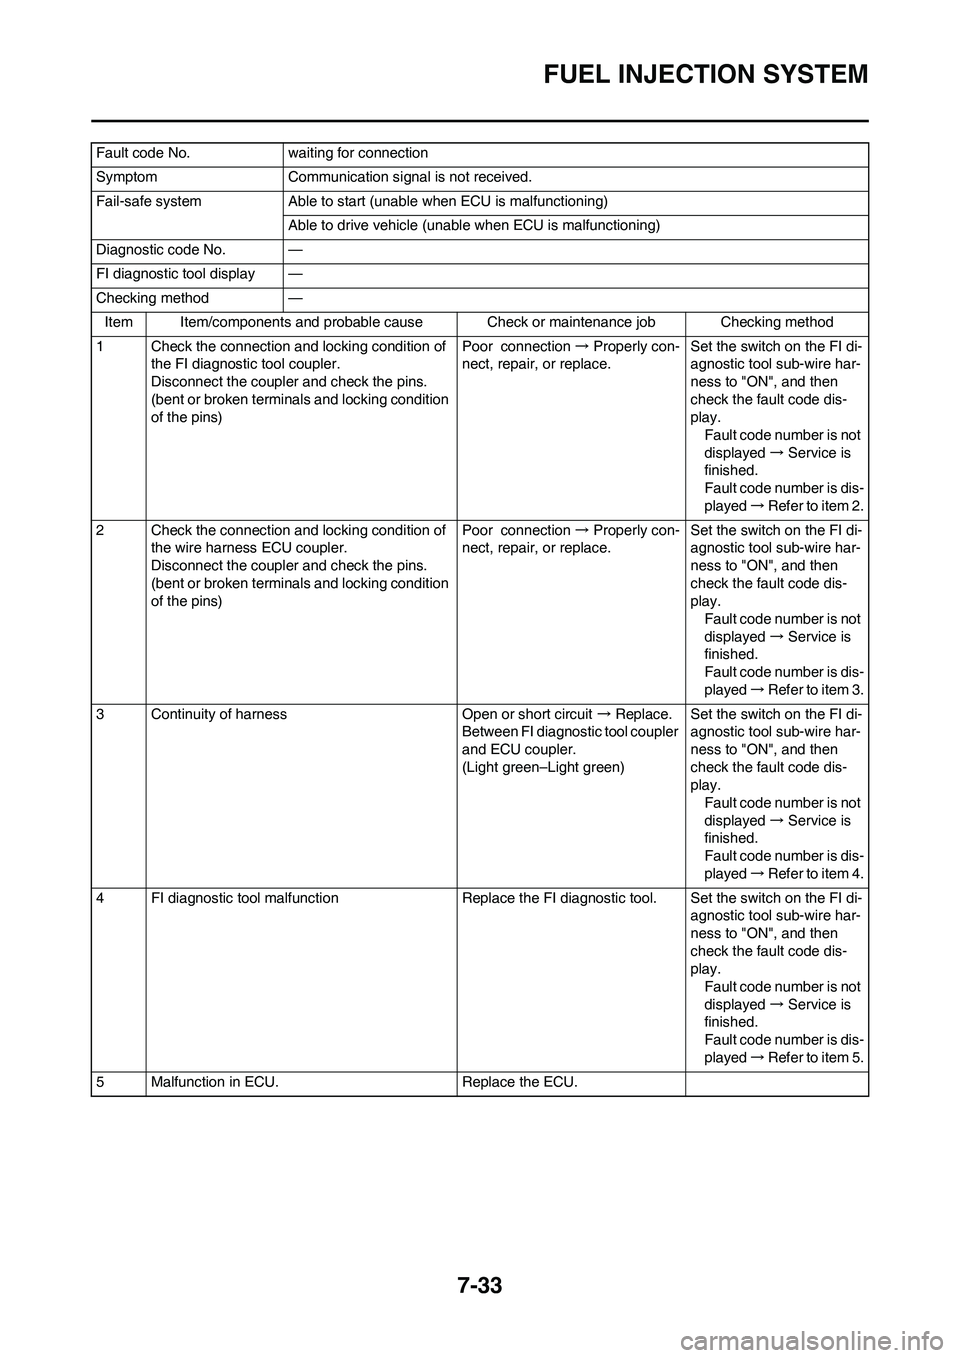
Fault code No. waiting for connection
Symptom Communication signal is not received.
Fail-safe system Able to start (unable when ECU is malfunctioning)
Able to drive vehicle (unable when ECU is malfunctioning)
Diagnostic code No. —
FI diagnostic tool display —
Checking method —
Item Item/components and probable cause Check or maintenance job Checking method
1 Check the connection and locking condition of
the FI diagnostic tool coupler.
Disconnect the coupler and check the pins.
(bent or broken terminals and locking condition
of the pins)Poor connection → Properly con-
nect, repair, or replace.Set the switch on the FI di-
agnostic tool sub-wire har-
ness to "ON", and then
check the fault code dis-
play.
Fault code number is not
displayed → Service is
finished.
Fault code number is dis-
played → Refer to item 2.
2 Check the connection and locking condition of
the wire harness ECU coupler.
Disconnect the coupler and check the pins.
(bent or broken terminals and locking condition
of the pins)Poor connection → Properly con-
nect, repair, or replace.Set the switch on the FI di-
agnostic tool sub-wire har-
ness to "ON", and then
check the fault code dis-
play.
Fault code number is not
displayed → Service is
finished.
Fault code number is dis-
played → Refer to item 3.
3 Continuity of harness Open or short circuit → Replace.
Between FI diagnostic tool coupler
and ECU coupler.
(Light green–Light green)Set the switch on the FI di-
agnostic tool sub-wire har-
ness to "ON", and then
check the fault code dis-
play.
Fault code number is not
displayed → Service is
finished.
Fault code number is dis-
played → Refer to item 4.
4 FI diagnostic tool malfunction Replace the FI diagnostic tool. Set the switch on the FI di-
agnostic tool sub-wire har-
ness to "ON", and then
check the fault code dis-
play.
Fault code number is not
displayed → Service is
finished.
Fault code number is dis-
played → Refer to item 5.
5 Malfunction in ECU. Replace the ECU.
Page 220 of 230

7-34
FUEL INJECTION SYSTEM
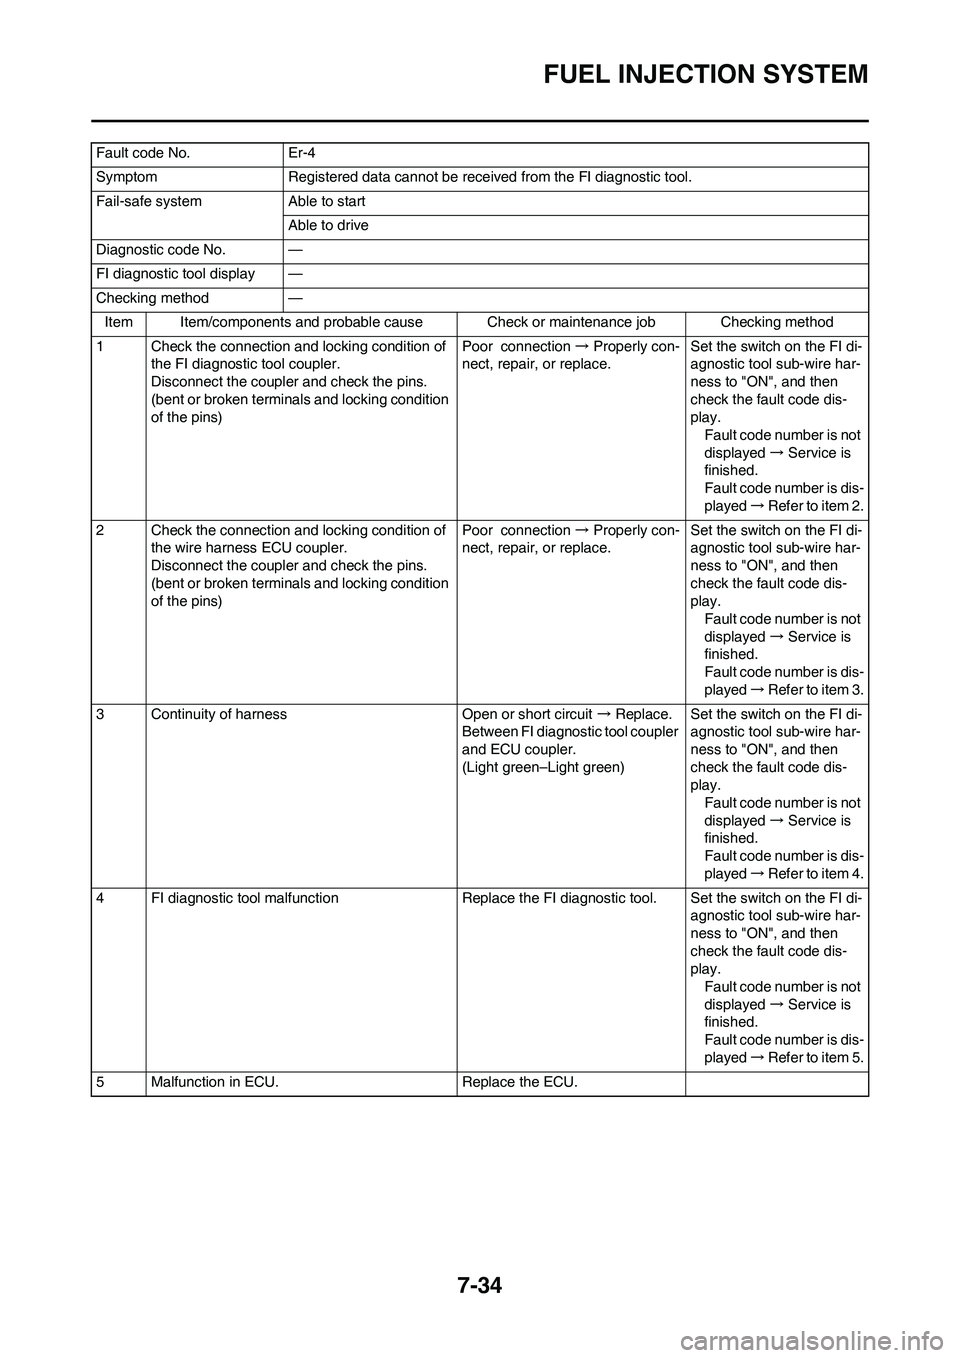
Fault code No. Er-4
Symptom Registered data cannot be received from the FI diagnostic tool.
Fail-safe system Able to start
Able to drive
Diagnostic code No. —
FI diagnostic tool display —
Checking method —
Item Item/components and probable cause Check or maintenance job Checking method
1 Check the connection and locking condition of
the FI diagnostic tool coupler.
Disconnect the coupler and check the pins.
(bent or broken terminals and locking condition
of the pins)Poor connection → Properly con-
nect, repair, or replace.Set the switch on the FI di-
agnostic tool sub-wire har-
ness to "ON", and then
check the fault code dis-
play.
Fault code number is not
displayed → Service is
finished.
Fault code number is dis-
played → Refer to item 2.
2 Check the connection and locking condition of
the wire harness ECU coupler.
Disconnect the coupler and check the pins.
(bent or broken terminals and locking condition
of the pins)Poor connection → Properly con-
nect, repair, or replace.Set the switch on the FI di-
agnostic tool sub-wire har-
ness to "ON", and then
check the fault code dis-
play.
Fault code number is not
displayed → Service is
finished.
Fault code number is dis-
played → Refer to item 3.
3 Continuity of harness Open or short circuit → Replace.
Between FI diagnostic tool coupler
and ECU coupler.
(Light green–Light green)Set the switch on the FI di-
agnostic tool sub-wire har-
ness to "ON", and then
check the fault code dis-
play.
Fault code number is not
displayed → Service is
finished.
Fault code number is dis-
played → Refer to item 4.
4 FI diagnostic tool malfunction Replace the FI diagnostic tool. Set the switch on the FI di-
agnostic tool sub-wire har-
ness to "ON", and then
check the fault code dis-
play.
Fault code number is not
displayed → Service is
finished.
Fault code number is dis-
played → Refer to item 5.
5 Malfunction in ECU. Replace the ECU.
Page 221 of 230
7-35
FUEL PUMP SYSTEM
FUEL PUMP SYSTEM
INSPECTION STEPS
If the fuel pump is not operating normally, perform the following procedures in the order given.
• Remove the following parts before inspection.
1. Seat
2. Side cover (right/left)
3. Fuel tank
• Use the following special tools in this inspection.
Check engine stop switch. No good→Replace.
OK ↓
Checking the couplers and leads connections No good→Repair or replace.
OK ↓
Check the fuel pump.(Checking the fuel pump
body)No good→
Replace the fuel pump assembly.
OK ↓
Replace the ECU.
Pocket tester:
YU-03112-C/90890-03112
Test harness S-pressure sensor (3P):
YU-03207/90890-03207
Page 222 of 230

7-36
ELECTRICAL COMPONENTS
ELECTRICAL
COMPONENTS
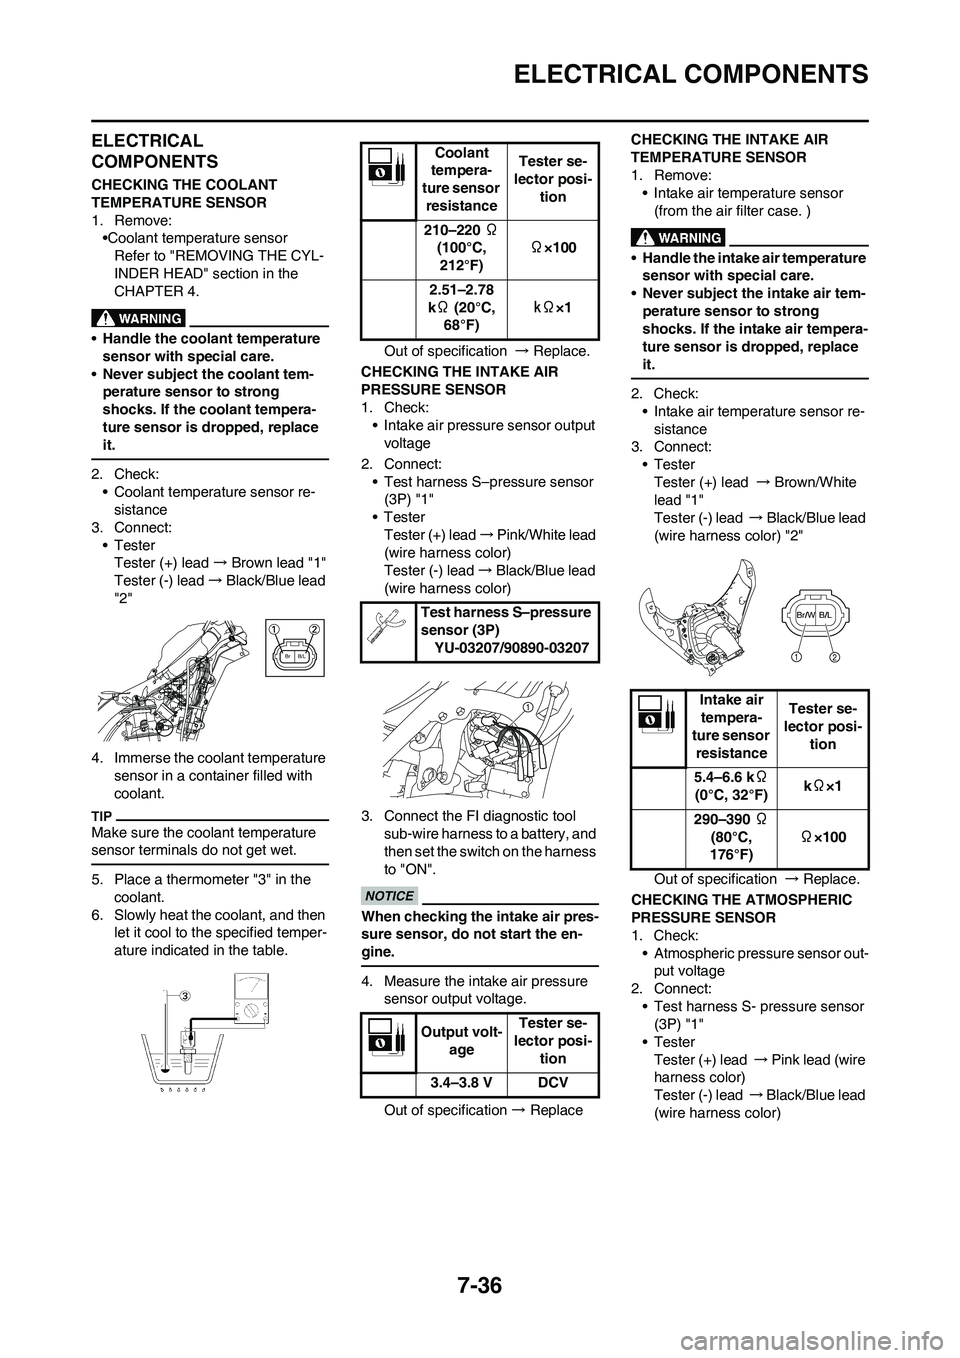
CHECKING THE COOLANT
TEMPERATURE SENSOR
1. Remove:
•Coolant temperature sensor
Refer to "REMOVING THE CYL-
INDER HEAD" section in the
CHAPTER 4.
•Handle the coolant temperature
sensor with special care.
•Never subject the coolant tem-
perature sensor to strong
shocks. If the coolant tempera-
ture sensor is dropped, replace
it.
2. Check:
• Coolant temperature sensor re-
sistance
3. Connect:
•Tester
Tester (+) lead → Brown lead "1"
Tester (-) lead → Black/Blue lead
"2"
4. Immerse the coolant temperature
sensor in a container filled with
coolant.
Make sure the coolant temperature
sensor terminals do not get wet.
5. Place a thermometer "3" in the
coolant.
6. Slowly heat the coolant, and then
let it cool to the specified temper-
ature indicated in the table.Out of specification → Replace.
CHECKING THE INTAKE AIR
PRESSURE SENSOR
1. Check:
• Intake air pressure sensor output
voltage
2. Connect:
• Test harness S–pressure sensor
(3P) "1"
•Tester
Tester (+) lead → Pink/White lead
(wire harness color)
Tester (-) lead → Black/Blue lead
(wire harness color)
3. Connect the FI diagnostic tool
sub-wire harness to a battery, and
then set the switch on the harness
to "ON".
When checking the intake air pres-
sure sensor, do not start the en-
gine.
4. Measure the intake air pressure
sensor output voltage.
Out of specification → ReplaceCHECKING THE INTAKE AIR
TEMPERATURE SENSOR
1. Remove:
• Intake air temperature sensor
(from the air filter case. )
•Handle the intake air temperature
sensor with special care.
•Never subject the intake air tem-
perature sensor to strong
shocks. If the intake air tempera-
ture sensor is dropped, replace
it.
2. Check:
• Intake air temperature sensor re-
sistance
3. Connect:
•Tester
Tester (+) lead → Brown/White
lead "1"
Tester (-) lead →Black/Blue lead
(wire harness color) "2"
Out of specification → Replace.
CHECKING THE ATMOSPHERIC
PRESSURE SENSOR
1. Check:
• Atmospheric pressure sensor out-
put voltage
2. Connect:
• Test harness S- pressure sensor
(3P) "1"
•Tester
Tester (+) lead → Pink lead (wire
harness color)
Tester (-) lead → Black/Blue lead
(wire harness color)
B/L Br
Coolant
tempera-
ture sensor
resistanceTester se-
lector posi-
tion
210–220 Ω
(100°C,
212°F)Ω×100
2.51–2.78
kΩ (20°C,
68°F)kΩ×1
Test harness S–pressure
sensor (3P)
YU-03207/90890-03207
Output volt-
ageTester se-
lector posi-
tion
3.4–3.8 V DCV
Intake air
tempera-
ture sensor
resistanceTester se-
lector posi-
tion
5.4–6.6 kΩ
(0°C, 32°F)kΩ×1
290–390 Ω
(80°C,
176°F)Ω×100
Br/WB/L
Page 223 of 230

7-37
ELECTRICAL COMPONENTS
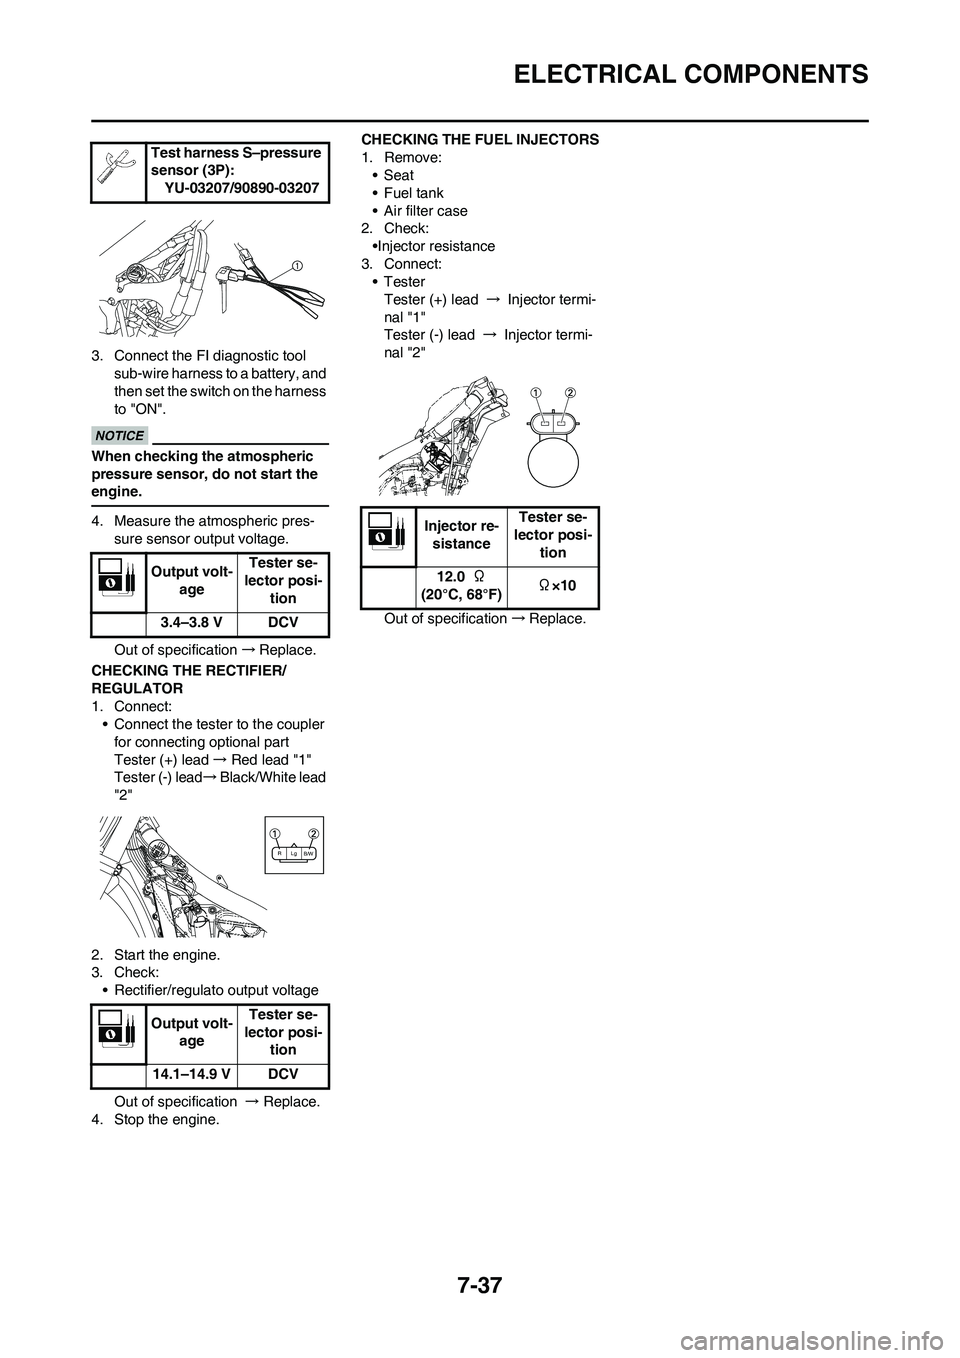
3. Connect the FI diagnostic tool
sub-wire harness to a battery, and
then set the switch on the harness
to "ON".
When checking the atmospheric
pressure sensor, do not start the
engine.
4. Measure the atmospheric pres-
sure sensor output voltage.
Out of specification→Replace.
CHECKING THE RECTIFIER/
REGULATOR
1. Connect:
• Connect the tester to the coupler
for connecting optional part
Tester (+) lead→ Red lead "1"
Tester (-) lead→ Black/White lead
"2"
2. Start the engine.
3. Check:
• Rectifier/regulato output voltage
Out of specification → Replace.
4. Stop the engine.CHECKING THE FUEL INJECTORS
1. Remove:
•Seat
•Fuel tank
• Air filter case
2. Check:
•Injector resistance
3. Connect:
•Tester
Tester (+) lead → Injector termi-
nal "1"
Tester (-) lead → Injector termi-
nal "2"
Out of specification→Replace. Test harness S–pressure
sensor (3P):
YU-03207/90890-03207
Output volt-
ageTester se-
lector posi-
tion
3.4–3.8 V DCV
Output volt-
ageTester se-
lector posi-
tion
14.1–14.9 V DCV
Lg
R
B/W
Injector re-
sistanceTester se-
lector posi-
tion
12.0 Ω
(20°C, 68°F) Ω×10
Page 224 of 230

8-1
CHASSIS
TUNING
CHASSIS
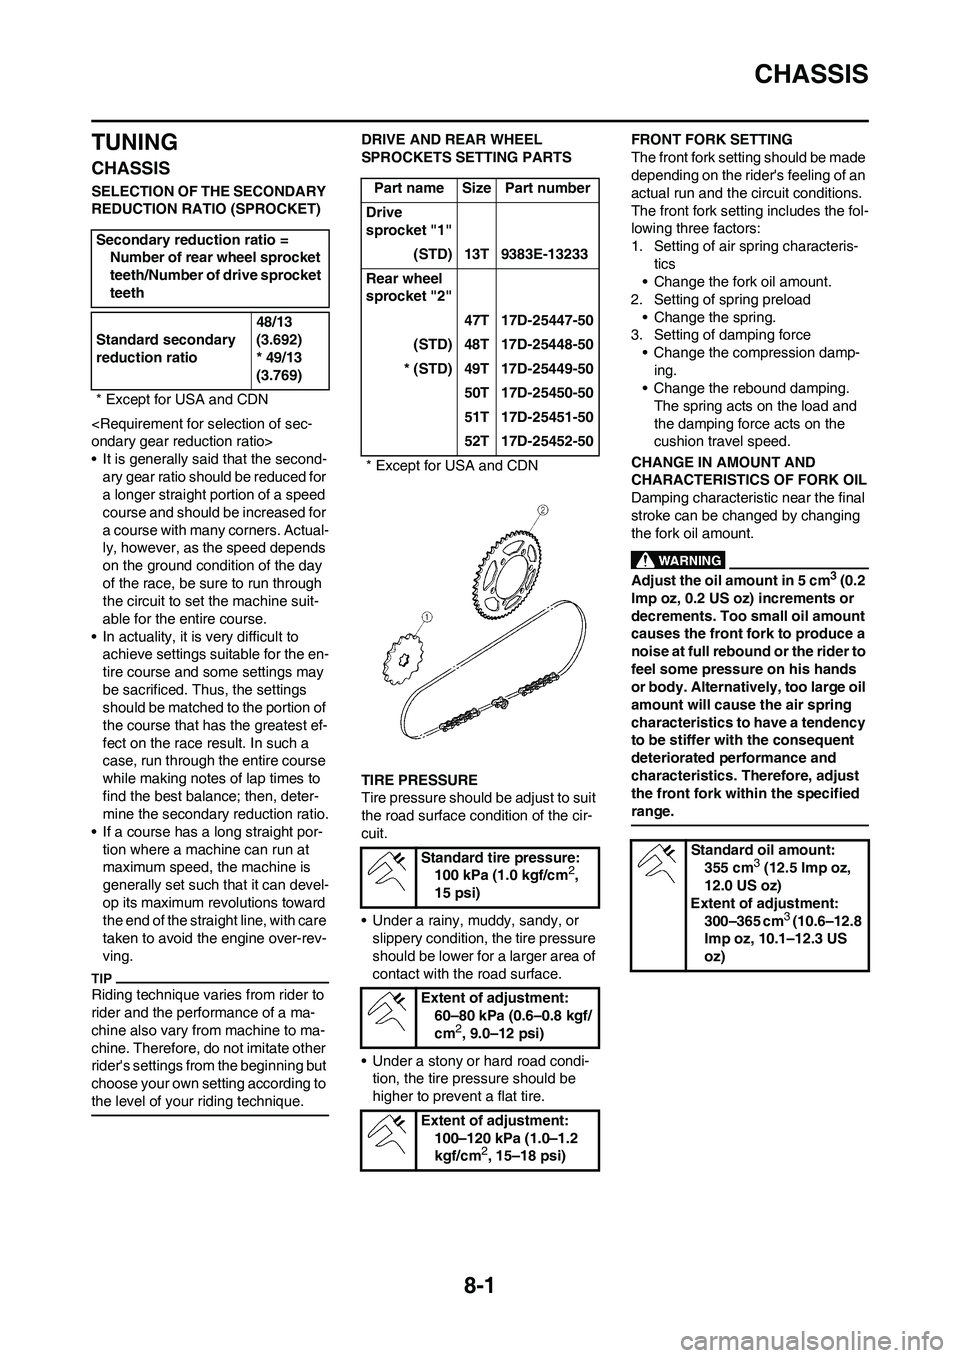
SELECTION OF THE SECONDARY
REDUCTION RATIO (SPROCKET)
ondary gear reduction ratio>
• It is generally said that the second-ary gear ratio should be reduced for
a longer straight portion of a speed
course and should be increased for
a course with many corners. Actual-
ly, however, as the speed depends
on the ground condition of the day
of the race, be sure to run through
the circuit to set the machine suit-
able for the entire course.
• In actuality, it is very difficult to achieve settings suitable for the en-
tire course and some settings may
be sacrificed. Thus, the settings
should be matched to the portion of
the course that has the greatest ef-
fect on the race result. In such a
case, run through the entire course
while making notes of lap times to
find the best balance; then, deter-
mine the secondary reduction ratio.
• If a course has a long straight por- tion where a machine can run at
maximum speed, the machine is
generally set such that it can devel-
op its maximum revolutions toward
the end of the straight line, with care
taken to avoid the engine over-rev-
ving.
Riding technique varies from rider to
rider and the performance of a ma-
chine also vary fr om machine to ma-
chine. Therefore, do not imitate other
rider's settings from the beginning but
choose your own setting according to
the level of your riding technique.
DRIVE AND REAR WHEEL
SPROCKETS SETTING PARTS
TIRE PRESSURE
Tire pressure should be adjust to suit
the road surface condition of the cir-
cuit.
• Under a rainy, muddy, sandy, or slippery condition, the tire pressure
should be lower for a larger area of
contact with the road surface.
• Under a stony or hard road condi- tion, the tire pressure should be
higher to prevent a flat tire. FRONT FORK SETTING
The front fork setting should be made
depending on the rider's feeling of an
actual run and the circuit conditions.
The front fork setting includes the fol-
lowing three factors:
1. Setting of air spring characteris-
tics
• Change the fork oil amount.
2. Setting of spring preload
• Change the spring.
3. Setting of damping force • Change the compression damp-
ing.
• Change the rebound damping. The spring acts on the load and
the damping force acts on the
cushion travel speed.
CHANGE IN AMOUNT AND
CHARACTERISTICS OF FORK OIL
Damping characteristic near the final
stroke can be changed by changing
the fork oil amount.
Adjust the oil amount in 5 cm3 (0.2
Imp oz, 0.2 US oz) increments or
decrements. Too small oil amount
causes the front fork to produce a
noise at full rebound or the rider to
feel some pressure on his hands
or body. Alternatively, too large oil
amount will cause the air spring
characteristics to have a tendency
to be stiffer with the consequent
deteriorated performance and
characteristics. Therefore, adjust
the front fork within the specified
range.
Secondary reduction ratio = Number of rear wheel sprocket
teeth/Number of drive sprocket
teeth
Standard secondary
reduction ratio 48/13
(3.692)
* 49/13
(3.769)
* Except for USA and CDN
Part name Size Part number
Drive
sprocket "1" (STD) 13T 9383E-13233
Rear wheel
sprocket "2" 47T 17D-25447-50
(STD) 48T 17D-25448-50
* (STD) 49T 17D-25449-50 50T 17D-25450-50
51T 17D-25451-50
52T 17D-25452-50
* Except for USA and CDN
Standard tire pressure:100 kPa (1.0 kgf/cm
2,
15 psi)
Extent of adjustment: 60–80 kPa (0.6–0.8 kgf/
cm
2, 9.0–12 psi)
Extent of adjustment: 100–120 kPa (1.0–1.2
kgf/cm
2, 15–18 psi)
Standard oil amount:
355 cm3 (12.5 Imp oz,
12.0 US oz)
Extent of adjustment:
300–365 cm
3 (10.6–12.8
Imp oz, 10.1–12.3 US
oz)