Page 49 of 138
:
Cold engine start with ambient temperature
above 25 °C (80 °F).
Ambient temp./starter (choke) position
6. Completely close the throttle lever and start
the engine by pushing the")
6-2
6 Position (3):
Cold engine start with ambient temperature
above 25 °C (80 °F).
Ambient temp./starter (choke) position
6. Completely close the throttle lever and start
the engine by pushing the start switch.
NOTICE: For maximum engine life, never
accelerate hard when the engine is cold!
[ECB00162]
TIPIf the engine fails to start, release the start switch,
then push it again. Pause a few seconds before
the next attempt. Each cranking should be as short
as possible to preserve battery energy. Do not
crank the engine more than 10 seconds on each
attempt.7. If the engine is started with the starter (choke)
in position (1), the starter (choke) should be
returned to position (2) to warm up the engine.
If the engine is started with the starter (choke)
in position (2), keep the starter (choke) in this
position to warm up the engine.
8. Continue warming up the engine until it idles
smoothly, then return the starter (choke) to
position (3) before riding.TIPThe engine is warm when it responds normally to
the throttle with the starter (choke) turned off.
1. Fully open
2. Half open
3. Closed
4. Starter (choke)U1BS60E0.book Page 2 Thursday, April 16, 2009 4:11 PM
Page 50 of 138

is not required when the engine is warm. Instead,
start the en")
6-3
6
EBU20291Starting a warm engine Follow the same procedure as for starting a cold
engine, with the exception that the starter (choke)
is not required when the engine is warm. Instead,
start the engine with the throttle slightly open.EBU20341Operating the drive select lever and
driving in reverse NOTICEECB00170Before shifting, stop the ATV, otherwise the
transmission may be damaged.Shifting: Reverse to Forward
1. Bring the ATV to a complete stop.
2. Pull in the clutch lever to disengage the clutch.
3. Apply the brake pedal.
4. While pulling the drive select lever handle up-
ward, move the drive select lever forward until
it completely stops.5. Release the brake pedal.
6. Open the throttle lever gradually and release
the clutch lever slowly.
Shifting: Forward to Reverse
WARNING
EWB00720Improper operation in reverse could make you
hit an obstacle or even a person behind you,
resulting in serious injury. When you shift into1. Drive select lever
2. Drive select lever handle
3. For forward drive
4. For reverse drive
U1BS60E0.book Page 3 Thursday, April 16, 2009 4:11 PM
Page 51 of 138

6-4
6 reverse, make sure there are no people or ob-
stacles behind you. When it is safe to proceed,
go slowly.
1. Bring the ATV to a complete stop.
2. Pull in the clutch lever to disengage the clutch.
3. Apply the brake pedal.
4. While pulling the drive select lever handle up-
ward, move the drive select lever to the rear
until it completely stops.TIPWhen in reverse, the reverse indicator light should
be on. If the indicator light does not come on, have
a Yamaha dealer check the electrical circuit.5. Check behind you for people or obstacles,
and then release the brake pedal.
6. Open the throttle lever gradually and release
the clutch lever slowly. Continue to watch to
the rear while backing.
EBU29760Shifting This ATV has a 6-speed forward and 1-speed re-
verse transmission. The transmission allows you
to control the amount of power you have available
at a given speed or for starting, accelerating, climb-
ing hills, etc.
To shift into neutral, return the throttle lever to the
closed position, apply the clutch, and then repeat-
edly depress the shift pedal until it stops.
When it stops, it will be in first gear. Raise the pedal
slightly to reach the neutral position.1. Shift pedal
2. Neutral position
U1BS60E0.book Page 4 Thursday, April 16, 2009 4:11 PM
Page 52 of 138

6-5
6
EBU20591To start out and accelerate
1. Release the throttle lever, and then release
the parking brake.NOTICEECB00200Always close the throttle before shifting gears,
otherwise damage to the engine and drive train
may result.2. Pull the clutch lever to disengage the clutch.
3. Shift into first gear.
4. Open the throttle gradually and at the same
time, release the clutch lever slowly.
WARNING! Opening the throttle abruptly
or releasing the clutch lever too quickly
could make the ATV wheelie, which would
increase the chance of an accident, includ-
ing an overturn.
[EWB00731]
5. Once the ATV has attained adequate speed,
release the throttle, and at the same time,
quickly pull in the clutch lever.
6. Shift the transmission into second gear.
(Make sure not to shift the transmission into
neutral.)
7. Open the throttle part way and gradually re-
lease the clutch lever.8. Follow the same procedure when shifting to
the next higher gear.
EBU20650To decelerate
When slowing down or stopping, release the throt-
tle and apply the brakes smoothly and evenly. As
you slow down, shift to a lower gear. Be sure that
the engine has sufficiently slowed before engaging
a lower gear. Improper use of the brakes or shifting
can cause the tires to lose traction, reducing con-
trol and increasing the possibility of an accident.
WARNING
EWB00710Make sure the engine has sufficiently slowed
before shifting to a lower gear. Engaging a low-
er gear when the engine speed is too high
could make the wheels stop rotating and lose
traction. This could cause loss of control, an
accident and injury. It could also cause engine
or drive train damage.NOTICEECB00180�Even with the transmission in the neutral po-
sition, do not coast for long periods of time
with the engine off, and do not tow the ATV
U1BS60E0.book Page 5 Thursday, April 16, 2009 4:11 PM
Page 53 of 138

6-6
6 for long distances. The transmission is prop-
erly lubricated only when the engine is run-
ning. Inadequate lubrication may damage
the transmission.
�Always use the clutch when changing gears.
The engine, transmission and drive train are
not designed to withstand the shock of
forced shifting and can be damaged by shift-
ing without using the clutch.EBU20672Engine break-in TIP�For ATVs equipped with an odometer or an hour
meter, follow the figures given in km (mi) or the
figures given in hours.�For ATVs not equipped with an odometer or
hour meter, follow the figures given in hours.There is never a more important period in the life of
your engine than the first 320 km (200 mi) or 20
hours of riding. For this reason, you should read
the following material carefully.
Since the engine is brand new, do not put an ex-
cessive load on it for the first 320 km (200 mi) or 20
hours. The various parts in the engine wear andpolish themselves to the correct operating clear-
ances. During this period, prolonged full-throttle
operation or any condition that might result in en-
gine overheating must be avoided.
0–160 km (0–100 mi) or 0–10 hours
Avoid prolonged operation above 1/2 throttle. Vary
the speed of the ATV regularly. Do not operate it at
one set throttle position.
160–320 km (100–200 mi) or 10–20 hours
Avoid prolonged operation above 3/4 throttle. Rev
the engine through the gears freely, but do not use
full throttle at any time.
320 km (200 mi) or 20 hours and beyond
The ATV can now be operated normally.
NOTICEECB00220If any engine trouble should occur during the
engine break-in period, immediately have a
Yamaha dealer check the ATV.
U1BS60E0.book Page 6 Thursday, April 16, 2009 4:11 PM
Page 54 of 138
6-7
6
EBU20722Parking When parking the ATV, shift into first gear, stop the
engine, apply the parking brake, and then turn the
fuel cock to “OFF”.EBU20903Parking on a slope
WARNING
EWB00850Avoid parking on hills or other inclines. Park-
ing on a hill or other incline could cause the
ATV to roll out of control, increasing the
chance of an accident. If you must park on an
incline, place the ATV transversely across theincline, shift into first gear, stop the engine, ap-
ply the parking brake, and then block the front
and rear wheels with rocks or other objects.
Do not park the ATV at all on hills that are so
steep you could not walk up them easily.
1. Bring the ATV to a stop by applying the front
brake, shift into first gear, and then stop the
engine.
2. With the front and rear brakes applied, apply
the parking brake.
3. Release the front and rear brakes.
1. Locked positionU1BS60E0.book Page 7 Thursday, April 16, 2009 4:11 PM
Page 55 of 138

6-8
6
EBU20910Accessories and loading EBU20921Genuine Yamaha Accessories
Choosing accessories for your ATV is an important
decision. Genuine Yamaha Accessories, which
are available only from a Yamaha dealer, have
been designed, tested, and approved by Yamaha
for use on your ATV. Many companies with no con-
nection to Yamaha manufacture parts and acces-
sories or offer other modifications for Yamaha
vehicles. Yamaha is not in a position to test the
products that these aftermarket companies pro-
duce. Therefore, Yamaha can neither endorse nor
recommend the use of accessories not sold by
Yamaha or modifications not specifically recom-
mended by Yamaha, even if sold and installed by
a Yamaha dealer.
Aftermarket parts, accessories, and modifica-
tions
While you may find aftermarket products similar in
design and quality to genuine Yamaha Accesso-
ries, recognize that some aftermarket accessories
or modifications are not suitable because of poten-
tial safety hazards to you or others. Installing after-market products or having other modifications
performed to your ATV that change any of the ve-
hicle’s design or operation characteristics can put
you and others at greater risk of serious injury or
death. You are responsible for injuries related to
changes in the vehicle.
Keep the following in mind when considering an
accessory or operating an ATV which has acces-
sories.
�Accessories should be rigidly and securely
mounted. An accessory which can shift position
or come off while you are riding could affect your
ability to control the ATV.�Do not mount an accessory where it could inter-
fere with your ability to control the ATV. Exam-
ples include (but are not limited to) a heavy or
bulky object attached to the handlebars which
could make steering difficult, an accessory that
limits your ability to move around on the seat, or
one that limits your view.�Use extra caution when riding an ATV with ac-
cessories. The ATV may handle differently than
it does without accessories.
U1BS60E0.book Page 8 Thursday, April 16, 2009 4:11 PM
Page 56 of 138

6-9
6
EBU20941Loading
WARNING
EWB00820Never exceed the stated load capacity for this
ATV. Overloading this ATV or carrying or tow-
ing cargo improperly could cause changes in
ATV handling which could lead to an accident.
Cargo should be properly distributed and se-
curely attached. Reduce speed when carrying
cargo or pulling a trailer. Allow greater dis-
tance for braking.As originally equipped, this ATV is not designed to
carry cargo or tow a trailer. If you choose to add ac-
cessories so that you can carry cargo or tow a trail-
er, you must use common sense and good
judgment as the stability and handling of an ATV
can be changed. When adding accessories, keep
the following points in mind:�Never exceed the weight limits shown. An over-
loaded ATV can be unstable.
�If you are carrying cargo and towing a trailer, in-
clude the tongue weight in the maximum ATV
load limit.�Load cargo on the carriers as close to the center
of the ATV as possible. Put cargo at the rear of
the front carrier, at the front of the rear carrier,
and center it.�Tie down cargo securely to the carriers. Make
sure cargo in the trailer cannot move around. A
shifting load can cause an accident.�Make sure the load does not interfere with con-
trols or your ability to see where you are going.�Ride more slowly than you would without a load.
The more weight you carry, the slower you
should go. Although conditions vary, it is good
practice not to exceed 2nd gear whenever you
are carrying heavier loads or when towing a trail-
er.�Allow more braking distance. A heavier ATV
takes longer to stop.�Avoid making sharp turns unless at very slow
speeds.�Avoid hills and rough terrain. Choose terrain
carefully. Added weight affects the stability and
handling of the ATV. MAXIMUM LOADING LIMIT
ATV loading limit (total weight of rider, cargo,
accessories, and tongue):
100.0 kg (220 lb)
U1BS60E0.book Page 9 Thursday, April 16, 2009 4:11 PM
 1
1 2
2 3
3 4
4 5
5 6
6 7
7 8
8 9
9 10
10 11
11 12
12 13
13 14
14 15
15 16
16 17
17 18
18 19
19 20
20 21
21 22
22 23
23 24
24 25
25 26
26 27
27 28
28 29
29 30
30 31
31 32
32 33
33 34
34 35
35 36
36 37
37 38
38 39
39 40
40 41
41 42
42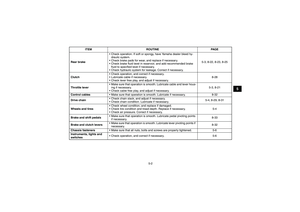 43
43 44
44 45
45 46
46 47
47 48
48 49
49 50
50 51
51 52
52 53
53 54
54 55
55 56
56 57
57 58
58 59
59 60
60 61
61 62
62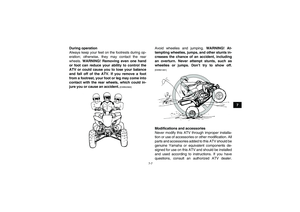 63
63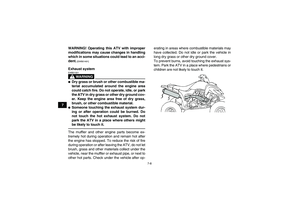 64
64 65
65 66
66 67
67 68
68 69
69 70
70 71
71 72
72 73
73 74
74 75
75 76
76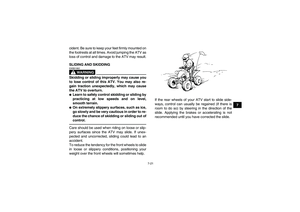 77
77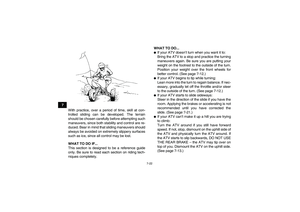 78
78 79
79 80
80 81
81 82
82 83
83 84
84 85
85 86
86 87
87 88
88 89
89 90
90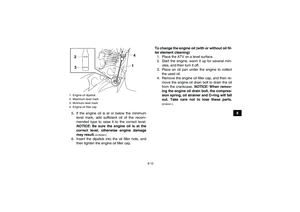 91
91 92
92 93
93 94
94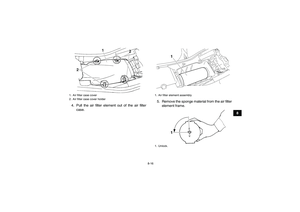 95
95 96
96 97
97 98
98 99
99 100
100 101
101 102
102 103
103 104
104 105
105 106
106 107
107 108
108 109
109 110
110 111
111 112
112 113
113 114
114 115
115 116
116 117
117 118
118 119
119 120
120 121
121 122
122 123
123 124
124 125
125 126
126 127
127 128
128 129
129 130
130 131
131 132
132 133
133 134
134 135
135 136
136 137
137