2010 VOLKSWAGEN TRANSPORTER ESP
[x] Cancel search: ESPPage 178 of 486
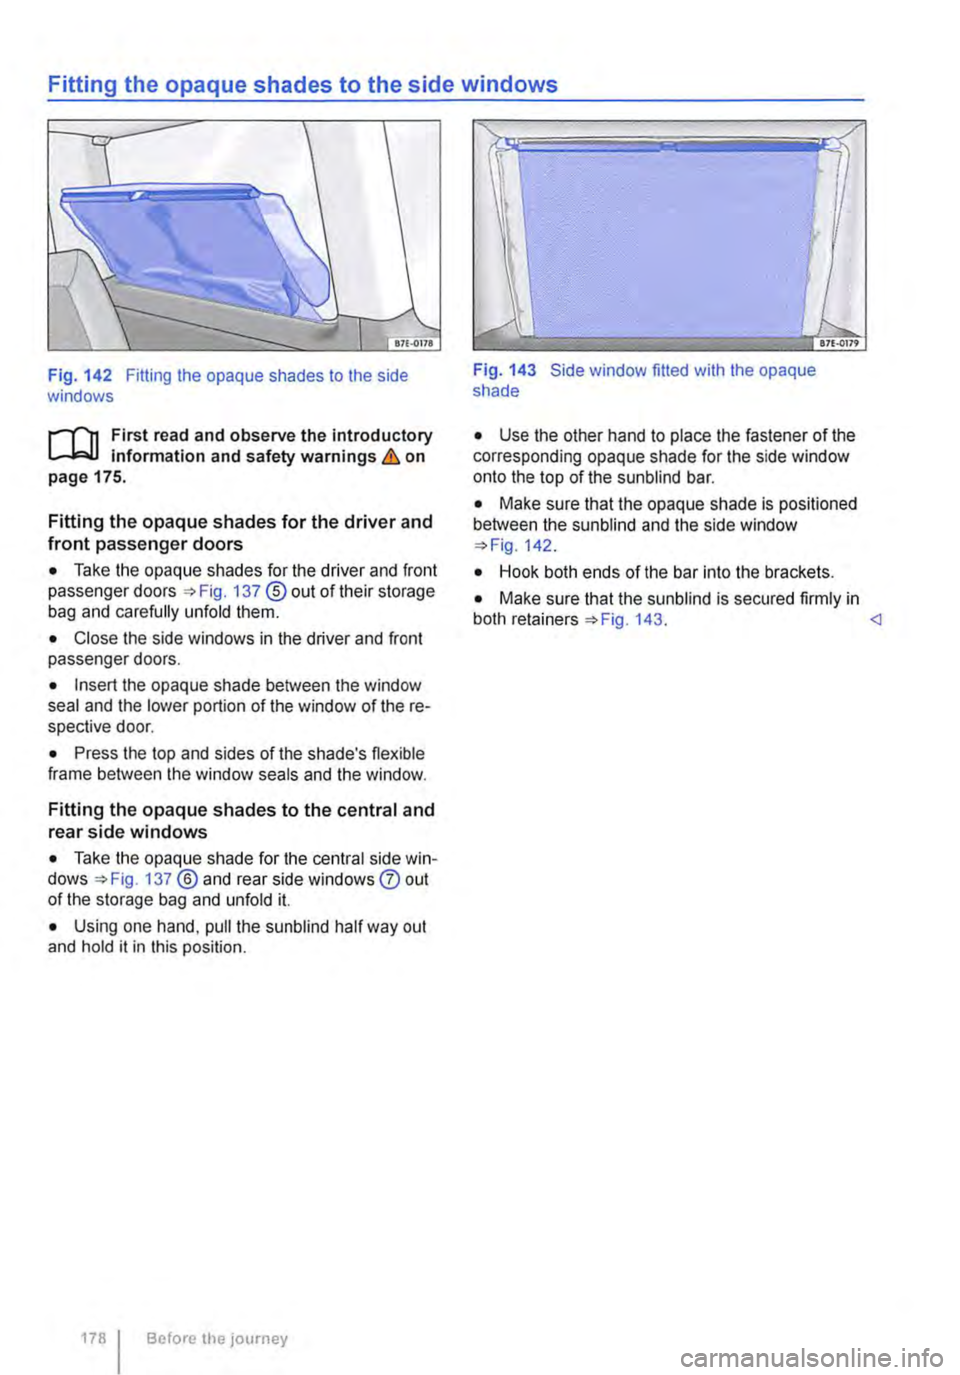
Fitting the opaque shades to the side windows
Fig. 142 Fitting the opaque shades to the side windows
rl'"'n First read and observe the introductory L-lc.l.l information and safety warnings & on page 175.
Fitting the opaque shades for the driver and front passenger doors
• Take the opaque shades for the driver and front passenger doors =>Fig. 137 ®out of their storage bag and carefully unfold them.
• Close the side windows in the driver and front passenger doors.
• Insert the opaque shade between the window seal and the lower portion of the window of the re-spective door.
• Press the top and sides of the shade's flexible frame between the window seals and the window.
Fitting the opaque shades to the central and rear side windows
• Take the opaque shade for the central side win-dows =>Fig. 137 ®and rear side windows 0 out of the storage bag and unfold it.
• Using one hand, pull the sunblind half way out and hold it in this position.
178 Before the journey
Fig. 143 Side window fitted with the opaque shade
• Use the other hand to place the fastener of the corresponding opaque shade for the side window onto the top of the sunblind bar.
• Make sure that the opaque shade is positioned between the sun blind and the side window =>Fig. 142.
• Hook both ends of the bar into the brackets.
• Make sure that the sunblind is secured firmly in both retainers=> Fig. 143. <1
Page 188 of 486
menus provided by way of the instrument cluster nor the factory-installed radio or navigation system can be used to make rear-seat telephony settings.
lfv'hen pairing a mobile telephone with the rear-seat telephony system using the hands-free profile (HFP) and when the mobile telephone is not in the charging base, observe the information on use of a mobile telephone in the vehicle without connection to the external aerial =>page 399.
Follow the operating manual for your mobile tele· phone and the instructions provided by the acces-sory manufacturer.
You may experience poor reception or may be cut off in areas where the signal is weak.
Most electronic devices are shielded against high-frequency signals. In rare cases, however, it Is pos-sible that electronic devices will not be shielded against high-frequency signals emitted by the rear-seat telephony system. This can cause Interfer-ence.
Bluetooth
Bluetooth technology is used to connect a mobile telephone to the hands-free system fitted In a vehi· cle. Pairing needs to be carried out once only in or-der to use the rear-seat telephony system with a Bluetooth mobile telephone.
Use compatible Bluetooth devices only. Information on compatible Bluetooth products Is available from your Volkswagen Commercial Vehicles dealer or on the Internet.
Some Bluetooth mobile telephones are detected and connected automatically when the ignition is switched on. For this to happen, the mobile tele-phone and the Bluetooth function in the telephone must be switched on, and all active Bluetooth con-nections to other units must be disconnected.
The Bluetooth connection is free of charge.
Bluetooth® is a registered trademark of Blue-tooth® SIG, Inc.
Declaration of conformity
BURY Sp. z o.o. herewith declares that this system complies with the basic requirements and the rele· van! stipulations of directive 1999/5/EG. This sys-tem has been classified as belonging to Device Class 1. A manufacturer's declaration of conformity for this system can be requested from the following e-mail address: [email protected]. Please formulate all enquiries either In English or German.
((
166 I Before the journey
Additional information and warnings:
• Digital voice enhancement =>page 173
• Accessories, modifications, repairs and renewal of parts =>page 394
• Radio or navigation system =>Booklet Radio, provision for mobile telephone, infotainment sys-tem, navigation system
A wARNING
Accidents and Injuries can occur If the driver Is distracted. Using the telephone or the rear· seat telephony system can distract you from what Is happening on the road.
• Select volume settings that allow signals from outside the vehicle (such as emergency services sirens) to be easily heard at all times. Comply with legal regulations.
• Your call may be cut off or you may be un-able to make calls If you are In an area with no mobile telephone network coverage, an area where the network Is very weak or, In some cases, In a tunnel, garage or under-pass. This also means that no emergency calls can be made.
• In some countries, lt Is only possible to make an emergency call from the rear-seat telephony system if it is connected to a mo-bile telephone containing a SIM card that is "unlocked" and has sufficient credit.
A WARNING
Any mobile telephone that is not secured or Is incorrectly secured in the vehicle could be flung though the interior during a sudden driving or braking manoeuvre, or In the event of an accident. This could cause Injuries.
• You should never position or attach a mo-bile telephone on a door, on the windscreen or above or near to the areas marked "AIR-BAG" on the steering wheel, the dash panel and the seat backrests, or between these areas and the vehicle occupants. The mobile telephone could cause serious Injury In an accident, especially when the alrbags Inflate.
A WARNING
Always switch off the mobile telephone when filling the tank and in areas with a risk of ex-plosion. Electromagnetic radiation can gener-ate sparks which can In turn start a fire.
• The mobile telephone can automatically log Itself Into the mobile telephone network again If the Bluetooth connection to the rear-seat telephony system has been Interrupted. I>
Page 190 of 486
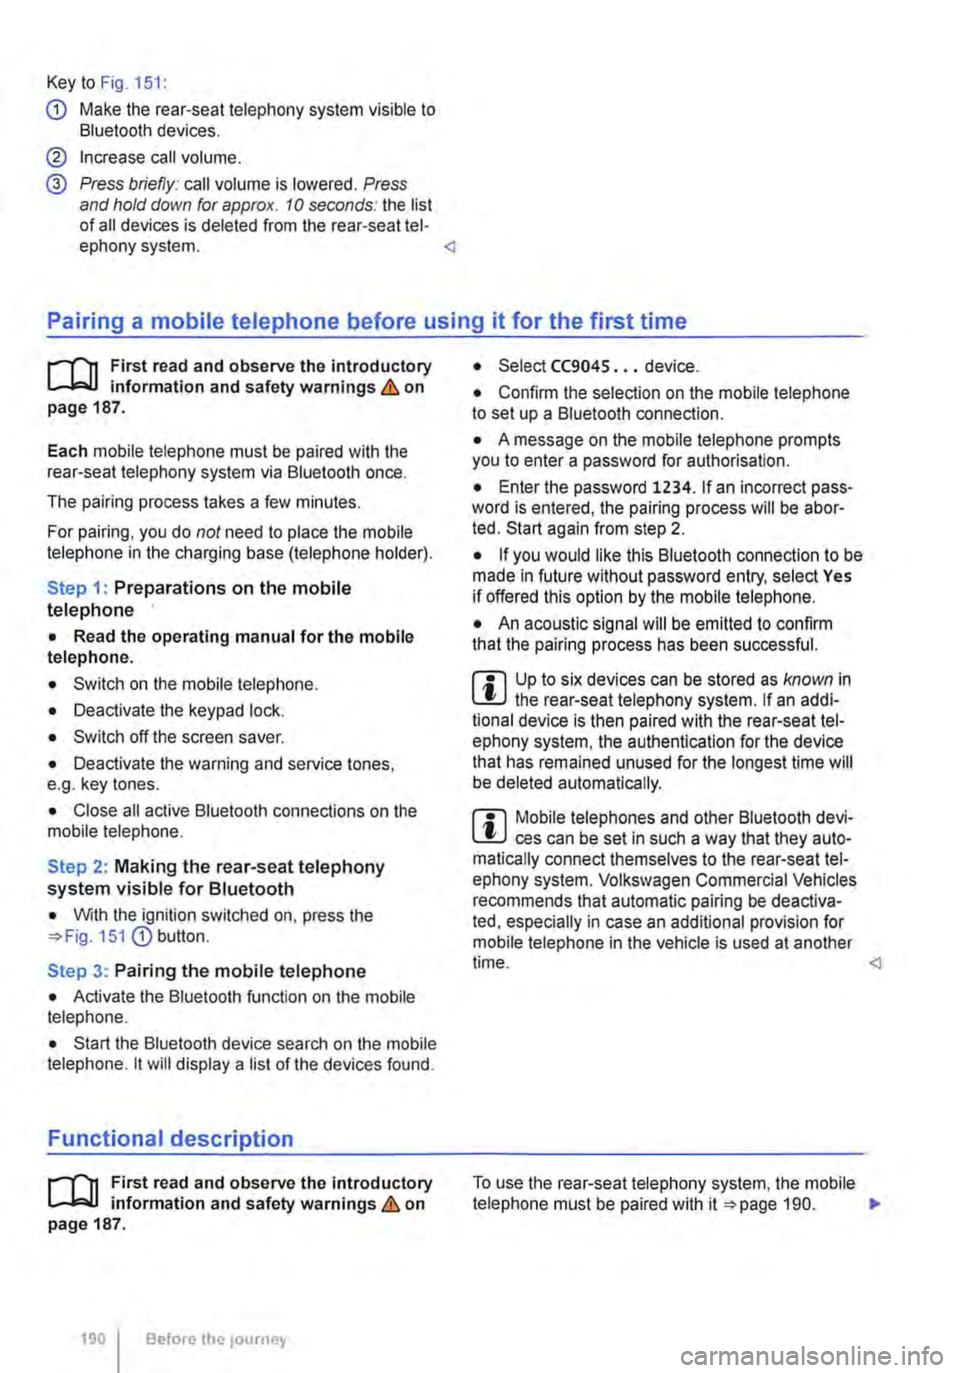
Key to Fig. 151:
G) Make the rear-seat telephony system visible to Bluetooth devices.
@ Increase call volume.
@ Press briefly: call volume is lowered. Press and hold down for approx. 10 seconds: the list of all devices is deleted from the rear-seat tel-ephony system.
il""'n First read and observe the introductory L--i=J.I information and safety warnings & on page 187.
Each mobile telephone must be paired with the rear-seat telephony system via Bluetooth once.
The pairing process takes a few minutes.
For pairing, you do not need to place the mobile telephone in the charging base (telephone holder).
Step 1: Preparations on the mobile telephone
• Read the operating manual for the mobile telephone.
• Switch on the mobile telephone.
• Deactivate the keypad lock.
• Switch off the screen saver.
• Deactivate the warning and service tones, e.g. key tones.
• Close all active Bluetooth connections on the mobile telephone.
Step 2: Making the rear-seat telephony system visible for Bluetooth
• With the ignition switched on, press the 151 G) button.
Step 3: Pairing the mobile telephone
• Activate the Bluetooth function on the mobile telephone.
• Start the Bluetooth device search on the mobile telephone. it will display a list of the devices found.
Functional description
il""'n First read and observe the introductory L--i=J.I information and safety warnings & on page 187.
190 I Before the journey
• Select CC9045 ... device.
• Confirm the selection on the mobile telephone to set up a Bluetooth connection.
• A message on the mobile telephone prompts you to enter a password for authorisation.
• Enter the password 1234. If an incorrect pass-word is entered, the pairing process will be abor-ted. Start again from step 2.
• If you would like this Bluetooth connection to be made in future without password entry, select Yes if offered this option by the mobile telephone.
• An acoustic signal will be emitted to confirm that the pairing process has been successful.
m Up to six devices can be stored as known in L!.J the rear-seat telephony system. If an addi-tional device is then paired with the rear-seat tel-ephony system, the authentication for the device that has remained unused for the longest time will be deleted automatically.
m Mobile telephones and other Bluetooth devi-L!.J ces can be set in such a way that they auto-matically connect themselves to the rear-seat tel-ephony system. Volkswagen Commercial Vehicles recommends that automatic pairing be deactiva-ted, especially in case an additional provision for mobile telephone in the vehicle is used at another time.
Page 206 of 486

Symbol Meaning
A Flow of electric current in amps
Lit up: 230-volt mains connection has been made and the battery charger is working. Flashing or displaying a number over 15 volts: malfunction. Disconnect the 230-volt mains connection and have the electrical system checked by a qualified workshop. Not lit up despite a 230-volt connection being made: there is a power cut or malfunction in the battery charger.
G The batteries are being charged by the alternator.
Warning messages
Under certain conditions, such as when the pop-up roof is open, warning messages appear on the dis-play when the engine is started. These warn against possible vehicle or equipment damage.
• Switch off the ignition and correct the cause of the warning message.
Malfunction
If a symbol flashes, there is a fault in the indicated system.
• Press the button G?) for five seconds to clear the fault. If this does not work or if other faults ap-pear, please contact a qualified workshop. Volks-wagen Commercial Vehicles recommends using a Volkswagen Commercial Vehicles dealership for this purpose.
A WARNING
Failure to observe illuminated warning lamps and text messages can lead to your vehicle breaking down in traffic, and can cause acci-dent and serious injury.
A WARNING (Continued)
• Never Ignore any Illuminated warning lamps or text messages.
• Stop the vehicle as soon as possible and when safe to do so.
• Stop the vehicle at a safe distance away from moving traffic and ensure that no part of the exhaust system can come Into contact with any Inflammable material underneath the vehicle, e.g. dry grass or fuel.
• Any broken-down vehicle poses an In-creased accident risk both for you and for other road users. If the situation requires, switch on the hazard warning lights and set up the warning triangle as a warning to other road users.
• Before opening the bonnet, switch off the engine and allow it to cool down sufficiently.
• The engine compartment of any motor ve-hicle is a dangerous area. Serious injuries can be sustained here 350.
CD
Failure to observe illuminated indicator lamps and text messages can lead to your vehicle be-ing damaged.
J'"'""'('n First read and observe the introductory L-J,:.IJ information given on page 204.
Main menu Possible functions
Pop-up roof Opening
Closing
Displays Outside temperature
206 Before the journey
Using the menus
• Turn the rotary/push knob 168@ to highlight a function or submenu or to change a set-ting.
• Press the rotary/push knob to select a function or submenu or to confirm a setting.
Description of the submenu with examples
Open the pop-up roof .,1
Close the pop-up roof .,t
Current outside temperature (28.SO C) ...
Page 211 of 486
• Stowage page 1 50
• Cleaning and caring for the interior 388
A WARNING
Loose objects may be flung through the vehi-cle interior in the event of a sudden driving or braking manoeuvre. This can cause serious injury and can also lead to loss of control of the vehicle.
• Do not stow any pets or any hard, heavy or sharp objects in the vehicle's open stow-age compartments, in the luggage net, on the dash panel, on the shelf behind the rear seats or in items of clothing and bags in the vehicle interior.
• Always keep stowage compartments closed while the vehicle is in motion.
A WARNING
Objects in the driver footweli can hinder ped-al operation. This can lead to loss of control of the vehicle and increase the risk of serious injury.
• Please ensure that all pedals can always be operated without any hindrance.
• The foot mats must always be properly se-cured in the footwell.
• No additional foot mats or other floor cov-erings should be placed over the fitted foot mat.
• Ensure that no objects can enter the driv-er footwell while the vehicle is in motion.
• If there are any objects in the footwell, re-move them when the vehicle is parked.
A WARNING
Improper use of the stowage compartments can cause serious injury.
• Never fill stowage compartments beyond their capacity.
A WARNING (Continued)
• Always take care when closing stowage compartments that nobody is within their functional area.
A WARNING
Cigarette lighters in the vehicle could be damaged or accidentally lit. This could lead to serious burns and other injuries.
• Before adjusting the seats always make sure that there is no lighter on or near the moveable parts of the seat.
• Before closing stowage areas or compart-ments always ensure that there is no lighter in the way.
• Never stow lighters in stowage areas or compartments or on other surfaces in the ve-hicle. Cigarette lighters may self-ignite on high-temperature surfaces, especially in sum-mer.
CD
• Hard objects on the shelf can chafe against the wires of the heating element in the rear win-dow and cause damage.
• Do not store any heat-sensitive objects, food or medicines inside the vehicle. Hot and cold temperatures could damage them or ren-der them unusable.
• Objects stored in the vehicle that are made from transparent materials, such as glasses, magnifying glasses or transparent suction cups on the windows, can concentrate the sun's rays and thus cause damage to the vehi-cle.
m Always ensure that the ventilation openings L!J between the rear window and the stowage area are uncovered to allow stale air to escape from the vehicle.
Page 216 of 486
Opaque shades kit, removable
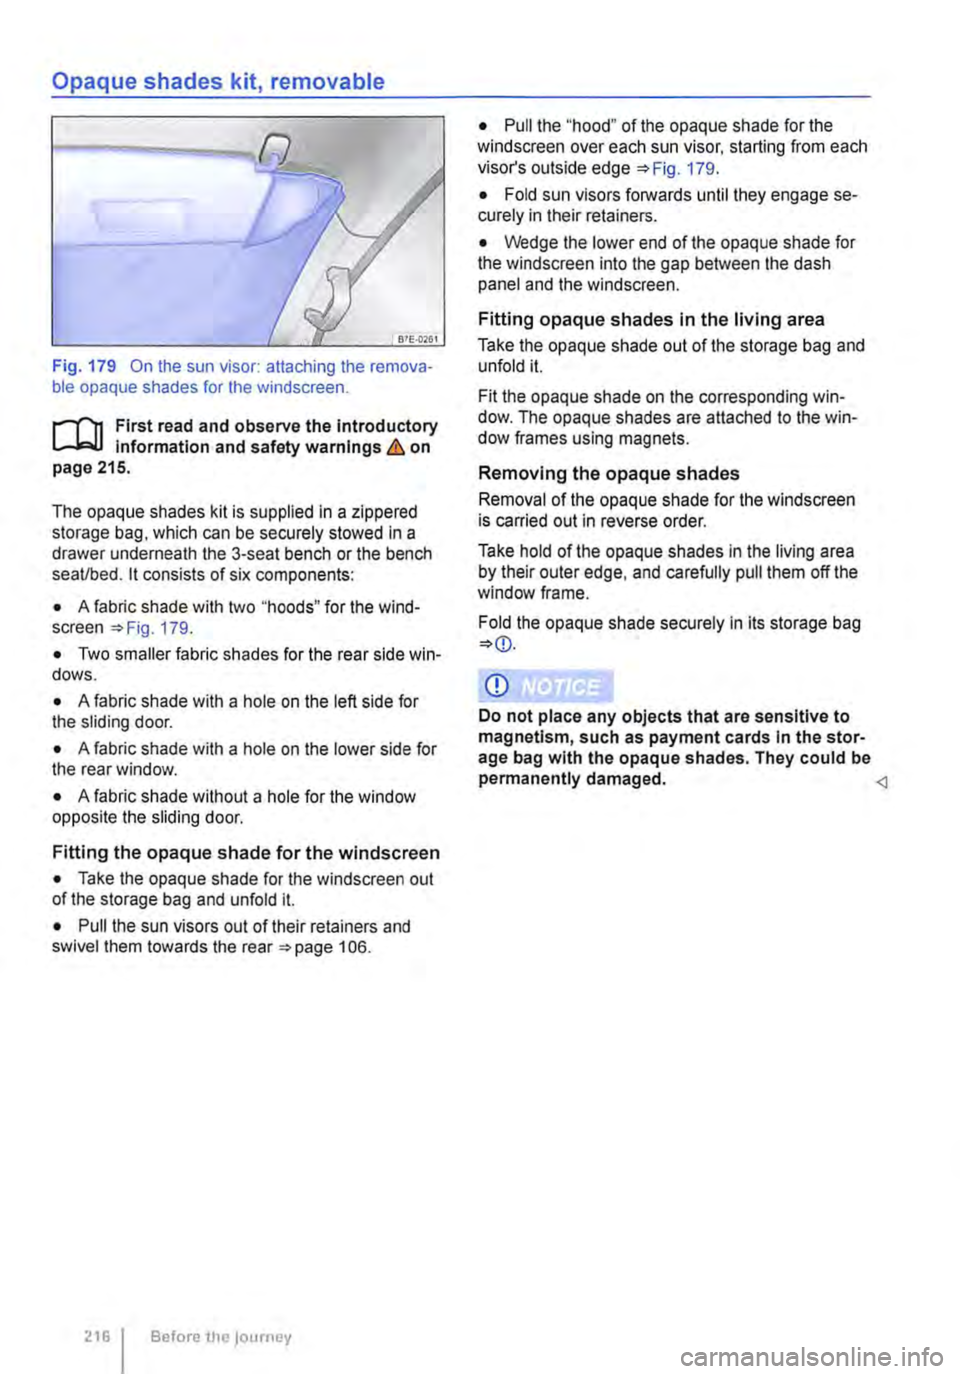
Fig. 179 On the sun visor: attaching the remova-ble opaque shades for the windscreen.
r-1"!1 First read and observe the introductory L-J,:.U Information and safety warnings & on page 215.
The opaque shades kit is supplied in a zippered storage bag, which can be securely stowed in a drawer underneath the 3-seat bench or the bench seaVbed. it consists of six components:
• A fabric shade with two "hoods" for the wind-screen =>Fig. 179.
• Two smaller fabric shades for the rear side win-dows.
• A fabric shade with a hole on the left side for the sliding door.
• A fabric shade with a hole on the lower side for the rear window.
• A fabric shade without a hole for the window opposite the sliding door.
Fitting the opaque shade for the windscreen
• Take the opaque shade for the windscreen out of the storage bag and unfold it.
• Pull the sun visors out of their retainers and swivel them towards the rear =>page 106.
216 Before the journey
• Pull the "'hood" of the opaque shade for the windscreen over each sun visor, starting from each visor's outside edge 179.
• Fold sun visors forwards until they engage se-curely in their retainers.
• Wedge the lower end of the opaque shade for the windscreen into the gap between the dash panel and the windscreen.
Fitting opaque shades in the living area
Take the opaque shade out of the storage bag and unfold it.
Fit the opaque shade on the corresponding win-dow. The opaque shades are attached to the win-dow frames using magnets.
Removing the opaque shades
Removal of the opaque shade for the windscreen is carried out in reverse order.
Take hold of the opaque shades in the living area by their outer edge, and carefully pull them off the window frame.
Fold the opaque shade securely in its storage bag
Q)
Do not place any objects that are sensitive to magnetism, such as payment cards in the stor-age bag with the opaque shades. They could be permanently damaged.
Page 218 of 486
Manual pop-up roof, California
C::O Introduction
This chapter contains information on the following subjects:
Opening the manual pop-up roof.......... 219
Closing the manual pop-up roof . 220
Roller shutter
Above the front seats there is a roller shutter, which must always be closed while the vehicle is in motion. This prevents the pop-up roof canvas from hanging down through the ceiling access and blocking the driver's view. Keeping the roller shut-ter closed also reduces wind noise while the vehi-cle is in motion.
A WARNING
Incorrect handling of the manual pop-up roof can cause accidents and serious injuries.
• Never drive the vehicle with the pop-up roof open. The pop-up roof must always be completely closed and securely locked while the vehicle is in motion.
• Never drive with people in the pop-up roof.
• Only open or close the pop-up roof while the vehicle Is stationary.
• Only mount a luggage roof rack when the pop-up roof is completely closed and secure-ly locked.
A WARNING
Careless or inattentive use of the manual pop-up roof could cause serious Injuries.
• The pop-up roof should only be opened or closed when you are sure that nobody is in its operating area.
• Never leave children or people requiring assistance alone in the vehicle.
• Always take all vehicle keys with you ev-ery time you leave the vehicle.
218 I Before the journey
CD
Incorrect handling of the manual pop-up roof can cause damage to it or to other parts of the vehicle.
• Make sure there Is adequate space before opening the pop-up roof.
• When closing the pop-up roof, always open the roller shutter and one of the vehicle doors to allow the excess air pressure to escape.
• Only close the pop-up roof when it is dry to prevent the build up of mould or mildew.
• Open the pop-up roof occasionally to air it out when it Is not being used for long periods oftime.
• Clean the pop-up roof bellows with water only. Never use household cleaners or Impreg-nating fabric treatment products.
• Close the pop-up roof during storms with driving rain and wind gusts. Otherwise the bel-lows could leak despite their specially treated fabric.
Page 220 of 486
A WARNING (Continued)
• Help others, especially children, to climb up and down safely.
A WARNING
If the safety net is not fitted or not properly fitted, children could fall off the pop-up roof bed and seriously injure themselves.
Closing the manual pop-up roof
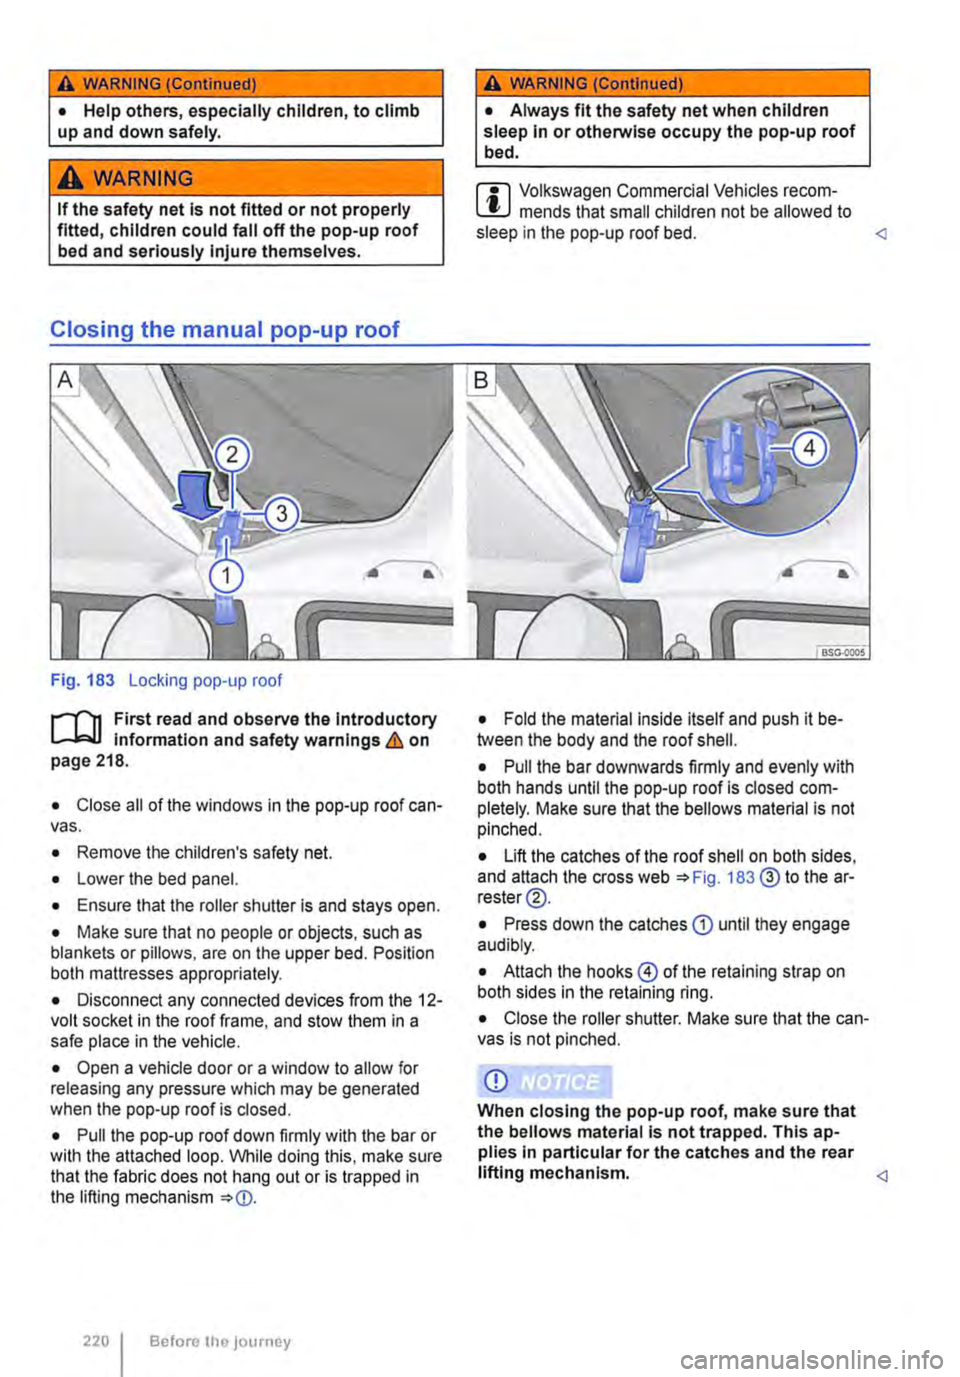
Fig. 183 Locking pop-up roof
,....--('n First read and observe the introductory L-J,::.U information and safety warnings & on page 218.
• Close all of the windows in the pop-up roof can-vas.
• Remove the children's safety net.
• Lower the bed panel.
• Ensure that the roller shutter is and stays open.
• Make sure that no people or objects, such as blankets or pillows, are on the upper bed. Position both mattresses appropriately.
• Disconnect any connected devices from the 12-volt socket in the roof frame, and stow them in a safe place in the vehicle.
• Open a vehicle door or a window to allow for releasing any pressure which may be generated when the pop-up roof is closed.
• Pull the pop-up roof down firmly with the bar or with the attached loop. While doing this, make sure that the fabric does not hang out or is trapped in the lifting mechanism
220 I Before the journey
A WARNING (ConUnued)
• Always fit the safety net when children sleep in or otherwise occupy the pop-up roof bed.
m Volkswagen Commercial Vehicles recom-L!J mends that small children not be allowed to sleep in the pop-up roof bed.
• Pull the bar downwards firmly and evenly with both hands until the pop-up roof is closed com-pletely. Make sure that the bellows material is not pinched.
• Lift the catches of the roof shell on both sides, and attach the cross web 183@ to the ar-rester@.
• Press down the catches CD until they engage audibly.
• Attach the hooks@ of the retaining strap on both sides in the retaining ring.
• Close the roller shutter. Make sure that the can-vas is not pinched.
CD
When closing the pop-up roof, make sure that the bellows material is not trapped. This ap-plies In particular for the catches and the rear lifting mechanism.