Page 408 of 592

408 3-7. Other interior features
Test the operation of the HomeLink by pressing the newly
programmed button. Check to se e if the gate/device operates
correctly.
Repeat the steps above to program another device for each of
the remaining HomeLink
buttons.
■ Programming other devices
To program other devices such as home security systems, home
door locks or lighting, contact your authorized Toyota dealer for
assistance.
■ Reprogramming a button
The individual HomeLink
buttons cannot be erased but can be
reprogrammed. To reprogram a button, follow the programming
instructions.
Operating the HomeLink
Press the appropriate HomeLink button. The HomeLink indicator
light on the HomeLink transceiver should turn on.
The HomeLink continues to send a signal for up to 20 seconds as long
as the button is pressed.
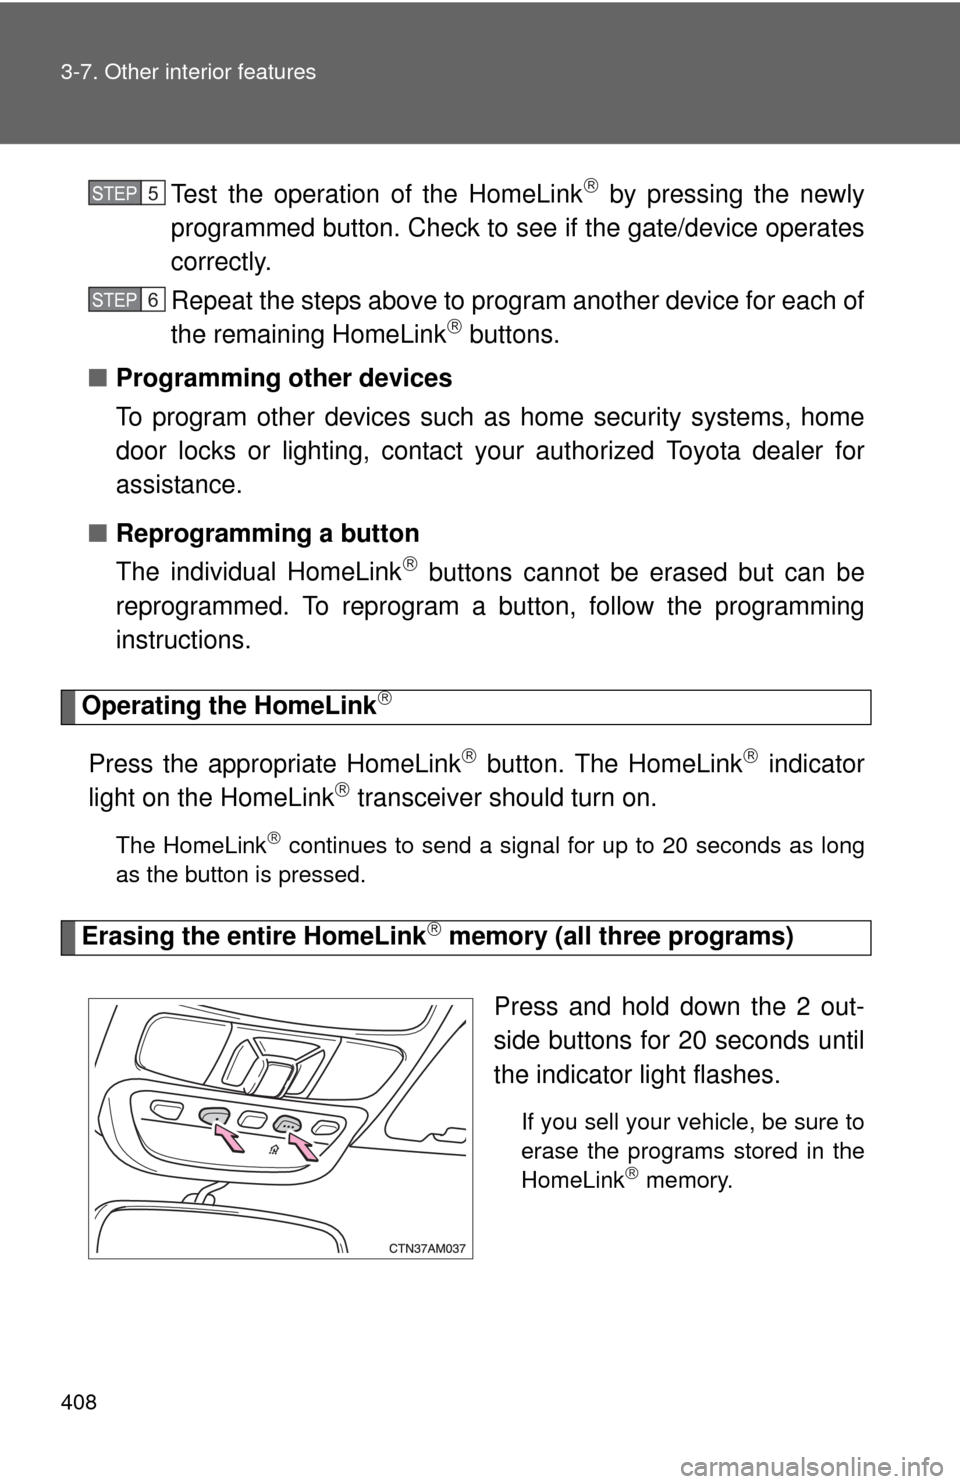
Erasing the entire HomeLink memory (all three programs)
Press and hold down the 2 out-
side buttons for 20 seconds until
the indicator light flashes.
If you sell your vehicle, be sure to
erase the programs stored in the
HomeLink
memory.
STEP5
STEP6
Page 428 of 592
428 4-2. Maintenance
Vehicle exterior
ItemsCheck points
Doors • Operate smoothly?
Engine hood • The lock system works properly?
Fluid leaks • Is there any leakage after park-
ing?
Tires • Inflation pressure is correct?
• Tire surfaces not worn or dam-
aged?
• Tires rotated according to the maintenance schedule?
• Wheel nuts are not loose?
CAUTION
■ If the engine is running
Turn the engine off and ensure that there is adequate ventilation before per-
forming maintenance checks.
Page 478 of 592
478 4-3. Do-it-yourself maintenance
Fuse layout and amperage ratings■ Engine compartment
FuseAmpereCircuit
1 MAIN 30 A Headlights, daytime running light
system, H-LP RL, H-LP LL
2 AM2 30 A INJ, IGN, GAUGE 2
3 ETCS 10 A Multiport fuel injection system/
sequential multiport fuel injection
system
4 DRL 20 A Daytime running light system,
H-LP RH, H-LP LH
5 DOOR NO.2 25 A Power door lock system
6 HORN 10 A Horns
7 DOME 10 A Personal/interior lights, vanity
lights, door courtesy lights, luggage
compartment light, engine switch
light, trip information display
Page 480 of 592
480 4-3. Do-it-yourself maintenance
27 L-PSD30 A Left side power sliding door
28 RR A/C 40 A Rear air conditioning system
29 DEF 40 A Rear window defogger, MIR HTR
30 SPARE 7.5 A Spare fuse
31 ALT 140 ACharging system, RR A/C, HTR,
FAN, PBD, R-PSD, L-PSD, DEF
32 ABS1 50 AAnti-lock brake system, traction
control system, vehicle stability
control system
33 ABS2 30 AAnti-lock brake system, traction
control system, vehicle stability
control system
34 ST 30 A Starting system
35 L-RR2 SEAT 30 A Power third seat
36 R-RR2 SEAT 30 A Power third seat
37 H-LP RL 10 A Right-hand headlight (low beam)
38 H-LP LL 10 ALeft-hand headlight (low beam),
front fog lights
39 RSE 7.5 A Rear seat entertainment system
40 INJ 10 AMultiport fuel injection system/
sequential multiport fuel injection
system
FuseAmpereCircuit
Page 482 of 592

482 4-3. Do-it-yourself maintenance
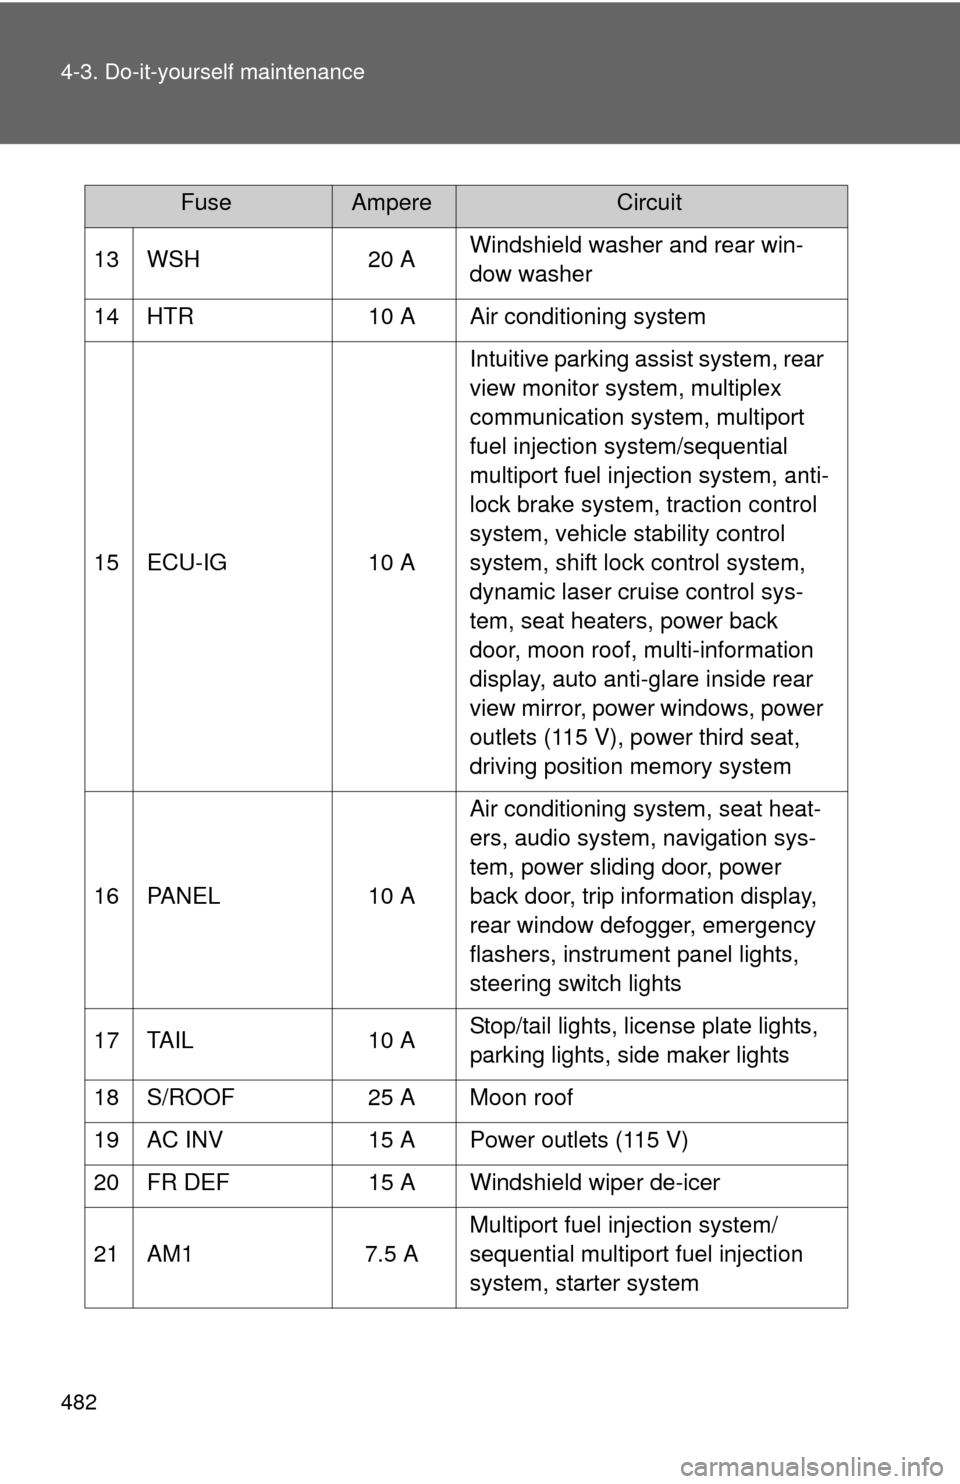
13 WSH20 AWindshield washer and rear win-
dow washer
14 HTR 10 A Air conditioning system
15 ECU-IG 10 AIntuitive parking assist system, rear
view monitor system, multiplex
communication system, multiport
fuel injection system/sequential
multiport fuel injection system, anti-
lock brake system, traction control
system, vehicle stability control
system, shift lock control system,
dynamic laser cruise control sys-
tem, seat heaters, power back
door, moon roof, multi-information
display, auto anti-glare inside rear
view mirror, power windows, power
outlets (115 V), power third seat,
driving position memory system
16 PANEL 10 AAir conditioning system, seat heat-
ers, audio system, navigation sys-
tem, power sliding door, power
back door, trip information display,
rear window defogger, emergency
flashers, instrument panel lights,
steering switch lights
17 TAIL 10 AStop/tail lights, license plate lights,
parking lights, side maker lights
18 S/ROOF 25 A Moon roof
19 AC INV 15 A Power outlets (115 V)
20 FR DEF 15 A Windshield wiper de-icer
21 AM1 7.5 AMultiport fuel injection system/
sequential multiport fuel injection
system, starter system
FuseAmpereCircuit
Page 491 of 592
491
4-3. Do-it-yourself maintenance
4
Maintenance and care
■
Tail and back-up lights
Open the back door and remove
the strap.
Remove the back door trim
board.
Turn the bulb bases counter-
clockwise.
Remove the light bulbs.
Tail light
Back-up light
STEP1
STEP2
STEP3
STEP4
Page 492 of 592
492 4-3. Do-it-yourself maintenance
■License plate lights
Open the back door and remove
the strap.
Remove the back door trim
board.
Turn the bulb bases counter-
clockwise.
Remove the light bulb.
STEP1
STEP2
STEP3
STEP4
Page 494 of 592

494 4-3. Do-it-yourself maintenance
CAUTION
■Replacing light bulbs
●Turn off the headlights. Do not attempt to replace the bulb immediately
after turning off the headlights.
The bulbs become very hot and may cause burns.
● Do not touch the glass portion of the light bulb with bare hands. Hold the
bulb by the plastic or metal portion.
If the bulb is scratched or dropped it may blow out or crack.
● Fully install light bulbs and any parts used to secure them. Failing to do so
may result in heat damage, fire, or water entering the headlight unit. This
may damage the headlights or cause condensation to build up on the lens.
● Do not attempt to take apart or repair the low beam headlight bulbs, con-
nectors, power supply circuits, or related components.
Doing so could result in electric shock and serious injury or death.
■ Discharge headlights
●Contact your Toyota dealer before replacing discharge headlights (includ-
ing light bulbs).
● Do not touch the high-intensity discharge headlight’s high voltage socket
when the headlights are turned on.
An extremely high voltage of 20000 V will be discharged and could result
in serious injury or death by electric shock.
■ To prevent damage or fire
Make sure bulbs are fully seated and locked.
NOTICE
■When installing the back door trim
To prevent damage, be careful not to pinch any of the wire harnesses or
connectors with the back door trim.