Page 284 of 592

284 3-2. Using the audio system
●Compatible media
Media that can be used for MP3 and WMA playback are CD-Rs and CD-
RWs.
Playback in some instances may not be possible, depending on the status
of the CD-R or CD-RW. Playback may not be possible or the audio may
jump if the disc is scratched or marked with fingerprints.
● Compatible disc formats
The following disc formats can be used.
• Disc formats: CD-ROM Mode 1 and Mode 2
CD-ROM XA Mode 2, Form 1 and Form 2
• File formats: ISO9660 Level 1, Level 2, (Romeo, Joliet) MP3 and WMA files written in any format other than those listed above
may not play correctly, and their file names and folder names may not
be displayed correctly.
Items related to standards and limitations are as follows.
• Maximum directory hierarchy: 8 levels
• Maximum length of folder names/file names: 32 characters
• Maximum number of folders: 192 (including the root)
• Maximum number of files per disc: 255
● File names
The only files that can be recognized as MP3/WMA and played are those
with the extension .mp3 or .wma.
● Multi-sessions
As the audio system is compatible with multi-sessions, it is possible to play
discs that contain MP3 and WMA files. However, only the first session can
be played.
Page 334 of 592

334 3-4. Using the hands-free phone system (for cellular phone)
Using the hands-free phone system for the first time
Before using the hands-free phone system, it is necessary to register
a cellular phone in the system. Th e phone registration mode will be
entered automatically when starting the system with no cellular
phone registered. Follow the procedure below to register a cellular
phone:
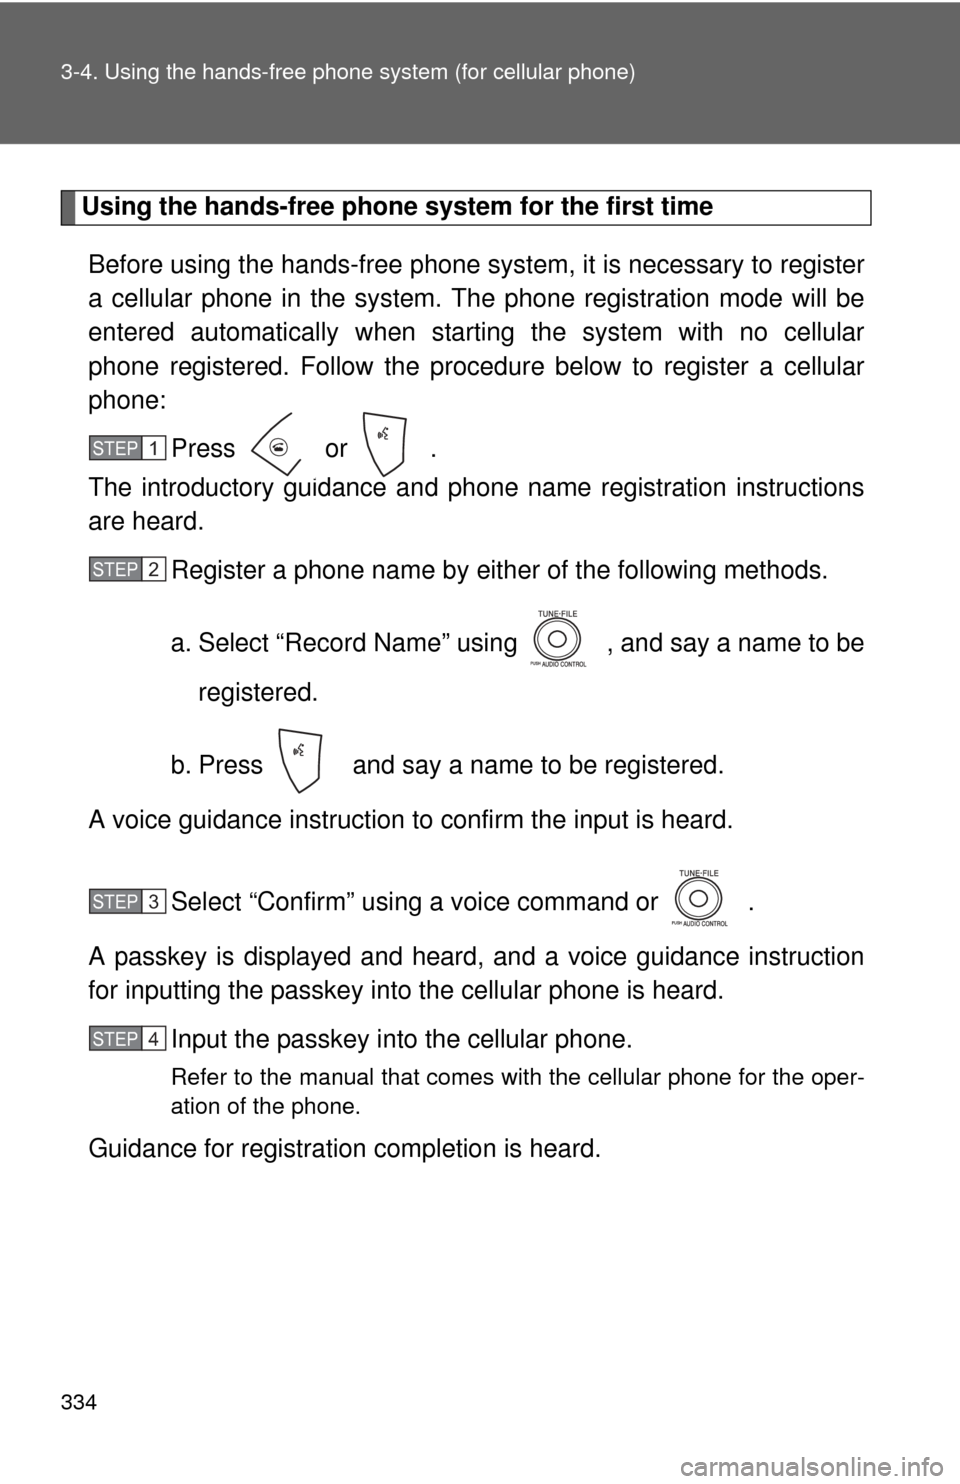
Press or .
The introductory guidance and phone name registration instructions
are heard.
Register a phone name by either of the following methods.
a. Select “Record Name” using , and say a name to be
registered.
b. Press and say a name to be registered.
A voice guidance instruction to confirm the input is heard.
Select “Confirm” using a voice command or .
A passkey is displayed and heard, and a voice guidance instruction
for inputting the passkey into the cellular phone is heard. Input the passkey into the cellular phone.
Refer to the manual that comes with the cellular phone for the oper-
ation of the phone.
Guidance for registration completion is heard.
STEP1
STEP2
STEP3
STEP4
Page 367 of 592
367
3-6. Using the
storage features
3
Interior features
■Installing the console box (7-passenger models)
Between the front seats
Install the front hook in the
front striker of the console box
installation base.
Push down on the back to
engage the rear lock.
Between the second seats If the right side second seat is in the inside position: Return
the seat to its original position. (The striker for the right side
second seat is also used as the console box lock striker.)
( P. 6 6 )
Install the front hook in the
rear striker of the double
striker set.
Push down on the back to
engage the rear lock.
STEP1
STEP2
Console box
Page 368 of 592
368 3-6. Using the storage features
CAUTION
■Caution while driving
Keep the console box closed.
Injuries may result in the event of an accident or sudden braking.
■ When installing the console box (7-passenger models)
●Be careful not to catch hands or feet in or under the console box.
● Make sure that the console box is securely installed by pushing it back and
forth, upward and sideways. Failure to do so may result in serious injury in
the event of sudden braking or a collision.
■ When installing the console box between the second seats (7-passen-
ger models)
Do not install the console box by any means other than the center striker
between the second seats. Doing so may result in serious injury in the event
of sudden braking or a collision, which may lead to an accident.
Console box
Page 414 of 592
414 3-7. Other interior features
Calibrating the compassThe direction display deviates fr om the true direction determined by
the earth’s magnetic field. The amoun t of deviation varies according
to the geographic position of the vehicle.
If you cross over a map boundary shown in illustration, the compass will
deviate.
To obtain higher precision or perfect calibration, refer to the following.
■Deviation calibration
Stop the vehicle in a level place.
Switch the trip information display to the outside temperature.
( P. 182)
Press and hold both the “MODE”
and “E/M” buttons simulta-
neously for 5 seconds until the
“VAR” indication and a number
(1 to 15) appears on the com-
pass display.
STEP1
STEP2
STEP3
Page 415 of 592
415
3-7. Other interior features
3
Interior features
Press the “E/M” button, and referring to the map above, select
the number of the zone where you are.
If the direction is displayed several seconds after adjustment, the
calibration is complete.
■
Circling calibration
When the direction display may not change after a turn, the com-
pass needs to be calibrated.
Stop the vehicle in a level place where it is safe to drive in a
circle. Press and hold both the “MODE”
and “E/M” buttons simulta-
neously for 10 seconds until the
“CAL” indication appears on the
compass display. (At this time,
the compass display is locked in
“N”.)
Drive the vehicle at 5 mph
(8 km/h) or less in a circle until
“CAL” indicator goes off and the
compass returns to the normal
mode.
If there is not enough space to
drive in a circle, drive around the
block until “CAL” indicator goes
off and the compass returns to
the normal mode.
STEP4
STEP1
STEP2
STEP3
Page 461 of 592

461
4-3. Do-it-yourself maintenance
4
Maintenance and care
CAUTION
■When inspecting or replacing tires
Observe the following precautions to
prevent accidents. Failure to do so
may cause damage to parts of the drive train, as well as dangerous han-
dling characteristics, which may lead to an accident resulting in death or
serious injury.
●Do not mix tires of different makes, models or tread patterns. Also, do
not mix tires of remarkably different treadwear.
●Do not use tire sizes other than those recommended by Toyota.
●Do not mix differently constructed ti res (radial, bias-belted or bias-ply
tires).
●Do not mix summer, all season and snow tires.
●Do not tow if your vehicle has a compact spare tire installed.
■When initializing the tire pressure warning system
Do not push the tire pressure warnin g reset switch without first adjusting
the tire inflation pressure to the spec ified level. Otherwise, the tire pres-
sure warning light may not come on ev en if the tire inflation pressure is
low, or it may come on when the tire inflation pressure is actually normal.
Page 496 of 592
496
5-1. Essential information
If your vehicle needs to be towed
Before towingThe following may indicate a problem with your transmission. Contact
your Toyota dealer before towing.
● The engine is running, but the vehicle will not move.
● The vehicle makes an abnormal sound.
If towing is necessary, we recommend having your vehicle towed by
your Toyota dealer or a commerci al towing service, using a lift-type
truck or a flat bed truck.
Use a safety chain system for all to wing, and abide by all state/pro-
vincial and local laws.
2WD models only: If towing from th e front, the vehicle's rear wheels
and axles must be in good condition. ( P. 497)
If they are damaged, use a towing dolly or flat bed truck.