Page 56 of 264

DESTINATION SEARCH
60
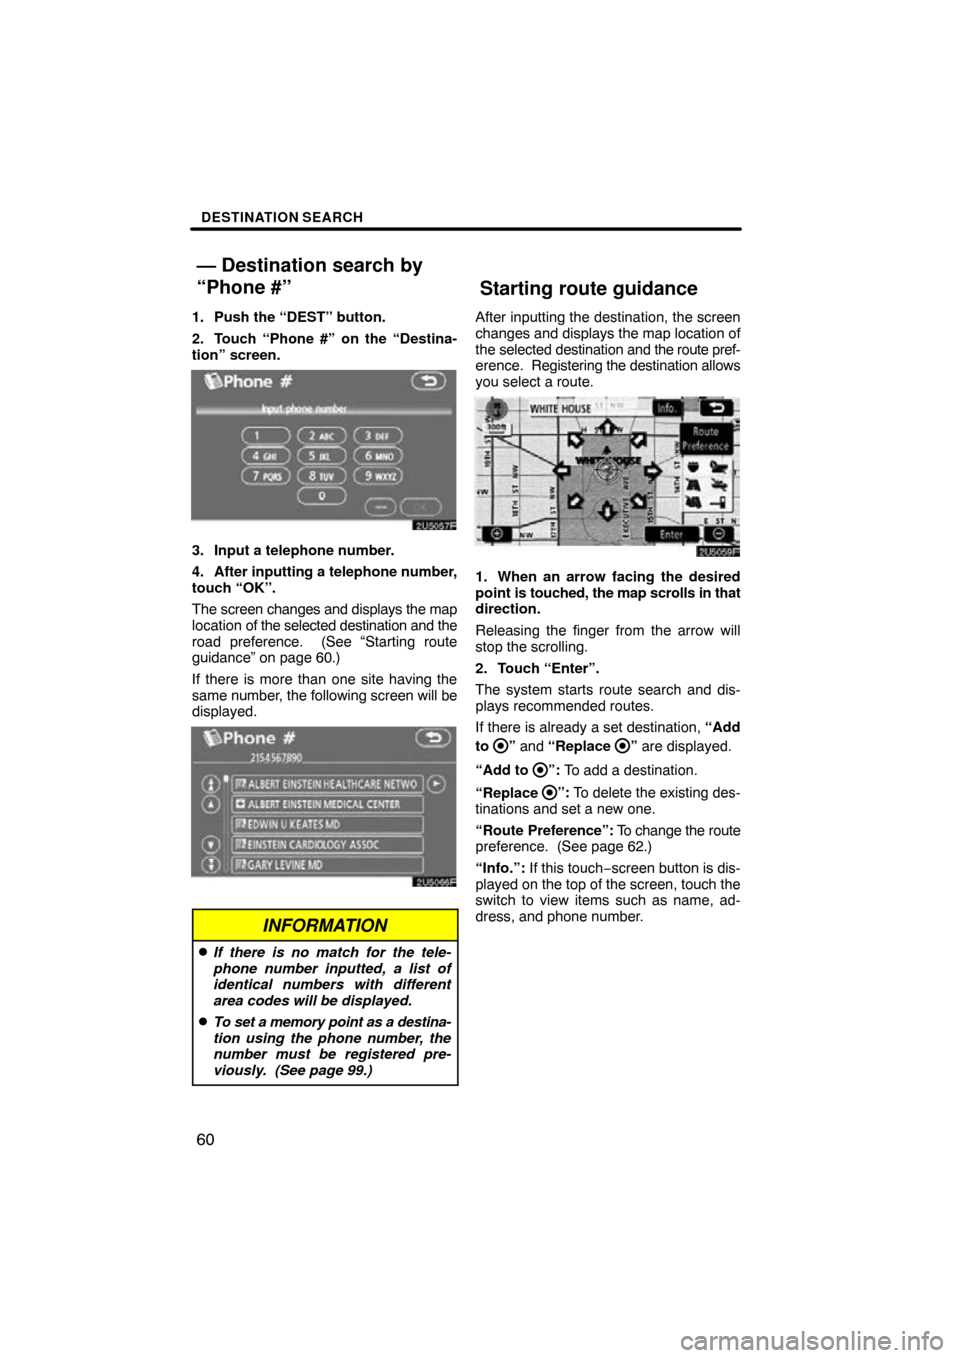
1. Push the “DEST” button.
2. Touch “Phone #” on the “Destina-
tion” screen.
3. Input a telephone number.
4. After inputting a telephone number,
touch “OK”.
The screen changes and displays the map
location of the selected destination and the
road preference. (See “Starting route
guidance” on page 60.)
If there is more than one site having the
same number, the following screen will be
displayed.
INFORMATION
�If there is no match for the tele-
phone number inputted, a list of
identical numbers with different
area codes will be displayed.
�To set a memory point as a destina-
tion using the phone number, the
number must be registered pre-
viously. (See page 99.)
After inputting the destination, the screen
changes and displays the map location of
the selected destination and the route pref-
erence. Registering the destination allows
you select a route.
1. When an arrow facing the desired
point is touched, the map scrolls in that
direction.
Releasing the finger from the arrow will
stop the scrolling.
2. Touch “Enter”.
The system starts route search and dis-
plays recommended routes.
If there is already a set destination, “Add
to
” and “Replace ” are displayed.
“Add to
”: To add a destination.
“Replace
”: To delete the existing des-
tinations and set a new one.
“Route Preference”: To change the route
preference. (See page 62.)
“Info.”: If this touch− screen button is dis-
played on the top of the screen, touch the
switch to view items such as name, ad-
dress, and phone number.
— Destination search by
“Phone #”Starting route guidance
Page 59 of 264
DESTINATION SEARCH
63
3 ROUTES SELECTION
1. To select the desired route from
three routes, touch “3 Routes”.
2. Touch “Quick1”, “Quick2” or
“Short” to select the desired route.
“Quick1”: Recommended route.
This route is indicated by an orange line.
“Quick2”: Alternative route.
This route is indicated by a purple line.
“Short”: A route by which you can reach
the destination in the shortest distance.
This route is indicated by a green line.
“Info.”: To display the following informa-
tion about each of the 3 routes.
1Time necessary for the entire trip
2Distance of the entire trip
3Toll road
4Freeway
5Ferry
Page 61 of 264

SECTION 3
ROUTE GUIDANCE
65
ROUTE GUIDANCE
Route guidance
�Route guidance screen 66
� Typical voice guidance prompts 69
� Distance and time to destination 71
� Setting and deleting destination 72
Adding destinations 72
. . . . . . . . . . . . . . . . . . . . . . . . . . . . . . . . . . .
Reordering destinations 72
. . . . . . . . . . . . . . . . . . . . . . . . . . . . . . .
Deleting destinations 73
.
� Setting route . . . . . . . . . . . . . . . . . . . . . . . . . . . . . . . .
74
Search condition 74
. . . . . . . . . . . . . . . . . . . . . . . . . . . . . . . . . . . . .\
Detour setting 75
. . . . . . . . . . . . . . . . . . . . . . . . . . . . . . . . . . . . .\
. . .
Route preference 77
. . . . . . . . . . . . . . . . . . . . . . . . . . . . . . . . . . . .
Starting route from adjacent road 77
. . . . . . . . . . . . . . . . . . . . . . .
� Map view 78
Display POI icons 78
. . . . . . . . . . . . . . . . . . . . . . . . . . . . . . . . . . . .
Route overview 81
. . . . . . . . . . . . . . . . . . . . . . . . . . . . . . . . . . . . .\
.
Route preview 82
. . . . . . . . . . . . . . . . . . . . . . . . . . . . . . . . . . . . .\
. .
Route trace 83
. . . . . . . . . . . . . . . . . . . . . . . . . . . . . . . . . . . . .\
. . . . .
∗: Point of Interest
. . . . . . . . . . . . . . . . . . . . . . . . . . . . . . . . . . . .\
. . . . . . . . . . . . . . . . . . . . . . . . . . . . . . . . . . . . . . . . . . . . .\
. . . . . . . . . . . . . . . . . . . . . . . . . . . . . . . . . . . . . . .
. . . . . . . . . . . . . . . . . . . . . . . .
. . . . . . . . . . . . . . . . . . . . . . . . . . . . . . . . . . . . . . . . . . . . . . . . . . . .
Page 62 of 264

ROUTE GUIDANCE
66
During route guidance, various types of
guidance screens can be displayed de-
pending on conditions.
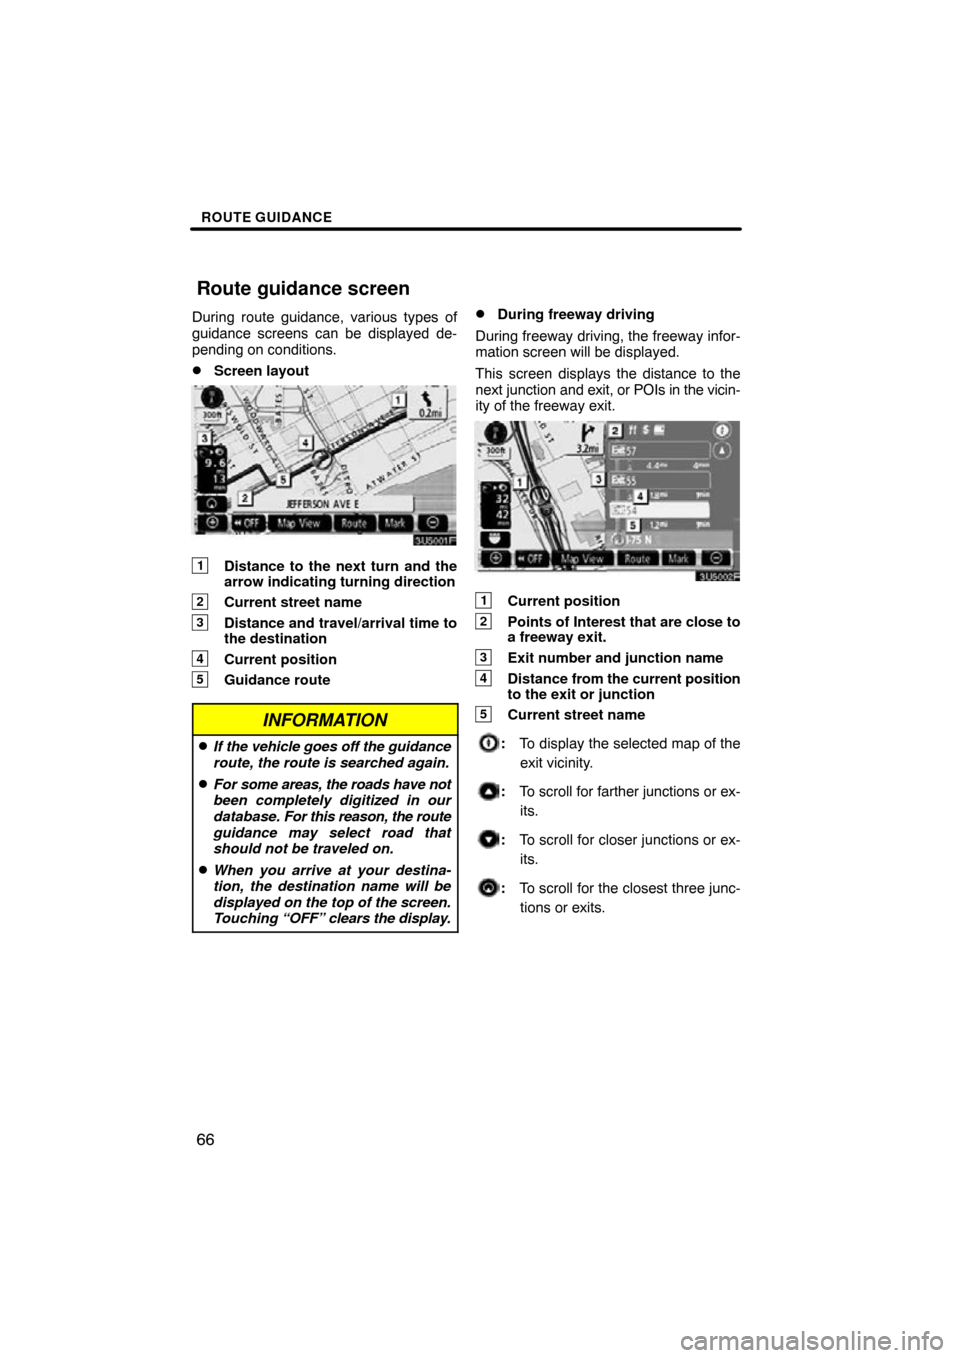
�Screen layout
1Distance to the next turn and the
arrow indicating turning direction
2Current street name
3Distance and travel/arrival time to
the destination
4Current position
5Guidance route
INFORMATION
�If the vehicle goes off the guidance
route, the route is searched again.
�For some areas, the roads have not
been completely digitized in our
database. For this reason, the route
guidance may select road that
should not be traveled on.
�When you arrive at your destina-
tion, the destination name will be
displayed on the top of the screen.
Touching “OFF” clears the display.
�During freeway driving
During freeway driving, the freeway infor-
mation screen will be displayed.
This screen displays the distance to the
next junction and exit, or POIs in the vicin-
ity of the freeway exit.
1Current position
2Points of Interest that are close to
a freeway exit.
3Exit number and junction name
4Distance from the current position
to the exit or junction
5Current street name
: To display the selected map of the
exit vicinity.
: To scroll for farther junctions or ex-
its.
: To scroll for closer junctions or ex-
its.
: To scroll for the closest three junc-
tions or exits.
Route guidance screen
Page 63 of 264
ROUTE GUIDANCE
67
�
When
approaching a freeway exit or
junction
When the vehicle approaches an en-
trance, exit, or junction, the guidance
screen for the freeway will be displayed.
1Road/area name
2Distance from the current position
to the exit or junction
3Current position
“OFF”: The guidance screen on freeway
disappears and the map screen appears.
When touching
or pushing the
“MAP/VOICE” button, the guidance
screen on freeway reappears.
�When approaching an intersection
When the vehicle approaches an intersec-
tion, the intersection guidance screen will
be displayed.
1Next street name
2Distance to the intersection
3Current position
“OFF”: The intersection guidance screen
disappears and the map screen appears.
When touching
or pushing the
“MAP/VOICE” button, the intersection
guidance screen reappears.
Page 64 of 264
ROUTE GUIDANCE
68
�
Other screens
TURN LIST SCREEN
On this screen, the list of turns on the guid-
ance route can be viewed.
Touching
during guidance displays
the turn list.
1Next street name or destination
name
2Turn direction
3Distance to the next turn
4Current street name ARROW SCREEN
On this screen, information about next
turns on the
guidance route can be viewed.
Touching
during guidance displays
the arrow screen.
1Exit number, street name contain-
ing number or next street name
2Turn direction
3Distance to the next turn
4Current street name
Page 67 of 264

ROUTE GUIDANCE
71
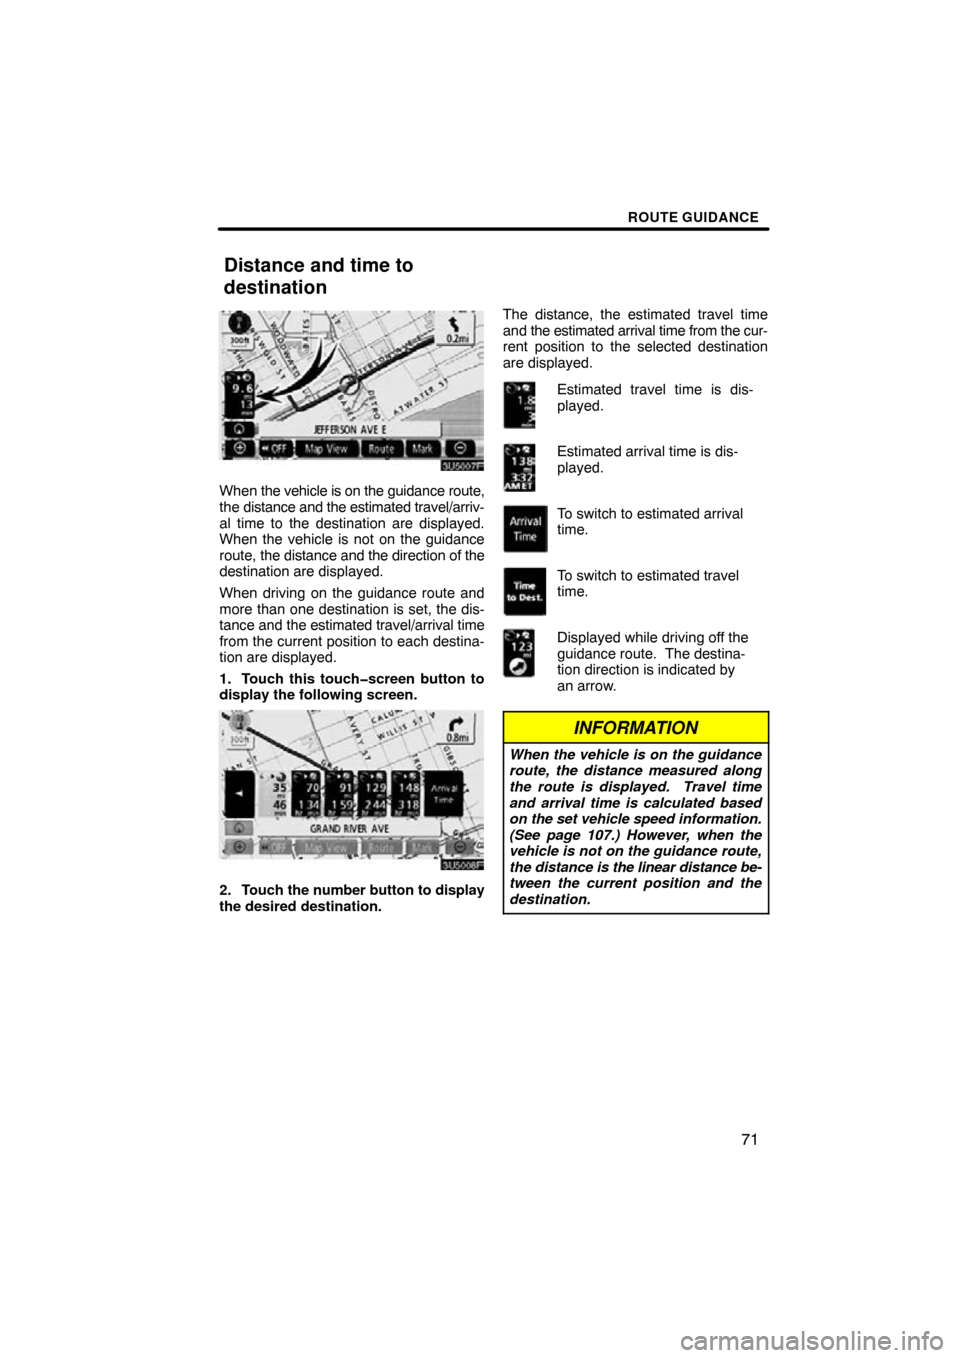
When the vehicle is on the guidance route,
the distance and the estimated travel/arriv-
al time to the destination are displayed.
When the vehicle is not on the guidance
route, the distance and the direction of the
destination are displayed.
When driving on the guidance route and
more than one destination is set, the dis-
tance and the estimated travel/arrival time
from the current position to each destina-
tion are displayed.
1. Touch this touch�screen button to
display the following screen.
2. Touch the number button to display
the desired destination. The distance, the estimated travel time
and the estimated arrival time from the cur-
rent position to the selected destination
are displayed.
Estimated travel time is dis-
played.
Estimated arrival time is dis-
played.
To switch to estimated arrival
time.
To switch to estimated travel
time.
Displayed while driving off the
guidance route. The destina-
tion direction is indicated by
an arrow.
INFORMATION
When the vehicle is on the guidance
route, the distance measured along
the route is displayed. Travel time
and arrival time is calculated based
on the set vehicle speed information.
(See page 107.) However, when the
vehicle is not on the guidance route,
the distance is the linear distance be-
tween the current position and the
destination.
Distance and time to
destination
Page 68 of 264
ROUTE GUIDANCE
72
Adding destinations and searching again
for the routes can be done.
1. Touch “Route”.
2. Touch “Add”.
3. Input an additional destination in
the same way as the destination
search. (See “Destination search” on
page 41.)
4. Touch the desired “Add” to deter-
mine the arrival order of the additional
destination. When more than one destination is set,
you can change the arrival order of the
destinations.
1. Touch “Route”.
2. Touch “Reorder”.
3. Select
the destination in the order of
arrival by touching the destination but-
ton.
Reordered number of arrival is displayed
on the right side of the screen.
Touching “Undo” will cancel each se-
lected order number from the previously
input number.
Setting and deleting
destination —
— Adding destinations
— Reordering destinations