2010 SUZUKI SX4 display
[x] Cancel search: displayPage 92 of 297

2-75BEFORE DRIVING
80J23-03E
NOTE:
If you push the indicator selector knob or
do not turn the knob for more than 5 sec-
onds while activating the illumination
control, the illumination control will be
canceled automatically and the display
(D) will show the odometer indication.
You can change the brightness when the
position lights or headlights are on even
if the ignition switch is in the “ACC” or
“LOCK” position.
When you reconnect the negative (–) ter-
minal to the battery, the brightness of the
instrument panel lights will be reinitial-
ized. Readjust the brightness according
to your preference.
NOTE:
If you select the lowest brightness level
when the position lights or headlights are
on, the instrument panel lights other than
meter lights are turned off.
Clock (if equipped)
When the ignition switch is in the “ON”
position, the display (E) shows the time.To change the time indication:
1) Push the trip meter selector knob (1)
and the indicator selector knob (2)
together.
2) To change the hour indication, turn the
indicator selector knob (2) left or right
repeatedly when the hour indication
flashes. To change the hour indication
quickly, turn and hold the indicator
selector knob (2). To set the hour indi-
cation, push the the indicator selector
knob (2) and the minute indication will
flash.
3) To change the minute indication, turn
the indicator selector knob (2) left or
right repeatedly when the minute indi-
cation flashes. To change the minute
indication quickly, turn and hold the
indicator selector knob (2). To set the
minute indication, push the indicator
selector knob (2).
NOTE:
When you reconnect the negative (–) ter-
minal to the battery, the clock indication will
be reinitialized. Change the indication
again to your preference.
Lighting Control Lever
65D611
WARNING
If you attempt to adjust the display
while driving, you could lose control
of the vehicle.
Do not attempt to adjust the display
while driving.
WARNING
If you attempt to adjust the display
while driving, you could lose control
of the vehicle.
Do not attempt to adjust the display
while driving.
WARNING
To avoid possible injury, do not oper-
ate controls by reaching through the
steering wheel.
Page 114 of 297
3-13OPERATING YOUR VEHICLE
80J23-03E
D (Drive)
Use this position for all normal driving.
With the gearshift lever in “D” range you
can get an automatic downshift by press-
ing the accelerator pedal. The higher the
vehicle speed is, the more you need to
press the accelerator pedal to get a down-
shift.
M (manual mode)
Use this position for driving in the manual
mode.
Refer to “Manual mode” later in this section
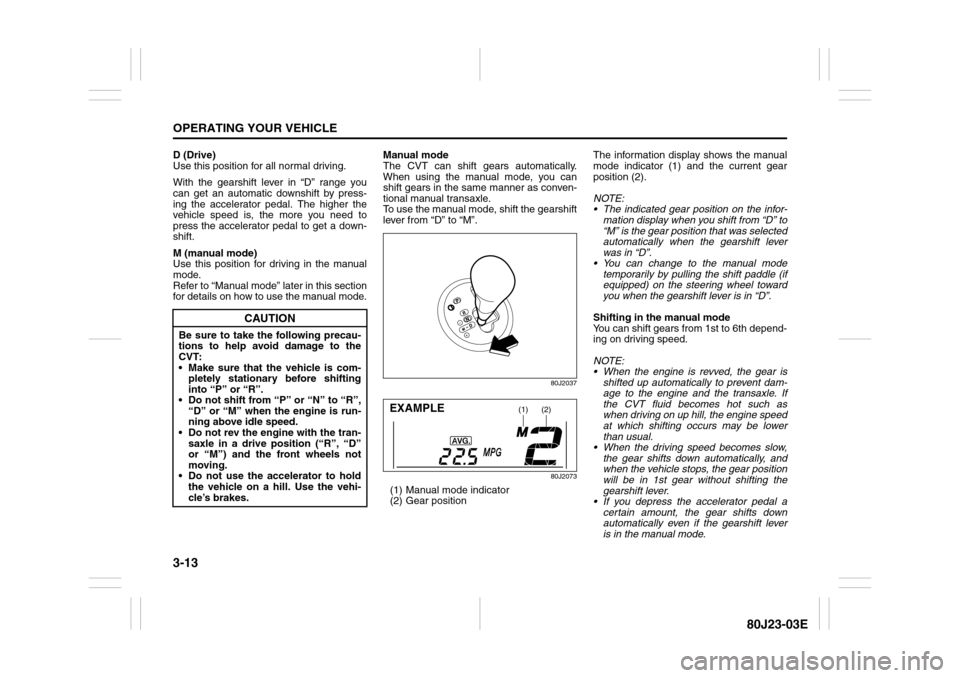
for details on how to use the manual mode.Manual mode
The CVT can shift gears automatically.
When using the manual mode, you can
shift gears in the same manner as conven-
tional manual transaxle.
To use the manual mode, shift the gearshift
lever from “D” to “M”.
80J2037
80J2073
(1) Manual mode indicator
(2) Gear positionThe information display shows the manual
mode indicator (1) and the current gear
position (2).
NOTE:
The indicated gear position on the infor-
mation display when you shift from “D” to
“M” is the gear position that was selected
automatically when the gearshift lever
was in “D”.
You can change to the manual mode
temporarily by pulling the shift paddle (if
equipped) on the steering wheel toward
you when the gearshift lever is in “D”.
Shifting in the manual mode
You can shift gears from 1st to 6th depend-
ing on driving speed.
NOTE:
When the engine is revved, the gear is
shifted up automatically to prevent dam-
age to the engine and the transaxle. If
the CVT fluid becomes hot such as
when driving on up hill, the engine speed
at which shifting occurs may be lower
than usual.
When the driving speed becomes slow,
the gear shifts down automatically, and
when the vehicle stops, the gear position
will be in 1st gear without shifting the
gearshift lever.
If you depress the accelerator pedal a
certain amount, the gear shifts down
automatically even if the gearshift lever
is in the manual mode.
CAUTION
Be sure to take the following precau-
tions to help avoid damage to the
CVT:
Make sure that the vehicle is com-
pletely stationary before shifting
into “P” or “R”.
Do not shift from “P” or “N” to “R”,
“D” or “M” when the engine is run-
ning above idle speed.
Do not rev the engine with the tran-
saxle in a drive position (“R”, “D”
or “M”) and the front wheels not
moving.
Do not use the accelerator to hold
the vehicle on a hill. Use the vehi-
cle’s brakes.
(1)
(2)
EXAMPLE
Page 116 of 297
3-15OPERATING YOUR VEHICLE
80J23-03E
Canceling the manual mode
To cancel the manual mode, shift the gear-
shift lever from “M” to “D”.
Temporary manual mode
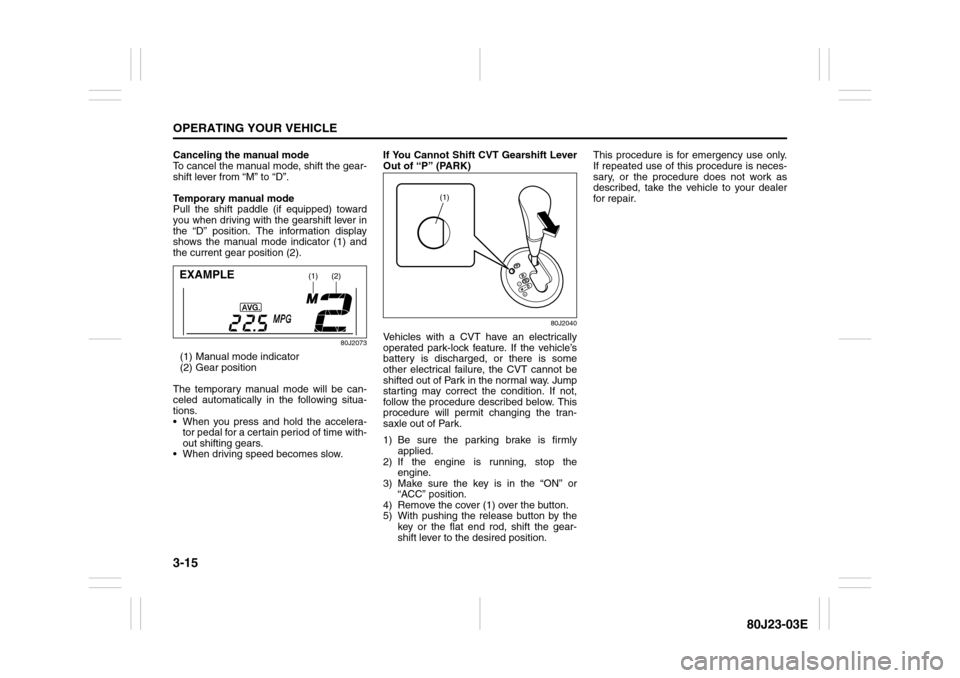
Pull the shift paddle (if equipped) toward
you when driving with the gearshift lever in
the “D” position. The information display
shows the manual mode indicator (1) and
the current gear position (2).
80J2073
(1) Manual mode indicator
(2) Gear position
The temporary manual mode will be can-
celed automatically in the following situa-
tions.
When you press and hold the accelera-
tor pedal for a certain period of time with-
out shifting gears.
When driving speed becomes slow.If You Cannot Shift CVT Gearshift Lever
Out of “P” (PARK)
80J2040
Vehicles with a CVT have an electrically
operated park-lock feature. If the vehicle’s
battery is discharged, or there is some
other electrical failure, the CVT cannot be
shifted out of Park in the normal way. Jump
starting may correct the condition. If not,
follow the procedure described below. This
procedure will permit changing the tran-
saxle out of Park.
1) Be sure the parking brake is firmly
applied.
2) If the engine is running, stop the
engine.
3) Make sure the key is in the “ON” or
“ACC” position.
4) Remove the cover (1) over the button.
5) With pushing the release button by the
key or the flat end rod, shift the gear-
shift lever to the desired position.This procedure is for emergency use only.
If repeated use of this procedure is neces-
sary, or the procedure does not work as
described, take the vehicle to your dealer
for repair.
(1)
(2)
EXAMPLE
(1)
Page 150 of 297
5-9OTHER CONTROLS AND EQUIPMENT
80J23-03E
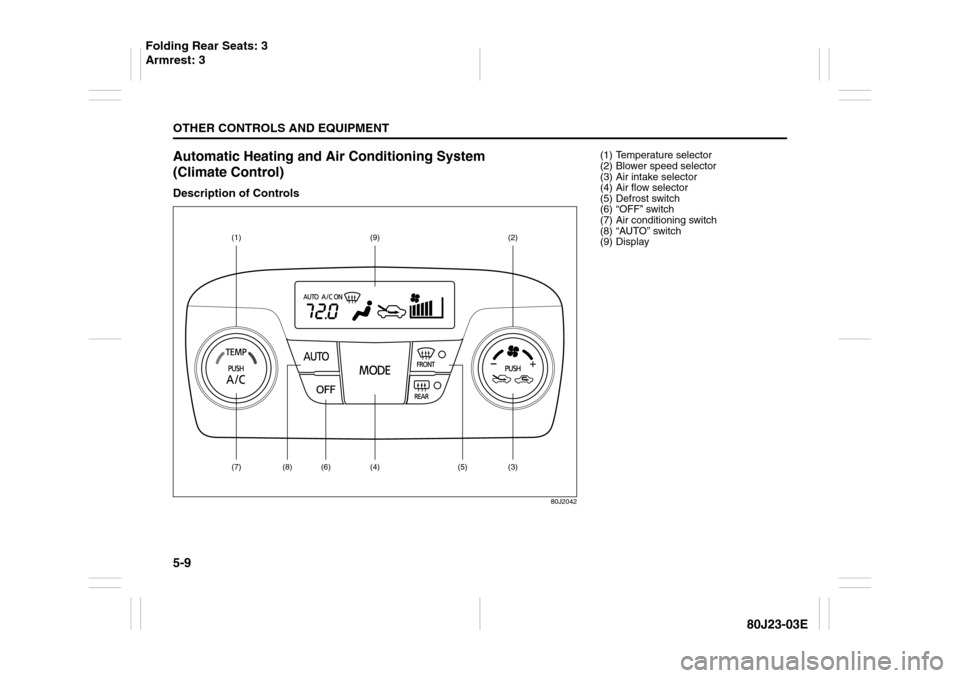
Automatic Heating and Air Conditioning System
(Climate Control)Description of Controls
80J2042
(1)
(9)
(2)
(7)
(3)
(5)
(4) (
6) (
8)
(1) Temperature selector
(2) Blower speed selector
(3) Air intake selector
(4) Air flow selector
(5) Defrost switch
(6) “OFF” switch
(7) Air conditioning switch
(8) “AUTO” switch
(9) Display
Folding Rear Seats: 3
Armrest: 3
Page 151 of 297
5-10
OTHER CONTROLS AND EQUIPMENT
80J23-03E
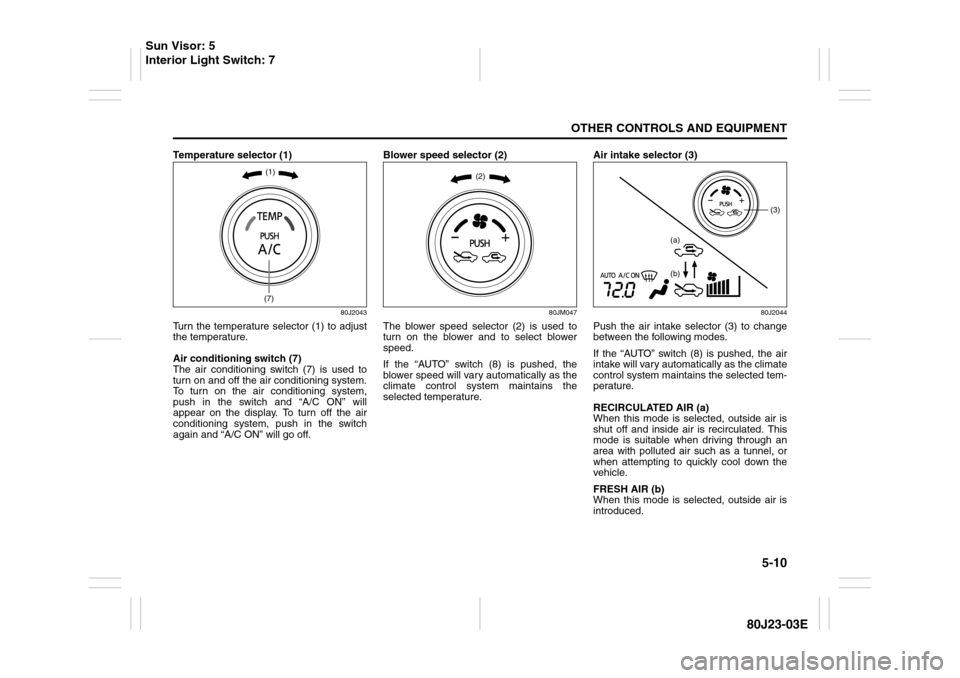
Temperature selector (1)
80J2043
Turn the temperature selector (1) to adjust
the temperature.
Air conditioning switch (7)
The air conditioning switch (7) is used to
turn on and off the air conditioning system.
To turn on the air conditioning system,
push in the switch and “A/C ON” will
appear on the display. To turn off the air
conditioning system, push in the switch
again and “A/C ON” will go off.Blower speed selector (2)
80JM047
The blower speed selector (2) is used to
turn on the blower and to select blower
speed.
If the “AUTO” switch (8) is pushed, the
blower speed will vary automatically as the
climate control system maintains the
selected temperature.Air intake selector (3)
80J2044
Push the air intake selector (3) to change
between the following modes.
If the “AUTO” switch (8) is pushed, the air
intake will vary automatically as the climate
control system maintains the selected tem-
perature.
RECIRCULATED AIR (a)
When this mode is selected, outside air is
shut off and inside air is recirculated. This
mode is suitable when driving through an
area with polluted air such as a tunnel, or
when attempting to quickly cool down the
vehicle.
FRESH AIR (b)
When this mode is selected, outside air is
introduced.
(1)(7)
(2)
(3)
(a)
(b)
Sun Visor: 5
Interior Light Switch: 7
Page 152 of 297
5-11OTHER CONTROLS AND EQUIPMENT
80J23-03E
“FRESH AIR” and “RECIRCULATED AIR”
are selected alternately each time the air
intake selector is pushed.
NOTE:
If you select “RECIRCULATED AIR” for an
extended period of time, the air in the vehi-
cle can become contaminated. Therefore,
you should occasionally select “FRESH
AIR”.Air flow selector (4)
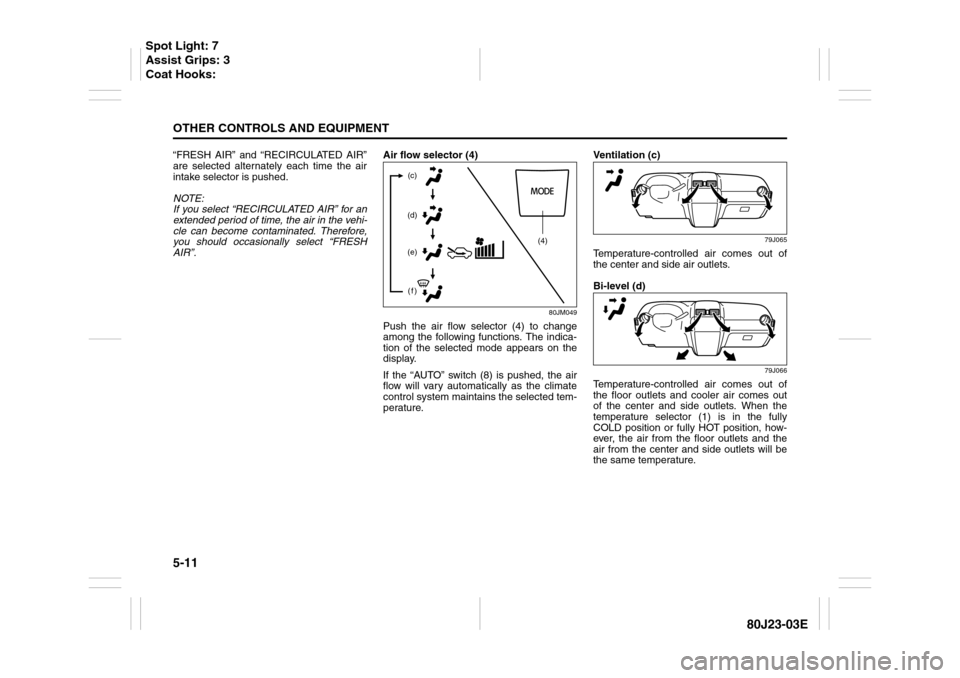
80JM049
Push the air flow selector (4) to change
among the following functions. The indica-
tion of the selected mode appears on the
display.
If the “AUTO” switch (8) is pushed, the air
flow will vary automatically as the climate
control system maintains the selected tem-
perature.Ventilation (c)
79J065
Temperature-controlled air comes out of
the center and side air outlets.
Bi-level (d)
79J066
Temperature-controlled air comes out of
the floor outlets and cooler air comes out
of the center and side outlets. When the
temperature selector (1) is in the fully
COLD position or fully HOT position, how-
ever, the air from the floor outlets and the
air from the center and side outlets will be
the same temperature.
(4) (c)
(d)
(e)
(f)
Spot Light: 7
Assist Grips: 3
Coat Hooks:
Page 154 of 297
5-13OTHER CONTROLS AND EQUIPMENT
80J23-03E
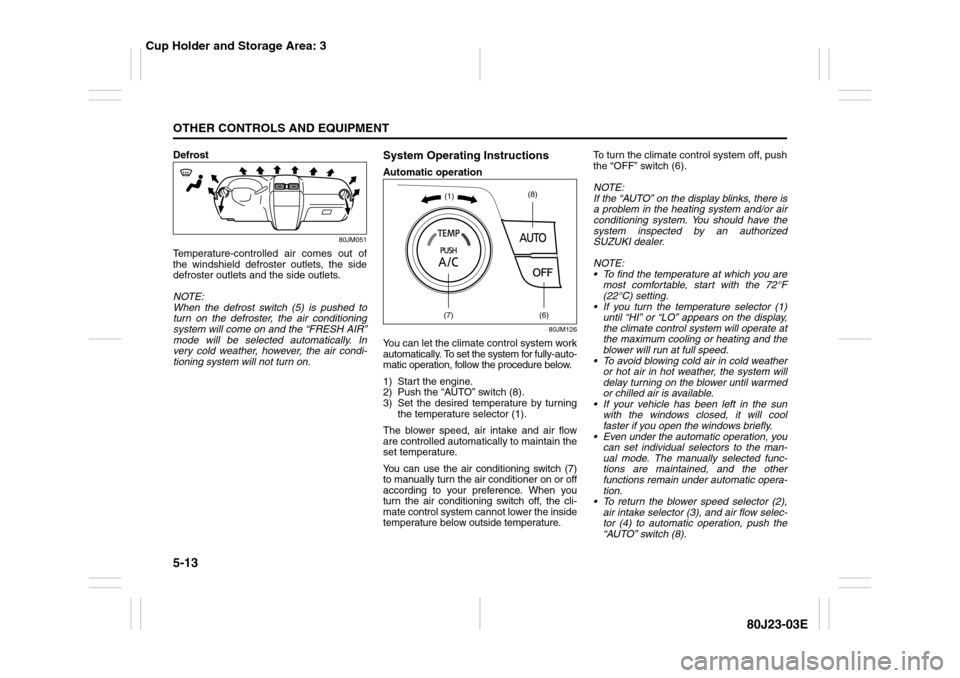
Defrost
80JM051
Temperature-controlled air comes out of
the windshield defroster outlets, the side
defroster outlets and the side outlets.
NOTE:
When the defrost switch (5) is pushed to
turn on the defroster, the air conditioning
system will come on and the “FRESH AIR”
mode will be selected automatically. In
very cold weather, however, the air condi-
tioning system will not turn on.
System Operating InstructionsAutomatic operation
80JM126
You can let the climate control system work
automatically. To set the system for fully-auto-
matic operation, follow the procedure below.
1) Start the engine.
2) Push the “AUTO” switch (8).
3) Set the desired temperature by turning
the temperature selector (1).
The blower speed, air intake and air flow
are controlled automatically to maintain the
set temperature.
You can use the air conditioning switch (7)
to manually turn the air conditioner on or off
according to your preference. When you
turn the air conditioning switch off, the cli-
mate control system cannot lower the inside
temperature below outside temperature.To turn the climate control system off, push
the “OFF” switch (6).
NOTE:
If the “AUTO” on the display blinks, there is
a problem in the heating system and/or air
conditioning system. You should have the
system inspected by an authorized
SUZUKI dealer.
NOTE:
To find the temperature at which you are
most comfortable, start with the 72°F
(22°C) setting.
If you turn the temperature selector (1)
until “HI” or “LO” appears on the display,
the climate control system will operate at
the maximum cooling or heating and the
blower will run at full speed.
To avoid blowing cold air in cold weather
or hot air in hot weather, the system will
delay turning on the blower until warmed
or chilled air is available.
If your vehicle has been left in the sun
with the windows closed, it will cool
faster if you open the windows briefly.
Even under the automatic operation, you
can set individual selectors to the man-
ual mode. The manually selected func-
tions are maintained, and the other
functions remain under automatic opera-
tion.
To return the blower speed selector (2),
air intake selector (3), and air flow selec-
tor (4) to automatic operation, push the
“AUTO” switch (8).
(7)
(6)
(8)
(1)
Cup Holder and Storage Area: 3
Page 155 of 297

5-14
OTHER CONTROLS AND EQUIPMENT
80J23-03E
80JM127
Be careful not to cover the interior temper-
ature sensor (10) located between the
steering wheel and the climate control
panel, or the solar sensor (11) located at
the top of the driver’s side dashboard.
These sensors are used by the automatic
system to regulate temperature.
Manual operationYou can manually control the climate con-
trol system. Set the selectors to the
desired positions.
79J070
NOTE:
If you need maximum defrosting:
push the defrost switch (5) to turn on the
defroster (the air conditioning system will
come on and the “FRESH AIR” mode will
be selected automatically),
set the blower speed selector to HIGH,
adjust the temperature selector to the
“HI” indication on the display, and
adjust the side outlets so the air blows
on the side windows.
MaintenanceIf you do not use the air conditioner for a
long period, such as during winter, it may
not give the best performance when you
start using it again. To help maintain opti-
mum performance and durability of your air
conditioner, it needs to be run periodically.
Operate the air conditioner at least once a
month for one minute with the engineidling.
This circulates the refrigerant and oil and
helps protect the internal components.
Your air conditioner is equipped with air fil-
ters. Clean or replace them as specified in
the “Maintenance Schedule” in the
“INSPECTION AND MAINTENANCE” sec-
tion. Have this job done by your SUZUKI
dealer as the lower glove box must be low-
ered for this job.
NOTE:
Your vehicle uses the air conditioning
refrigerant HFC-134a, commonly called
“R-134a”. R-134a replaced R-12 around
1993 for automotive applications. Other
refrigerants are available, including recy-
cled R-12, but only R-134a should be used
in your vehicle.
(11)
(10)
EXAMPLE
EXAMPLE
CAUTION
Using the wrong refrigerant may
damage your air conditioning sys-
tem. Use R-134a only. Do not mix or
replace the R-134a with other refrig-
erants.
Accessory Socket: 8
Frame Hooks: 5, 6