2010 SUZUKI KIZASHI Side turn signal light
[x] Cancel search: Side turn signal lightPage 10 of 388

ILLUSTRATED TABLE OF CONTENTS
57L20-03E
EXTERIOR1. High-mount Stop Light (P.12-3)
2. Rear Combination Light (P.7-53)
3. Radio Antenna (P.5-9)
4. Engine Hood (P.5-75)
5. Headlight (P.2-100, P.7-46)
6. Windshield Wiper (P.2-107)
7. Outside Rearview Mirror (P.2-22)
8. Fuel Filler Cap (P.5-74)
9. License Plate Light (P.7-53)
10. Trunk Lid (P.2-5)
11. Front Fog Light (if equipped)
(P.2-105, P.7-50)
12. Side Marker Light (P.7-51)
13. Side Turn Signal Light (P.7-50)
14. Door Locks (P.2-3)
57L1F003
1
5
7
2
3
4
6
8
10
9 11
14
13
12
Page 13 of 388

ILLUSTRATED TABLE OF CONTENTS
57L20-03E
INSTRUMENT PANEL1. Front Fog Light Switch (if equipped)(P.2-105)
2. Lighting Control Lever (P.2-100)/ Turn Signal Control Lever (P.2-105)
3. Shift Paddles (if equipped) (P.3-17)
4. Instrument Cluster (P.2-68)
5. Windshield Wiper and Washer Lever (P.2-107)
6. Front Seat Heater Switch (if equipped) (P.2-28)
7. Hazard Warning Switch (P.2-106)
8. ESP
® OFF Switch (P.3-33)
9. Parking Sensor Switch (if equipped) (P.3-26)
10. 2WD/i-AWD (intelligent All Wheel Drive) Switch (if equipped) (P.3-19)
11. Trunk lid unlatch switch (P.2-5)
12. Engine Hood Release Handle (P.5-75)
13. Tilt/Telescoping/Steering Lock Lever (P.2-110)
14. Engine Switch (P.3-2)
15. Universal Serial Bus (USB) Socket (P.5-81)
16. Accessory Socket (P.5-80)/ Cigarette Lighter (if equipped) (P.5-81)
17. Heated Rear Window and Heated Outside Rearview Mirrors Switch
(if equipped) (P.2-111)
57L1F006
1
3
2
4
7
6
14
13
12
11
9 10
17
16
15
8 5
3
6
Page 19 of 388

BEFORE DRIVING
2
57L20-03E
60G404
BEFORE DRIVINGKeys .................................................................................... 2-1
Immobilizer System .......................................................... 2-2
Door Locks ........................................................................ 2-3
Keyless Start System Remote Controller ....................... 2-6
Theft Deterrent Alarm System ......................................... 2-14
Windows ............................................................................ 2-17
Mirrors ................................................................................ 2-20
Front Seats ........................................................................ 2-23
Front Seat Heater (if equipped) ........................................ 2-28
Rear Seats .......................................................................... 2-29
Seat Belts and Child Restraint Systems ......................... 2-34
Supplemental Restraint System (air bags) ..................... 2-55
Instrument Cluster ............................................................ 2-68
Warning and Indicator Lights .......................................... 2-69
Speedometer ..................................................................... 2-78
Tachometer ........................................................................ 2-78
Fuel Gauge ......................................................................... 2-78
Temperature Gauge .......................................................... 2-79
Brightness Control ............................................................ 2-79
Information Display ........................................................... 2-80
Lighting Control Lever ...................................................... 2-100
Front Fog Light Switch (if equipped) .............................. 2-105
Turn Signal Control Lever ................................................ 2-105
Hazard Warning Switch .................................................... 2-106
Rain-sensing Wipers and Washer Lever ......................... 2-107
Tilt/Telescoping/Steering Lock Lever (if equipped) ....... 2-110
Horn .................................................................................... 2-111
Heated Rear Window and Heated Outside
Rearview Mirrors (if equipped) Switch ............................ 2-111
Page 135 of 388

3-4
OPERATING YOUR VEHICLE
57L20-03E
Keyless Push Start SystemProvided the keyless start system remote
controller is within the “interior workable
area” (Refer to the related explanation in
this section), you can use the engine
switch for starting the engine and selecting
a power supply mode (“ACC” or “ON”). In
addition, the following functions can be
used:
Keyless entry function. Refer to “KeylessStart System Remote Controller” in the
“Before Driving” section for details.
Locking and unlocking doors using a request switch. Refer to “Keyless Start
System Remote Controller” in the
“Before Driving” section for details.
Opening the trunk lid from outside using the trunk lid request switch.
Immobilizer (anti-theft) function. Refer to “Immobilizer System” in the “Before Driv-
ing” section for details.Engine Switch IlluminationThe engine switch is illuminated lit in the
following situations:
The driver’s door is open (only when the
engine is not in operation).
For 15 seconds after the driver’s door is closed (only when the engine is not in
operation).
The position lights are on.
The illumination will fade out when it is not
required.
82K253
NOTE:
To save the battery, the illumination will be
automatically turned off when both of the
following conditions are simultaneously
met (battery saver function):
The headlights and position lights are turned off.
A period of 15 minutes has elapsed after opening the driver’s door.
Selection of Power Supply ModesPress the engine switch to select the
“ACC” or “ON” mode as follows when you
use an electric accessory or check the
operation of instruments without running
the engine.
1) Bring the keyless start system remote controller with you and sit in the driver’s
seat.
2) Without depressing the brake pedal, press the engine switch (1).
82K254
Every time you push the engine switch
without the brake pedal depressed, the
power supply mode changes as follows.
(1)
Lighting/Turn Signal Control Lever: 8
Windshield Wiper and Washer Lever: 8
Page 168 of 388

3-37OPERATING YOUR VEHICLE
57L20-03E
should add 1 psi to the recommended
cold tire inflation pressure for every 10°F
difference between garage temperature
and outside temperature.
For tire inflation pressure information, refer
to “Tire Inflation Pressure” in the “INSPEC-
TION AND MAINTENANCE” section.
To make the low tire pressure warning light
turn off, the vehicle must be driven for
longer and faster than the specified thresh-
olds after adjusting the tire pressure.
Please ask an authorized SUZUKI dealer
for details.
TPMS Malfunction Indicator
The TPMS malfunction indicator is not
reset even after the engine is turned off; it
remains in the on state until the normal
conditions are restored.
WARNING
Your vehicle has also been equipped
with a TPMS malfunction indicator to
indicate when the system is not oper-
ating properly.
WARNING
The TPMS malfunction indicator is
combined with the low tire pressure
telltale. When the system detects a
malfunction, the telltale will flash for
approximately one minute and then
remain continuously illuminated.
This sequence will continue upon
subsequent vehicle start-ups as long
as the malfunction exists.
WARNING
When the malfunction indicator is
illuminated, the system may not be
able to detect or signal low tire pres-
sure as intended. TPMS malfunctions
may occur for a variety of reasons,
including the installation of replace-
ment or alternate tires or wheels on
the vehicle that prevent the TPMS
from functioning properly. Always
check the TPMS malfunction telltale
after replacing one or more tires or
wheels on your vehicle to ensure that
the replacement or alternate tires and
wheels allow the TPMS to continue to
function properly.
Page 335 of 388

7-50
INSPECTION AND MAINTENANCE
57L20-03E
5) Pull on the cable (4) toward the rear of
the vehicle to remove the bulb socket
(5) from the parking light body.
NOTE:
You can remove the parking light’s bulb
socket only by pulling on the cable, but this
method must never be used to remove the
bulb sockets of any other lights.
6) Replace the bulb, then follow the above
steps in reverse to restore the original
state.Side turn signal lights
57L71028
1) Pull out the rear end of the side turn
signal light (1) while pushing it toward
the front of the vehicle as shown in the
illustration.
57L71029
2) Disconnect the coupler while pushing
the lock release (2) on it.
3) Replace the side turn signal light (1),
then follow the above steps in reverse
to restore the original state.
Front fog light (if equipped)
1) Start the engine. To facilitate bulb
replacement, turn the steering wheel
away from the front fog light whose bulb
is to be replaced, then turn off the
engine.
57L70039
2) Remove the screw (1).
(1)
(2)
(1)
EXAMPLE
Page 337 of 388

7-52
INSPECTION AND MAINTENANCE
57L20-03E
57L70041
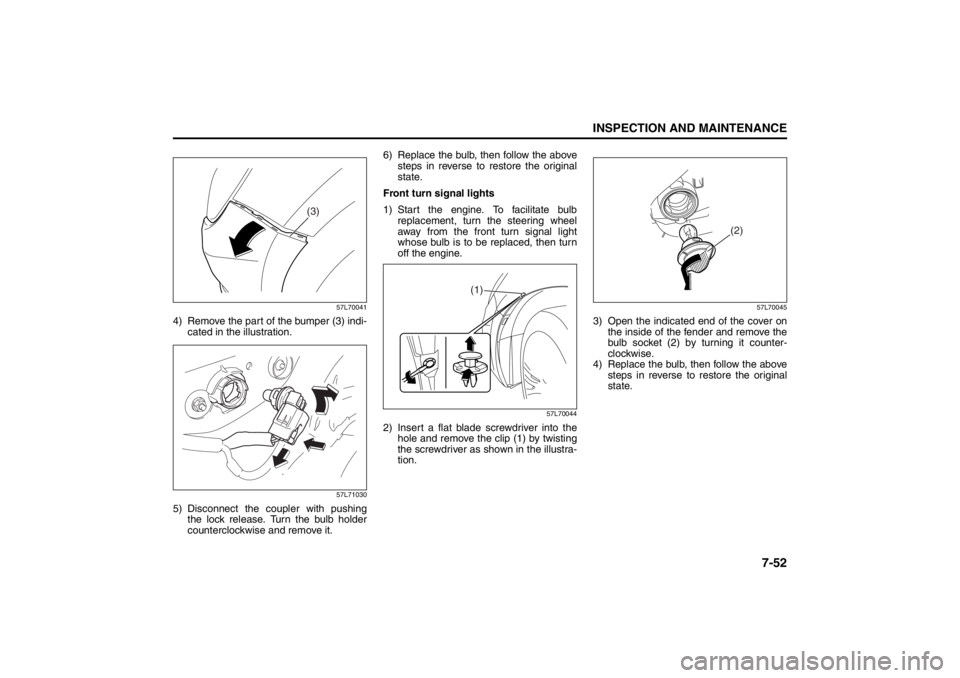
4) Remove the part of the bumper (3) indi-
cated in the illustration.
57L71030
5) Disconnect the coupler with pushing
the lock release. Turn the bulb holder
counterclockwise and remove it.6) Replace the bulb, then follow the above
steps in reverse to restore the original
state.
Front turn signal lights
1) Start the engine. To facilitate bulb
replacement, turn the steering wheel
away from the front turn signal light
whose bulb is to be replaced, then turn
off the engine.
57L70044
2) Insert a flat blade screwdriver into the
hole and remove the clip (1) by twisting
the screwdriver as shown in the illustra-
tion.
57L70045
3) Open the indicated end of the cover on
the inside of the fender and remove the
bulb socket (2) by turning it counter-
clockwise.
4) Replace the bulb, then follow the above
steps in reverse to restore the original
state.
(3)
(1)
(2)
Page 338 of 388

7-53INSPECTION AND MAINTENANCE
57L20-03E
Rear combination lights
(reversing/turn signal/brake/tail lights)
57L70019
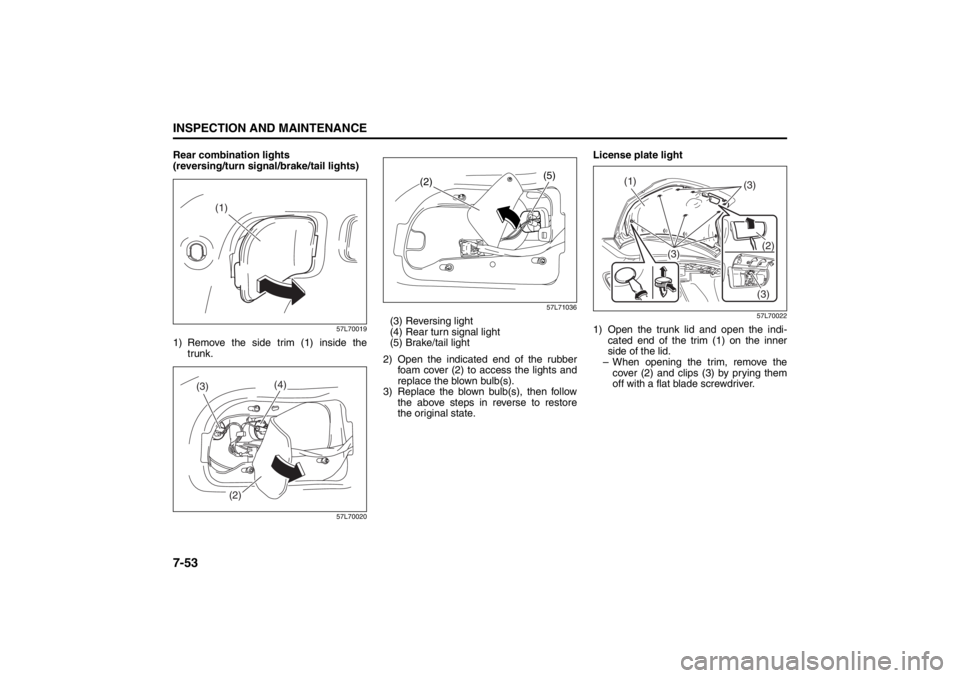
1) Remove the side trim (1) inside the
trunk.
57L7002057L71036
(3) Reversing light
(4) Rear turn signal light
(5) Brake/tail light
2) Open the indicated end of the rubber
foam cover (2) to access the lights and
replace the blown bulb(s).
3) Replace the blown bulb(s), then follow
the above steps in reverse to restore
the original state.License plate light
57L70022
1) Open the trunk lid and open the indi-
cated end of the trim (1) on the inner
side of the lid.
– When opening the trim, remove the
cover (2) and clips (3) by prying them
off with a flat blade screwdriver.
(1)
(4)
(3)
(2)
(5)
(2)
(1)
(3)
(3)(2)
(3)