2010 SUZUKI KIZASHI buttons
[x] Cancel search: buttonsPage 237 of 388

5-58
OTHER CONTROLS AND EQUIPMENT
57L20-03E
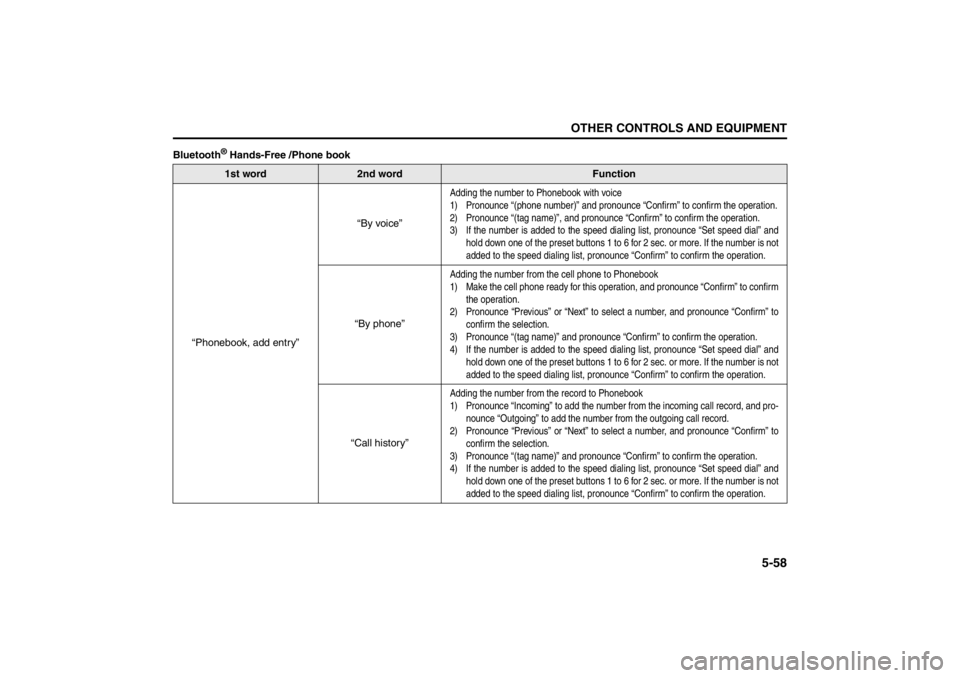
Bluetooth
® Hands-Free /Phone book1st word
2nd word
Function
“Phonebook, add entry”“By voice”
Adding the number to Phonebook with voice
1) Pronounce “(phone number)” and pronounce “Confirm” to confirm the operation.
2) Pronounce “(tag name)”, and pronounce “Confirm” to confirm the operation.
3) If the number is added to the speed dialing list, pronounce “Set speed dial” and
hold down one of the preset buttons 1 to 6 for 2 sec. or more. If the number is not
added to the speed dialing list, pronounce “Confirm” to confirm the operation.
“By phone”
Adding the number from the cell phone to Phonebook
1) Make the cell phone ready for this operation, and pronounce “Confirm” to confirm
the operation.
2) Pronounce “Previous” or “Next” to select a number, and pronounce “Confirm” to
confirm the selection.
3) Pronounce “(tag name)” and pronounce “Confirm” to confirm the operation.
4) If the number is added to the speed dialing list, pronounce “Set speed dial” and
hold down one of the preset buttons 1 to 6 for 2 sec. or more. If the number is not
added to the speed dialing list, pronounce “Confirm” to confirm the operation.
“Call history”
Adding the number from the record to Phonebook
1) Pronounce “Incoming” to add the number from the incoming call record, and pro-
nounce “Outgoing” to add the number from the outgoing call record.
2) Pronounce “Previous” or “Next” to select a number, and pronounce “Confirm” to
confirm the selection.
3) Pronounce “(tag name)” and pronounce “Confirm” to confirm the operation.
4) If the number is added to the speed dialing list, pronounce “Set speed dial” and
hold down one of the preset buttons 1 to 6 for 2 sec. or more. If the number is not
added to the speed dialing list, pronounce “Confirm” to confirm the operation.
Page 238 of 388

5-59OTHER CONTROLS AND EQUIPMENT
57L20-03E
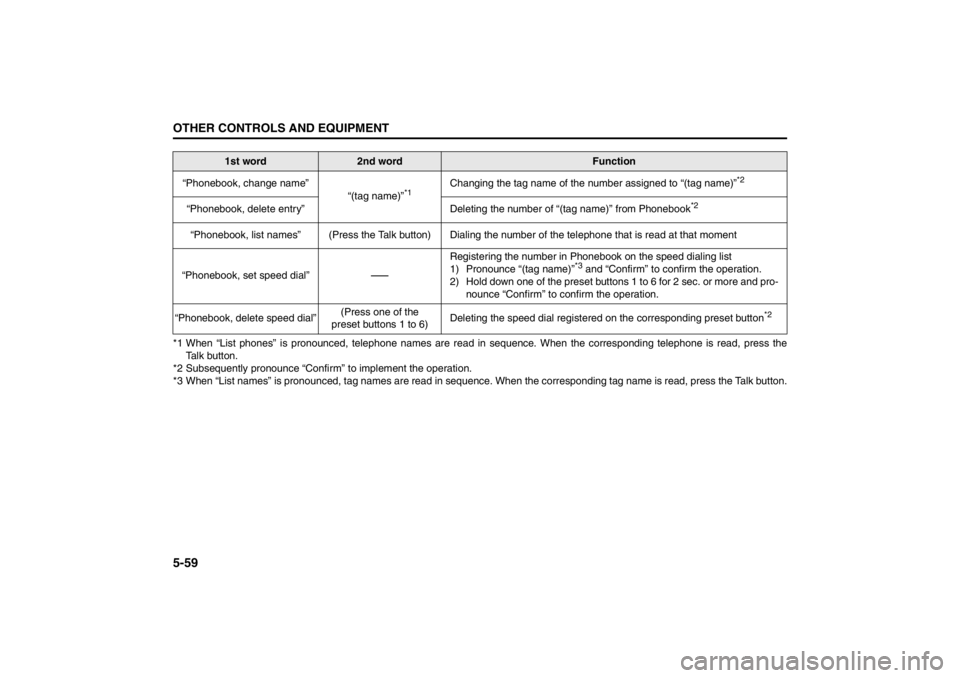
*1 When “List phones” is pronounced, telephone names are read in sequence. When the corresponding telephone is read, press the
Talk button.
*2 Subsequently pronounce “Confirm” to implement the operation.
*3 When “List names” is pronounced, tag names are read in sequence. When the corresponding tag name is read, press the Talk button. “Phonebook, change name”
“(tag name)”
*1
Changing the tag name of the number assigned to “(tag name)”
*2
“Phonebook, delete entry” Deleting the number of “(tag name)” from Phonebook
*2
“Phonebook, list names” (Press the Talk button) Dialing the number of the telephone that is read at that moment
“Phonebook, set speed dial”
-
Registering the number in Phonebook on the speed dialing list
1) Pronounce “(tag name)”
*3 and “Confirm” to confirm the operation.
2) Hold down one of the preset buttons 1 to 6 for 2 sec. or more and pro-
nounce “Confirm” to confirm the operation.
“Phonebook, delete speed dial”(Press one of the
preset buttons 1 to 6)Deleting the speed dial registered on the corresponding preset button
*2
1st word
2nd word
Function
Page 245 of 388

5-66
OTHER CONTROLS AND EQUIPMENT
57L20-03E
Anti-Theft Feature
TUNE / FOLDER / CHDISPAS
RPT
XM
USBMENU
RDM
SEEK/ TRACK/CAT
SOUNDPUSH
1
2
3
4
5
6
VOL PUSH POWER
CD
FM/ AMH
M
(2)
(3)
(1)
(4)
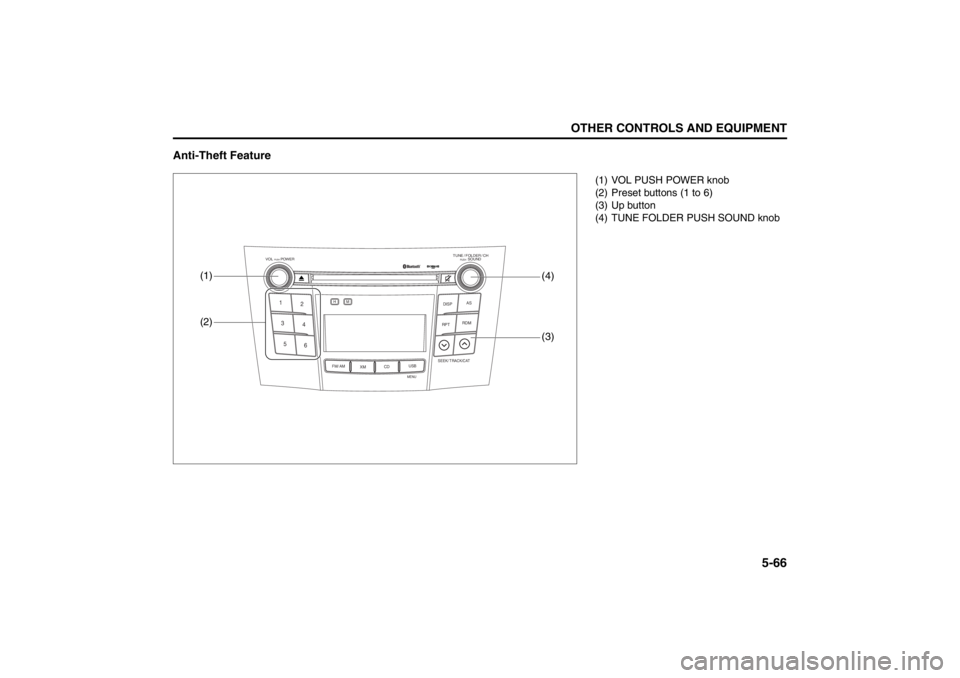
(1) VOL PUSH POWER knob
(2) Preset buttons (1 to 6)
(3) Up button
(4) TUNE FOLDER PUSH SOUND knob
Page 246 of 388

5-67OTHER CONTROLS AND EQUIPMENT
57L20-03E
The anti-theft feature is intended to dis-
courage theft or the audio system by pre-
venting the system from operating when it
is moved to a different vehicle.
This feature works by allowing you to enter
a Personal Identification Number (PIN).
When the audio system is disconnected
from its power source, such as when the
audio system is removed or the battery is
disconnected, the system will not operate
again unless the PIN is reentered.Setting the Anti-Theft Function
1) Press the VOL PUSH POWER knob
(1) to power off.
2) Press the Preset buttons (2) 1, 6 and
VOL PUSH POWER knob (1) simulta-
neously.
“SECURITY” is displayed.
3) Press the Up button (3) and Preset
button (2) 1 simultaneously.
4) Enter a 4-digit PIN number using the
Preset buttons (2) 1-4.
5) Hold down TUNE FOLDER PUSH
SOUND knob (4) for 1 sec. or more.
NOTE:
Write down your PIN for the future use.
Canceling the anti-theft feature
This operation is to be done when you
want to cancel the anti-theft function or
change your PIN.
1) Press the Preset buttons (2) 1, 6 and
the VOL PUSH POWER knob (1)
simultaneously.
2) Press the Up button (3) and Preset
button (2) 1 simultaneously.
3) Enter a 4-digit PIN number using the
Preset buttons (2) 1-4.
4) Hold down the TUNE FOLDER PUSH
SOUND knob (4) for 1 sec. or more.
NOTE:
To change your PIN, first delete your cur-
rent PIN, then set a new one.Confirming Your Personal Identification
Number (PIN)
When the main power source is discon-
nected such as when you exchange your
battery, etc, you will have to confirm your
PIN to be able to use the audio system.
1) Press the engine switch to change the
ignition mode to “ACC”.
2) Press the Up button (3) and Preset
button (2) 1 simultaneously.
3) Enter a 4-digit PIN number using the
Preset buttons (2) 1-4.
4) Hold down the TUNE FOLDER PUSH
SOUND knob (4) for 1 sec. or more.
If the PIN that you input matches the
registered PIN, the power of the audio-
system will turn off, and you will be
able to operate the audio system.
NOTE:
If you input your PIN incorrectly, “ERROR”
will be displayed. If you enter an incorrect
PIN more than 10 times, “HELP” will be
displayed and you can not perform any
further operation.
Page 273 of 388

5-94
OTHER CONTROLS AND EQUIPMENT
57L20-03E
any garage door opener position manufac-
tured before April 1, 1982). A garage door
that cannot detect an object – signaling the
door to stop and reverse – does not meet
current U.S. federal safety standards. For
more information, contact HomeLink
® at
www.homelink.com
or by calling 1-800-
355-3515.
Retain the original transmitter of the RF
device you are programming for use in
other vehicles as well as for future
HomeLink
® programming. It is also sug-
gested that upon the sale of the vehicle,
the programmed HomeLink
® buttons be
erased for security purposes. Refer to
“Programming HomeLink
®” (step 1) only)
or, for assistance, contact HomeLink
® at
www.homelink.com
or by calling 1-800-
355-3515.
Programming HomeLink
®
NOTE:
Some vehicles may require the ignition
switch to be turned to the second (or
“accessories”) position or the “on” position
for programming and/or operation of
HomeLink
®. It is also recommended that a
new battery be placed in the hand-held
transmitter of the device being pro-
grammed to HomeLink
® for quicker train-
ing and accurate transmission of the
radiofrequency signal. Do not repeat “Pro-
gramming HomeLink
®” – step 1) to train
additional devices to a second or thirdHomeLink
® button. Begin with “Program-
ming HomeLink
®” – step 2).
57L51036
1) Press and hold the two outer
HomeLink
® buttons (buttons one and
three) – releasing only when the indica-
tor light begins to flash (after 20 sec-
onds). Do not hold the buttons for
longer than 30 seconds and do not
repeat step 1) to program a second
and/or third hand-held transmitter to the
remaining two HomeLink
® buttons.
2) Position the end of your hand-held
transmitter 5–14 cm (1–3 inches) away
from the HomeLink
® button you wish to
program while keeping the indicator
light in view.
3) Simultaneously press and hold both the
chosen HomeLink® and hand-held
transmitter buttons. Do not release the
buttons until step 4) has been com-
pleted.NOTE:
Some gate operators and garage door
openers may require you to replace this
Programming step 3) with procedures
noted in the “Gate Operator / Canadian
Programming” section.
4) After the HomeLink
® indicator light
changes from a slow to a rapidly blink-
ing light, release both the HomeLink
®
and hand-held transmitter buttons.
NOTE:
If the HomeLink
® indicator light does not
change to a rapidly blinking light, contact
HomeLink
® at www.homelink.com
or call
1-800-355-3515 for assistance.
5) Press and hold the just-trained
HomeLink
® button and observe the
indicator light.
– If the indicator light stays on con-
stantly, programming is complete and
your device should activate when the
HomeLink® button is pressed and
released.
NOTE:
To program the remaining two HomeLink
®
buttons, begin with “Programming
HomeLink
®” – step 2). Do not repeat step
1).
– If the indicator light blinks rapidly for
two seconds and then turns to a con-
stant light continue with “Programming
Page 274 of 388

5-95OTHER CONTROLS AND EQUIPMENT
57L20-03E
HomeLink
®” steps 6–8 to complete the
programming of a rolling code
equipped device (most commonly a
garage door opener).
66J051
66J052
6) At the garage door opener receiver
(motor-head unit) in the garage, locate
the “learn” or “smart” button. This can
usually be found where the hanging
antenna wire is attached to the motor-
head unit.
7) Firmly press and release the “learn” or
“smart” button. (The name and color of
the button may vary by manufacturer.)
NOTE:
There are 30 seconds in which to initiate
step 8).
8) Return to the vehicle and firmly press,
hold for two seconds and release the
programmed HomeLink
® button.
Repeat the “press/hold/release”
sequence a second time, and, depend-
ing on the brand of the garage door
opener (or other rolling code equipped
device), repeat this sequence a third
time to complete the programming pro-
cess.
HomeLink
® should now activate your
rolling code equipped device.
NOTE:
To program the remaining two HomeLink
®
buttons, begin with “Programming
HomeLink
®” – step 2). Do not repeat step
1).
For questions or comments, please con-
tact HomeLink
® at www.homelink.com
or
1-800-355-3515.
Gate Operator / Canadian Program-
mingCanadian radio-frequency laws require
transmitter signals to “time-out” (or quit)
after several seconds of transmission –
which may not be long enough for
HomeLink
® to pick up the signal during
programming. Similar to this Canadian law,
some U.S. gate operators are designed to
“time-out” in the same manner.
If you live in Canada or you are having diffi-
culties programming a gate operator by
using the Programming procedures
(regardless of where you live), replace
“Programming HomeLink
®” step 3) with
the following:
NOTE:
If programming a garage door opener or
gate operator, it is advised to unplug the
device during the “cycling” process to pre-
vent possible overheating.
3) Continue to press and hold the
HomeLink
® button while you press and
release – every two seconds (“cycle”)
your hand-held transmitter until the fre-
quency signal has successfully been
accepted by HomeLink
®. (The indicator
light will flash slowly and then rapidly.)
Proceed with “Programming HomeLink
®”
step 4) to complete.
Page 275 of 388

5-96
OTHER CONTROLS AND EQUIPMENT
57L20-03E
Using HomeLink
®
To operate, simply press and release the
programmed HomeLink
® button. Activation
will now occur for the trained device (i.e.
garage door opener, gate operator, secu-
rity system, entry door lock, home/office
lighting, etc.). For convenience, the hand-
held transmitter of the device may also be
used at any time. In the event that there
are still programming difficulties or ques-
tions, contact HomeLink
® at
www.homelink.com
or 1-800-355-3515.
Erasing HomeLink
® Buttons
To erase programming from the three but-
tons (individual buttons cannot be erased
but can be “reprogrammed” as outlined
below), follow the step noted:
Press and hold the two outer HomeLink
®
buttons until the indicator light begins to
flash-after 20 seconds. Release both but-
tons. Do not hold for longer that 30 sec-
onds. HomeLink
® is now in the train (or
learning) mode and can be programmed at
any time beginning with “Programming
HomeLink
®” – step 2).
Reprogramming a Single
HomeLink
® Button
To program a device to HomeLink
® using a
HomeLink
® button previously trained, fol-
low these steps:
1) Press and hold the desired HomeLink
®
button. DO NOT release the button.
2) The indicator light will begin to flash
after 20 seconds. Without releasing the
HomeLink
® button, proceed with “Pro-
gramming HomeLink
®” – step 2).
For questions or comments, contact
HomeLink
® at www.homelink.com
or 1-
800-355-3515.
Frame HooksFront hook (1)
1) Take out the necessary tools (jack bar,
wheel nut wrench and tow hook) from
the onboard tool set.
2) Use the end of the jack bar (a) wrapped
with a cloth (b) to open the front tow
hook cover (c).
57L51037
3) Insert the tow hook (e) into the tow
hook receptacle (d) and screw the hook
in as far as it can be turned by hand.
(c)
(a)
(b)