Page 17 of 90
Navigation 31
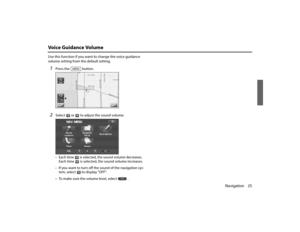
Map OperationsSelecting Map OrientationYou can select either "heading up" or "north up" display on
the current map screen by using the following procedure.1
Select or .If you select ("north up" display), the system rotates the
map so that north is always directly upwards on the screen. If you select
("heading up" display), the system rotates the
map so that the direction in wh ich you are heading is always
directly upwards on the screen (note that the red arrow points t o
the north).
<"Heading up" display>
<"North up" display>
Legacy_B2462BE-A.book Page 31
Wednesday, April 22, 2009 5:32 PM
Page 18 of 90
32 NavigationMap OperationsChanging Map ScaleYou can increase or decrease the scale of the map using the
following procedure:1
Select or to change the map scale.
2
Selecting or changes the scale as shown
below.
Legacy_B2462BE-A.book Page 32 Wednesday, April 22, 2009 5:32 PM
Page 19 of 90
Navigation 33
Map Operations
NOTE• Briefly touching or allows you to change the ma p scale.
• Touching or for a long time allows you to ch ange the map scale.
• Selecting either of the followin g on the scale bar displayed by
selecting or allows you to change to the specifie d map scale.
• The scale can be displayed in Imperial or metric units. To change the units, See
Page 69.
Imperial display
Metric display 1/32 mi (mile)
50 m1/4 mi (mile)
500 m2 mi (mile)
4 km 16 mi (mile)
32 km128 mi (mile)
256 km
Current scale
Scale to be changed
Legacy_B2462BE-A.book Page 33
Wednesday, April 22, 2009 5:32 PM
Page 20 of 90
34 NavigationSetting RouteSetting Destination
Setting destination/wayp oints by scrolling the mapEven if you do not know the exact address of your destination or a way-
point on your route to the destination, you can set it by scrolling the
map as follows:1
Touch the screen and scroll the map until the crosshair
reaches the destination or a waypoint.
2
Select the (destination or waypoint) key.The key will separate into the destination key and the waypoint key.
3
Select for setting the destinationThe system will calculate the route and display the entire route to
the destination on the map.
Select for a waypoint. The system will program the
address of the waypoint on your route. (See Page 60.) You can set
up to 5 waypoints per trip.
Legacy_B2462BE-A.book Page 34 Wednesday, April 22, 2009 5:32 PM
Page 21 of 90
Navigation 35
Setting Route
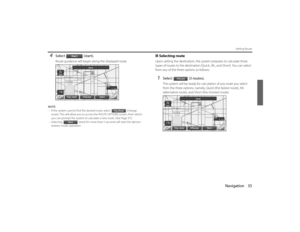
4
Select (start).Route guidance will begin along the displayed route.
NOTE• If the system cannot find the desired route, select (change
route). This will allow you to access the ROUTE OPTIONS screen, from which
you can prompt the system to calculate a new route. (See Page 57.)
• Selecting (start) for more than 5 seconds will start the demon-
stration mode operation.
■ Selecting routeUpon setting the destination, the sy stem prepares to calculate three
types of routes to the destination (Q uick, Alt., and Short). You can select
from any of the three options as follows:1
Select (3 routes).The system will be ready for calculation of any route you select
from the three options, namely, Quick (the fastest route), Alt.
(alternative route), and Short (the shortest route).
Legacy_B2462BE-A.book Page 35 Wednesday, April 22, 2009 5:32 PM
Page 22 of 90
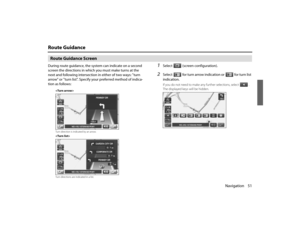
36 NavigationSetting Route2
Select (information).The screen will display details (required time, total distance, roads
used, etc.) regarding each option.
3
Select (Quick), (Alt.), (Short)
or as you desire, and then select (Start) to con-
firm your selection.
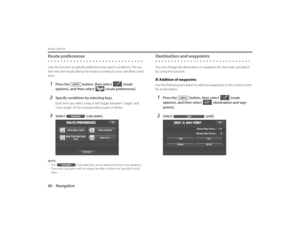
Setting destination from the navigation menuYou can set the destination using a variety of categories if you start set-
ting from the DESTINATION ENTRY screen. Before you can use any of
these categories, perform the following steps:1
Press the button.
2
Select the desired search category.
Legacy_B2462BE-A.book Page 36 Wednesday, April 22, 2009 5:32 PM
Page 23 of 90
Navigation 37
Setting Route
You can switch between screens by selecting (next page)
or (previous page).
NOTE• If the set destination area is different from the one displayed under "Search
Area" in the right part of the screen, you must select the (change)
key and specify the desired area again.
• Depending on the category used or th e status of the map displayed, the
point that is located may differ from the location where the fa cility you want
to visit actually exists. (Address)
See Page 38.
(Point of Interests) See Page 41.
(Select from Map) See Page 43.
(Emergency) See Page 44.
(Memory Point) See Page 40.
(Previous Destination) See Page 42.
(Intersection) See Page 46.
(Freeway Ent/Exit) See Page 43.
(Phone number) See Page 48.
(Coordinates) See Page 45.
(Home) See Page 40.
-(Preset1) - (Preset5)Legacy_B2462BE-A.book Page 37 Wednesday, April 22, 2009 5:32 PM
Page 24 of 90
38 NavigationSetting Route■"Address" category1
Press the button and select (address).
2
Enter a house number using the keypad on the house
number input screen and select .
3
Enter the street name and select (list).
: Use this key to delete the last character entered. Select it
repeatedly if you want to delete all the characters entered.
You can switch between keypad scr eens showing different characters
by selecting (others), (symbols) or (alphabet).
4
Select the desired street from the list.If the same street name exists in more than one city, a list of these
towns will be shown.
5
Select the correct to wn from the list.
Legacy_B2462BE-A.book Page 38 Wednesday, April 22, 2009 5:32 PM


.Route guidance will begin along the displayed route.
NOTE• If the system cannot find the desired route, select (change
route). This will allow you to a")
.The screen will display details (required time, total distance, roads
used, etc.) regarding each option.
3
Select (Quick), (Alt.), (Short)
or as you")

or (previous page).
NOTE• If the set destination area is different from the one displayed under \"Search
Area\"")
.
2
Enter a house number using the keypad on the house
number input screen and select .
3
Enter the street name")