Page 23 of 90
Navigation 37
Setting Route
You can switch between screens by selecting (next page)
or (previous page).
NOTE• If the set destination area is different from the one displayed under "Search
Area" in the right part of the screen, you must select the (change)
key and specify the desired area again.
• Depending on the category used or th e status of the map displayed, the
point that is located may differ from the location where the fa cility you want
to visit actually exists. (Address)
See Page 38.
(Point of Interests) See Page 41.
(Select from Map) See Page 43.
(Emergency) See Page 44.
(Memory Point) See Page 40.
(Previous Destination) See Page 42.
(Intersection) See Page 46.
(Freeway Ent/Exit) See Page 43.
(Phone number) See Page 48.
(Coordinates) See Page 45.
(Home) See Page 40.
-(Preset1) - (Preset5)Legacy_B2462BE-A.book Page 37 Wednesday, April 22, 2009 5:32 PM
Page 26 of 90

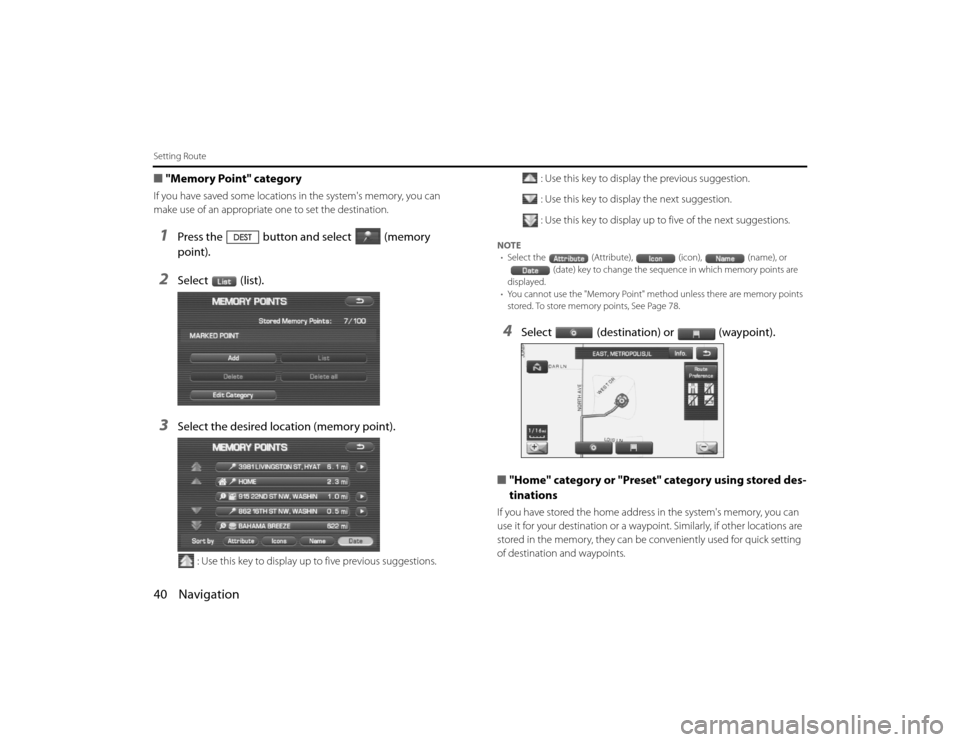
40 NavigationSetting Route■"Memory Point" categoryIf you have saved some locations in the system's memory, you can
make use of an appropriate one to set the destination.1
Press the button and select (memory
point).
2
Select (list).
3
Select the desired location (memory point).
: Use this key to display up to five previous suggestions. : Use this key to display the previous suggestion.
: Use this key to display the next suggestion.
: Use this key to display up to five of the next suggestions.
NOTE
• Select the (Attribute), (icon), (name), or
(date) key to change the sequen ce in which memory points are
displayed.
• You cannot use the "Memory Point" method unless there ar e memory points
stored. To store memory points, See Page 78.4
Select (destination) or (waypoint).
■ "Home" category or "Preset" category using stored des-
tinations
If you have stored the home addre ss in the system's memory, you can
use it for your destination or a waypoi nt. Similarly, if other locations are
stored in the memory, they can be conveniently used for quick setti ng
of destination and waypoints.
Legacy_B2462BE-A.book Page 40 Wednesday, April 22, 2009 5:32 PM
Page 27 of 90

Navigation 41
Setting Route
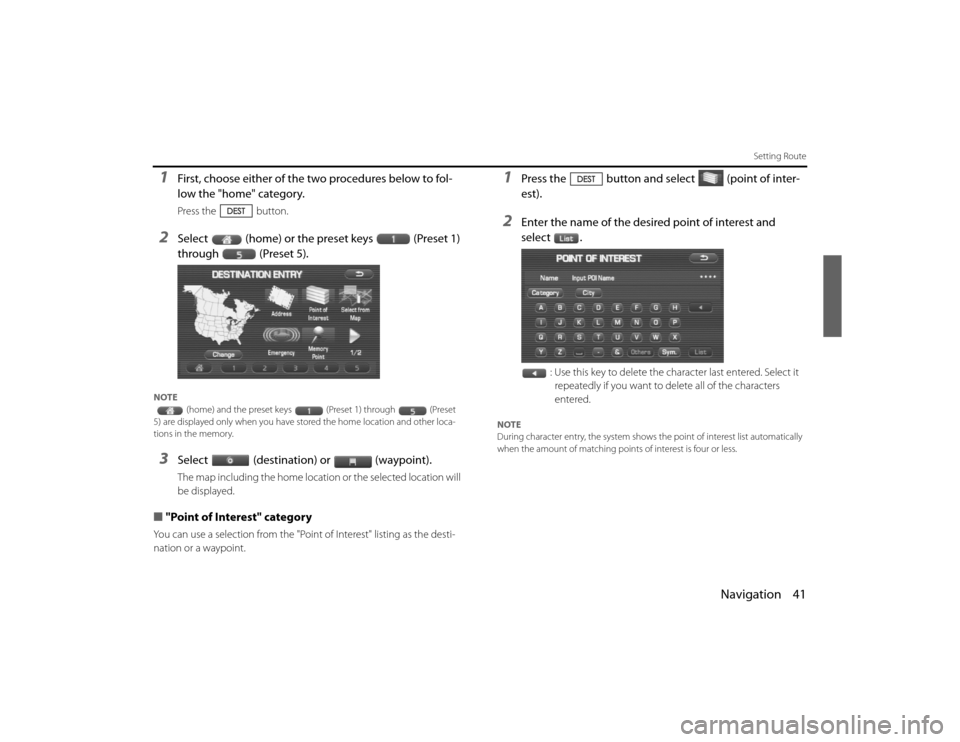
1
First, choose either of the two procedures below to fol-
low the "home" category.Press the button.
2
Select (home) or the preset keys (Preset 1)
through (Preset 5).
NOTE(home) and the preset keys (Preset 1) through (P reset
5) are displayed only when you have stor ed the home location and other loca-
tions in the memory. 3
Select (destination) or (waypoint).The map including the home location or the selected location will
be displayed.
■ "Point of Interest" categoryYou can use a selection from the "Point of Interest" listing as the des ti-
nation or a waypoint.
1
Press the button and select (point of inter-
est).
2
Enter the name of the desired point of interest and
select .
: Use this key to delete the character last entered. Select it repeatedly if you want to delete all of the characters
entered.
NOTE
During character entry, the system shows the point of intere st list automatically
when the amount of matching points of interest is four or less .
EN(Hokubei)_Legacy_02_Navi-a.fm Page 41 Friday, May 1, 2009 11:21 AM
Page 62 of 90
![SUBARU LEGACY 2010 5.G Navigation Manual
76 NavigationNavigation Setup
[Default List]ItemInitial condition
Map display
Search Area
Display Guidance Language
Voice Recognition Language
Map Orientation (1 and 2 screen)
Map Display Mode
Map Di SUBARU LEGACY 2010 5.G Navigation Manual
76 NavigationNavigation Setup
[Default List]ItemInitial condition
Map display
Search Area
Display Guidance Language
Voice Recognition Language
Map Orientation (1 and 2 screen)
Map Display Mode
Map Di](/manual-img/17/7276/w960_7276-61.png)
76 NavigationNavigation Setup
[Default List]ItemInitial condition
Map display
Search Area
Display Guidance Language
Voice Recognition Language
Map Orientation (1 and 2 screen)
Map Display Mode
Map Display Scale
Map Configuration
Q-POI Map Display
Show POI Icon Display
Right Screen Setting, POI
Passage Point Display/Current Location, Map Screen ( Time
Requirement, Time, Direction / Distance)Passage Point Display/ Full Route, Map Screen ( Time Require-
ment, Time, Direction / Distance)
Restricted Road
Freeway Information Disc A ( WEST ): CA
Disc B (MID): IL
Disc C (EAST ): DC
US English, female
US English
North up
Single-screen display
Single-screen:
10,000 map (1/16 mi) (100 m)
Dual-screen:
40,000 map (1/4 mi) (500 m)
Arrow Mode
Off
Off
On
Next passage point
Destination
On
Off
Volume Control
Volume Preset
4
Navigation Setup Menu
Distance
Road Restriction Warnings
Reverse Mute
Keyboard Layout
Arrival Timemile
On
Off
ABC
Required remaining time
Item Initial condition
Map Mode
Guidance Screen
Q-POI Selection
Language Selection Auto
On
A: Gas station
B: ATM
C: Parking
D: Grocery store
E: All Restaurants
F: Hotel
US English, female, male,
French, Espanõl
Route Options
Search Condition
Route Preferences Quick
Allow Toll Road: Off
Allow Ferry: Off
Allow Major Roads: On
Allow Time Restricted Road:
Off
Item
Initial condition
Legacy_B2462BE-A.book Page 76 Wednesday, April 22, 2009 5:32 PM
Page 67 of 90

Navigation 81
Stored Locations
NOTEThe "With direction" ( / ) keys in the "With Sound" page are
used to activate response sounds only when you come near the me m-
ory point from the specified direction. Select or and s et
the direction using or . Selecting allows you to listen to
respective sounds.
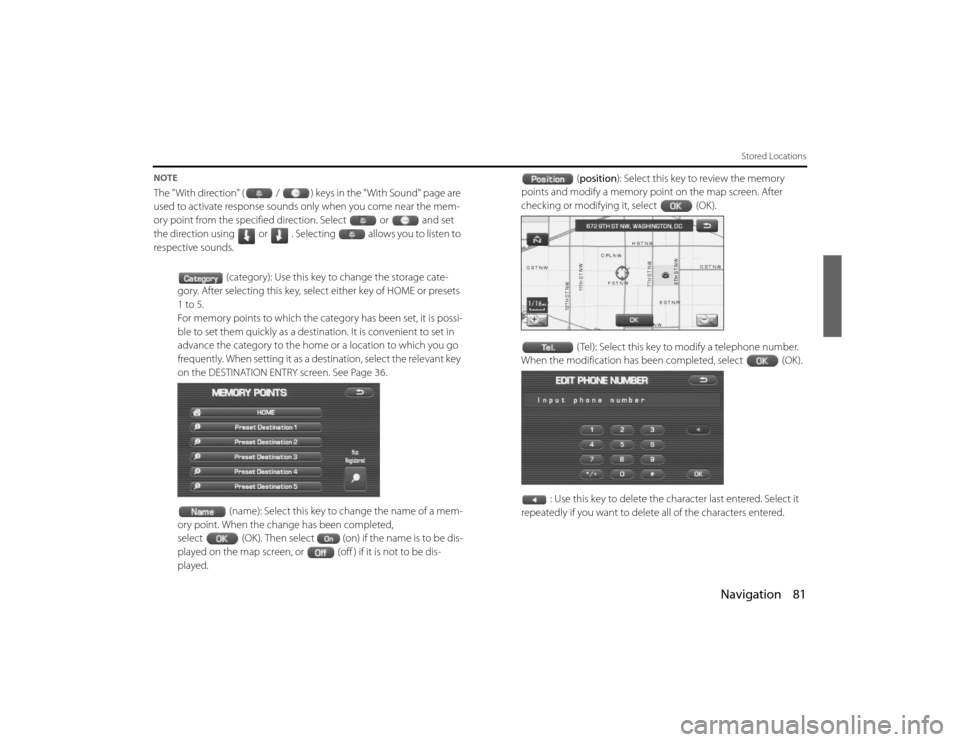
(category): Use this key to change the storage cate-
gory. After selecting this key, select either key of HOME or presets
1 to 5.
For memory points to which the ca tegory has been set, it is possi-
ble to set them quickly as a destinat ion. It is convenient to set in
advance the category to the home or a location to which you go
frequently. When setting it as a de stination, select the relevant key
on the DESTINATION ENTRY screen. See Page 36.
(name): Select this key to change the name of a mem-
ory point. When the change has been completed,
select (OK). Then select (on) if the name is to be dis-
played on the map screen, or (off ) if it is not to be dis-
played. (
position ): Select this key to review the memory
points and modify a memory point on the map screen. After
checking or modifying it, select (OK).
( Tel): Select this key to modify a telephone number.
When the modification has been completed, select (OK).
: Use this key to delete the character last entered. Select it
repeatedly if you want to delete all of the characters entered.Legacy_B2462BE-A.book Page 81 Wednesday, April 22, 2009 5:32 PM