2010 SUBARU FORESTER park assist
[x] Cancel search: park assistPage 120 of 402

NOTE
This light does not turn off unless the
tank is replenished up to an internal
fuel quantity of approximately 4.0 US
gal (15 liters, 3.3 Imp gal).
CAUTION
Promptly put fuel in the tank when-
ever the low fuel warning light
illuminates. Engine misfires as a
result of an empty tank could cause
damage to the engine. Warning and indicator lights
Several of the warning and indicator lights
illuminate momentarily and then turn off
when the ignition switch is initially turned
to the
“ON ”position. This permits check-
ing the operation of the bulbs.
Apply the parking brake and turn the
ignition switch to the “ON ”position. The
following lights illuminate:
: Seatbelt warning light (The seatbelt warning light turns off
only when the driver fastens theseatbelt.)
: Front passenger ’s seatbelt warning
light
(The seatbelt warning light turns off
only when the front seat passenger
fastens the seatbelt.)
: SRS airbag system warning light
ON /
: Front passenger ’s frontal airbag
ON indicator light
/: Front passenger ’s frontal airbag
OFF indicator light
: CHECK ENGINE warning light/Mal- function indicator lamp
: Coolant temperature high warning light
: Charge warning light
: Oil pressure warning light
: AT OIL TEMP warning light
(AT models)
: Low tire pressure warning light (U.S.- spec. models)
/: ABS warning light
/: Brake system warning light
: Low fuel warning light
: Hill start assist warning light (MT models)
: Door open warning light
: AWD warning light(AT models)
: Vehicle Dynamics Control operation indicator light
: Vehicle Dynamics Control warning light/Vehicle Dynamics Control OFF
indicator light
: SPORT mode indicator light(AT models)
: Cruise control indicator light
: Cruise control set indicator light
: Automatic headlight beam leveler warning light (models with HID head- Instruments and controls
3-9
– CONTINUED –
Page 129 of 402

3-18Instruments and controls
inspected.
6. If the brake fluid level is below the “MIN ”mark, DO NOT drive the vehicle.
Instead, have the vehicle towed to the
nearest SUBARU dealer for repair.
& Low fuel warning light
The low fuel warning light illuminates
when the tank is nearly empty approxi-
mately 2.6 US gal (10.0 liters, or 2.2 Imp
gal). It only operates when the ignition
switch is in the “ON ”position. When this
light illuminates, fill the fuel tank immedi-
ately. NOTE
This light does not turn off unless the
tank is replenished up to an internal
fuel quantity of approximately 3.7 US
gal (14 liters, 3.1 Imp gal).
CAUTION
Promptly put fuel in the tank when-
ever the low fuel warning light
illuminates. Engine misfires as a
result of an empty tank could cause
damage to the engine. &
Hill start assist warning
light (MT models)
When the ignition switch is in the “ON ”
position, the Hill start assist warning light
illuminates and turns off after approxi-
mately 2 seconds. While the engine is
rotating, if there are any malfunctions, the
light will illuminate.
WARNING
When the Hill start assist system
light illuminates, have the vehicle
inspected at an authorized SUBARU
dealer.
& Door open warning light
The door open warning light illuminates if
any door or the rear gate is not fullyclosed.
Always make sure this light is out before
you start to drive. &All-Wheel Drive warn-
ing light (AT models)
The All-Wheel Drive warning light illumi-
nates when the ignition switch is turned tothe “ON ”position and turns off after the engine has started.
This light illuminates when All-Wheel
Drive is disengaged and the drive me-
chanism is switched to Front Wheel Drive
for maintenance or similar purposes.
It flashes if the vehicle is driven with tires
of differing diameters fitted on the wheels
or with an excessively low air pressure in
any of the tires.
CAUTION
Continuing to drive with the AWD
warning light flashing can damage
the powertrain. If the AWD warning
light starts to flash, promptly park in
a safe place and check whether the
tires have differing diameters and
whether any of the tires has an
excessively low inflation pressure.
& Automatic headlight
beam leveler warning
light (models with HID headlights)
The automatic headlight beam leveler
warning light illuminates when the ignition
switch is turned to the “ON ”position and
turns off after approximately 3 seconds.
This light illuminates when the automatic
headlight beam leveler does not operate
Page 218 of 402

Fuel...................................................................... 7-2
Fuel requirements ............................................... 7-2
Fuel filler lid and cap ........................................... 7-3
State emission testing (U.S. only) ...................... 7-6
Preparing to drive ............................................... 7-7
Starting the engine .............................................. 7-7
Manual transmission model ................................. 7-7
Automatic transmission model ............................ 7-8
Stopping the engine ............................................ 7-9
Remote engine start system (dealer option) ................................................. 7-10
Starting your vehicle .......................................... 7-10
Remote start safety features ............................... 7-10
Entering the vehicle while it is running via remote start ................................................................. 7-11
Entering the vehicle following remote engine start shutdown ......................................................... 7-11
Pre-heating or pre-cooling the interior of the vehicle ............................................................. 7-11
Service mode ..................................................... 7-11
Remote transmitter programming and programmable feature option ............................ 7-11
System maintenance .......................................... 7-12
Manual transmission .......................................... 7-14
Shifting speeds .................................................. 7-14
Driving tips ........................................................ 7-15
Automatic transmission ..................................... 7-15
Select lever ........................................................ 7-16
Shift lock function .............................................. 7-17
Selection of manual mode .................................. 7-19
Driving tips ........................................................ 7-20 SPORT mode
..................................................... 7-20
Power steering ................................................... 7-21
Braking ............................................................... 7-21
Braking tips ....................................................... 7-21
Brake system .................................................... 7-22
Disc brake pad wear warning indicators ............. 7-22
ABS (Anti-lock Brake System) .......................... 7-23
ABS system self-check ...................................... 7-23
ABS warning light .............................................. 7-23
Electronic Brake Force Distribution (EBD) system ............................................................. 7-24
Steps to take if EBD system malfunctions ..... ..... 7-25
Vehicle Dynamics Control system .................... 7-26
Vehicle Dynamics Control system monitor..... ..... 7-27
Vehicle Dynamics Control OFF switch ................ 7-29
Tire pressure monitoring system (TPMS) (U.S.-spec. models). ........................................ 7-30
Parking your vehicle ......................................... 7-31
Parking brake .................................................... 7-31
Parking tips ....................................................... 7-32
Hill start assist system (MT models) ................ 7-33
Hill start assist warning light .............................. 7-34
Cruise control .................................................... 7-34
To set cruise control .......................................... 7-35
To temporarily cancel the cruise control ............. 7-35
To turn off the cruise control .............................. 7-36
To change the cruising speed .. .......................... 7-36
Cruise control indicator light .............................. 7-37
Cruise control set indicator light ........................ 7-38
Starting and operating
7
Page 225 of 402

7-8Starting and operating
If the engine does not start, try the following. (1) Turn the ignition switch to the“OFF ”position and wait for at least
10 seconds. After checking that the
parking brake is firmly set, turn the
ignition switch to the “START ”position
while depressing the accelerator pedal
slightly (approximately a quarter of the
full stroke). Release the accelerator
pedal as soon as the engine starts.
(2) If this fails to start the engine, turn
the ignition switch back to the “OFF ”
position and wait for at least 10
seconds. Then fully depress the accel-
erator pedal and turn the ignition
switch to the “START ”position. If the
engine starts, quickly release the
accelerator pedal.
(3) If this fails to start the engine, turn
the ignition switch again to the “OFF ”
position. After waiting for 10 seconds
or longer, turn the ignition switch to the“ START ”position without depressing
the accelerator pedal.
(4) If the engine still refuses to start,
contact your nearest SUBARU dealer
for assistance.
6. Confirm that all warning and indicator
lights have gone off after the engine has
started. The fuel injection system auto-
matically lowers the idle speed as the engine warms up.
NOTE . The engine may be difficult to start
when the battery has been discon-
nected and reconnected (for mainte-
nance or other purposes). This diffi-
culty is caused by the electronically
controlled throttle ’s self-diagnosis
function. To overcome it, keep the
ignition switch in the “ON ”position
for approximately 10 seconds before
starting the engine.. For non-turbo models, to protect the
engine while the shift lever is in the
neutral position, the engine is con-
trolled so that the engine speed may
not become too high even if the accel-
erator pedal is depressed hard. & Automatic transmission model
1. Apply the parking brake.
2. Turn off unnecessary lights and ac- cessories.
3. Shift the select lever to the “P ” or “N ”
position (preferably “P ”position).
The starter motor will only operate when
the select lever is at the “P ”or “N ”position.
4. Turn the ignition switch to the “ON ”
position and check the operation of the warning and indicator lights. Refer to“
Warning and indicator lights ”F 3-9.
5. Turn the ignition switch to the “START ”
position without depressing the accelera-
tor pedal. Release the key immediately
after the engine has started.
If the engine does not start, try the following.
(1) Turn the ignition switch to the“OFF ”position and wait for at least
10 seconds. After checking that the
parking brake is firmly set, turn the
ignition switch to the “START ”position
while depressing the accelerator pedal
slightly (approximately a quarter of the
full stroke). Release the accelerator
pedal as soon as the engine starts.
(2) If this fails to start the engine, turn
the ignition switch back to the “OFF ”
position and wait for at least 10
seconds. Then fully depress the accel-
erator pedal and turn the ignition
switch to the “START ”position. If the
engine starts, quickly release the
accelerator pedal.
(3) If this fails to start the engine, turn
the ignition switch again to the “OFF ”
position. After waiting for 10 seconds
or longer, turn the ignition switch to the“ START ”position without depressing
the accelerator pedal.
Page 226 of 402

(4) If the engine still refuses to start,
contact your nearest SUBARU dealer
for assistance.
6. Confirm that all warning and indicator
lights have gone out after the engine has
started. The fuel injection system auto-
matically lowers the idle speed as the
engine warms up.
While the engine is warming up, make
sure that the select lever is at the “P ” or
“ N ”position and that the parking brake is
applied.
CAUTION
If you restart the engine while the
vehicle is moving, shift the select
lever into the “N ” position. Do not
attempt to place the select lever of a
moving vehicle into the “P ” posi-
tion.
NOTE . The engine may be difficult to start
when the battery has been discon-
nected and reconnected (for mainte-
nance or other purposes). This diffi-
culty is caused by the electronically
controlled throttle ’s self-diagnosis
function. To overcome it, keep the
ignition switch in the “ON ”position for approximately 10 seconds before
starting the engine..
For non-turbo models, to protect the
engine while the select lever is in the“ P ” or “N ” position, the engine is
controlled so that the engine speed
may not become too high even if the
accelerator pedal is depressed hard. Stopping the engine
The ignition switch should be turned off
only when the vehicle is stopped and the
engine is idling.
WARNING
Do not stop the engine when the
vehicle is moving. This will cause
loss of power to the power steering
and the brake booster, making steer-
ing and braking more difficult. It
could also result in accidental acti-
vation of the “LOCK ”position on the
ignition switch, causing the steering
wheel to lock. Starting and operating
7-9
Page 250 of 402

Hill start assist system (MT models)
CAUTION
The Hill start assist system is a
device only for helping the driver
to START the vehicle on an uphill
grade. To prevent accidents when
the vehicle is parked on a slope, be
sure to firmly set the parking brake.
When setting the parking brake,
make sure that the vehicle remains
stationary when the clutch pedal isreleased.
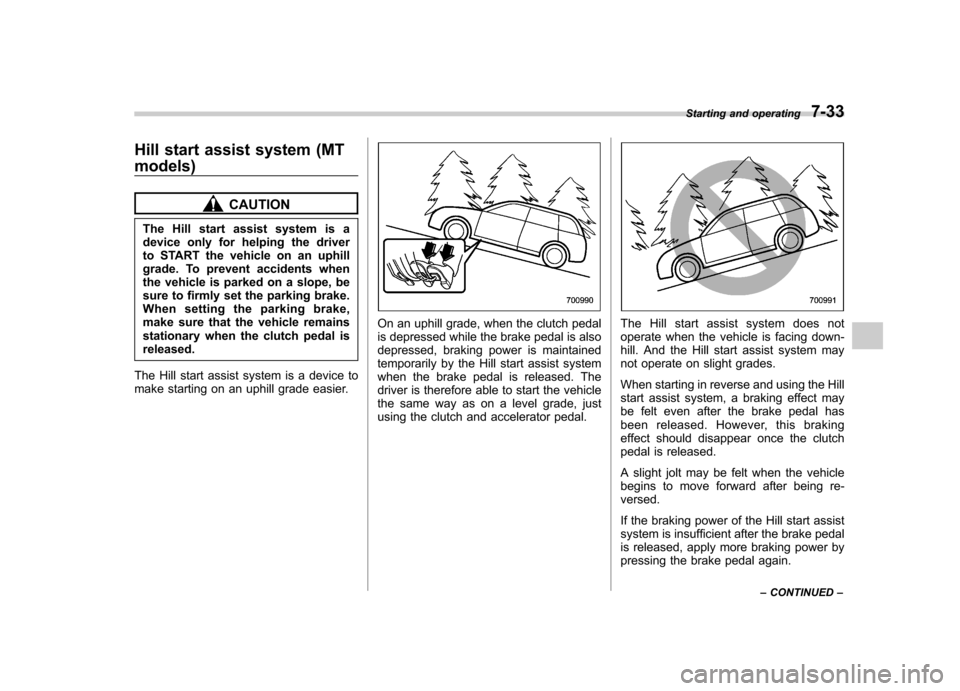
The Hill start assist system is a device to
make starting on an uphill grade easier.
On an uphill grade, when the clutch pedal
is depressed while the brake pedal is also
depressed, braking power is maintained
temporarily by the Hill start assist system
when the brake pedal is released. The
driver is therefore able to start the vehicle
the same way as on a level grade, just
using the clutch and accelerator pedal.The Hill start assist system does not
operate when the vehicle is facing down-
hill. And the Hill start assist system may
not operate on slight grades.
When starting in reverse and using the Hill
start assist system, a braking effect may
be felt even after the brake pedal has
been released. However, this braking
effect should disappear once the clutch
pedal is released.
A slight jolt may be felt when the vehicle
begins to move forward after being re-versed.
If the braking power of the Hill start assist
system is insufficient after the brake pedal
is released, apply more braking power by
pressing the brake pedal again. Starting and operating
7-33
– CONTINUED –
Page 303 of 402

10-4Appearance care
Corrosion protection
Your SUBARU has been designed and
built to resist corrosion. Special materials
and protective finishes have been used on
most parts of the vehicle to help maintain
fine appearance, strength, and reliableoperation. &Most common causes of corrosion
The most common causes of corrosion are:
1. The accumulation of moisture retain-
ing dirt and debris in body panel sections,
cavities, and other areas.
2. Damage to paint and other protective
coatings caused by gravel and stone
chips or minor accidents.
Corrosion is accelerated on the vehicle when:
1. It is exposed to road salt or dust
control chemicals, or used in coastal
areas where there is more salt in the air,
or in areas where there is considerable
industrial pollution.
2. It is driven in areas of high humidity,
especially when temperatures range just
above freezing.
3. Dampness in certain parts of the
vehicle remains for a long time, even though other parts of the vehicle may be
dry.
4. High temperatures will cause corro-
sion to parts of the vehicle which cannot
dry quickly due to lack of proper ventila-tion.
& To help prevent corrosion
Wash the vehicle regularly to prevent
corrosion of the body and suspension
components. Also, wash the vehicle
promptly after driving on any of the
following surfaces. . roads that have been salted to prevent
them from freezing in winter. mud, sand, or gravel
. coastal roads
After the winter has ended, it is recom-
mended that the underbody be given a
very thorough washing.
Before the beginning of winter, check the
condition of underbody components, such
as the exhaust system, fuel and brake
lines, brake cables, suspension, steering
system, floor pan, and fenders. If any of
them are found to be rusted, they should
be given an appropriate rust prevention
treatment or should be replaced. Contact
your SUBARU dealer to perform this kind
of maintenance and treatment if you need assistance.
Repair chips and scratches in the paint as
soon as you find them.
Check the interior of the vehicle for water
and dirt accumulation under the floor mats
because that could cause corrosion.
Occasionally check under the mats to
make sure the area is dry.
Keep your garage dry. Do not park your
vehicle in a damp, poorly ventilated
garage. In such a garage, corrosion can
be caused by dampness. If you wash the
vehicle in the garage or put the vehicle
into the garage when wet or covered with
snow, that can cause dampness.
If your vehicle is operated in cold weather
and/or in areas where road salts and other
corrosive materials are used, the door
hinges and locks, and hood latch should
be inspected and lubricated periodically.
Page 306 of 402

Maintenance schedule....................................... 11-3
Maintenance precautions ................................... 11-3
Before checking or servicing in the engine compartment .................................................... 11-4
When you do checking or servicing in the engine compartment while the engine is running .......... 11-4
Engine hood ....................................................... 11-5
Engine compartment overview .......................... 11-6
Non-turbo models .............................................. 11-6
Turbo models ..................................................... 11-7
Engine oil ............................................................ 11-8
Checking the oil level ......................................... 11-8
Changing the oil and oil filter .............................. 11-9
Recommended grade and viscosity .................. 11-11
Recommended grade and viscosity under severe driving conditions ............................... 11-12
Synthetic oil ..................................................... 11-12
Cooling system ................................................ 11-12
Cooling fan, hose and connections ................... 11-12
Engine coolant ................................................. 11-13
Air cleaner element .......................................... 11-15
Replacing the air cleaner element ..................... 11-16
Spark plugs ...................................................... 11-18
Recommended spark plugs .............................. 11-18
Drive belts ........................................................ 11-18
Manual transmission oil .................................. 11-19
Checking the oil level ....................................... 11-19
Recommended grade and viscosity .................. 11-20
Automatic transmission fluid .......................... 11-20
Checking the fluid level .................................... 11-20 Recommended fluid
......................................... 11-21
Front differential gear oil (AT models) ........... 11-21
Checking the oil level ...................................... 11-21
Recommended grade and viscosity .................. 11-22
Rear differential gear oil .................................. 11-22
Checking the gear oil level ............................... 11-22
Recommended grade and viscosity .................. 11-22
Power steering fluid ........................................ 11-23
Checking the fluid level .................................... 11-23
Recommended fluid ......................................... 11-24
Brake fluid ........................................................ 11-24
Checking the fluid level .................................... 11-24
Recommended brake fluid ............................... 11-25
Clutch fluid (MT models) ................................. 11-25
Checking the fluid level .................................... 11-25
Recommended clutch fluid ............................... 11-26
Brake booster .................................................. 11-26
Brake pedal ...................................................... 11-27
Checking the brake pedal free play .................. 11-27
Checking the brake pedal reserve distance....... 11-27
Clutch pedal (MT models) ............................... 11-27
Checking the clutch function ............................ 11-27
Checking the clutch pedal free play .................. 11-28
Hill start assist system (MT models) .............. 11-28
Replacement of brake pad and lining ............ 11-28
Breaking-in of new brake pads and linings ....... 11-29
Parking brake stroke ....................................... 11-29
Tires and wheels .............................................. 11-30
Types of tires ................................................... 11-30
Maintenance and service
11