2010 SUBARU FORESTER headlight bulb
[x] Cancel search: headlight bulbPage 9 of 402

10
Illustrated index &Exterior1) Engine hood (page 11-5)
2) Headlight switch (page 3-25)
3) Replacing bulbs (page 11-46)
4) Wiper switch (page 3-30)
5) Moonroof (page 2-23)
6) Roof rail (page 8-14)
7) Door locks (page 2-4)
8) Tire pressure (page 11-32)
9) Flat tires (page 9-6)
10) Tire chains (page 8-11)
11) Front fog light switch (page 3-28)
12) Tie-down hooks (page 9-12)
13) Towing hook (page 9-12)
Page 120 of 402

NOTE
This light does not turn off unless the
tank is replenished up to an internal
fuel quantity of approximately 4.0 US
gal (15 liters, 3.3 Imp gal).
CAUTION
Promptly put fuel in the tank when-
ever the low fuel warning light
illuminates. Engine misfires as a
result of an empty tank could cause
damage to the engine. Warning and indicator lights
Several of the warning and indicator lights
illuminate momentarily and then turn off
when the ignition switch is initially turned
to the
“ON ”position. This permits check-
ing the operation of the bulbs.
Apply the parking brake and turn the
ignition switch to the “ON ”position. The
following lights illuminate:
: Seatbelt warning light (The seatbelt warning light turns off
only when the driver fastens theseatbelt.)
: Front passenger ’s seatbelt warning
light
(The seatbelt warning light turns off
only when the front seat passenger
fastens the seatbelt.)
: SRS airbag system warning light
ON /
: Front passenger ’s frontal airbag
ON indicator light
/: Front passenger ’s frontal airbag
OFF indicator light
: CHECK ENGINE warning light/Mal- function indicator lamp
: Coolant temperature high warning light
: Charge warning light
: Oil pressure warning light
: AT OIL TEMP warning light
(AT models)
: Low tire pressure warning light (U.S.- spec. models)
/: ABS warning light
/: Brake system warning light
: Low fuel warning light
: Hill start assist warning light (MT models)
: Door open warning light
: AWD warning light(AT models)
: Vehicle Dynamics Control operation indicator light
: Vehicle Dynamics Control warning light/Vehicle Dynamics Control OFF
indicator light
: SPORT mode indicator light(AT models)
: Cruise control indicator light
: Cruise control set indicator light
: Automatic headlight beam leveler warning light (models with HID head- Instruments and controls
3-9
– CONTINUED –
Page 132 of 402
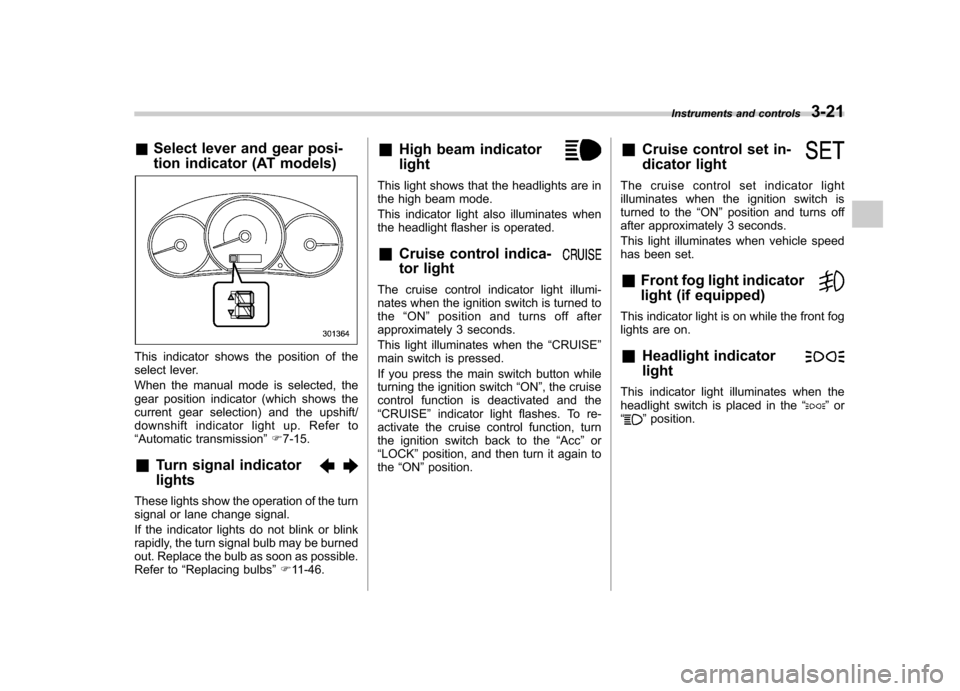
&Select lever and gear posi-
tion indicator (AT models)
This indicator shows the position of the
select lever.
When the manual mode is selected, the
gear position indicator (which shows the
current gear selection) and the upshift/
downshift indicator light up. Refer to“Automatic transmission ”F 7-15.
& Turn signal indicator lights
These lights show the operation of the turn
signal or lane change signal.
If the indicator lights do not blink or blink
rapidly, the turn signal bulb may be burned
out. Replace the bulb as soon as possible.
Refer to “Replacing bulbs ”F 11-46. &
High beam indicator light
This light shows that the headlights are in
the high beam mode.
This indicator light also illuminates when
the headlight flasher is operated. &Cruise control indica-
tor light
The cruise control indicator light illumi-
nates when the ignition switch is turned tothe “ON ”position and turns off after
approximately 3 seconds.
This light illuminates when the “CRUISE ”
main switch is pressed.
If you press the main switch button while
turning the ignition switch “ON ”, the cruise
control function is deactivated and the “ CRUISE ”indicator light flashes. To re-
activate the cruise control function, turn
the ignition switch back to the “Acc ”or
“ LOCK ”position, and then turn it again to
the “ON ”position. &
Cruise control set in-
dicator light
The cruise control set indicator light
illuminates when the ignition switch is
turned to the “ON ”position and turns off
after approximately 3 seconds.
This light illuminates when vehicle speed
has been set. & Front fog light indicator
light (if equipped)
This indicator light is on while the front fog
lights are on. & Headlight indicator light
This indicator light illuminates when the
headlight switch is placed in the “”or
“” position. Instruments and controls
3-21
Page 307 of 402

Maintenance and serviceTire pressure monitoring system (TPMS)(U.S.-spec. models) ........................................ 11-30
Tire inspection ................................................. 11-32
Tire pressures and wear ................................... 11-32
Wheel balance .................................................. 11-34
Wear indicators ................................................ 11-34
Tire rotation direction mark .............................. 11-35
Tire rotation ..................................................... 11-35
Tire replacement .............................................. 11-36
Wheel replacement ........................................... 11-36
Wheel covers (if equipped) ............................... 11-37
Aluminum wheels ............................................. 11-37
Windshield washer fluid .................................. 11-38
Replacement of wiper blades .......................... 11-39
Windshield wiper blade assembly ..................... 11-40
Windshield wiper blade rubber ......................... 11-40
Rear window wiper blade assembly .................. 11-41Rear window wiper blade rubber ...
................... 11-42
Battery .............................................................. 11-43
Fuses ................................................................ 11-44
Main fuse .......................................................... 11-45
Installation of accessories .............................. 11-46
Replacing bulbs ............................................... 11-46
Headlights (models with HID headlights) ........... 11-46
Headlights (models without HID headlights) ...... 11-46
Position light ................................................... 11-49
Front turn signal light ...................................... 11-49
Rear combination lights ................................... 11-49
License plate light ........................................... 11-50
Dome light, map light, cargo area light and door step light ............................................... 11-50
Other bulbs ..................................................... 11-51
Page 351 of 402
11-46Maintenance and service
Installation of accessories
Always consult your SUBARU dealer
before installing fog lights or any other
electrical equipment in your vehicle. Such
accessories may cause the electronic
system to malfunction if they are incor-
rectly installed or if they are not suited for
the vehicle. Replacing bulbs
WARNING
Bulbs may become very hot while
illuminated. Before replacing bulbs,
turn off the bulbs and wait until the
bulbs cool down. Otherwise, there is
a risk of sustaining a burn injury.
CAUTION
Replace any bulb only with a new
bulb of the specified wattage. Using
a bulb of different wattage could
result in a fire. For the specified
wattage of each bulb, refer to “Bulb
chart ”F 12-10.
& Headlights (models with HID headlights)
WARNING
High-intensity-discharge (HID) bulbs
are used for the low beams of the
headlights. These HID bulbs use an
extremely high voltage. To avoid the
risk of an electric shock that could
result in serious injury, observe the following precautions. .
Do not replace any headlight
bulbs (both low beam and high
beam) by yourself.
. Do not remove/restore the head-
light assemblies by yourself.
. Do not remove any headlight-
assembly components by your-self.
For replacement, contact your
SUBARU dealer.
& Headlights (models without
HID headlights)
CAUTION
Halogen headlight bulbs become
very hot while in use. If you touch
the bulb surface with bare hands or
greasy gloves, fingerprints or
grease on the bulb surface will
develop into hot spots, causing the
bulb to break. If there are finger
prints or grease on the bulb surface,
wipe them away with a soft cloth
moistened with alcohol.
Page 352 of 402
NOTE .If headlight aiming is required, con-
sult your SUBARU dealer for proper
adjustment of the headlight aim.. It may be difficult to replace the
bulbs. Have the bulbs replaced by your
SUBARU dealer if necessary. !
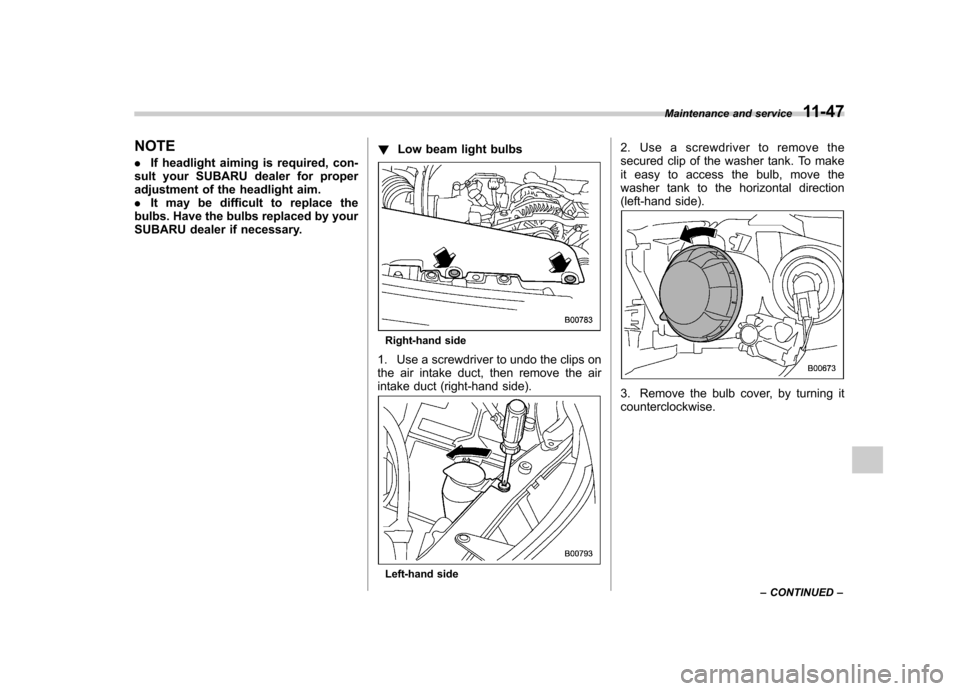
Low beam light bulbs
Right-hand side
1. Use a screwdriver to undo the clips on
the air intake duct, then remove the air
intake duct (right-hand side).
Left-hand side 2. Use a screwdriver to remove the
secured clip of the washer tank. To make
it easy to access the bulb, move the
washer tank to the horizontal direction
(left-hand side).
3. Remove the bulb cover, by turning it counterclockwise.
Maintenance and service
11-47
– CONTINUED –
Page 353 of 402
11-48Maintenance and service
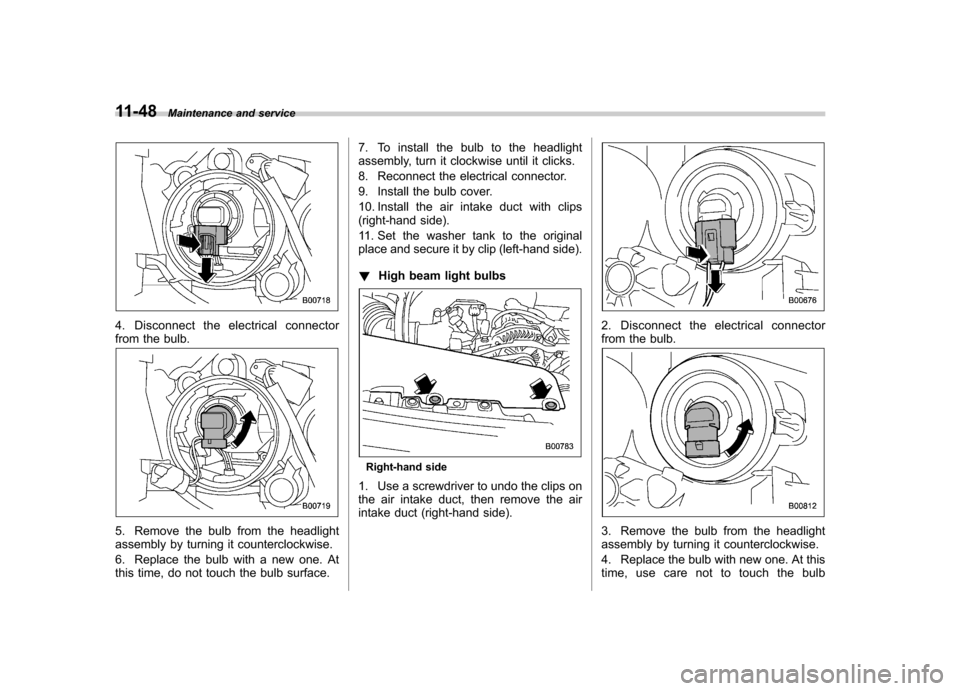
4. Disconnect the electrical connector
from the bulb.
5. Remove the bulb from the headlight
assembly by turning it counterclockwise.
6. Replace the bulb with a new one. At
this time, do not touch the bulb surface. 7. To install the bulb to the headlight
assembly, turn it clockwise until it clicks.
8. Reconnect the electrical connector.
9. Install the bulb cover.
10. Install the air intake duct with clips
(right-hand side).
11. Set the washer tank to the original
place and secure it by clip (left-hand side). !
High beam light bulbs
Right-hand side
1. Use a screwdriver to undo the clips on
the air intake duct, then remove the air
intake duct (right-hand side).
2. Disconnect the electrical connector
from the bulb.
3. Remove the bulb from the headlight
assembly by turning it counterclockwise.
4. Replace the bulb with new one. At this
time, use care not to touch the bulb
Page 354 of 402
surface.
5. To install the bulb to the headlight
assembly, turn it clockwise until it clicks.
6. Reconnect the electrical connector.
7. Install the air intake duct with clips
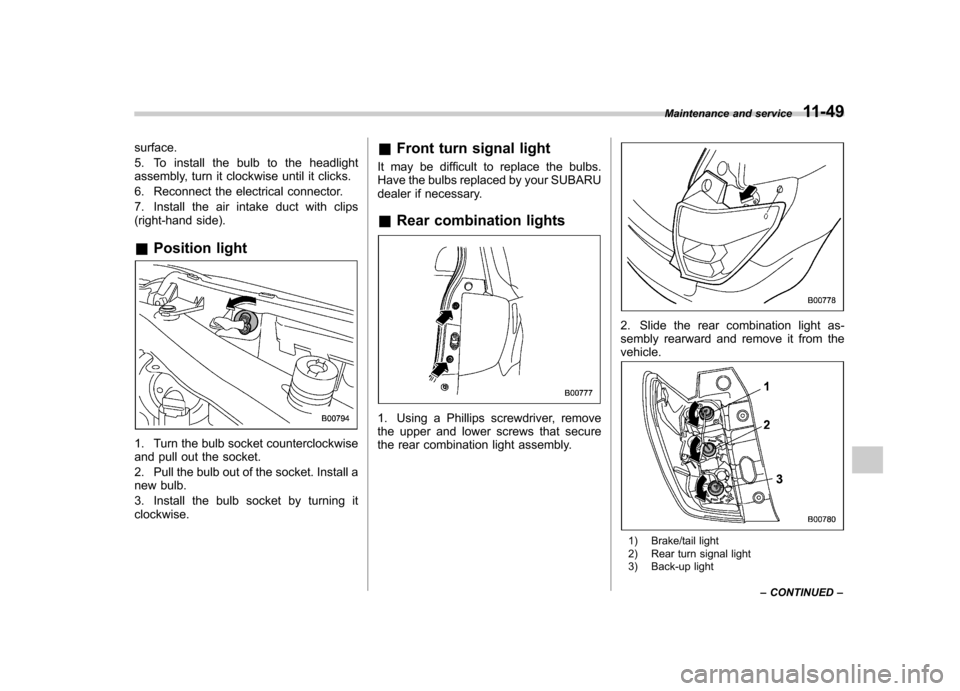
(right-hand side). &Position light
1. Turn the bulb socket counterclockwise
and pull out the socket.
2. Pull the bulb out of the socket. Install a
new bulb.
3. Install the bulb socket by turning it clockwise. &
Front turn signal light
It may be difficult to replace the bulbs.
Have the bulbs replaced by your SUBARU
dealer if necessary. & Rear combination lights
1. Using a Phillips screwdriver, remove
the upper and lower screws that secure
the rear combination light assembly.
2. Slide the rear combination light as-
sembly rearward and remove it from thevehicle.
1) Brake/tail light
2) Rear turn signal light
3) Back-up light Maintenance and service
11-49
– CONTINUED –