2010 SMART FORTWO COUPE engine
[x] Cancel search: enginePage 107 of 216

>> Operation.The first 1000 miles (1500 km) .............106
At the gas station ............................. 106
Engine compartment ......................... 107
Front compartment ............................ 110
Tires and wheels .............................. 114
Winter driving ................................ 132
Driving instructions ........................134
Driving abroad ................................ 140
Vehicle care ................................... 141451_AKB; 3; 22, en-USd2ureepe,Version: 2.11.8.12009-07-27T09:36:34+02:00 - Seite 105
Page 108 of 216

The first 1000 miles (1500 km)
In the Operation section you will find
detailed information on operating,
maintaining and caring for your vehicle.
The more cautiously you treat your vehicle
during the break-in period, the more
satisfied you will be with its performance
later on.
R Drive your vehicle during the first
1 000 miles (1 500 km) at varying but
moderate vehicle and engine speeds.
R During this period, avoid heavy loads
(full throttle driving) and excessive
engine speeds (no more than 2
/ 3 of
maximum rpm in each gear).
R Shift gears in a timely manner.
R Do not attempt to slow the vehicle down
by shifting to a lower gear.
R Avoid accelerating by kickdown.
After 1 000 miles (1 500 km), you may
gradually increase vehicle and engine
speeds to the permissible maximum.
All of the above instructions also apply
when driving the first 1 000 miles (1 500 km)
after the engine has been replaced.
i Always obey applicable speed limits.
At the gas station
Refueling
GWarning!
Gasoline is highly flammable and
poisonous. It burns violently and can cause
serious personal injury.
Never allow sparks, flame or smoking
materials near gasoline!
Turn off the engine before refueling.
Whenever you are around gasoline, avoid
inhaling fumes and skin or clothing
contact. Extinguish all smoking materials.
Direct skin contact with fuels and the
inhalation of fuel vapors are damaging to
your health.
! Do not put diesel fuel in vehicles with
gasoline engines. Do not mix gasoline
with diesel fuel. Even small quantities
of diesel fuel will damage the injection
system. Damage caused by adding diesel
fuel will not be covered by the smart
Limited Warranty.
If diesel fuel has mixed with gasoline,
do not start the engine. Otherwise the
catalytic converter will be irreparably
damaged.
Contact an authorized smart center or
Roadside Assistance immediately and
have the vehicle towed.
! Damage resulting from mixing gasoline
with diesel fuel is not covered by the
smart Limited Warranty.
The fuel filler flap is located on the
passenger side towards the rear. Locking/
unlocking the vehicle with the key
automatically locks/unlocks the fuel filler
flap.
i In case the central locking system does
not release the fuel filler flap, or the
opening mechanisms is clamping,
contact Roadside Assistance or an
authorized smart center.0046Opening the fuel filler flap0047Inserting the fuel filler cap106At the gas station>> Operation.
451_AKB; 3; 22, en-USd2ureepe,Version: 2.11.8.12009-07-27T09:36:34+02:00 - Seite 106
Page 109 of 216

008AFuel filler cap0088Fuel type label0086HolderXTurn off the engine.XRemove the key from the starter switch.XOpen the fuel filler flap by pulling at the
point indicated by arrow 0046.XTurn fuel filler cap 008A counterclockwise
and hold on to it until possible pressure
is released.XTake off fuel filler cap 008A.
!
The fuel filler cap is tethered to the
fuel filler flap. Do not drop the fuel
filler cap. It could damage the vehicle
paint finish.
XInsert fuel filler cap 008A in direction of
arrow 0047 into holder 0086 on the inside of
the fuel filler flap.XFully insert filler nozzle unit and
refuel.XOnly fill your tank until the filler nozzle
unit cuts out — do not top off or overfill .GWarning!
Overfilling of the fuel tank may create
pressure in the system which could cause a
gas discharge. This could cause the gas to
spray back out when removing the fuel pump
nozzle, which could cause personal injury.
XReplace fuel filler cap 008A.XTurn fuel filler cap 008A clockwise until
the handle grip overturns.
i Make sure to close the fuel filler flap
before locking the vehicle as the fuel
filler flap locking pin prevents closing
after you have locked the vehicle.
XClose the fuel filler flap.
You should hear the latch close shut.
i Only use premium unleaded gasoline
with a minimum Posted Octane Rating of
91 (average of 96 RON/86 MON).
Information on gasoline quality can
normally be found on the fuel pump.
Please contact gas station personnel in
case labels on the pump cannot be found.
For more information on gasoline, see
“Premium unleaded gasoline”
( Y page 207) and “Fuel requirements”
( Y page 208), or contact an authorized
smart center.
Check regularly and before a long trip
For information on quantities and
requirements of operating agents, see
“Service fluids and capacities”
( Y page 204).
Check the following:
R Engine oil level ( Y page 108)
R Tire inflation pressure ( Y page 116)
R Coolant level ( Y page 111)
R Vehicle lighting ( Y page 164)
R Windshield washer system ( Y page 112)
R Brake fluid ( Y page 113)
Engine compartment
Engine compartment cover
Open the engine compartment cover to
check the engine oil level and if necessary,
to add engine oil.
GWarning!
High outside temperature, stop-and-go
traffic, driving on long uphill grades or
driving at high engine speed may increase
the temperature in the engine
compartment. Therefore, the engine
compartment cover and parts in the area
around the engine compartment cover may
be hot. Parts of the engine can become very
hot. To prevent burns, let the engine cool
off completely before touching the engine
Engine compartment107>> Operation.451_AKB; 3; 22, en-USd2ureepe,Version: 2.11.8.12009-07-27T09:36:34+02:00 - Seite 107Z
Page 110 of 216

compartment cover, parts in the area
around the engine compartment cover, and
parts of the engine.XTurn off the engine.XEngage the parking brake.XOpen the tailgate.GWarning!
Exercise extreme caution if you see flames
or smoke coming from the engine
compartment. Move away from the vehicle
and call the fire department.
If the coolant temperature warning lamp
indicates that the engine is overheated, do
not attempt to open the engine compartment
cover. Move away from the vehicle and wait
until the engine has cooled before opening
the engine compartment.
GWarning!
To help prevent personal injury, stay clear
of moving parts when the engine
compartment cover is open and the engine
is running.
GWarning!
The engine is equipped with a
transistorized ignition system that
utilizes high voltage. Do not touch any
components (ignition coils, spark plug
sockets, diagnostic socket) of the ignition
system
R while the engine is running
R while starting the engine
R if ignition is “on” and the engine is
turned manually
XOpening: Grasp the strap on cargo
compartment floor 0046.XLift cargo compartment floor 0046 with the
strap.XEngage hook 0088 into top mounting of
cargo compartment cover blind 0086.XRemove fastening screw 0047.XRemove engine compartment cover 008A.XClosing: Slide engine compartment cover
008A forward into the tabs provided.XTighten fastening screw 0047.XDisengage hook 0088 from top mounting
0086 .XFold cargo compartment floor 0046 back
down.XPush the right hand and left hand cargo
compartment floor edges under the edges
of the side panels.XClose the tailgate.
Engine oil
The amount of oil your engine needs will
depend on a number of factors, including
driving style. Increased oil consumption
can occur when the vehicle is new or the
vehicle is driven at higher engine speeds
frequently.
Engine oil consumption checks should only
be made after the vehicle break-in period.
108Engine compartment>> Operation.
451_AKB; 3; 22, en-USd2ureepe,Version: 2.11.8.12009-07-27T09:36:34+02:00 - Seite 108
Page 111 of 216

! Do not use any special lubricant
additives, as these may increase wear
and damage the drive assemblies. Using
special additives not approved by smart
may cause damage not covered by the
smart Limited Warranty. More
information on this subject is available
at any smart center.
Checking engine oil level
! Check the engine oil level at regular
intervals.
When checking the engine oil level
R the vehicle must be parked on level
ground
R the vehicle must have been stationary for
at least five minutes with the engine
turned off
XTurn off the engine.XEngage the parking brake.XOpen the tailgate.XOpen the engine compartment cover
( Y page 107).
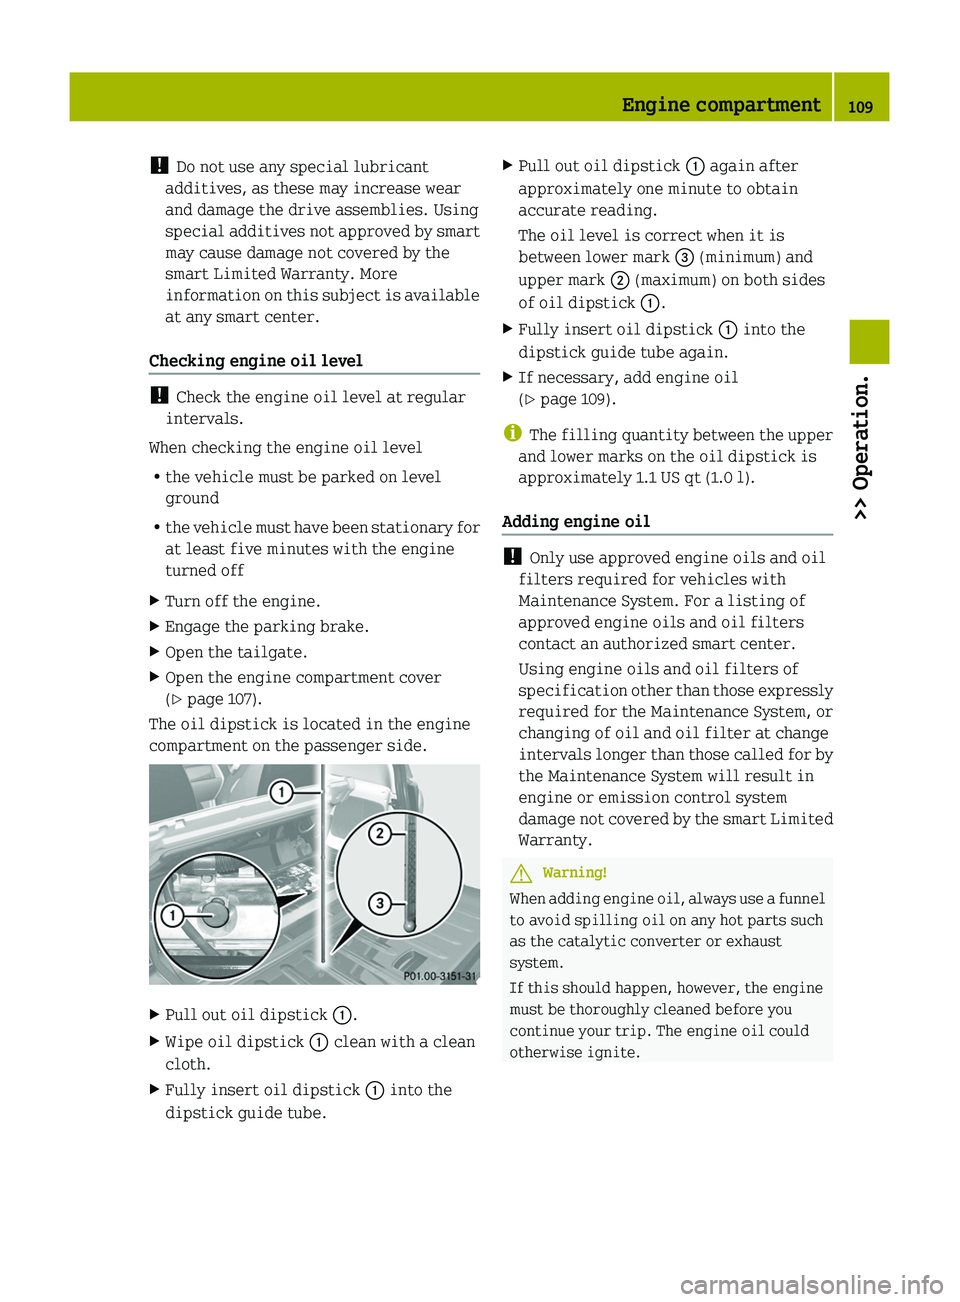
The oil dipstick is located in the engine
compartment on the passenger side.
XPull out oil dipstick 0046.XWipe oil dipstick 0046 clean with a clean
cloth.XFully insert oil dipstick 0046 into the
dipstick guide tube.XPull out oil dipstick 0046 again after
approximately one minute to obtain
accurate reading.
The oil level is correct when it is
between lower mark 008A (minimum) and
upper mark 0047 (maximum) on both sides
of oil dipstick 0046.XFully insert oil dipstick 0046 into the
dipstick guide tube again.XIf necessary, add engine oil
( Y page 109).
i
The filling quantity between the upper
and lower marks on the oil dipstick is
approximately 1.1 US qt (1.0 l).
Adding engine oil
! Only use approved engine oils and oil
filters required for vehicles with
Maintenance System. For a listing of
approved engine oils and oil filters
contact an authorized smart center.
Using engine oils and oil filters of
specification other than those expressly
required for the Maintenance System, or
changing of oil and oil filter at change
intervals longer than those called for by
the Maintenance System will result in
engine or emission control system
damage not covered by the smart Limited
Warranty.
GWarning!
When adding engine oil, always use a funnel
to avoid spilling oil on any hot parts such
as the catalytic converter or exhaust
system.
If this should happen, however, the engine
must be thoroughly cleaned before you
continue your trip. The engine oil could
otherwise ignite.
Engine compartment109>> Operation.451_AKB; 3; 22, en-USd2ureepe,Version: 2.11.8.12009-07-27T09:36:34+02:00 - Seite 109Z
Page 112 of 216

The filler cap is located in the engine
compartment on the passenger side.XUnscrew filler cap 0046 from the filler
neck.XAdd engine oil as required.
Do not add more than 0.53 US qt (0.5 l)
engine oil at a time.XWait one minute until the engine oil has
run into the oil pan.XCheck the engine oil level once more.XAdd engine oil once more if necessary.
Be careful not to spill any oil when adding
to avoid environmental damage caused by
oil entering the ground and water.
! Excess engine oil must be siphoned or
drained off. It could cause damage to the
engine or emission control system not
covered by the smart Limited Warranty.
XScrew filler cap 0046 back on the filler
neck.XClose the engine compartment cover
( Y page 107).
Front compartment
Service flap
Remove the service flap to check the
coolant level, windshield washer reservoir
level, and brake fluid level.
Insert the service flap on the front of the
vehicle so that it does not get damaged or
dirty.
GWarning!
Always turn the key to starter switch
position 0 and remove the key from the
starter switch before opening the service
flap.
If the windshield wipers should
inadvertently be switched on, you could be
seriously injured by the wiper washer
drive, which is located just below the
service flap.
GWarning!
Make sure the service flap is locked while
driving. Otherwise, the service flap could
become detached and pose a hazard to you
or others.
GWarning!
To help prevent personal injury, stay clear
of moving parts when the service flap is
open.
The radiator fan may continue to run for
approximately 30 seconds or may even
restart after the engine has been turned
off. Stay clear of fan blades.
! Check the fill levels at regular
intervals.
! Carefully remove ice, snow, and any
other deposits from the air intake
grilles above the service flap to ensure
air intake at all times.
XPark the vehicle on level ground.XTurn off the engine.XEngage the parking brake.110Front compartment>> Operation.
451_AKB; 3; 22, en-USd2ureepe,Version: 2.11.8.12009-07-27T09:36:34+02:00 - Seite 110
Page 114 of 216

cooling system, or if the coolant
temperature warning lamp 00AE in the
instrument cluster indicates that the
coolant is overheated.
R Do not remove the pressure cap on coolant
reservoir if coolant temperature is
above 158 ¦ (70 ¥). Allow engine to cool
down before removing cap. The coolant
reservoir contains hot fluid and is under
pressure.
R Using a rag, slowly turn the cap
approximately 1
/ 2 turn to relieve excess
pressure. If opened immediately,
scalding hot fluid and steam will be
blown out under pressure.
The engine coolant is a mixture of water
and anticorrosion/antifreeze. To check the
coolant level the vehicle must be parked on
level ground and the engine must have
cooled down. For more information, see
“Coolants” ( Y page 209).
Checking coolant levelXRemove the service flap and insert it on
the front of the vehicle ( Y page 110).
The coolant reservoir is located in the
front compartment on the driver’s side.
XAllow the radiator to cool down for at
least 30 minutes.XUsing a rag, slowly turn pressure
cap 0046 approximately 1
/ 2 turncounterclockwise to release any excess
pressure.XContinue turning pressure cap 0046
counterclockwise and remove it.
The coolant level is correct if the level
R for cold coolant: reaches marking
bar 0047 visible through the filling
opening
R for warm coolant: is approximately
0.6 in (1.5 cm) higherXIf necessary, add coolant.
Adding coolant
XAdd coolant as required. The coolant
level may not exceed the maximum filling
level.XReplace and tighten pressure cap 0046.XRemount the service flap and close it
( Y page 110).
Windshield/rear window washer system
Both the windshield and the rear window 14
washer are supplied from the windshield
washer reservoir.
The recommended minimum filling level is
1.06 US qt (1.0 l).
XRemove the service flap and insert it on
the front of the vehicle ( Y page 110).14
Coupé only.112Front compartment>> Operation.
451_AKB; 3; 22, en-USd2ureepe,Version: 2.11.8.12009-07-27T09:36:34+02:00 - Seite 112
Page 134 of 216

Tire ply composition and material used
This indicates the number of plies or the
number of layers of rubber-coated fabric
in the tire tread and sidewall. Tire
manufacturers also must indicate the ply
materials in the tire and sidewall, which
include steel, nylon, polyester, and others.
Tire speed rating
Part of tire designation; indicates the
speed range for which a tire is approved.
Total load limit
Rated cargo and luggage load plus
68 kilograms (150 lbs) times the vehicle’s
designated seating capacity.
Traction
Force exerted by the vehicle on the road via
the tires. The amount of grip provided.
Tread
The portion of a tire that comes into
contact with the road.
Treadwear indicators
Narrow bands, sometimes called “wear
bars” that show across the tread of a tire
when only 1
/ 16 in (1.6 mm) of tread remains.
Uniform Tire Quality Grading Standards
A tire information system that provides
consumers with ratings for a tire’s
traction, temperature and treadwear.
Ratings are determined by tire
manufacturers using U.S. government
testing procedures. The ratings are molded
into the sidewall of the tire.
Vehicle maximum load on the tire
Load on an individual tire that is
determined by distributing to each axle
its share of the maximum loaded vehicle
weight and dividing it by two.
Winter driving
Before the onset of winter, have your
vehicle winterized at an authorized smart
center. This service includes:
R Check of anticorrosion and antifreeze
concentration.
R Addition of washer concentrate to the
water of the windshield/rear window.
Use a windshield washer concentrate
labeled for winter which is formulated
for temperatures below freezing point
( Y page 208).
R Battery test. Battery capacity drops with
decreasing ambient temperature. A well
charged battery helps to make sure the
engine can be started, even at low
ambient temperatures.
R Tire change.
Winter tires
GWarning!
Winter tires with a tread depth of less than
1 / 6 in (4 mm) must be replaced. They are no
longer suitable for winter operation.
Always use winter tires at temperatures
below 45 ¦ (7¥ ) and whenever wintry road
conditions prevail. Not all M+S rated tires
provide special winter performance. Make
sure the tires you use show the mountain/
snowflake marking 004D on the tire
sidewall. These tires meet specific snow
traction performance requirements of the
Rubber Manufacturers Association (RMA)
and the Rubber Association of Canada (RAC)
and have been designed specifically for
use in snow conditions. Use of winter tires
is the only way to achieve the maximum
132Winter driving>> Operation.
451_AKB; 3; 22, en-USd2ureepe,Version: 2.11.8.12009-07-27T09:36:34+02:00 - Seite 132