2010 SKODA YETI oil level
[x] Cancel search: oil levelPage 184 of 271

Driving and the Environment183
Using the system
Safety
Driving Tips
General Maintenance
Breakdown assistance
Technical Data
Fill up your tank. The fuel consumption of the vehicle is much higher when driving
off-road than when driving on the road.
Install the towing eye at the front or at the rear before driving off-road. It is not
always possible to install the towing eye if the vehicle got stuck.
Always check the inflation pressure of a ll the tyres and if necessary correct it.
Check the vehicle tool kit and supplement it according to your needs.
Fill with engine oil up to the line , so that the engine is sufficiently supplied with
engine oil when the vehicle is in a tilted position page 205, “Check engine oil level”.
Top up wash fluid.
Stow your load as low as possible in th e vehicle and attach all the items which are
loose.
Off-road driving
Never be alone when driving off-road and be prepared to encounter unexpected
situations. Travel together with at least two off-road vehicles. Equipment with which
you can call for help in an emer gency is particularly useful.
Drive slowly through unclear terrain.
You must stop when encountering difficul t passages and explore the continuation
of the route on foot. If you cannot go on or if you doubt the safety of the route, turn
back and choose another way.
Drive slowly over hilltops. Ma ke sure that the wheels of the vehicle do not lift off
the ground, as this could severely damage the vehicle and it may become disabled.
Drive slowly on difficult stretches of the route. When driving on a slippery ground,
s h i f t u p i n to t h e n e xt h i g h e r g e a r a n d m a ke s u re t h a t t he v e h i c l e a l w a y s s t a y s i n m o t i o n.
Do not drive too fast so that you do n't lose control over your vehicle.
If your vehicle got stuck in sand, snow or sludge, it may be more effective to reverse
the vehicle than trying to drive forwards.
Place stones, footmats or pieces of wood under the spinning wheels in order to
achieve traction on a sandy or slippery ground.
Do no drive throug h water before reading what you must take into account
page 179.
Keep sufficient distance from other vehicles even at low speeds. When the first
vehicle suddenly gets stuck, the following vehi cle can still stop in time without getting
stuck itself.
Do not plan day trips which are too far in distance.
Do not use the cruise control system when driving off-road. It is only intended for
driving on the road.
WARNING
The intelligent engineering of your ve hicle cannot overcome the physical
limits of your vehicle.
Be very alert and look ahead when driving off-road. Excessive speed or
incorrect driving manoeuvres can caus e damage to the vehicle and lead to
serious injuries.
Observe the important guidelines page 179.Caution
Pay attention to the ground clearance of the vehicle! The vehicle can be severely
damaged and become disabled once it touches the ground.
Never drive off-road with an almost empty fuel tank. The fuel supply to the engine
can be interrupted and therefore the cata lytic converter can be severely damaged.
Do not leave your foot on the clutch pedal or let the clutch slip when driving off-
road. Overwise you may unintentionally de press the clutch pedal on uneven ground
leading to a loss of control over the vehicle. In addition, the force for connecting the
engine and the gearbox is lost. Moreover, driving while letting the clutch slip causes a
fast wear of the clutch linings.Note
The fuel consumption is high er when driving off-road than when driving on conven-
tional roads, especially through difficult terr ain. When you prepare for your journey, be
aware of an increase in fuel consumption; the nearest filling station may be far away.
AA
s2ug.6.book Page 183 Friday, April 9, 2010 2:24 PM
Page 206 of 271

Inspecting and replenishing205
Using the system
Safety
Driving Tips
General Maintenance
Breakdown assistance
Technical Data
Overview of the engine compartment
The main inspection points.Fig. 163 Petrol engine 1.8 ltr./118 kW TSI
Coolant expansion bottle . . . . . . . . . . . . . . . . . . . . . . . . . . . . . . . . . . . . . . .
Windshield washer fluid reservoir . . . . . . . . . . . . . . . . . . . . . . . . . . . . . . .
Engine oil filler opening . . . . . . . . . . . . . . . . . . . . . . . . . . . . . . . . . . . . . . . .
Engine oil dipstick . . . . . . . . . . . . . . . . . . . . . . . . . . . . . . . . . . . . . . . . . . . . . .
Brake fluid reservoir . . . . . . . . . . . . . . . . . . . . . . . . . . . . . . . . . . . . . . . . . . . .
Battery (below a cover) . . . . . . . . . . . . . . . . . . . . . . . . . . . . . . . . . . . . . . . . .Note
The location of the inspection points in th e engine compartment of petrol and diesel
engines is practically identical.
Engine oilCheck engine oil level
The dipstick indicates the le vel of oil in the engine.Checking the oil level– Ensure that the vehicle is po sitioned on a level surface.
– Switch the engine off.
– Open the bonnet in “Working in the engine compartment” on page 204.
– Wait a few minutes and pull out the oil dipstick.
– Wipe off the dipstick with a clea n cloth and insert it again fully.
– Then withdraw the dipstick again and read off the oil level.Oil level within range –You must not top up the oil.Oil level within range –You may top up the oil. It is possible that the oil level may then be within range
after doing this.Oil level within range –You must top up the oil page 206. It is sufficient, once this is done, to keep the
oil level within range .
A1
208
A2
214
A3
206
A4
205
A5
209
A6
210
Fig. 164 Dipstick
AAAB
AA
ACAB
s2ug.6.book Page 205 Friday, April 9, 2010 2:24 PM
Page 207 of 271

Inspecting and replenishing
206
It is normal for the engine to consume oil. The oil consumption may be as much as 0.5
l/1 000 km depending on your style of driving and the conditions under which you
operate your vehicle. The oil consumption may be slightly hi gher than this during the
first 5 000 kilometres.
One should therefore check the oil level at regular intervals, preferably every time after
the fuel tank is filled or after driving for long stretches.
We recommend maintaining the oil level within the range - but not above this, if
the engine has been operating at high load s, for example during a lengthy motorway
trip during the summer months, towing a tr ailer or negotiating a high mountain pass.
The warning light in the instrument cluster* will indicate page 31 whether the oil
level is too low. In this case, check the oil level as soon as possible. Top up with an
appropriate quantity of oil.
Caution
The oil level must on no account extend beyond the range . Danger of damaging
the catalytic converter.
Do not continue your journey if for some reason it is not possible under the
conditions prevailing to top up with oil. Switch the engine off and obtain professional
assistance from a specialist garage, otherwise it could lead to severe engine damage.Note
Engine oil specifications page 243, “Technical Data”.Replenishing engine oil– Inspecting the engine oil level page 205.
– Unscrew the cap of the engine oil filler opening.
– Pour in a suitable grade of oil in portions of 0.5 litres page 246, “Engine oil spec-
ifications”.
– Inspect the oil level page 205.
– Carefully screw on the cap of the filler opening and push the dipstick in fully.
WARNING
Avoid dripping oil onto hot parts of the engine when topping up will oil - a
risk of fire!
Read and observe the warning notes page 204, “Working in the engine
compartment” before working in the engine compartment.For the sake of the environment
The oil level must on no acco unt extend beyond the range page 205. Oil will
otherwise be drawn in through the crankc ase ventilation and may pass through the
exhaust system to atmosphere. The oil ma y combust in the catalytic converter and
damage it.Changing engine oilThe engine oil must be changed at the intervals stated in the Service schedule or
according to the service interval indicator page 18, “Service Interval Display”.
WARNING
Only carry out the engine oil change, if you have the required professional
knowledge!
Read and observe the warning notes page 204, “Working in the engine
compartment” before working in the engine compartment.
First of all, let the engine cool down, we ar an eye protection and gloves - risk
of caustic burns due to hot oil.Caution
You must not pour any additives into the engine oil - risk of engine damage! Damage,
which results from such product, are excluded from the warranty.
For the sake of the environment
You must on no account pour oil into the ground or into the sewage system.
AAAA
AA
s2ug.6.book Page 206 Friday, April 9, 2010 2:24 PM
Page 209 of 271
Inspecting and replenishing
208
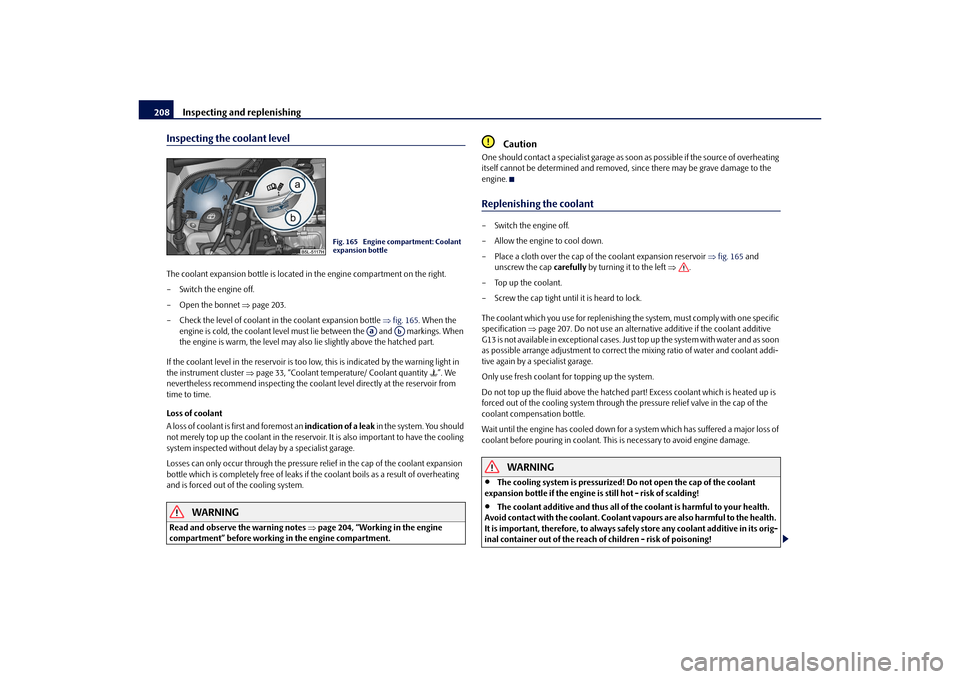
Inspecting the coolant levelThe coolant expansion bottle is located in the engine compartment on the right.
– Switch the engine off.
– Open the bonnet page 203.
– Check the level of coolant in the coolant expansion bottle fig. 165 . When the
engine is cold, the coolant level must lie between the and markings. When
the engine is warm, the level may also lie slightly above the hatched part.
If the coolant level in the reservoir is too lo w, this is indicated by the warning light in
the instrument cluster page 33, “Coolant temperature/ Coolant quantity ”. We
nevertheless recommend inspecting the cool ant level directly at the reservoir from
time to time.
Loss of coolant
A loss of coolant is first and foremost an indication of a leak in the system. You should
not merely top up the coolant in the reservoir. It is also important to have the cooling
system inspected without delay by a specialist garage.
Losses can only occur through the pressure relief in the cap of the coolant expansion
bottle which is completely free of leaks if the coolant boils as a result of overheating
and is forced out of the cooling system.
WARNING
Read and observe the warning notes page 204, “Working in the engine
compartment” before working in the engine compartment.
Caution
One should contact a specialist garage as s oon as possible if the source of overheating
itself cannot be determined and removed, since there may be grave damage to the
engine.Replenishing the coolant– Switch the engine off.
– Allow the engine to cool down.
– Place a cloth over the cap of the coolant expansion reservoir fig. 165 and
unscrew the cap carefully by turning it to the left .
–Top up the coolant.
– Screw the cap tight until it is heard to lock.
The coolant which you use for replenishing the system, must comply with one specific
specification page 207. Do not use an alternative additive if the coolant additive
G13 is not available in exceptional cases. Just top up the system with water and as soon
as possible arrange adjustment to correct the mixing ratio of water and coolant addi-
tive again by a specialist garage.
Only use fresh coolant for topping up the system.
Do not top up the fluid above the hatched pa rt! Excess coolant which is heated up is
forced out of the cooling system through the pressure relief valve in the cap of the
coolant compensation bottle.
Wait until the engine has cooled down for a system which has suffered a major loss of
coolant before pouring in coolant. This is necessary to avoid engine damage.
WARNING
The cooling system is pressurized! Do not open the cap of the coolant
expansion bottle if the engine is still hot - risk of scalding!
The coolant additive and thus all of the coolant is harmful to your health.
Avoid contact with the coolant. Coolant vapours are also harmful to the health.
It is important, therefore, to always safely store any coolant additive in its orig-
inal container out of the reach of children - risk of poisoning!
Fig. 165 Engine compartment: Coolant
expansion bottle
Aa
Ab
s2ug.6.book Page 208 Friday, April 9, 2010 2:24 PM
Page 211 of 271

Inspecting and replenishing
210
If the fluid level has dropped below the MIN marking, do not drive any
further - risk of accident! Obtain professional assistance.
Replacing brake fluidBrake fluid absorbs moisture. This causes the fluid to absorb moisture from the
surrounding air over a period of time. Excessive water in the brake fluid may be the
cause of corrosion in the brake system. The water content also lowers the boiling point
of the brake fluid.
One may only use new genuine brake fluid from Škoda Auto. The brake fluid must
comply with one of the following standards or specifications:
VW 50114
FMVSS 116 DOT4
DIN ISO 4925 CLASS 4
We recommend that you have the brake fluid replaced by an authorised Škoda
Service Partner as part of an Inspection Service.
WARNING
Using old brake fluid can result in severe stress on the brakes because of the
formation of vapour bubbles in the br ake system. This greatly impairs the
braking efficiency and thus also the safety of your vehicle.
Caution
Brake fluid damages the paintwork of the vehicle.
For the sake of the environment
In view of the problems involved with proper disposal of brake fluid, the special tools
and the professional knowledge required, you should have the brake fluid replaced by
authorised Škoda Service Partners.
BatteryWorking on the batteryFig. 167 Engine compartment: Polyester cover of the vehicle battery / plastic cover of the
vehicle batteryThe battery is located in the engine compartment in a polyester cover fig. 167 - left,
or in a plastic cover* fig. 167 - right.
– Open the battery cover in direction of arrow or press the interlock on the side of the battery cover in direction of arrow fig. 167 , fold the cover up and
remove the battery.
– The installation of the battery co ver takes place in the reverse order.
The edge of the polyester battery cover fig. 167 - left is inserted between the battery
and the side wall of the battery cover when working on the battery.
Removal and installation of the battery is not recommended since it can, under certain
circumstances, lead to major dama ge. Contact a specialist garage.
There is a risk of injuries, scalding, accidents and burns when carrying out any work on
the battery and on the electrical system. For th is reason, it is essential to comply with
the warning instructions stated below and with the general applicable rules of
safety.
WARNING
The battery acid is strongly corrosive and must, therefore, be handled with
the greatest of care. Always wear prot ective gloves, eye and skin protection
WARNING (continued)
A1
A2
s2ug.6.book Page 210 Friday, April 9, 2010 2:24 PM
Page 226 of 271

Breakdown assistance225
Using the system
Safety
Driving Tips
General Maintenance
Breakdown assistance
Technical Data
Changing a wheelPreliminary workThe following steps should be carried ou t before actually changing the wheel.
– If it is necessary to change a wheel, park the vehicle as far away as possible from
the traffic flow. The place you choose should be level.
–Have all the occupants get out. While changing a wheel, the occupants of the
vehicle should not stand on the road (e.g. behind a crash barrier).
– Apply the handbrake firmly.
–Engage 1st gear or if your vehicle is fitted with an automatic gearbox, position the
selector lever into position P .
– If a trailer is coupled, uncouple it.
–Take the vehicle tool kit page 223 and the spare wheel* page 224 out of the
luggage compartment.
WARNING
If you find yourself in flowing traffic switch on the hazard warning lights
system and place the warning triangle on the side of the road at the prescribed
distance from your vehicle while observing all national legal provisions. In this
way you are protecting not only yourself but also other road users.
Never start the engine with the vehicle si tting on the raised jack - danger of
suffering injury.Caution
If you have to change a wheel on a slope first block the opposite wheel with a stone or
similar object in order to secure the vehicle from unexpectedly rolling away.
Note
Comply with the national legal regulations.
Changing a wheelAlways change a wheel on a level surface as far as possible.
– Take off the full wheel trim* page 226 or the wheel trim cap page 227 or the
caps page 226.
– In the case of light alloy wheels remove the wheel trim cap page 227.
– First of all slacken the safety wheel bolt * and afterwards the other wheel bolts page 227.
– Jack up the vehicle until the wheel to be changed is clear of the ground
page 227.
– Unscrew the wheel bolts and place them on a clean surface (cloth, paper etc.).
– Take off the wheel.
– Fit on the spare wheel and tighten the wheel bolts slightly.
– Lower the car.
– Tighten the wheel bolts firmly, alternatel y and diagonally using the wheel wrench
(crosswise) and last the safety wheel bolt* page 227.
– Mount the full wheel trim/wheel trim cap or the caps.
Note
All bolts must be clean and must turn easily.
You must never grease or oil the wheel bolts!
When fitting on unidirectiona l tyres, ensure that the tyres rotate in the correct
direction page 216.
Subsequent stepsAfter changing the wheel, you mu st perform the following steps.
– Stow and attach the replaced wheel in the spare wheel well using a special screw
page 224, fig. 175.
– Stow the vehicle tool kit in the space provided.
– Check the tyre pressure on the spare wheel just mounted as soon as possible.
s2ug.6.book Page 225 Friday, April 9, 2010 2:24 PM
Page 231 of 271

Breakdown assistance
230WARNING
The non-insulated parts of the terminal clamps must never make contact
with each other. Furthermore, the cable connected to the positive terminal of
the battery must not come into contact with electrically conducting parts of the
vehicle - risk of a short circuit!
Do not affix the jump starting cables to the negative terminal of the
discharged battery. There is the risk of detonating gas seeping out the battery
being ignited by the strong spark which results from the engine being started.
Run the jump-start cables so that they cannot be caught by any rotating
parts in the engine compartment.
Do not bend over the batteries - risk of caustic burns!
The vent screws of the battery cells must be tightened firmly.
Keep any sources of ignition (naked flame, smouldering cigarettes etc.)
away from the battery - risk of an explosion!
Never jump-start the batteries which have a too low electrolyte level - risk
of explosion and caustic burns!
Tow-starting and towing vehicleGeneralPlease pay attention to the following instru ctions if you are going to use a tow rope:Driver of the towing vehicle– Do not drive off until the tow rope is taught.
– Release the clutch particularly gently wh en starting off or depress the accelerator
particularly gently if yo ur vehicle is fitted with an automatic gearbox.Driver of the towed vehicle– Switch the ignition on so that the steering wheel is not blocked and you can also
operate the turn signal lights, the headlight flasher, the windscreen wipers and
windscreen washer system. – Take the vehicle out of gear or move the selector lever into position
N if your
vehicle is fitted with an automatic gearbox.
– Note that the brake servo unit and power steering only operate if the engine is running. You will require significantly greater physical force to depress the brake
pedal and to steer the vehicle if the engine is not running.
– Ensure that the tow rope is always kept taught.
Tow rope or tow bar
A tow bar is safest way of towing a vehicle and also minimizes any shocks. You can use
a tow rope only if a suitable tow bar is not available.
The tow rope must be elastic to protect the vehicle. Thus one should only use plastic
fibre rope or a rope made out of a similarly elastic material.
Only attach the tow rope to the towing eyes provided for this purpose page 231
and page 231.
Driving style
Towing another vehicle requires a certain am ount of practice. Both drivers should be
familiar with the particular points about to wing a vehicle. Unskilled drivers should not
attempt to tow in another vehicle or to be towed in.
One should be constantly vigilant not to allow impermissibly high towing forces or
jerky loadings. There is always a risk of excessive stresses and damage resulting at the
points to which you attach the tow rope or tow bar when you attempt to tow a vehicle
which is not standing on a paved road.
Caution
If the gearbox of your vehicle no longer contains any oil because of a defect, your
vehicle must only be towed in with the driven wheels raised clear of the ground, or on
a special vehicle transporter or trailer.
Note
Please comply with any national legal provisions particularly regarding the
switched on signal systems, when towi ng in or tow-starting another vehicle.
The tow rope must not be twisted as it may in certain circumstances result in the
front towing eye being unscrewed out of your vehicle.
s2ug.6.book Page 230 Friday, April 9, 2010 2:24 PM
Page 247 of 271

Technical Data
246
Engine oil specificationsThe grade of engine oil should be se lected in accordance with precise
specifications.The engine of your vehicle has been factory-filled with a high-grade oil which you can
use throughout the year - except in extreme climatic regions.
You can mix various oils together with each other when refilling with oil. This does not,
however, apply for models with flexible service intervals (QG1).
Engine oils are, of course, undergoing co ntinuous further development. Thus the
information stated in this Owner's Manual is only correct at the time of publication.
Specialist garages are informed by Škoda Auto about current changes. We recommend
having this oil change undertaken by a specialist garage.
The specifications (VW standards) stated in the following must be indicated separately
or together with other specifications on the bottle.
Engine oil specifications for models with flexible service intervals (QG1) Engine oil specifications for vehicles with fixed service intervals (QG2)
If the oils specified above are not available, oils according to ACEA A2 or ACEA A3 can
be used once for refilling. ACEA A3.
If the oils specified above are not available, oils according to ACEA B3 or ACEA B4 can
be used once for refilling.
Caution
Only the above-mentioned oils may be used on vehicles with flexible service intervals
(QG1). We recommend always refilling with oi
l of the same specification since this will
maintain the properties of the oil. In exce ptional cases, you must top up only once
engine oil complying with Specification VW 50 2 00 (only for petrol engines) or Specifi-
cation VW 505 01 (only for diesel engines) to maximum 0.5 litres. You must not use
other engine oils - risk of engine damage!
Note
Before a long drive we recommend that you purchase and carry with you engine
oil which complies with the specification for your vehicle. Consequently, you will
always have the correct engine oil for refilling.
We recommend using a preservative from the Škoda original accessories offered
by your Škoda dealer.
For further information - see Service shedule.
Petrol engines
Specification
Content
a)
a)Oil capacity with oil filter change. Inspect oil leve l when filling; do not fill up too much. The oil
level must be between the markings page 205, “Check engine oil level”.1.2 ltr./77 kW TSI - EU5
VW 504 00
3,6
1.8 ltr./118 (112) kW TSI - EU5 / EU2
VW 504 00
4,6
Diesel engines
Specification
Content
2.0 ltr./81 kW TDI CR DPF - EU5
VW 507 00
4,3
2.0 ltr./103 kW TDI CR DPF - EU5 / EU4
VW 507 00
4,3
2.0 ltr./125 kW TDI CR DPF - EU5
VW 507 00
4,3
Petrol engines
Specification
Content
1.2 ltr./77 kW TSI - EU5
VW 502 00
3,6
1.8 ltr./118 (112) kW TSI - EU5 / EU2
VW 502 00
4,6
Diesel engines
Specification
Content
2.0 ltr./81 kW TDI CR DPF - EU5
VW 507 00
4,3
2.0 ltr./103 kW TDI CR DPF - EU5 / EU4
VW 507 00
4,3
2.0 ltr./125 kW TDI CR DPF - EU5
VW 507 00
4,3
s2ug.6.book Page 246 Friday, April 9, 2010 2:24 PM