2010 SKODA YETI belt
[x] Cancel search: beltPage 74 of 271
Seats and Stowage73
Using the system
Safety
Driving Tips
General Maintenance
Breakdown assistance
Technical Data
– Move the head restraint downwards if required by pressing the locking button with
one hand in direction of arrow page 72, fig. 58 and by pressing with the other
hand the head restraint downwards.
Removing and installing a head restraint– Pull the head restraint out of the seat backrest as far as the stop.
– Press the locking button in the direction of arrow page 72, fig. 58 and pull the
head restraint out.
– To re-insert the head restraint, push it down into the seat backrest far enough until you hear the locking button engage.
The position of the front and rear outer head restraints is adjustable in height. The
middle rear head restraint is adjustable in two positions.
The head restraints must be adjusted to ma tch the size of the seat occupant. Correctly
adjusted head restraints together with the seat belts offer effective protection for the
occupants page 138, “Correct seated position”.
WARNING
The head restraints must be correctly adjusted in order to offer effective
protection for the occupants in the event of an accident.
Do not drive under any circumstance with removed head restraints - risk of
injury!
If the rear seats are occupied, the rear head restraint must not be in the
lower position.
Middle rear head restraint*IIn certain countries national legal provisions also require the equipment of the rear
seat with fixing eyes for child seat using the “Top Tether” system page 162. For vehi-
cles, which are equipped with such fixing eyes, a deviating sequence for removing the
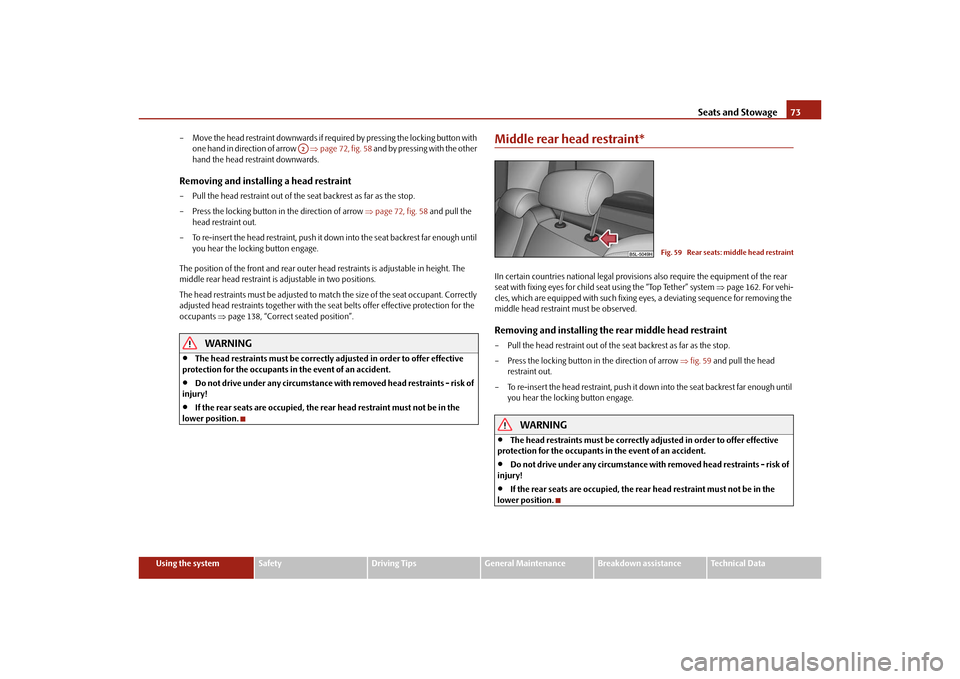
middle head restraint must be observed.Removing and installing the rear middle head restraint– Pull the head restraint out of the seat backrest as far as the stop.
– Press the locking button in the direction of arrow fig. 59 and pull the head
restraint out.
– To re-insert the head restraint, push it do wn into the seat backrest far enough until
you hear the locking button engage.
WARNING
The head restraints must be correctly adjusted in order to offer effective
protection for the occupants in the event of an accident.
Do not drive under any circumstance with removed head restraints - risk of
injury!
If the rear seats are occupied, the rear head restraint must not be in the
lower position.
A2
Fig. 59 Rear seats: middle head restraint
s2ug.6.book Page 73 Friday, April 9, 2010 2:24 PM
Page 75 of 271

Seats and Stowage
74
Rear seatsAdjusting seats in forward/back directionFig. 60 Releasing at the front / rearTo enlarge the luggage compartment, the ou ter rear seats can be pushed forwards,
folded fully forwards or the seats can be removed.Moving seats in forward/back direction– Pull the lever fig. 60 up in direction of arrow or on the release loop in
direction of arrow fig. 60 and move the seat into the desired position .
Note
Please refer to the following guidelines page 139, “Correct seated position for the
occupants on the rear seats”.
Adjusting the seat backrestAdjust the angle of the seat backrest– Pull the lever fig. 61 and adjust the desired an gle of the seat backrest.Folding rear seats forwardsFig. 62 Fold seat forward / secure folded forward seatsFolding rear seats fully forwards and secure– Open the guide loop for the seat belt on the side of the outer seats and put the belt
tongue into the opening of the wheel housing on the respective side trim panel -
safety holder.
– Remove the head restraint from the rear middle seat page 73.
– Move the rear exterior seats as far as possible to the rear page 74.
AA
A1
A2
A3
Fig. 61 Adjusting the seat backrest
s2ug.6.book Page 74 Friday, April 9, 2010 2:24 PM
Page 76 of 271

Seats and Stowage75
Using the system
Safety
Driving Tips
General Maintenance
Breakdown assistance
Technical Data
– Pull on the levers
page 74, fig. 61 and fold the seat backrests of the rear exterior
seats onto the seat cushion as far as the stop.
– Fold the middle rear seat backrest forwards in the same way, then pull once more on the lever page 74, fig. 61 and press the seat backre st downwards until it is
heard to lock into a lower position.
– Pull the lever page 74, fig. 62 up and then fold the seat fully forwards.
– Secure the folded forward seat with the aid of the fixing belt to a guide rod of the head restraint for the front seat page 74, fig. 62 .
WARNING
Immediately secure the folded forward seat with the aid of the fixing belt to
a guide rod of the head restraint for the front seat - there is a risk of injury as
soon as the vehicle starts off.
If the seat is not in the rear end position, damage can occur to the locking
bolts if the seat is unlocked.Caution
Make sure that the storage compartment, th e ashtray and the cup holder in the rear
part of the centre console are closed (o therwise these could get damaged) before
folding forward the rear middle seat.
Note
Please refer to the following guidelines page 138, “Correct seated position for the
driver”.
Removing seatsFig. 63 Unlocking the folded forward seat / carrying handles on the seat cushionUnlocking and removing seats– Unlock the folded forward seat by pressin g the seat locks in direction of arrow
fig. 63 .
– Remove the seat by way of the carrying handles on the seat cushion fig. 63
and .
Note
The outer seats are not replaceable alternatively. In the rear area the left seat is marked
with the letter L and the right seat with the letter R.
Note
Please refer to the following guidelines page 139, “Correct seated position for the
occupants on the rear seats”.
AB
A1
AA
AB
s2ug.6.book Page 75 Friday, April 9, 2010 2:24 PM
Page 77 of 271

Seats and Stowage
76
Adjusting seats in crosswise directionMoving seats in crosswise direction– Remove the middle seat page 75.
– Fold the outer seat forwards page 74 and lock it page 75, fig. 63 .
– Move the folded forward and unlocked seat on the guide towards the middle of the vehicle up to the stop.
– Lock the seat at the end of the guide fig. 64 .Move seats into the initial positionLocking seats and folding back into position– If the seat is removed, first of all position it on the guide and lock the seat fig. 64 .
Check for yourself that the seat is correctly locked by pulling it up. – Fold the seat into the horizontal position until it is heard to lock. Check for yourself
that the seat can no longer be lifted by pulling it up.
– Push the lever fig. 65 and fold the backrest back in to position. Check for yourself
that the seat backrest is engaged.
– Take the belt tongue out of the safety holder.
– Close the guide loop of the seat belt on the side of the outer seats until it is heard to lock.
WARNING
The belt locks and the belts must be in their original position after folding
back the seat cushions and the seat backrests - they must be ready to use.
The seat backrests must be securely interlocked in position so that no
objects in the luggage compartment can slide into the passenger compartment
if there is sudden braking - risk of injury!
When folding the seat backrest always make sure that it has safely locked
into position, this is confirmed by the position and a visible marking on the
cover of the lever.Note
The seat belts of the outer seats must always be guided through the guide loops next
to the head restraints. Otherwise the seat belts can slip behind the seat.Folding table on the middle seat backrest*
Fig. 64 Locking the seatFig. 65 Folding the seat backrest back
into position
Fig. 66 Rear seats: Armrest
s2ug.6.book Page 76 Friday, April 9, 2010 2:24 PM
Page 78 of 271
Seats and Stowage77
Using the system
Safety
Driving Tips
General Maintenance
Breakdown assistance
Technical Data
– The middle seat backrest can be folded
page 74, “Folding rear seats forwards”
forwards and used as armres t or table with cup holder page 76, fig. 66 .
– You can place two cups or beverage cans into the recesses.
Note
If the middle rear seat backrest should be folded forward for lengthy periods, then
make sure that the belt locks are not located below it - this can result in permanent
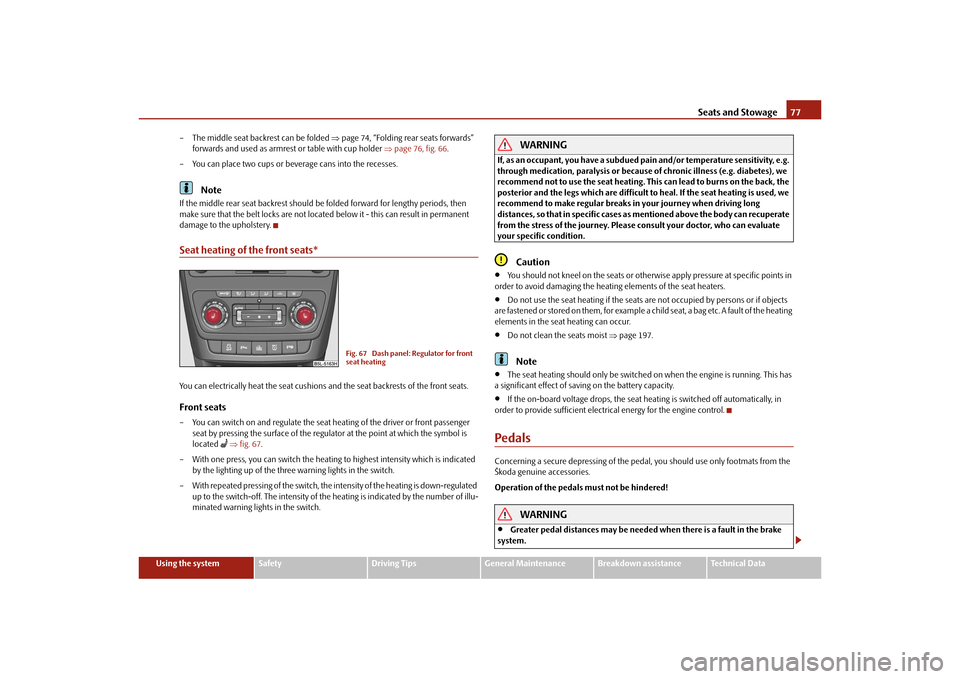
damage to the upholstery.Seat heating of the front seats*You can electrically heat the seat cushions and the seat backrests of the front seats.Front seats– You can switch on and regulate the seat heating of the driver or front passenger
seat by pressing the surface of the regulator at the point at which the symbol is
located
fig. 67 .
– With one press, you can switch the heating to highest intensity which is indicated by the lighting up of the three warning lights in the switch.
– With repeated pressing of the switch, the intensity of the heating is down-regulated up to the switch-off. The intensity of the heating is indicated by the number of illu-
minated warning lights in the switch.
WARNING
If, as an occupant, you have a subdued pain and/or temperature sensitivity, e.g.
through medication, paralysis or because of chronic illness (e.g. diabetes), we
recommend not to use the seat heating. This can lead to burns on the back, the
posterior and the legs which are difficult to heal. If the seat heating is used, we
recommend to make regular breaks in your journey when driving long
distances, so that in specific cases as mentioned above the body can recuperate
from the stress of the journey. Please consult your doctor, who can evaluate
your specific condition.
Caution
You should not kneel on the seats or otherwise apply pressure at specific points in
order to avoid damaging the heating elements of the seat heaters.
Do not use the seat heating if the seats ar e not occupied by persons or if objects
are fastened or stored on them, for example a child seat, a bag etc. A fault of the heating
elements in the seat heating can occur.
Do not clean the seats moist page 197.Note
The seat heating should only be switched on when the engine is running. This has
a significant effect of saving on the battery capacity.
If the on-board voltage drops, the seat heating is switched off automatically, in
order to provide sufficient electrical energy for the engine control.
PedalsConcerning a secure depressing of the peda l, you should use only footmats from the
Škoda genuine accessories.
Operation of the pedals must not be hindered!
WARNING
Greater pedal distances may be needed when there is a fault in the brake
system.
Fig. 67 Dash panel: Regulator for front
seat heating
s2ug.6.book Page 77 Friday, April 9, 2010 2:24 PM
Page 82 of 271

Seats and Stowage81
Using the system
Safety
Driving Tips
General Maintenance
Breakdown assistance
Technical Data
– Pull the luggage compartment cover out of the holders to the rear or press on
the bottom side of the luggage compartment cover in the front area.
– Fold the slackened front part of the luggage compartment cover over the head restraints of the rear seats.
– Slightly tilt the luggage compartment cover and remove it to the rear.
– Install again by pushing the luggage compartment cover forwards into the holder and hanging the support straps on the boot lid.
You can stow the removed luggage compartment cover behind the rear seat backrest.
WARNING
No objects should be placed on the luggage compartment cover, the vehicle
occupants could be endangered if th ere is sudden braking or the vehicle
collides with something.
Caution
Please ensure that the heating elements of the rear window heater are not damaged
as a result of objects placed in this area.
Note
Opening the tailgate also lifts up the luggage compartment cover.Separation net*Fig. 73 Use of the separation net behind the rear seats / behind the front seats
Install the separation net behind the front seats or the rear seats.Installing separation net– Remove the luggage compartment cover page 80.
– Take the separation net out of the bag.
– Unfold both parts of the cross rod until they are heard to engage.
– Insert the cross rod into the mount fig. 73 first on the one side and push the
cross rod forward. In the same way, fix the cross rod to the other side of the vehicle,
mount .
– Hang the carabines at the ends of the strap into the fixing eyes behind the rear or front seats.
– Pull the strap through the tensioning clasp, first of all on the one side and then on the other side.Removing the separation net behind the rear seats– Slacken the bands on both side s and take off the carabines fig. 73 .
– Push the cross rod first of all on the one side and then on the other side towards the rear.
– Take the cross rod out of the mounts .Packing separation net– Press the red button of the joint - so that it releases.
– Put the separation net folded together in the bag and close it.
– Attach the bag with the aid of the plastic ca rabines to the eyes on the left and right
luggage compartment trim panel.
Installing and removing the separation net be hind the rear seats with variable loading
floor* page 82 is carried out analogously as behind the rear seats without variable
loading floor. Use the lower fixing eyes on th e carrier rails in order to attach the carab-
ines.
The opening fig. 73 in the separation net is designed to feed through the three-
point seat belt page 144.
A2
A2
A1
AB
AB
AC
AC
AB
AA
AD
s2ug.6.book Page 81 Friday, April 9, 2010 2:24 PM
Page 95 of 271

Seats and Stowage
94
Removeable through-loading bag*The removeable through-loading bag is solely used for transporting
skis.Loading– Open a rear side door of the vehicle.
– Fold the backrest of the middle seat forwards page 74.
– Place the empty removeable through-load ing bag in the gap between the front and
rear seats in such a way that the end of the bag with the zip lies in the luggage
compartment.
– Open the boot lid.
– Push the skis into the removeable through-loading bag from the luggage compart- ment .
– Close the removeable through-loading bag with the zip.Securing– Pull the securing belt with both lock to ngues out of the pocket of the removeable
through-loading bag.
– Insert the lock tongues fig. 98 in the belt locks of the rear middle seat belt
, first of all on the one side and then on the other side.
– Place the securing belt in the middle of the skis between the heel and the tip of the
bindings and pull the secu ring belt tight at the free end of the belt .
WARNING
After placing the skis into the remove able through-loading bag, you must
secure it with the securing belt .
The securing belt must hold the skis tight.
Ensure that the securing belt for skis grasps the middle between the tip and
the heel element of the bi nding (see also imprint on the removeable through-
loading bag).Note
The removeable through-loading bag is foreseen for two pairs of skis. The total
weight of the skis which are transported must not exceed 10 kg.
You must put the skis and the sticks in the removeable through-loading bag with
the tips facing the rear.
If there are several pairs of skis in the removeable through-loading bag, ensure that
the bindings are positioned at the same height.
The removeable through-loading bag must never be folded together or stowed
when moist.
Fig. 98 Securing the removeable
through-loading bag
AA
AC
AB
AA
s2ug.6.book Page 94 Friday, April 9, 2010 2:24 PM
Page 138 of 271
Passive Safety137
Using the system
Safety
Driving Tips
General Maintenance
Breakdown assistance
Technical Data
SafetyPassive SafetyBasic informationDriving the safe way
Passive safety measures reduce the risk of injury in accident situations.In this section you will find important info rmation, tips and notes on the subject of
passive safety in your vehicle. We have combined everything here which you should
be familiar with, for example, regarding seat belts, airbags, child seats and safety of
children. It is therefore important, in partic ular, to comply with the notes and warnings
in this section for your own interest and in the interest of those travelling with you.
WARNING
This chapter contains important information on how to use the vehicle for
the driver and his occupants. You will find further information on safety, which
concerns you and those travelling with you, in the following chapters of this
Owner's Manual.
The complete on-board literature should always be in the vehicle. This
applies in particular, if you rent out or sell the vehicle.
Safety equipment
The safety equipment is part of the occupant protection and it can
reduce the risk of injuries in accident situations.“Do not put at risk” your safety and the safety of those travelling with you . In the event
of an accident, the safety equipment can redu ce the risk of injuries. The following list
contains part of the safety equipment in your vehicle:
Three-point seat belts for all the seats,
belt force limiter for front seats,
belt tensioner for front seats,
seat belt height adjuster for front seats,
front airbag for the driver and front passenger,
driver's knee airbag*,
front side airbags*,
rear side airbags*,
head airbags*,
anchoring points for child seat using the “ISOFIX” system,
anchoring points for child seat using the “Top Tether” system,
head restraint adjustable for height,
adjustable steering column.
The specified safety equipment works togeth er, in order to optimally protect you and
those travelling with you in accident situat ions. The safety equipment does not protect
you or the people travelling with you, if you or your occupants adopt an incorrect
seated position or the equipment is not correctly adjusted or used.
For this reason you will be provided with information on why this equipment is very
important, how it protects you and the occupants, what should be observed when
using the equipment and how you and the peop le travelling with you can make full use
of the existing safety equipment. This Owner's Manual contains important warning
notes, which you and those travelling with you should pay attention to in order to
reduce a risk of injury.
Safety concerns everybody!
Before setting off
The driver is always fully responsibl e for his occupants and for the oper-
ating safety of the vehicle.For your own safety and the safety of the pe ople travelling with you, please pay atten-
tion to the following points before setting off:
s2ug.6.book Page 137 Friday, April 9, 2010 2:24 PM