Page 81 of 287
 Owners Manual Seats and Stowage
80
Seats and StowageFront seatsBasic informationThe front seats have a wide range of differ ent settings and can thus be matched to the
physical characteristics of the driver and f")
Seats and Stowage
80
Seats and StowageFront seatsBasic informationThe front seats have a wide range of differ ent settings and can thus be matched to the
physical characteristics of the driver and front passenger. Correct adjustment of the
seats is particularly important for:
safely and quickly reaching the controls,
a relaxed, fatigue-free body position,
achieving the maximum protection offered by the seat belts and the airbag
system.
WARNING
Never transport more occupants than the maximum seating in the vehicle.
Each occupant must correctly fasten the seat belt belonging to the seat.
Children must be fastened page 180, “Transporting children safely” with a
suitable restraint system.
The front seats and the head restraints must always be adjusted to match
the body size of the seat occupant as well as the seat belts must always be
correctly fastened in order to provide an optimal protection for you and your
occupants.
Always keep your feet in the footwell when the vehicle is being driven -
never place your feet on the instrument panel, out of the window or on the
surfaces of the seats. This is particular ly important for the front seat passenger.
You will be exposed to increased risk of injury if it becomes necessary to apply
the brake or in the event of an accident. If an airbag is deployed, you may suffer
fatal injuries when adopting an incorrect seated position!
It is important for the driver and front passenger to maintain a distance of at
least 25 cm from the steering wheel or dash panel. Not maintaining this
minimum distance will mean that the airbag system will not be able to properly
protect you - hazard! The front seats and the head restraints must always also
be correctly adjusted to match the body size of the occupant.
Ensure that there are no objects in the footwell as any objects may get
behind the pedals during a driving or braking manoeuvre. You would then no
longer be able to operate the clutch, to brake or accelerate.
Do not transport any objects on the front passenger seat except those
provided for this purpose (e.g. child safety seat) - risk of accident!
Adjusting the front seatsAdjusting a seat in a forward/back direction– Pull the lever fig. 68 up and push the seat into the desired position.
– Release the lever and push the seat further until the lock is heard to engage.Adjusting height of seat– Lift the seat if required by pu lling or pumping lever upwards.
– Lower the seat if required by pushing or pumping lever downwards.Adjust the angle of the seat backrest– Relieve any pressure on the seat backrest (do not lean on it) and turn the hand- wheel fig. 68 to adjust the desired angle of the backrest.
WARNING (continued)
Fig. 68 Controls at seat
A1A1
A2A2
A3
s3fg.2.book Page 80 Friday, April 30, 2010 12:17 PM
Page 82 of 287
 Owners Manual Seats and Stowage81
Using the system
Safety
Driving Tips
General Maintenance
Breakdown assistance
Technical Data
Adjusting lumbar support*– Turn the lever until you have set the most comfortable")
Seats and Stowage81
Using the system
Safety
Driving Tips
General Maintenance
Breakdown assistance
Technical Data
Adjusting lumbar support*– Turn the lever until you have set the most comfortable curvature of the seat
upholstery in the area of your spine.
The driver's seat should be adjusted in such a way that the pedals can be fully pressed
to the floor with slightly bent legs.
The seat backrest on the driver's seat should be adjusted in such a way that the upper
point of the steering wheel can be easi ly reached with slightly bent arms.
WARNING
Only adjust the driver seat when the vehicle is stationary - risk of injury!
Take care when adjusting the seat! Adjusting the seat without care can lead
to bruises or injuries.
The seat backrests must not be angled too far back when driving otherwise
this will affect proper operation of the se at belts and of the airbag system - risk
of injury!
Adjusting front seats electrically*Adjusting seatsFig. 69 Side view: Controls for adju sting the seat / seat setting switchAdopt the correct seated position before setting page 80.
Adjusting a seat in a forward/back direction– Press the switch fig. 69 forwards or backwards fig. 69 .Set the height of the seat cushion– Press the switch fig. 69 upwards or downwards.Adjust the angle of the seat cushion– Press the switch fig. 69 at the front fig. 69 or at the back .Adjusting the seat backrest– Press the switch fig. 69 in the direction of the desired setting.Adjusting lumbar support*– Press the switch fig. 69 at the front in order to enlarge the curvature of the
lumbar support.
– Press the switch rear in order to reduce the curvature of the lumbar support.
– Press the switch top in order to adjust the curvature of the lumbar support higher.
– Press the switch bottom in order to adjust the curvature of the lumbar support lower.
Switch is operated in order to move the seat up/down and forward/back, while
switch is operated in order to move the backrest forward or back.
WARNING
Only adjust the driver seat when the vehicle is stationary - risk of injury!
Caution when adjusting the seat! You ma y suffer injuries or bruises as a
result of adjusting the seat without paying proper attention.
In view of the fact that the seats can also be adjusted when the ignition is
switched off (even when ignition key withdrawn), you should never leave chil-
dren unattended in the vehicle.
A4
AB
A1
ABAB
A2
A3
ACAAAAAAAA
ABAC
s3fg.2.book Page 81 Friday, April 30, 2010 12:17 PM
Page 83 of 287
 Owners Manual Seats and Stowage
82
The seat backrests must not be angled too far back when driving otherwise
this will affect proper operation of the se at belts and of the airbag system - risk
of injury!Note")
Seats and Stowage
82
The seat backrests must not be angled too far back when driving otherwise
this will affect proper operation of the se at belts and of the airbag system - risk
of injury!Note
If the movement of the seat is inadvertently interrupted during an adjustment, once
again press the switch in the appropriate di rection and continue with the adjustment
of the seat to the end.Storing settingStoring seat and exterior mirror settings for driving forward– Switch on the ignition.
– Adjust the seat page 81.
– Adjust both exterior mirrors page 77.
– Press button SET fig. 70 .
– Press one of the memory buttons within 10 seconds after pressing the button SET - an acknowledgement signal confirms that the seat setting is stored.Storing exterior mirror setting for reversing*– Switch on the ignition. – Turn the exterior mirror control to position
page 77.
– Engage the reverse gear.
– Move the right exterior mirror into the desired position page 77.
– Take the vehicle out of gear. The set position of the exterior mirror is stored.
Memory buttons
Memory for the seat offers the possibility to store the individual driver seat and
external mirror position. An individual posi tion can be allocated to each of the three
memory buttons fig. 70 , that is three in total. Af ter pressing the corresponding
memory button , the seat and the exterior mirror are automatically moved into the
positions which have been allocated to this button page 83.
Emergency Off
You can interrupt the setting operation at any time, if you operate any button of the
driver seat.
Note
For safety reasons, it is not possible to store this position if the inclination angle of
the seat backrest is more than 102 ° in relation to the seat cushion.
When storing settings with the memory buttons, we recommend that you begin
with the front button and assign a memory button to each additional driver.
Each new setting stored with the same button erases the previous setting.
Each time you store the seat and exterior mirror settings for driving forward you
also have to re-store the individual setting of the exterior mirror on the passenger side
for reversing.
Assigning the remote contro l key to the memory buttonsAssigning the remote control key to the memory buttonsAfter storing the settings of the seat and exterior mirrors, you have 10 seconds in order
to assign the radio remote control to the appropriate memory button.
– Withdraw the ignition key.
WARNING (continued)
Fig. 70 Driver seat: Memory buttons
and SET button
AA
AB
ABAB
s3fg.2.book Page 82 Friday, April 30, 2010 12:17 PM
Page 84 of 287
 Owners Manual Seats and Stowage83
Using the system
Safety
Driving Tips
General Maintenance
Breakdown assistance
Technical Data
– Press the unlock button
page 49, after the successful assignment an audible
si")
Seats and Stowage83
Using the system
Safety
Driving Tips
General Maintenance
Breakdown assistance
Technical Data
– Press the unlock button
page 49, after the successful assignment an audible
signal will sound. The setting is stored with the memory button which you have
selected.
Assigning the remote control key to the memory buttons on the KESSY*
systemOn vehicles which are equipped with the KESSY* system, the following procedure for
assigning the remote control key to the memory buttons exists for electrically adjust-
able front seats and mirrors*.
– Switch the ignition off within 10 seconds after storing the setting.
– Open the driver door.
– Press the unlock button on the remo te control key within 10 seconds.
If you wish to be able to retrieve the settings which are stored in the memory by also
using the radio remote control, you have to assign the radio remote control to a
memory button in each case.
If you wish, you can obtain an additional remote control key from an authorised Škoda
Service partner and then assign the remote control key to another memory button.
Note
If the radio remote control had previously been assigned to another memory
button, this setting is then erased by the new assignment.
If you assign the radio remote control to a memory button which has already been
assigned to a radio remote control, the ol d assignment is also replaced by a new
assignment in this case.
The assignment of the radio remote co ntrol to a memory button is retained,
however, after reassigning the seats and exterior mirrors.
After the successful assignment, the turn si gnal lights flash and an audible signal
will sound as a confirmation. The setting is stored with the memory button which you
have selected.
Retrieving settings of the seat and mirrors
You can retrieve the stored settings either with the memory buttons or
with the remote control*.Retrieving settings with memory buttons– In order to retrieve the stored setting, you have two possibilities:
– One-touch automatic memory: briefly press the desired memory button
page 82, fig. 70 . The seat and exterior mirror are moved automatically into the
stored positions (this applies only if the ignition is switched on and the speed is less
than 5 km/h).
– Memory keying : Press and hold the desired memory button pressed long
enough until the seat and the exterior mi rror are moved into the stored positions.Retrieving settings with remote control– If the driver door is closed and the ignition is switched off, briefly press the unlock
button of the radio remote control page 49 and then open the driver door.
– The seat and exterior mirrors now move automatically into the stored positions.Retrieving setting of exterior mirror for reversing*– Turn the rotary knob for the exterior mirror setting into the position
page 77
before engaging the reverse gear.
The mirror returns into its initial position, after the rotary knob is moved out of the
position
and put into another position or if the speed is more than 15 km/h.
Emergency Off
You can interrupt the setting operation at any time, if you operate any button of the
driver seat.
AB
AB
s3fg.2.book Page 83 Friday, April 30, 2010 12:17 PM
Page 85 of 287
 Owners Manual Seats and Stowage
84
Head restraintsFig. 71 Head restraint: Adjusting / pulling outBest protection is achieved if the top edge of the head restraint is at the same level as
the upper part of your h")
Seats and Stowage
84
Head restraintsFig. 71 Head restraint: Adjusting / pulling outBest protection is achieved if the top edge of the head restraint is at the same level as
the upper part of your head.Adjusting the height of a head restraint– Grasp the side of the head restraint with both hands and push it in upward direc- tion as desired page 84, fig. 71 - left.
– Move the head restraint downwards if required by pressing and holding the safety button with one hand page 84, fig. 71 - right and by pressing with the other hand
the head restraint downwards.Removing and installing a head restraint– Pull the head restraint up out of the seat backrest as far as the stop (on the rear
head restraints fold forward the seat backrest).
– Press the locking button in the direction of arrow page 84, fig. 71 - right and pull
the head restraint out.
– To re-insert the head restraint, push it down into the seat backrest far enough until you hear the locking button engage.
The position of the front and rear outer head restraints is adjustable in height. The
middle rear head restraint is adjustable in two positions. The head restraints must be adjusted to ma
tch the size of the seat occupant. Correctly
adjusted head restraints together with the seat belts offer effective protection for the
occupants page 162, “Correct seated position”.
WARNING
The head restraints must be correctly adjusted in order to offer effective
protection for the occupants in the event of an accident.
Do not drive under any circumstance with removed head restraints - risk of
injury.
If the rear seats are occupied, the rear head restraint must not be in the
lower position.
Middle rear head restraintIIn certain countries national legal provisions also require the equipment of the rear
seat with fixing eyes for child seat using the “Top Tether” system page 186,
“Attaching child seat using the “Top Tether” system”. For vehicles, which are equipped
with such fixing eyes, a de viating sequence for removing the middle head restraint
must be observed.Removing and installing the rear middle head restraint– Pull the head restraint out of the seat backrest as far as the stop.
Fig. 72 Rear seats: middle head
restraint
s3fg.2.book Page 84 Friday, April 30, 2010 12:17 PM
Page 86 of 287
 Owners Manual Seats and Stowage85
Using the system
Safety
Driving Tips
General Maintenance
Breakdown assistance
Technical Data
– Press the locking button in the direction of arrow
fig. 72 , press simultane-")
Seats and Stowage85
Using the system
Safety
Driving Tips
General Maintenance
Breakdown assistance
Technical Data
– Press the locking button in the direction of arrow
fig. 72 , press simultane-
ously the locking button into the opening using a flat screwdriver with a width
of maximum 5 mm and pull out the head restraint.
– To re-insert the head restraint, push it down into the seat backrest far enough until you hear the locking button engage.
WARNING
The head restraints must be correctly adjusted in order to offer effective
protection for the occupants in the event of an accident.
Do not drive under any circumstance with removed head restraints - risk of
injury.
If the rear seats are occupied, the rear head restraint must not be in the
lower position.
Rear seatsFolding the seat backrest forwardsFig. 73 Unlock the seat back rest / lock the seat backrestThe luggage compartment can be increased in size by folding the seat backrests
forward or also by folding the seat cushions forward on vehicles of the type Combi.
Folding the seat backrests forward– Before folding the seat backrests forwards, you must adapt the position of the front
seats in such a way that they are not damaged by the folded seat backrests.
9)
– Unlock the seat backrest by pressing the unlocking handle fig. 73 and fold it
completely forwards.Put the seat backrests into the original position– Install the head restraint in the slightly lifted seat backrest.
– Place the rear lateral seat belt fig. 73 behind the edge of the side trim panel.
– Then push the seat backrest back into th e upright position until the securing knob
clicks into place - check by pulling on the seat backrest.
– Make sure that the red pin fig. 73 is covered.
WARNING
The belts and the belt locks must be in their original position after folding
back the seat backrests - th ey must be ready to use.
The seat backrests must be securely interlocked in position so that no
objects in the luggage compartment can slide into the passenger compartment
if there is sudden braking - risk of injury.
Pay attention that the seat backrests are correctly interlocked. It is only then
that the three-point seat belt for the middle seat can reliably fulfil its function.
Before folding the seat backrest back into the secure position, place the rear
lateral seat belt behind the edge of the si de trim panel. Take suitable measures
to prevent that the seat belt is jammed between the seat backrest and the side
trim panel and is thus damaged.
AA
AB
9)If the front seats are too far back, we recommend that you have the rear head restraints removed
before the seat backrests are folded forward, in order to achieve a loading space as horizontal as
possible. Store the removed head restraints in such a way that they cannot be damaged or
soiled. Please refer to the guidelines page 87.
AA
AC
AB
s3fg.2.book Page 85 Friday, April 30, 2010 12:17 PM
Page 87 of 287
 Owners Manual Seats and Stowage
86
Folding the rear seats forwards (Combi)To enlarge the luggage compartment, the rear seats can be folded forwards page 85,
if necessary fold the seat cushions forwards.Folding")
Seats and Stowage
86
Folding the rear seats forwards (Combi)To enlarge the luggage compartment, the rear seats can be folded forwards page 85,
if necessary fold the seat cushions forwards.Folding the seat cushion forwards– Pull up the seat cushion in direction of arrow fig. 74 and fold forwards in
direction of arrow .
Note
In order to achieve a loading space as horizo ntal as possible, the rear head restraints
can be removed before folding the seat backrests forwards. Store the removed head
restraints in such a way that th ey cannot be damaged or soiled.Rear seat armrest
– You can fold down the armrest to enhance occupant comfort fig. 75 .Seat heaters*Fig. 76 Dash panel: Regulator for front seat heating / rear centre console: Regulator for
heating the rear seatsYou can electrically heat the seat backrests and the surfaces of the front seats and the
two outer rear seats.
– You can switch on and regulate the seat heating of the driver or front passenger
seat by pressing the surface of the regulator at the point at which the symbol is
located
fig. 76 - left.
– You can switch on and adjust the heaters of the left or right rear seats by pressing the regulator
fig. 76 - right.
– With one press, you can switch the heating to highest intensity - 3rd stage, which is
indicated by the lighting up of the three warning lights in the switch.
– With repeated pressing of the switch, the intensity of the heating is down-regulated up to the switch-off. The intensity of the heating is indicated by the number of illu-
minated warning lights in the switch.
– If you switch the heating to the highest intensity - 3rd stage, it is automatically switched over to the 2nd stage after 10 mi nutes (two warning lights light up in the
switch).
Fig. 74 Folding the seat cushion
forwardsA1
A2
Fig. 75 Rear seats: Armrest
s3fg.2.book Page 86 Friday, April 30, 2010 12:17 PM
Page 88 of 287
 Owners Manual Seats and Stowage87
Using the system
Safety
Driving Tips
General Maintenance
Breakdown assistance
Technical Data
WARNING
If, as an occupant, you have a subdued pain and/or temp erature sensitivity, e")
Seats and Stowage87
Using the system
Safety
Driving Tips
General Maintenance
Breakdown assistance
Technical Data
WARNING
If, as an occupant, you have a subdued pain and/or temp erature sensitivity, e.g.
through medication, paralysis or because of chronic illness (e.g. diabetes), we
recommend not to use the seat heating. Th is can lead to burns on the back, the
posterior and the legs which are difficult to heal. If the seat heating is used, we
recommend to make regular breaks in your journey when driving long
distances, so that in specific cases as mentioned above the body can recuperate
from the stress of the journey. Please consult your doctor, who can evaluate
your specific condition.
Caution
You should not kneel on the seats or otherwise apply pressure at specific points in
order to avoid damaging the heating elements of the seat heaters.
Do not use the seat heating if the seats are not occupied by persons or if objects
are fastened or stored on them, for example a child seat, a bag etc. A fault of the heating
elements in the seat heating can occur.
Do not clean the seats moist page 209.Note
The seat heating should only be switched on when the engine is running. This has
a significant effect of saving on the battery capacity.
If the on-board voltage drops, the seat heating is switched off automatically, in
order to provide sufficient electrical energy for the engine control.
PedalsConcerning a secure depressing of the peda l, you should use only footmats from the
Škoda genuine accessories.
Operation of the pedals must not be hindered!
WARNING
Greater pedal distances may be needed when there is a fault in the brake
system.
Do not place any footmats or other additional floor coverings in the area of
the pedals in order to ensure that all the pedals can be fully depressed and are
able to return unobstructed to their initial position - risk of accident!
There must be no objects on the floor which could roll under the pedals. You
would then no longer be able to apply the brakes, operate the clutch or acceler-
ator - risk of accident!
luggage compartmentLoading the luggage compartmentPlease observe the following in the interest of having good handling characteristics of
your vehicle:
– Distribute the items of luggage as evenly as possible.
– Place heavy objects as far forward as possible.
– Attach the items of luggage to the lashing eyes or the fixing net* page 88.
In the event of an accident, there is such a high kinetic energy which is produced by
small and light objects that they can cause severe injuries. The magnitude of the kinetic
energy depends on the speed at which the vehicle is travelling and on the weight of the
object. The speed at which the vehicle is trave lling is in this case the more significant
factor.
Example: In the event of a frontal collision at a speed of 50 km/h, an unsecured object
with a weight of 4.5 kg produces an en ergy, which corresponds to 20 times its own
weight. This means that it results in a weight of approx. 90 kg. You can imagine the inju-
ries that can occur, if this “bullet” is flying through the interior compartment and hits
an occupant.
WARNING
Stow the objects in the luggage compartment and attach them to the
lashing eyes.WARNING (continued)
s3fg.2.book Page 87 Friday, April 30, 2010 12:17 PM
 1
1 2
2 3
3 4
4 5
5 6
6 7
7 8
8 9
9 10
10 11
11 12
12 13
13 14
14 15
15 16
16 17
17 18
18 19
19 20
20 21
21 22
22 23
23 24
24 25
25 26
26 27
27 28
28 29
29 30
30 31
31 32
32 33
33 34
34 35
35 36
36 37
37 38
38 39
39 40
40 41
41 42
42 43
43 44
44 45
45 46
46 47
47 48
48 49
49 50
50 51
51 52
52 53
53 54
54 55
55 56
56 57
57 58
58 59
59 60
60 61
61 62
62 63
63 64
64 65
65 66
66 67
67 68
68 69
69 70
70 71
71 72
72 73
73 74
74 75
75 76
76 77
77 78
78 79
79 80
80 81
81 82
82 83
83 84
84 85
85 86
86 87
87 88
88 89
89 90
90 91
91 92
92 93
93 94
94 95
95 96
96 97
97 98
98 99
99 100
100 101
101 102
102 103
103 104
104 105
105 106
106 107
107 108
108 109
109 110
110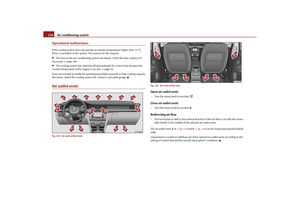 111
111 112
112 113
113 114
114 115
115 116
116 117
117 118
118 119
119 120
120 121
121 122
122 123
123 124
124 125
125 126
126 127
127 128
128 129
129 130
130 131
131 132
132 133
133 134
134 135
135 136
136 137
137 138
138 139
139 140
140 141
141 142
142 143
143 144
144 145
145 146
146 147
147 148
148 149
149 150
150 151
151 152
152 153
153 154
154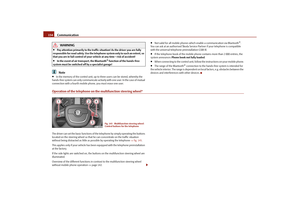 155
155 156
156 157
157 158
158 159
159 160
160 161
161 162
162 163
163 164
164 165
165 166
166 167
167 168
168 169
169 170
170 171
171 172
172 173
173 174
174 175
175 176
176 177
177 178
178 179
179 180
180 181
181 182
182 183
183 184
184 185
185 186
186 187
187 188
188 189
189 190
190 191
191 192
192 193
193 194
194 195
195 196
196 197
197 198
198 199
199 200
200 201
201 202
202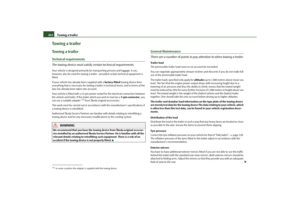 203
203 204
204 205
205 206
206 207
207 208
208 209
209 210
210 211
211 212
212 213
213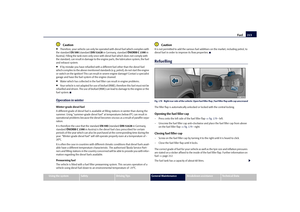 214
214 215
215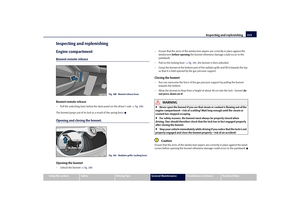 216
216 217
217 218
218 219
219 220
220 221
221 222
222 223
223 224
224 225
225 226
226 227
227 228
228 229
229 230
230 231
231 232
232 233
233 234
234 235
235 236
236 237
237 238
238 239
239 240
240 241
241 242
242 243
243 244
244 245
245 246
246 247
247 248
248 249
249 250
250 251
251 252
252 253
253 254
254 255
255 256
256 257
257 258
258 259
259 260
260 261
261 262
262 263
263 264
264 265
265 266
266 267
267 268
268 269
269 270
270 271
271 272
272 273
273 274
274 275
275 276
276 277
277 278
278 279
279 280
280 281
281 282
282 283
283 284
284 285
285 286
286