2010 SKODA OCTAVIA TOUR service interval
[x] Cancel search: service intervalPage 3 of 199
Introduction
2
On-board literature
The on-board literature for your vehicle consists of this “ Owner's Manual”
as well as a “ Service schedule ” and a “Help on the road ”. There can also be
a variety of other additional operating manuals and instructions on-board
(e.g. an operating manual for the radio) depending on the vehicle model and
equipment.
If one of the publications listed above is missing, please contact an author-
ised Škoda dealer immediately, where one will be glad to assist you in such
matters.
One should note that the details give n in the vehicle's papers always
take precedence over those in the Owner's Manual.
Owner's Manual
This Owner's Manual describes the current scope of equipment. Certain
items of equipment listed are only inst alled later on and only envisaged for
particular markets. The illustrations can differ in minor details from your
vehicle; they are only intended for general information.
In addition to information regarding all the controls and equipment, the
Owner's Manual also contains important information regarding care and
operation for your safety and also to retain the value of your vehicle. To
provide you with valuable tips and ai ds. You will learn how you can operate
your vehicle safely, economically and in an environmentally conscious
way.
For safety reasons, please also pay attention to the information on
accessories, modifications and replacement of parts page 157.
The other chapters of the Owner's Manua l are also important, however, for
proper treatment of your car - in addition to regular care and maintenance -
helps to retain its value and in many cases is also one of the conditions for
possible warranty claims. The Service schedule
contains:
Vehicle data,
Service intervals,
Overview of the service work,
Service proof,
Confirmation of mobility warranty
(only valid in certain countries),
important information on the warranty.
The confirmations of the carried out se rvice work are one of the conditions
for possible warranty claims.
Please always present the Service schedule when you take your car to an
authorised Škoda Service Partner.
If the Service schedule is missing or worn, please contact your authorised
Škoda Service Partner, where your car is serviced regularly. You will receive a
duplicate, in which the previously carried out service work are confirmed.
Help on the road
contains the most important telephone numbers in individual countries as
well as the addresses and telephone numbers of Škoda importers.
s2bs.2.book Page 2 Monday, September 27, 2010 9:53 AM
Page 4 of 199

Contents3
Using the system
Safety
Driving Tips
General Maintenance
Breakdown assistance
Technical Data
ContentsLayout of this Owner's Manual
(explanations)
. . . . . . . . . . . . . . . . . . . . . . . . . .
Using the system
. . . . . . . . . . . . . . . . . . . . . .
Cockpit
. . . . . . . . . . . . . . . . . . . . . . . . . . . . . . . . . . . . . . . .
Overview . . . . . . . . . . . . . . . . . . . . . . . . . . . . . . . . . . . .
The brief instruction
. . . . . . . . . . . . . . . . . . . . . . . . . .
Basic functions and important information . . . . .
Instruments and Indic ator/Warning Lights
. . .
Overview of the instrument cluster . . . . . . . . . . . . .
Engine revolutions counter . . . . . . . . . . . . . . . . . . . .
Speedometer . . . . . . . . . . . . . . . . . . . . . . . . . . . . . . . .
Engine coolant temperature Display . . . . . . . . . . .
Fuel gauge . . . . . . . . . . . . . . . . . . . . . . . . . . . . . . . . . . .
Counter for distance driven . . . . . . . . . . . . . . . . . . .
Service Interval Display . . . . . . . . . . . . . . . . . . . . . . .
Digital clock . . . . . . . . . . . . . . . . . . . . . . . . . . . . . . . . . .
Recommended gear* . . . . . . . . . . . . . . . . . . . . . . . . .
Multi-functional indicator (onboard computer)*
Warning lights . . . . . . . . . . . . . . . . . . . . . . . . . . . . . . . .
Unlocking and locking
. . . . . . . . . . . . . . . . . . . . . . . .
Key . . . . . . . . . . . . . . . . . . . . . . . . . . . . . . . . . . . . . . . . . .
Changing the battery in the remote control key .
Electronic immobiliser . . . . . . . . . . . . . . . . . . . . . . . .
Child safety lock . . . . . . . . . . . . . . . . . . . . . . . . . . . . . .
Central locking system . . . . . . . . . . . . . . . . . . . . . . . .
Remote control* . . . . . . . . . . . . . . . . . . . . . . . . . . . . . .
Synchronisation of the remote control . . . . . . . . . .
Anti-theft alarm system* . . . . . . . . . . . . . . . . . . . . . .
Power windows* . . . . . . . . . . . . . . . . . . . . . . . . . . . . .
Lights and Visibility
. . . . . . . . . . . . . . . . . . . . . . . . . . .
Lights . . . . . . . . . . . . . . . . . . . . . . . . . . . . . . . . . . . . . . . .
Interior lighting . . . . . . . . . . . . . . . . . . . . . . . . . . . . . . . Visibility . . . . . . . . . . . . . . . . . . . . . . . . . . . . . . . . . . . . . .
Windshield wiper and wash system . . . . . . . . . . . . .
Rear-view mirror . . . . . . . . . . . . . . . . . . . . . . . . . . . . . .
Seats and Stowage
. . . . . . . . . . . . . . . . . . . . . . . . . . . . .
Front seats . . . . . . . . . . . . . . . . . . . . . . . . . . . . . . . . . . . .
Head restraints . . . . . . . . . . . . . . . . . . . . . . . . . . . . . . . .
Middle rear head restraint* . . . . . . . . . . . . . . . . . . . .
Rear seats . . . . . . . . . . . . . . . . . . . . . . . . . . . . . . . . . . . .
Pedals . . . . . . . . . . . . . . . . . . . . . . . . . . . . . . . . . . . . . . . .
luggage compartment . . . . . . . . . . . . . . . . . . . . . . . . .
Net partition* (Combi) . . . . . . . . . . . . . . . . . . . . . . . .
The roof rack* . . . . . . . . . . . . . . . . . . . . . . . . . . . . . . . .
Cup holder . . . . . . . . . . . . . . . . . . . . . . . . . . . . . . . . . . .
Note holder . . . . . . . . . . . . . . . . . . . . . . . . . . . . . . . . . .
Ashtray* . . . . . . . . . . . . . . . . . . . . . . . . . . . . . . . . . . . . . .
Cigarette lighter*, power sockets . . . . . . . . . . . . . . .
Storage compartments . . . . . . . . . . . . . . . . . . . . . . . .
Overview . . . . . . . . . . . . . . . . . . . . . . . . . . . . . . . . . . . . .
Storage compartment on the front passenger side
Storage compartment on the driver's side . . . . . . .
Storage compartment on the dash panel . . . . . . . .
Storage compartment in front centre console* . .
Storage compartment in the front doors . . . . . . . .
Front seat armrest with storage compartment* . .
Rear seat armrest with storage compartment* . . .
Storage compartment in rear centre console* . . .
Seat backrest with opening for skis* . . . . . . . . . . . .
Clothes hooks* . . . . . . . . . . . . . . . . . . . . . . . . . . . . . . .
Heating and air conditioning system
. . . . . . . . . .
Air outlet vents . . . . . . . . . . . . . . . . . . . . . . . . . . . . . . . .
Heating . . . . . . . . . . . . . . . . . . . . . . . . . . . . . . . . . . . . . .
Climatic* . . . . . . . . . . . . . . . . . . . . . . . . . . . . . . . . . . . . .
Starting-off and Driving
. . . . . . . . . . . . . . . . . . . . . . .
Setting steering wheel position . . . . . . . . . . . . . . . . .
Ignition lock . . . . . . . . . . . . . . . . . . . . . . . . . . . . . . . . . . Starting the engine . . . . . . . . . . . . . . . . . . . . . . . . . . . .
Switching off the engine . . . . . . . . . . . . . . . . . . . . . . .
Shifting . . . . . . . . . . . . . . . . . . . . . . . . . . . . . . . . . . . . . .
Handbrake . . . . . . . . . . . . . . . . . . . . . . . . . . . . . . . . . . .
Rear parking aid* . . . . . . . . . . . . . . . . . . . . . . . . . . . . .
Cruise control system (CCS)* . . . . . . . . . . . . . . . . . .
Communication
. . . . . . . . . . . . . . . . . . . . . . . . . . . . . . .
Mobile phones and two-way radio systems . . . . .
Safety
. . . . . . . . . . . . . . . . . . . . . . . . . . . . . . . . . . . . . . .
Passive Safety
. . . . . . . . . . . . . . . . . . . . . . . . . . . . . . . . .
Basic information . . . . . . . . . . . . . . . . . . . . . . . . . . . . .
Correct seated position . . . . . . . . . . . . . . . . . . . . . . .
Seat belts
. . . . . . . . . . . . . . . . . . . . . . . . . . . . . . . . . . . . . .
Why seat belts? . . . . . . . . . . . . . . . . . . . . . . . . . . . . . . .
The physical principle of a frontal collision . . . . . .
Important safety information regarding the use of seat
belts . . . . . . . . . . . . . . . . . . . . . . . . . . . . . . . . . . . . . . . . .
How are seat belts correctly fastened? . . . . . . . . . .
Airbag system
. . . . . . . . . . . . . . . . . . . . . . . . . . . . . . . . .
Description of the airbag system . . . . . . . . . . . . . . .
Front airbags . . . . . . . . . . . . . . . . . . . . . . . . . . . . . . . . .
side airbags* . . . . . . . . . . . . . . . . . . . . . . . . . . . . . . . . .
Head airbags* . . . . . . . . . . . . . . . . . . . . . . . . . . . . . . . .
Deactivating an airbag . . . . . . . . . . . . . . . . . . . . . . . .
Transporting children safely
. . . . . . . . . . . . . . . . . .
What you should know about transporting children!
Child seat . . . . . . . . . . . . . . . . . . . . . . . . . . . . . . . . . . . .
Attaching a child seat using the “ISOFIX” system .
Attaching child seat using the “Top Tether”* system
6799101015151516161616171818182230303031313136373739424245
4647505252535454565761626364646465656666666767676868696970707173777777
78798080818284848585858689898990919494959799101103103105108109
s2bs.2.book Page 3 Monday, September 27, 2010 9:53 AM
Page 16 of 199

Instruments and Indicator/Warning Lights15
Using the system
Safety
Driving Tips
General Maintenance
Breakdown assistance
Technical Data
Instruments and Indicator/Warning LightsOverview of the instrument cluster
Engine revolutions counter page 15
Speedometer page 16
Engine coolant temperature display page 16
Display
with counter for distance driven page 16
with Service Interval Display page 17
with digital clock page 18
with Multi-functional indicator* page 18
Button for the selection of the mode (t urn button)/the setting (press button):
Set hours/minutes
Activating/deactivating the second speed in mph or km/h*
Service interval - Display of the remaining number of days, kilometres or miles
to the next Inspection Service/Reset*
1)
Reset trip counter for distance driven
Resetting Service Interval Display
Activate/deactivate display mode
Fuel gauge page 16
Engine revolutions counterThe red zone in the revolutions counter fig. 15 indicates the maximum permis-
sible engine speed for all gears for an engine which has been run in and operating at a
normal temperature. Before reaching the re d zone of the rev counter scale, shift up
into the next higher gear. The engine control unit restricts the engine speed to a steady
limit value.
Before reaching the red zone of the rev counter scale, shift up into the next higher gear.
Fig. 15 Instrument cluster
A1A2A3A4A5
1)Valid for countries where the values are indicated in British measuring units.A6
A1
s2bs.2.book Page 15 Monday, September 27, 2010 9:53 AM
Page 18 of 199

Instruments and Indicator/Warning Lights17
Using the system
Safety
Driving Tips
General Maintenance
Breakdown assistance
Technical Data
Odometer
The odometer indicates the total distance in
kilometres or miles which the vehicle has
been driven.
Fa u l t d i s p l a y
If there is a fault in the instrument cluster Error will appear in the display. Contact a
specialist garage.
WARNING
Never seek to adjust the trip counter for distance driven while driving for safety
reasons!
Note
If the display of the second speed is acti vated in mph or km/h, this speed is shown
instead of the odometer on the display.Service Interval DisplayService Interval Display
Before the next service interval a key symbol
and the remaining kilometres are
indicated after switching on the ignition fig. 16. At the same time, a display appears
regarding the remaining days until the next service interval.
The kilometre indicator or the days indicator reduces in steps of 100 km. or days until
the service due date is reached. A flashing key symbol
and the text
Service appears in the display for 20 seconds
as soon as the due date for the service is reached.
Resetting Service Interval Display
It is only possible to reset the Service Interval Display, if a service message or at least a
pre-warning is shown on the disp lay of the instrument cluster.
We recommend having this resetting performed by a specialist garage.
The specialist garage:
resets the memory of the display after the appropriate inspection,
makes an entry in the Service schedule,
affix the sticker with the entry of the following service interval to the side of the
dash panel on the driver's side.
This can be reset as follows: Press the button page 15, fig. 15 and keep it pressed
down, start the ignition, release the butt on and turn it to the left or right.Caution
We recommend you ask a specialist garage to reset the service interval display. Incor-
rectly setting the service interval display can cause problems to the vehicle.
Note
Never reset the display between service intervals otherwise this may result in
incorrect readouts.
information is retained in the Service Inte rval Display also after the battery of the
vehicle is disconnected.
The service interval display will need to be re-configured if the instrument cluster
is replaced. Contact a specialist garage. This work is carried out by a specialist garage.
The data displayed is the same after resetting the display with flexible service inter-
vals (QG1) using the reset button as that for a vehicle with fixed service intervals (QG2).
We therefore recommend having the Service In terval Display reset only by an author-
ised Škoda Service Partner who is familiar with the procedure for resetting the display
with a vehicle system tester.
Please refer to the brochure Service schedule for extensive information about the
service intervals.
Fig. 16 Service Interval Display: Note
A5
s2bs.2.book Page 17 Monday, September 27, 2010 9:53 AM
Page 49 of 199

Lights and Visibility
48
Automatic wipe/wash for windscreen
– Pull the lever towards the steering wheel into sprung position , the wash system
sprays immediately, the windscreen wiper starts wiping a little later. The wash
system and the windscreen wiper operate simultaneously at a speed of more than
120 km/h.
– Release the lever. The windscreen wash system stops and the wiper continues for another 3 - 4 wiper strokes (depending on the period of spraying of the wind-
screen). At a speed of more than 2 km/h , the wiper wipes once again* 5 seconds
after the last wiper stroke in order to wipe the last drops from the windscreen. This
function can be activated/deacti vated by a specialist garage.Wiping the rear window pane*– Push the lever away from the steering wheel into position - the widescreen
wiper will operate every 6 seconds.Automatic wipe/wash for the rear window pane*– Press the lever from the steering wheel forward into the sprung position , the
wash system sprays immediately, the windscreen wiper starts wiping a little later.
As long as you hold the lever in this position, the wiper operates as well as the wash
system.
– Letting go of the lever will cause the windscreen wash system to stop and the wiper to continue for another 2 - 3 wiper strokes (depending on the period of spraying of
the windscreen). The lever will stay in position after releasing it .Switching windscreen wipers off– Move the lever back into its home position .
After the windscreen wiper switches off each time or the ignition switches off for the
third time, the position of the windscreen wiper changes, this counteracts an early
fatigue of the wiper rubbers.
The windscreen wipers and the wash system only operate if the ignition is switched on
and the bonnet is closed
4). If the intermittent wipe is switched on, the intervals are also controlled depending on
speed.
The rear window will be wiped again if the
front window wipers are on when reverse
gear is selected.
The windscreen washer nozzles are heated* when the ignition is switched on.
Top up with wash liquid page 150.
Winter position
If the windscreen wipers are in rest position, they cannot be folded out from the wind-
screen. For this reason we recommend adjust ing the windscreen wipers in winter so
that they can be folded out from the windscre en easily. You can set this rest position as
follows:
Switch on the windscreen wipers.
Switch off the ignition. The windscreen wipers remain in the position in which they
were when switching off the ignition.
You can also use the service position page 49 as a winter position.
WARNING
Properly maintained windscreen wiper blades are essential for clear visi-
bility and safe driving page 49.
Do not use the windscreen washer sy stem at low temperatures, without
heating the windscreen beforehand. Otherwise the window cleaner could
freeze on the windscreen and re strict the view to the front.
The rain sensor only operates as a su pport. The driver is not released from
the responsibility to set the function of the windscreen wipers manually
depending on the visibility conditions.Caution
In frosty weather, please firs t of all check whether the windscreen wiper blades are not
frozen to the windscreen before switching them on. Switching on windscreen wipers
when the blades are frozen to the windscreen may result in damage both to the blades
and the motor of the windscreen wipers!
4)On vehicles which do not have a contact switch for the bonnet, the windshield wiper and wash
system operates also when the bonnet is opened.
A5
A6
A7
A6
A0
s2bs.2.book Page 48 Monday, September 27, 2010 9:53 AM
Page 102 of 199
Airbag system101
Using the system
Safety
Driving Tips
General Maintenance
Breakdown assistance
Technical Data
being deployed. When the deployed head airbag is inflated, parts of the acces-
sories fitted may in certain circumstances be thrown into the interior of the car
and cause injuries to the occupants
page 157, “Accessories, changing and
replacing parts”.
Any work on the head airbag system including installing and removing
system components because of other repair work (e.g. removing headliner)
must only be carried out by a specialist garage.
Deactivating an airbagDeactivating airbags
If any airbags have been deactivated, switch them on again as soon as
possible so that they are able to again provide their proper protection.There is the technical means installed within your vehicle to switch off the front, side*
or head airbag* (take out of commission).
This is why you should have the deactivation of the airbags carried out by a specialist
garage.
On vehicles equipped with the switch for de activation of the airbags, you can deacti-
vate the front passenger airbag by means of this switch page 101.
Deactivation of airbags is envisaged only for particular instances, such as if:
you must in exceptional cases use a child seat on the front passenger seat where
the child has its back to the direction of tr avel of the vehicle (in some countries this
must be in the direction of travel due to other legal regulations applying) page 103,
“Important safety information regarding the use of child safety seats”,
you are not able to maintain the distan ce of at least 25 cm between middle of
steering wheel and chest, despite the driver seat being correctly adjusted,
special attachments are required in the ar ea of the steering wheel because of a
physical disability,
you have installed other seats (e.g. orthopaedic seats without side airbags). Monitoring the airbag system
The functionality of the airbag system is al
so monitored electronically when one airbag
has been switched off.
If the airbag was switched off using diagnostic equipment:
The warning light for the airbag system li ghts up for 4 seconds after switching on
the ignition and then flashes for 12 seconds afterwards in 2 second intervals.
Front passenger airbags switched off using the switch for front passenger
airbags* in storage compartmen t on the front passenger side:
the airbag indicator light in the instrume nt cluster comes on for about 4 seconds
each time the igniti on is switched on,
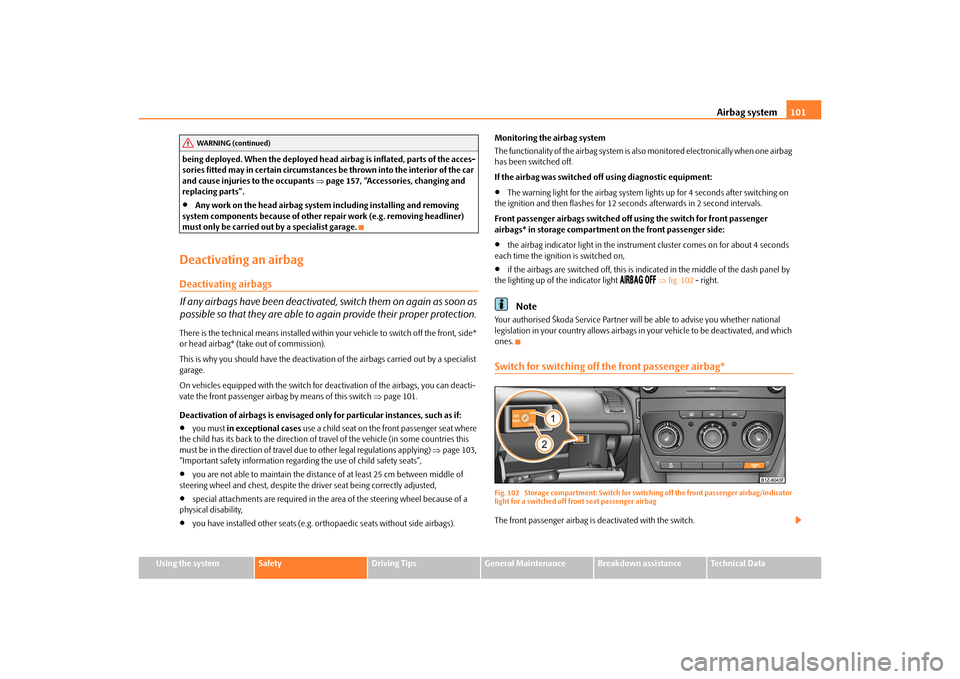
if the airbags are switched off, this is in dicated in the middle of the dash panel by
the lighting up of the indicator light
fig. 102 - right.
Note
Your authorised Škoda Service Partner will be able to advise you whether national
legislation in your country allows airbags in your vehicle to be deactivated, and which
ones.Switch for switching off the front passenger airbag*Fig. 102 Storage compartment: Switch for swit ching off the front passenger airbag/indicator
light for a switched off front seat passenger airbagThe front passenger airbag is deactivated with the switch.
WARNING (continued)
s2bs.2.book Page 101 Monday, September 27, 2010 9:53 AM
Page 122 of 199

Driving and the Environment121
Using the system
Safety
Driving Tips
General Maintenance
Breakdown assistance
Technical Data
Reducing idling
Idling also costs fuel.It is worthwhile switching off the engine in a traffic jam or when waiting at a level
crossing or at traffic lights with a lengthy red phase. Even after just 30 - 40 seconds you
will have saved more fuel th an that is needed when you start the engine up again.
If an engine is only idling it takes much longer for it to reach its normal operating
temperature. Wear-and-tear an d pollutant emissions, though, are particularly high in
the warming-up phase. This is why you should drive off right after starting the engine.
Do avoid high engine revolu tions at this time, however.Regular servicing
A poorly tuned engine consumes an unnecessarily high amount of fuel.Having your vehicle serviced regularly at a specialist garge enables you to satisfy one
of the requirements for economical motoring even before you set off on your journey.
Keeping your vehicle properly serviced not on ly has a positive effect on the safety of
your vehicle and maintaining its value, but also saves on fuel.
A poorly tuned engine can result in a fu el consumption which is 10 % higher than
normal.
The foreseen maintenance work should be undertaken exactly according to the
Service schedule by a specialist garage.
Also check the oil level after refuelling. Oil consumption is dependent to a consider-
able extent on the load and speed of the en gine. Oil consumption could be as high as
0.5 litres/1 000 km depending on your style of driving.
It is quite normal that a new engine has a higher oil consumption at first, and reaches
its lowest level only after a certain running in time. It is therefore not possible to
correctly assess the oil consum ption of a new vehicle until after you have driven about
5 000 km.
For the sake of the environment
You can achieve additional improvements in your fuel economy by using high-
lubricity oils.
Check the ground below your vehicle at regu lar intervals to detect any leakages in
good time. Please have your vehicle inspected by a specialist garge if you find any
stains caused by oil or other fluids on the floor.
Avoid driving short distances
Short distances result in an above-average high fuel consumption.– Avoid driving a distance of no more than 4 km if the engine is cold.
The engine and catalytic converter mu st first have reached their optimal operating
temperature in order to effectively reduce fuel consumption and pollutant emissions.
The cold engine vehicle cons umes approx. 15 - 20 litres/100 km of fuel immediately
after starting. Fuel co nsumption drops to 10 litres/100 km after just 1 kilometre. The
engine reaches its operating temperat ure (outside temperature and engine
dependent) only after about 4 to 10 kilometres and the fuel consumption then stabi-
lizes. You should therefore avoid driving short distances whenever possible.
An important factor in this connection is also the ambient temperature. The
fig. 116 shows the different fuel consumptions for the same distance, on the one
hand at +20 °C and on the other hand at -10 °C. Your vehicle has a higher fuel
consumption in winter than in summer.
Fig. 116 Fuel consumption in litres/100
km at different temperatures
s2bs.2.book Page 121 Monday, September 27, 2010 9:53 AM
Page 134 of 199

Taking care of your vehicle and cleaning the vehicle133
Using the system
Safety
Driving Tips
General Maintenance
Breakdown assistance
Technical Data
Underbody protectionThe underside of your vehicle is protected for life against chemical and mechanical
influences.
One cannot, however, completely rule out damage to the protective layer when
driving so we recommend that you inspect the protective layer on the underside of
your vehicle and on the chassis at certain intervals - this is best done at the beginning
and end of the winter - and to touch up any damaged areas.
The authorised Škoda Service Partners have suitable spray products available as well
as the necessary equipment and are familiar with the instructions for use. It is therefore
best to have such touch-up work or additional corrosion protection measures carried
out by an authorised Škoda Service Partner.
WARNING
Never use additional underbody protection or corrosion-protection agents for
the exhaust pipes, catalytic converters or heat shields. When the engine
reaches its operating temperature, these su bstances might ignite - risk of fire!Protection of hollow spacesAll the cavities of your vehicle which are at risk from corrosion are protected for life by
a layer of protective wax applied in the factory.
This wax protection does not require to be inspected or re-treated. Please remove any
small amount of wax which flows out of the cavities at high temperatures with a plastic
scraper and clean the spot using petroleum cleaner.
WARNING
Safety and environmental pr otection regulations should observed when using
petroleum cleaner to remove wax - a risk of fire!Engine compartmentGood corrosion protection is very importan t, particularly in winter when one often
drives over its salt-strewn roads. One should therefore clean the whole engine compartment before and after the salt spreading period and treat with preservative in
order to prevent the salt from being destructive.
The authorised Škoda Service Partners have the cleaning agents and preservatives
recommended by Škoda and al
so the required equipment.
WARNING
It is necessary to observe the guidelines given in the chapter before working
on the engine compartment page 140, “Working in the engine compart-
ment”.
Let the engine cool down before cleaning the engine compartment.Caution
Engine cleaning may be only be un dertaken when the ignition is off.
It is recommended to cover the generator before washing the engine compart-
ment.For the sake of the environment
The dirty water produced by washing the engine has washed away petrol, and residues
of grease and oil and should therefore be cleaned by an oil separator. This is why
engine washing should only be undertaken in a specialist garage or at a fuelling station
(when these are fitted with the required equipment).Care of the interior of vehiclePlastic parts, artificial leather and clothsYou can clean plastic parts and artificial leather with a moist cloth. You should only
treat such parts with special solvent-free plastic cleaning and care products it does
prove to be adequate.
Upholstery cloth and cloth trim on the do ors, luggage compartment cover, headliner
etc. are best treated with special cl eaning products, using if necessary a dry foam and
a soft sponge or brush.
s2bs.2.book Page 133 Monday, September 27, 2010 9:53 AM