2010 SKODA OCTAVIA TOUR gearbox
[x] Cancel search: gearboxPage 7 of 199
Layout of this Owner's Manual (explanations)
6
Layout of this Owner's Manual (explanations)The Owner's Manual has been systematically designed, in order to make it easy for you
to find and absorb the information you require.Chapters, table of contents and subject indexThe text of the Owner's manual is divided into relatively short sections which are
combined into easy-to-read chapters. The chapter you are reading at any particular
moment is highlighted at the bottom right of the page.
The Table of contents is arranged according to the chapters and the detailed Subject
index at the end of the Owner's Manual helps you to rapidly find the information you
are looking for.SectionsThe majority of Sections apply to all models.
Since there is a wide range of different equipment and options available it is clearly
unavoidable, despite dividing the contents into sections, that mention may be made
of equipment whic h is not fitted to your vehicle.Brief information and instructionsEach section has a Heading.
This is followed by Brief information (in large italic lettering), which tells you the
subject which is dealt with in this section.
Most of the illustrations are accompanied by an Instruction (in relatively large letters)
which explains to you in a straightforw ard way the action you have to take. Work steps
which have to be carried out are illustrated with a hyphen.Direction indicationsAll direction indications such as “left”, “right”, “front”, “rear” relate to the direction of
travel of the vehicle.Explanation of symbols Equipment which is marked in such a way is only standard on certain vehicle model
versions or only suppliable as opti onal equipment for certain models. End of a section.
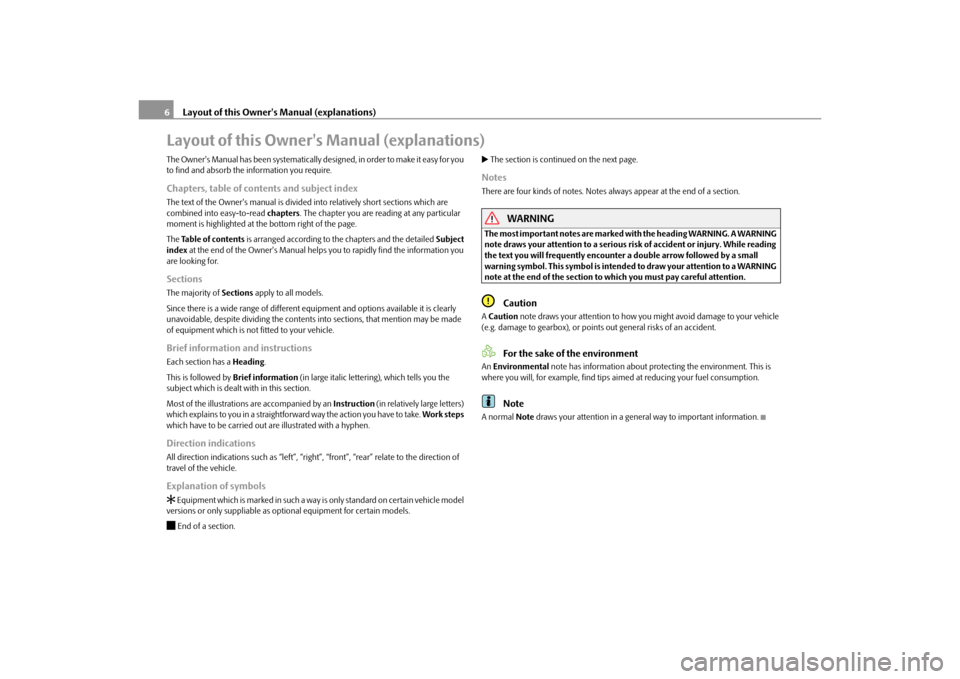
The section is continued on the next page.NotesThere are four kinds of notes. Notes always appear at the end of a section.
WARNING
The most important notes are marked with the heading WARNING. A WARNING
note draws your attention to a serious risk of accident or injury. While reading
the text you will frequently encounter a double arrow followed by a small
warning symbol. This symbol is intend ed to draw your attention to a WARNING
note at the end of the section to which you must pay careful attention.
Caution
A Caution note draws your attention to how you might avoid damage to your vehicle
(e.g. damage to gearbox), or points out general risks of an accident.
For the sake of the environment
An Environmental note has information about protecting the environment. This is
where you will, for example, find tips ai med at reducing your fuel consumption.
Note
A normal Note draws your attention in a general way to important information.
s2bs.2.book Page 6 Monday, September 27, 2010 9:53 AM
Page 79 of 199

Starting-off and Driving
78
You should not switch on any major elec trical components during the heating
period. Otherwise the ve hicle battery will be drained unnecessarily.
- start engine
Applies to all models:
Position
To lock the steering , with the ignition key withdrawn, turn the steering wheel until the
steering locking pin is heard to engage. You should always lock the steering as a general
rule if you leave your vehicle. This acts as a deterrent against possible theft of your
vehicle .
Position
Move the steering wheel back and forward a little if the ignition key cannot, or cannot
easily be turned into this position, in order to release the steering lock.
Position
The engine is started in this position. At the same time any switched on low beam or
main beam or other electrical components with major electrical consumers are briefly
switched off. The ignition key moves back into position after being released.
The ignition key must be turned back into position each time before starting the
engine again. The starter repeat lock in th e ignition lock prevents the starter being
engaged when the engine is r unning and thus getting damaged.
WARNING
When driving, the ignition key must always be in the position (ignition
switched on) without the engine running. This position is indicated by the
warning lights coming on. If this is not the case, it could result in unexpected
locking of the steering wh eel - risk of accident!
Do not withdraw the ignition key from the lock until the vehicle has come to
a stop. The steering lock can engage immediately - risk of accident!
Always withdraw the ignition key if you are going to leave the vehicle, even
for a short time. This is particularly important if children are left in the vehicle.
Children might otherwise st art the engine or switch on electrical equipment
(e.g. power windows) - risk of accident or injury!
Starting the engineGeneral
You can only start the engine only using an original ignition key.
Place the gearshift lever into neutral and put on the handbrake firmly before
starting the engine.
Before starting, it is necessary to depres s the clutch pedal and to keep it pressed
down until the engine starts. If you try and start the engine without pressing the clutch
pedal, the engine will not start. A message in the information display of the instrument
cluster will also appear indicate th e need to press the clutch pedal.
Let go of the ignition key as soon as the engine starts otherwise you may damage
the starter.
The engine running noises may louder at first be louder for a short time after starting
the cold engine until oil pressure can be built up in the hydraulic valve clearance
compensation. This is quite normal and is not an operating problem.
If the engine does not start ...
You can use the battery of anothe r vehicle as a jump-start aid page 165.
It is only possible to tow-start vehicles fi tted with a manual gearbox. The tow-starting
distance must not be more than 50 metres. Observe the following
guidelines page 167, “Tow-starting and towing vehicle”.
WARNING
Never run the engine in non ventilated or enclosed areas. The exhaust gases
of the engine contain besides the odou rless and colourless carbon monoxide a
poisonous gas - hazard! Carbon mono xide can cause unconsciousness and
death.
Never leave your vehicle unattended with the engine running.Caution
The starter may only be operated (ignitio n key position ), if the engine is not
running. If the starter is imme diately operated after switchin g off the engine, the starter
or the engine can be damaged.
A3
A1A2A3
A2
A1
A2
A3
s2bs.2.book Page 78 Monday, September 27, 2010 9:53 AM
Page 81 of 199
Starting-off and Driving
80Note
The radiator fan may continue running fo r a further 10 minutes or so after the
engine and the ignition have been switched off. The coolant fan may, however, also
switch on again after some time if the co olant temperature rises because of an accu-
mulation of heat in the engine or if the engine is warm and the engine compartment is
additionally heated by strong sunlight.
This is why particular care is required when carrying out any work in the engine
compartment page 140, “Working in the engine compartment”.
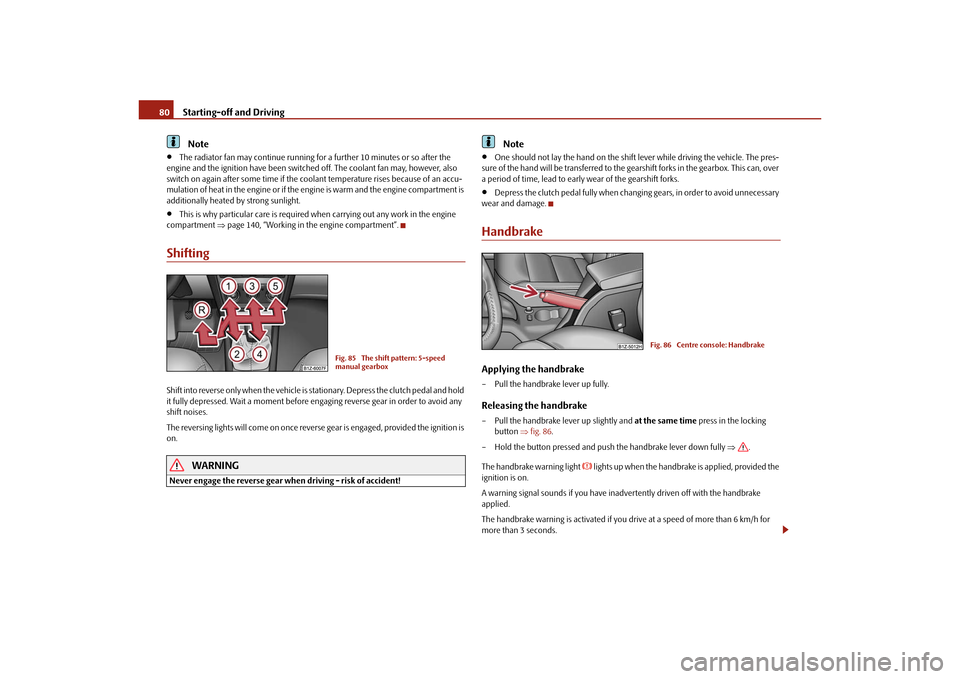
ShiftingShift into reverse only when the vehicle is stationary. Depress the clutch pedal and hold
it fully depressed. Wait a moment before en gaging reverse gear in order to avoid any
shift noises.
The reversing lights will come on once reverse gear is engaged, provided the ignition is
on.
WARNING
Never engage the reverse gear when driving - risk of accident!
Note
One should not lay the hand on the shift lever while driving the vehicle. The pres-
sure of the hand will be transferred to the gearshift forks in the gearbox. This can, over
a period of time, lead to earl y wear of the gearshift forks.
Depress the clutch pedal fully when changi ng gears, in order to avoid unnecessary
wear and damage.
HandbrakeApplying the handbrake– Pull the handbrake lever up fully.Releasing the handbrake– Pull the handbrake lever up slightly and at the same time press in the locking
button fig. 86 .
– Hold the button pressed and push the handbrake lever down fully .
The handbrake warning light
lights up when the handbrak e is applied, provided the
ignition is on.
A warning signal sounds if you have inadvertently driven off with the handbrake
applied.
The handbrake warning is activated if you drive at a speed of more than 6 km/h for
more than 3 seconds.
Fig. 85 The shift pattern: 5-speed
manual gearbox
Fig. 86 Centre console: Handbrake
s2bs.2.book Page 80 Monday, September 27, 2010 9:53 AM
Page 83 of 199
Starting-off and Driving
82
If a warning signal sounds for about 3 seconds after switching the ignition on and
engaging reverse gear, and there is no obstac le close to your vehicle, this indicates a
system fault. Have the fault rectified by a specialist workshop.
The sensors must be kept clean and free of ice to enable the parking aid to operate
properly.
Cruise control system (CCS)*IntroductionThe cruise control system (CCS) maintains a constant speed, above approx. 30 km/h
(20 mph), once it has been set, without yo u having to depress the accelerator pedal.
This is only possible to the extent permit ted by the power output and braking power of
the engine. The cruise control system makes it possible - particularly on long journeys
- for you to rest your “accelerator foot”.
WARNING
The cruise control system must not, for safety reasons, be used in dense
traffic or on unfavourable road surfaces (such as icy roads, slippery roads or
loose chippings) - risk of accident!
In order to prevent unintentional use of the cruise control system, always
switch off the system after use.Note
Always depress the clutch pedal if you switch on the cruise control system when
the gearbox is in Neutral. Otherwise the engine can rev up unintentionally.
The cruise control system is not able to maintain a constant speed when driving on
steep downhill sections. The weight of the vehicle increases the speed at which it
travels. One should shift down in good time to a lower gear or slow the vehicle down
by applying the foot brake.
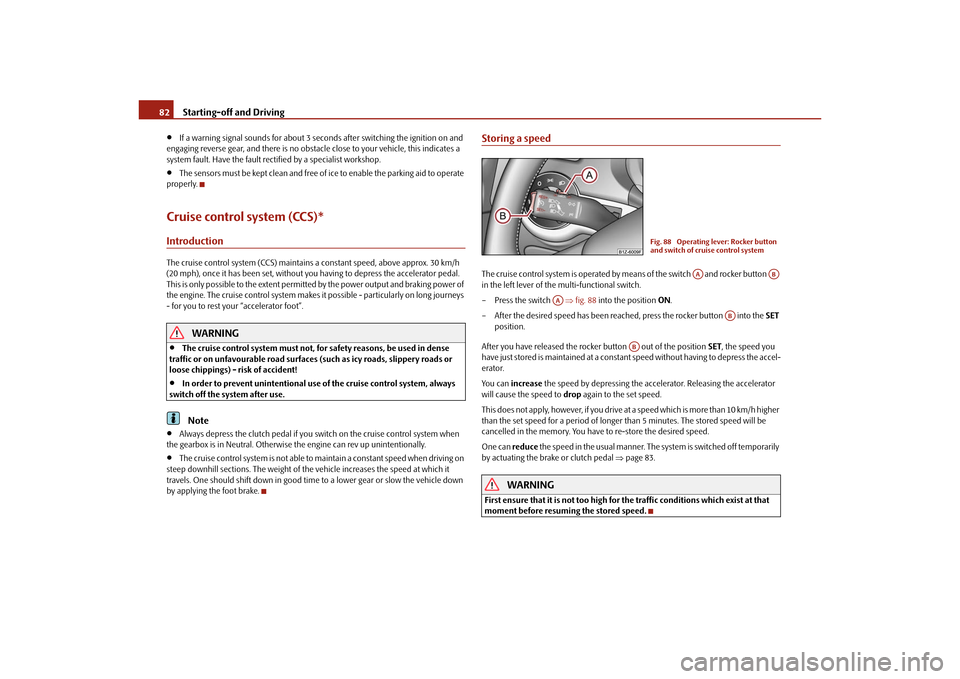
Storing a speedThe cruise control system is operated by means of the switch and rocker button
in the left lever of the multi-functional switch.
– Press the switch fig. 88 into the position ON.
– After the desired speed has been reached, press the rocker button into the SET
position.
After you have released the rocker button out of the position SET, the speed you
have just stored is maintained at a consta nt speed without having to depress the accel-
erator.
You can increase the speed by depressing the acce lerator. Releasing the accelerator
will cause the speed to drop again to the set speed.
This does not apply, however, if you drive at a speed which is more than 10 km/h higher
than the set speed for a period of longer than 5 minutes. The stored speed will be
cancelled in the memory. You have to re-store the desired speed.
One can reduce the speed in the usual manner. The system is switched off temporarily
by actuating the brake or clutch pedal page 83.
WARNING
First ensure that it is not too high for the traffic conditions which exist at that
moment before resuming the stored speed.
Fig. 88 Operating lever: Rocker button
and switch of cruise control system
AA
AB
AA
AB
AB
s2bs.2.book Page 82 Monday, September 27, 2010 9:53 AM
Page 125 of 199

Driving and the Environment
124
Driving through bodies of water on roadsIn order to avoid damage to the vehicle when driving through bodies of water (e.g.
flooded roads), observe the following:
Determine the depth of the water when driv ing through bodies of water. The water
can reach at the maximum the web on the lower sill of the vehicle fig. 117 .
Drive no more than at walking speed. At a higher speed, a water wave can form in
front of the vehicle which can cause water to penetrate into the air induction system of
the engine or into other parts of the vehicle.
Never let the vehicle stand in the water, never drive backwards and do not switch
off the engine.
WARNING
Driving through water, mud, sludge etc. can reduce the braking power and
extend the braking distance - risk of accident!
Avoid sudden and severe braking manoeuvres immediately after driving
through bodies of water.
After driving through bodies of water, the brakes must be cleaned and dried
as soon as possible by intermittent braking. Only apply the brakes for the
purpose of drying and cleaning the brake discs if the traffic conditions permit
this. Do not place any other road users in jeopardy.
Caution
When driving through bodies of water, parts of the vehicle such as the engine,
gearbox, catalytic converte r, chassis or electrics can be severely damaged.
Oncoming vehicles can gene rate water waves which can exceed the permissible
water level for your vehicle.
Potholes, mud or rocks can be hidden under the water making it difficult or impos-
sible to drive through the body of water.
Do not drive through salt water. The salt can lead to corrosion. Immediately rinse
all the parts of the vehicle, which came into contact with the salt water, with fresh
water.Note
After driving through a body of water, we recommend that the vehicle is checked by a
specialist garage.
Fig. 117 Crossing bodies of water
s2bs.2.book Page 124 Monday, September 27, 2010 9:53 AM
Page 168 of 199

Breakdown assistance167
Using the system
Safety
Driving Tips
General Maintenance
Breakdown assistance
Technical Data
Tow-starting and towing vehicleGeneralPlease pay attention to the following instructions if you are going to use a tow rope:Driver of the towing vehicle– Do not drive off until the tow rope is taught.
– Release the clutch particularly gently when starting off.Driver of the towed vehicle– Switch the ignition on so that the steeri ng wheel is not blocked and you can also
operate the turn signal lights, the headlight flasher, the windscreen wipers and
windscreen washer system.
– Move the gearshift lever into Neutral.
– Note that the brake servo unit and power steering only operate if the engine is running. You will require significantly grea ter physical force to depress the brake
pedal and to steer th e vehicle if the engine is not running.
– Ensure that the tow rope is always kept taught.
Tow rope or tow bar
A tow bar is safest way of towing a vehicle an d also minimizes any shocks. You can use
a tow rope only if a suitable tow bar is not available.
The tow rope must be elastic to protect the vehicle. Thus one should only use plastic
fibre rope or a rope made out of a similarly elastic material.
Only attach the tow rope to the towing eyes provided for this purpose page 167
and page 168.
Driving style
Towing another vehicle requires a certain am ount of practice. Both drivers should be
familiar with the particular points about to wing a vehicle. Unskilled drivers should not
attempt to tow in another vehicle or to be towed in.
One should be constantly vigi lant not to allow impermissibly high towing forces or
jerky loadings. There is always a risk of excessive stresses and damage resulting at the points to which you attach the tow rope or
tow bar when you attempt to tow a vehicle
which is not standing on a paved road.
Caution
If the gearbox of your vehicle no longer contains any oil because of a defect, your
vehicle must only be towed in with the driven wheels raised clear of the ground, or on
a special vehicle transporter or trailer.
Note
Please comply with any national legal provisions particularly regarding the
switched on signal systems, when towi ng in or tow-starting another vehicle.
The tow rope must not be twisted as it may in certain circumstances result in the
front towing eye being unscrewed out of your vehicle.
Front towing eye
The towing eye is stored in th e box for the vehicle tool kit.Fig. 141 Front bumper: protective grille/installing the towing eyeRemove the protective grille carefully as follows:
– Press on grille with the hand (at the end removed from the licence plate) and
release it in the direction of the arrow fig. 141 - left.
s2bs.2.book Page 167 Monday, September 27, 2010 9:53 AM
Page 171 of 199

Fuses and light bulbs
170
Fuse cover in engine compartmentOn some vehicles, the battery cover must be removed before removing the fuse cover
page 146.Removing fuse cover– Move the circlips fig. 144 as far as the stop, the symbol
appears behind the
circlip and remove the cover.
Installing fuse cover– Position the fuse cover on the fuse box and push the circlips as far as the stop -
the symbol
is visible behind the circlip.
Caution
When unlocking and locking the fuse cover, it must be pressed on the sides to the
box, otherwise damage can occur to the locking mechanism.
Carefully position the fuse cover in the engine compartment. If the cover was not
correctly positioned, water can get into the fuses and this results in a damage to the
vehicle!
Fuse assignment in engine compartmentCertain electrical components are only stan dard on certain vehicle model versions or
only suppliable as optional equipment for certain models.
Fig. 144 Fuse cover in engine compart-
ment
AA
AA
No.
Power consumer
Amperes
F1
Not assigned
F2
Control unit for automatic gearbox DQ 200
30
F3
Measuring circuit
5
F4
Valves for ABS
30/20
F5
Control unit for automatic gearbox
15
F6
Instrument cluster, windshield wiper lever and turn signal
light lever
5
F7
Power supply for terminal 15 (ignition on), starter
40
F8
Radio
15
F9
Phone
5
F10
Engine control unit, Main relay
5/10
F11
Control unit for auxiliary heating
20
F12
Control unit for CAN databus
5
F13
Engine control unit
15/30
F14
Ignition
20
Fig. 145 Schematic representation of
fuse carrier in engine compartment
s2bs.2.book Page 170 Monday, September 27, 2010 9:53 AM
Page 172 of 199

Fuses and light bulbs171
Using the system
Safety
Driving Tips
General Maintenance
Breakdown assistance
Technical Data
Fuse assignment in the dash panelCertain electrical components are only stan dard on certain vehicle model versions or
only suppliable as optional equipment for certain models.
F15
Lambda probe
glow plug system relay
10
5
F16
Central control unit, right main headlight, right rear light
unit
30
F17
Horn
15
F18
Amplifier for digital sound processor
30
F19
Front window wiper
30
F20
Wa te r pump
valve for fuel dosing
High-pressure pump
10
20
15
F21
Lambda probe
Vacuum pump
10/15 20
F22
Clutch pedal switch, brake pedal switch
5
F23
Secondary air pump
Air mass meter
Fuel high pressure pump
5
10
15
F24
Activated charcoal filter, exha ust gas recirculation valve,
radiator fan
10
F25
Pump for ABS
30/40
F26
Central control unit, left main headlight, left rear light unit
30
F27
Secondary air pump
Glow plug system
40
50
F28
Not assigned
F29
Power supply terminal 30 (con tinuous current supply from
the battery)
50
F30
Te r m i n a l X
a)
50
a)In order not to drain the battery unnecessarily wh en starting the engine, the electrical compo-
nents of this terminal are automatically switched off.No.
Power consumer
Amperes
No.
Power consumer
Amperes
1
Diagnostic socket, Engine control unit, Electrical fuel
pump
10
2
Control unit for ABS, ESP
5
3
Airbag
5
4
Heating, air conditioning, reve rsing lights, interior rear
view mirror dimming, te lephone preinstallation
5
5
Control unit for headlamp beam adjustment
5
6
Instrument cluster, Control unit for automatic gearbox,
Control unit for electromechanical power steering, Parking
aid; Haldex clutch
5
7
Not assigned
8
Not assigned
9
Not assigned
10
Not assigned
11
Not assigned
12
Central locking control unit
10
Fig. 146 Schematic representation of
the fuse carrier in the dash panel
s2bs.2.book Page 171 Monday, September 27, 2010 9:53 AM