Page 9 of 14
 Blues Car Radio Manual CD player
7
CD playerUsing the systemInserting the CD– Press the button , in order to select the source for the play func-
tion:
CD
(internal CD drive),
EXT
(CD changer, if it is connected to")
CD player
7
CD playerUsing the systemInserting the CD– Press the button , in order to select the source for the play func-
tion:
CD
(internal CD drive),
EXT
(CD changer, if it is connected to the
radio) or
AUX
.
– Carefully insert a CD into the CD case until it is automatically
drawn in. The play function begins automatically.
Operating the CD playerAudio CD: Select track – Press the rocker switch or during the play function of the CD, in
order to select the previous and/or the next title.
– Press the rocker switch or for a longer period of time for fast
reverse or forward replay of the track. The play function is continued after releasing the button.
MP3 Data: Select track – Press the rocker switch or during the play function of the CD, in
order to select the previous and/or the next title.
– Press the rocker switch or for a longer period of time for fast
reverse or forward replay of the track. The play function is continued after releasing the button.
– Briefly press the rocker switch or for scrolling in the folders or
in the play lists (if they are present on the CD).
Function SCAN – Press the rocker switch , in order to scroll through the CD. The
first 10 seconds of each title are played.
– In order to return to the normal mode, press once again the rocker
switch .
– Press the rocker switch or if you wish to select the previous or
the following track.
End the play function of the CD – In order to end the play function of
the CD and to activate the radio,
press the rocker switch . The CD remains in the unit.
Ejecting CD – Press the button , the Cd is ejected.Display of additional information (MP3 data) In the display, you can select the display of
additional information via the MP3 data
using the station keys - :•
- Number of the folder and number of the track;
•
- Name of the track;
•
- Name of the performer;
•
- Name of the album;
•
- Name of the data;
•
- Name of the folder.Note
•
If the ejected CD is not removed, it is drawn in again for safety reasons.
•
If the radio is functioning in the TP mode before changing to the CD mode, the
play function of the CD is interrupted during the traffic reports and the unit
CD
A7
SCAN
SCAN
A/F
A61
6
123456
s220.book Page 7 Tuesday, August 5, 2008 6:46 AM
Page 10 of 14
 Blues Car Radio Manual CD player
8switches over to the radio mode. After the traffic reports have ended, the unit switches back once again to the CD mode.Replay the tracks in random order– Press the rocker switch , in o")
CD player
8switches over to the radio mode. After the traffic reports have ended, the unit switches back once again to the CD mode.Replay the tracks in random order– Press the rocker switch , in order to activate the menu Set-up. – Select a function of the
MIX
menu with the help of the station keys.
– Set the desired value by turning the button .MIX Play function of titles in random order.•
MIX OFF
- the function of the menu is switched off;
•
MIX CD
- Plays the tracks on a CD in random order;
•
MIX FLD
- Play function of titles in random order in a certain (folder);
•
MIX PLS
- Play function of the playlist (folde
r of selected tracks from individual
folders, which is stored on the CD). Is on
ly displayed when a playlist is created for
the replayed CD.General information for MP3 operationRequirements for the MP3 data and data carrier •
650 MB and 700 MB CD-ROM, CD-R, CD-RW.
•
The CDs must correspond to the ISO 9660 Level 2 standard as well as the Joliet
data system (single and multi-session).•
Data names must be no longer than 64 characters.
•
The list structure is restricted to a depth of 8 list levels.
•
The name of the artist, the album and the title of the reproduced MP3 data can
be shown as ID3 tag, providing this information is available. The list and data name will be displayed if there is no ID3 tag.•
Play lists are not supported.
Bit rate (data flow per time unit) •
The system supports MP3 data with bit rates of 32 to 320 KB/s as well as MP3
data with variable bit rates.•
The indicated playing time data with variable bit rates is not reliable.
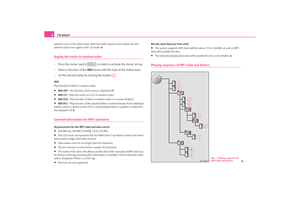
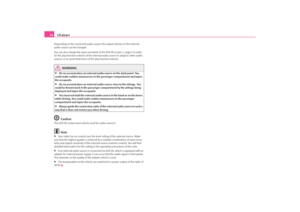
Playing sequence of MP3 data and folders
MENU
A1
Fig. 1 Playing sequence of MP3 data and folders
s220.book Page 8 Tuesday, August 5, 2008 6:46 AM
Page 11 of 14
 Blues Car Radio Manual CD player
9
The unit plays the MP3 data stored on
a data carrier in a certain sequence
⇒ page 8, fig. 1
. The illustration shows an exampl
e of a typical MP3 CD containing
the titles (Tracks
�")
CD player
9
The unit plays the MP3 data stored on
a data carrier in a certain sequence
⇒ page 8, fig. 1
. The illustration shows an exampl
e of a typical MP3 CD containing
the titles (Tracks
), folder (Folder
) and sub-folder.
Information on how to use a CDCD to jump Uneven road surfaces and strong vibrations may cause the CD to jump. Formation of condensation When it is cold and after rain showers, moisture can deposit in the CD drive (condensation). This can effect the CD ju
mp or impair the play function. In such
cases wait until the moisture has dissipated. Notes for the care of the CDs If a CD is soiled, please never clean the CD
in the direction of a circle but rather from
inside to outside with a soft lint-free cloth. In case of severe layers of dir t we recom- mend to clean the CD with a commercially av
ailable CD cleaner. Also in this case
do not clean the CD in the direction of a circle but rather from inside to outside and then let it dry off. Overheating protection If the temperature in the unit exceeds 85°C, the play function of the CD is ended for safety reasons.
Caution
•
Never use liquids such as gasoline, paint thinner or disk cleaner, otherwise the
surface of the CD could get damaged!•
Never expose the CD to direct sun rays!
•
Please never write or affix the CD!Note
Dirt or damage of a CD can lead to diffic
ulties when “reading” the information. The
difficulty in reading the error depends on th
e dirt or on the severity of the mechan-
ical damage. Severe scratches cause reading errors which can make the CD jump or “
get stuck
”. All CDs must be treated carefully and always be stored in a protec-
tive case.Input AUX-IN*The input for external audio sources
AUX-IN is located below the armrest
of the front seats and is marked with the logo
.
Activating an external audio source – Press the button and once again the button in order to select
the external input. The play function starts automatically after connecting the external source.
End play function of the external source – Press the rocker switch . It starts the play function of the last
selected radio station.
– Press the button and select the CD source for the play function.An external audio source connected to the
AUX-IN socket is merely replayed via the
radio and the loudspeakers. The external audio sources
cannot
be controlled via
the radio. You can select another audio source on
the radio at any time. As long as the
external audio source is no
t switched off, it remains always active in the back-
ground. Please refer to the Owner's manual of the respective manufacturer for the opera- tion of the external audio source. Use the standard jack plug 3.5 mm for the AUX-IN socket. If the external audio source does not have this jack
plug, you must use an adapter.
Adjust the play function volume of the external audio source The play function volume of the external audio source can be changed via the volume control on the radio.
CD
CD
A/F
CD
s220.book Page 9 Tuesday, August 5, 2008 6:46 AM
Page 12 of 14
 Blues Car Radio Manual CD player
10
Depending on the connected audio source
the output volume on the external
audio source can be changed. You can also change the input sensitivity of the AUX-IN socket
⇒page 4 in ord")
CD player
10
Depending on the connected audio source
the output volume on the external
audio source can be changed. You can also change the input sensitivity of the AUX-IN socket
⇒page 4 in order
for the play function volume of the extern
al audio source to adapt to other audio
sources or to avoid distortions of the play function volume.
WARNING
•
On no account place an external audio source on the dash panel. You
could make sudden manoeuvres in th
e passenger compartment and injure
the occupants.•
On no account place an external audio source close to the airbags. You
could be thrown back in the passen
ger compartment by the airbags being
deployed and injure the occupants.•
You must not hold the external audio source in the hand or on the knees
while driving. You could make su
dden manoeuvres in the passenger
compartment and injure the occupants.•
Always guide the connection cable of the external audio source in such a
way that is does not re
strict you when driving.
Caution
The AUX-IN socket must only be used for audio sources!
Note
•
Your radio has no control over the leve
l setting of the external source. Make
sure that the highest quality is achieved by a suitable combination of input sensi- tivity and output sensitivity of the extern
al source (volume control). You will find
detailed information for this setting in the operating instructions of the units.•
If an external audio source is connected
via AUX-IN, which is equipped with an
adapter for external power supply, it can occur that the audio signal is interrupted. This depends on the quality of the adapter which is used.•
The loudspeakers in the vehicle are matched to a power output of the radio of
30°W.s220.book Page 10 Tuesday, August 5, 2008 6:46 AM
Page 13 of 14
 Blues Car Radio Manual Škoda Auto pursues a policy of constant product and model development. We trust
that you will understand that changes to models in terms of shape, equipment and
engineering, may be introduced at an")
Škoda Auto pursues a policy of constant product and model development. We trust
that you will understand that changes to models in terms of shape, equipment and
engineering, may be introduced at any time. The information about scope of
delivery, appearance, performances, dimensions, weight, fuel consumption,
standards and functions of the vehicle is only correct at the time of publication.
Certain items of equipment might only be installed later on (information given by
the local authorised Škoda Service Partner) and only envisaged for particular
markets. It is therefore not possible for legal claims to be made based on the data,
illustrations and descriptions contained in this Owner's Manual.Reprinting, reproduction or translation, either in whole or in part, is not permitted
without the written consent of Škoda Auto.
Škoda Auto expressly reserves all rights relating to copyright laws.
We reserve the right to make changes to this document.
Issued by: ŠKODA AUTO a.s.
© ŠKODA AUTO a.s. 2009
Blues.indd 2Blues.indd 222.4.2009 14:01:3022.4.2009 14:01:30
Page 14 of 14
SIMPLY CLEVER
www.skoda-auto.com
Autorádio Blues
Octavia, Yeti anglicky 05.09
S00.5610.63.20
1Z0 012 149 CD
ŠkodaAuto
CAR RADIO BLUES
Blues.indd 1Blues.indd 122.4.2009 14:01:2722.4.2009 14:01:27


 Blues Car Radio Manual SIMPLY CLEVER
www.skoda-auto.com
Autorádio Blues
Octavia, Yeti anglicky 05.09
S00.5610.63.20
1Z0 012 149 CD
ŠkodaAuto
CAR RADIO BLUES
Blues.indd 1Blues.indd 122.4.2009 14:01:2722.4.2009")