2010 PORSCHE BOXSTER S height
[x] Cancel search: heightPage 34 of 294

32
Operation, Safety
Seat Adjustment and Head
Restraints
Warning!
The seat may move unexpectedly if you
attempt to adjust while driving. This could
cause sudden loss of control, resulting in se-
rious personal injury or death.
f Do not adjust seats while the vehicle is in mo-
tion.
The backrest locks must be engaged at all
times while the vehicle is in motion.
Safety belts only offer protection when the
backrest is upright and the belts are properly
positioned on the body.
Improperly positioned sa fety belts or safety
belts worn by passengers in an excessively
reclined position can cause serious personal
injury or death in an accident.
f Do not operate the car with the driver or
passenger backrests excessively reclined
(see “Seat position”).
Risk of injury if persons or animals are in the
movement range of the seat during seat
adjustment.
f Adjust the seat so that no-one is put at risk.
Caution!
Risk of damage to windshield, sun visor, etc.
when the seat is adjusted or folded back or
forward.
f Adjust the seat so that the s e a t b a c k re s t i s n o t in contact with any other object.
The driver and passenger seats provide
integrated head restraints in the backrests. The
head restraints are not adjustable. Warning!
All occupants, including the driver, should not
operate a vehicle or sit in a vehicle's seat until the
head restraints and backrests, respectively, are
placed in their proper posi tions so that the risk of
neck injuries is minimize d in the event of a crash.
For proper positioning of the head restraint, the
seatback's inclination should be adjusted such
that the head restraint is in an upright position.
Driver and passenger should be seated upright
and in the center of their seats.
Seat positionAn ergonomically correct sitting position is
important for safe and fatigue-free driving.
We recommend the following procedure for adjust-
ing the driver’s seat to suit individual
requirements:
1. Vehicles with manual transmission:
Adjust the seat until, with the clutch pedal fully
depressed, your leg remains at a slight angle.
Vehicles with Porsche Doppelkupplung
(PDK):
Adjust the seat until, with your left foot on the
footrest, your left leg remains at a slight angle.
2. Rest your outstretched arm on the steering wheel.
Set the backrest angle (not applicable for
Sports bucket seat) and the steering-wheel
position so that your wr ist rests on the outer
rim of the steering wheel. At the same time,
the shoulders must still be in noticeable
contact with the backrest.
3. Adjust the seat height (not applicable for
Sports bucket seat) to give yourself enough
headroom and a good overview of the vehicle.
4. Electrically adjustable seat: Adjust the seat angle until your thighs rest
lightly on the seat cushion.
Page 35 of 294

Operation, Safety
33
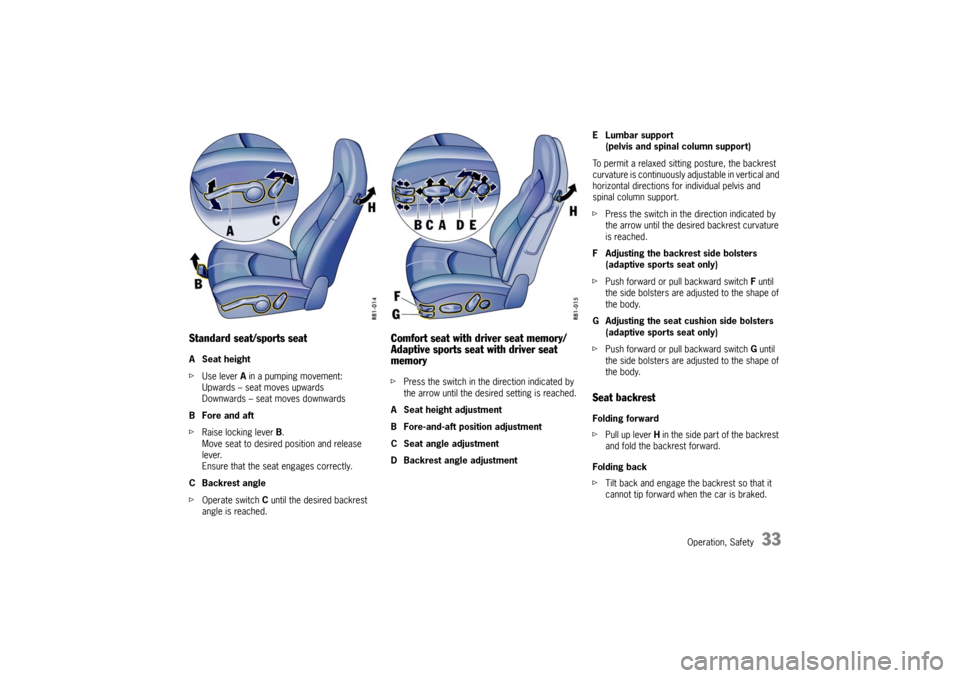
Standard seat/sports seatA Seat height
fUse lever A in a pumping movement:
Upwards – seat moves upwards
Downwards – seat moves downwards
B Fore and aft
f Raise locking lever B.
Move seat to desired position and release
lever.
Ensure that the seat engages correctly.
CBackrest angle
f Operate switch C until the desired backrest
angle is reached.
Comfort seat with driver seat memory/
Adaptive sports seat with driver seat
memoryf Press the switch in the direction indicated by
the arrow until the desired setting is reached.
A Seat height adjustment
B Fore-and-aft position adjustment
C Seat angle adjustment
D Backrest angle adjustment E Lumbar support
(pelvis and spinal column support)
To permit a relaxed sitting posture, the backrest
curvature is continuously adjustable in vertical and
horizontal directions for individual pelvis and
spinal column support.
f Press the switch in the direction indicated by
the arrow until the desired backrest curvature
is reached.
F Adjusting the backrest side bolsters (adaptive sports seat only)
f Push forward or pull backward switch F until
the side bolsters are adjusted to the shape of
the body.
G Adjusting the seat cushion side bolsters (adaptive sports seat only)
f Push forward or pull backward switch G until
the side bolsters are adjusted to the shape of
the body.
Seat backrestFolding forward
f Pull up lever H in the side part of the backrest
and fold the backrest forward.
Folding back
f Tilt back and engage the backrest so that it
cannot tip forward when the car is braked.
Page 41 of 294

Operation, Safety
39
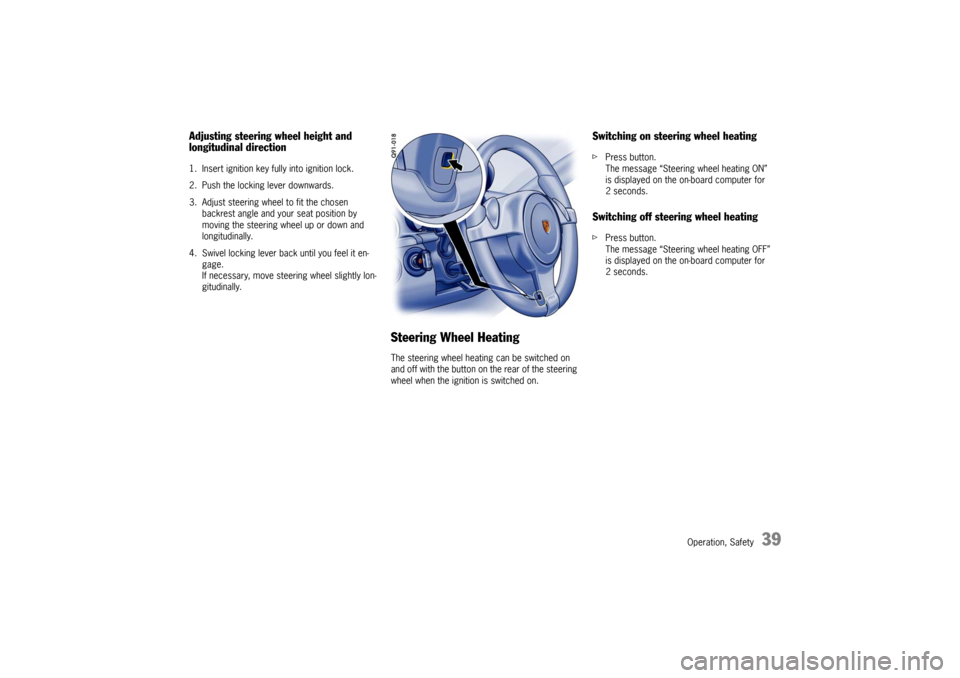
Adjusting steering wheel height and
longitudinal direction1. Insert ignition key fully into ignition lock.
2. Push the locking lever downwards.
3. Adjust steering wheel to fit the chosen backrest angle and your seat position by
moving the steering wheel up or down and
longitudinally.
4. Swivel locking lever back until you feel it en- gage.
If necessary, move steering wheel slightly lon-
gitudinally.
Steering Wheel HeatingThe steering wheel heatin g can be switched on
and off with the button on the rear of the steering
wheel when the ignition is switched on.
Switching on steering wheel heatingf Press button.
The message “Steering wheel heating ON”
is displayed on the on-board computer for
2seconds.Switching off steering wheel heatingfPress button.
The message “Steering wheel heating OFF”
is displayed on the on-board computer for
2seconds.
Page 216 of 294

214
Maintenance, Car Care
Washing The best method of protecting your car from the
damaging effects of the environment is frequent
washing and the application of a preservative. The
underside of your vehicle should also be thorough-
ly washed for cinders, salt or sanding at winter’s
end.
The longer salt, road du st and industrial dust,
dead insects, bird droppi ngs or substances from
trees (resin, pollen) are allowed to remain on the
bodywork, the more serious is their harmful ef-
fect.
New cars should be washed carefully with plenty
of clear water to protect the new paint work. Dark
paint finishes show up the smallest of surface
damage (e.g., scratches) more readily than lighter
colors.
Dark colors are also more susceptible to scratch-
ing because of the compos ition of their pigments
and require particularly careful paint care.
f Do not wash your car in bright sunlight or while
the bodywork is still hot.
f When washing by hand, use abundant water, a
soft sponge or wash brush, and Porsche car
shampoo.
f Begin by spraying the body thoroughly with wa-
ter to rinse away loose dirt. f
After washing, rinse the car with plenty of wa-
ter and then dry with a chamois leather.
Do not use the same chamois leather for dry-
ing as you use for cleaning the windshield and
windows.
Warning!
Moisture which gets on to the brakes during
a car wash can reduce braking efficiency or
make the brakes pull unevenly which could
increase the danger of an accident, causing
serious personal injuries or death.
f After washing the car, test the brakes and
steering and briefly brake the discs dry.
When doing this, take care not to hamper other
road users behind you (traffic conditions permitting).
Automatic car washes
f Please see the chapter “WIPER BLADES” on
Page 212.
Optional add-on parts or parts which project
beyond the contours of the vehicle may be
damaged by design features (e.g. brushes) of au-
tomatic car washes. The following parts are particularly
susceptible to damage:
– Convertible top (hot wax treatment cannot be
used, as the wax attacks the convertible top
material)
– Windshield wipers (alw ays switch them off to
prevent them wiping unintentionally in intermit-
tent or sensor operation)
– External antennas (always unscrew)
– Rear spoiler
– Wheels (the wider the rim and the lower the tire height, the greater the risk of damage)
– High-gloss wheels (to prevent these from get- ting scratched, do not clean with the wheel-
cleaning brushes of the car wash).
f Please consult the operator before using auto-
matic car washes.
f Wash and dry by hand all points not reached by
a car wash, such as door and lid seams or
door sills.
Note
Automatic car washes spray water at odd angles
and high pressures, which are not seen in normal
driving. Therefore, water can sometimes find its
way into the passengers compartment during or
shortly after the car wash.
Page 234 of 294

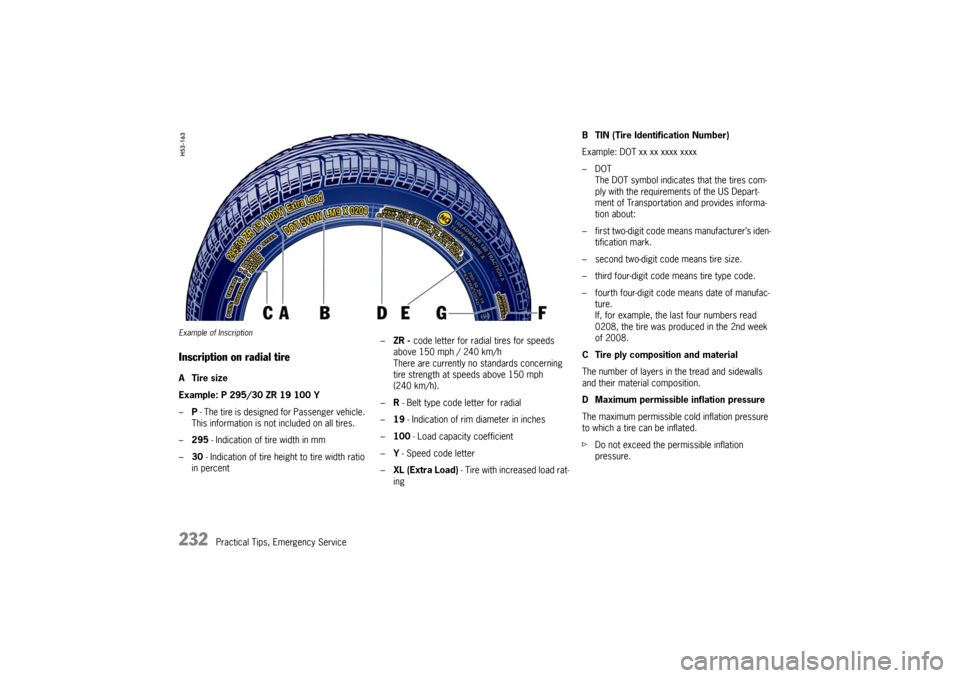
232
Practical Tips, Emergency Service
Example of InscriptionInscription on radial tireATire size
Example: P 295/30 ZR 19 100 Y
–P - The tire is designed for Passenger vehicle.
This information is not included on all tires.
– 295 - Indication of tire width in mm
– 30 - Indication of tire height to tire width ratio
in percent –
ZR - code letter for radial tires for speeds
above 150 mph / 240 km/h
There are currently no standards concerning
tire strength at speeds above 150 mph
(240 km/h).
– R - Belt type code letter for radial
– 19 - Indication of rim diameter in inches
– 100 - Load capacity coefficient
– Y - Speed code letter
– XL (Extra Load) - Tire with increased load rat-
ing
B TIN (Tire Identification Number)
Example: DOT xx xx xxxx xxxx
–DOT
The DOT symbol indicates that the tires com-
ply with the requirements of the US Depart-
ment of Transportation and provides informa-
tion about:
– first two-digit code means manufacturer’s iden- tification mark.
– second two-digit code means tire size.
– third four-digit code means tire type code.
– fourth four-digit code means date of manufac- ture.
If, for example, the last four numbers read
0208, the tire was produced in the 2nd week
of 2008.
C Tire ply composition and material
The number of layers in the tread and sidewalls
and their material composition.
D Maximum permissible inflation pressure
The maximum permissible cold inflation pressure
to which a tire can be inflated.
f Do not exceed the permissible inflation
pressure.
Page 266 of 294

264
Practical Tips, Emergency Service
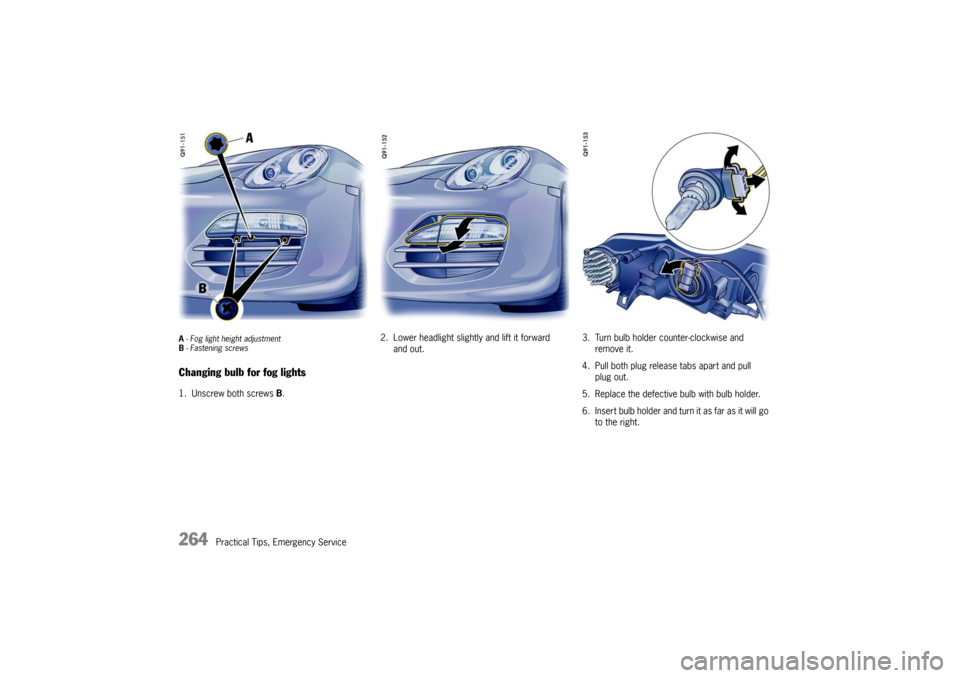
A- Fog light height adjustment
B -Fastening screwsChanging bulb for fog lights1. Unscrew both screws B. 2. Lower headlight slightly and lift it forward
and out. 3. Turn bulb holder counter-clockwise and
remove it.
4. Pull both plug release tabs apart and pull plug out.
5. Replace the defective bulb with bulb holder.
6. Insert bulb holder and turn it as far as it will go to the right.
Page 284 of 294

282
Technical Data
Weights
Dimensions BoxsterManual transmissionPorsche Doppelkupplung
Empty weight (depending on equipment) 2943 lbs. to 3153 lbs. 3009 lbs. to 3230 lbs.
1335 kg to 1430 kg 1365 kg to 1465 kg
Maximum gross weight 3605 lbs./1635 kg 3682 lbs./1670 kg
Maximum axle load, front* 1731 lbs./785 kg1731 lbs./785 kg
Maximum axle load, rear* 2017 lbs./915 kg 2017 lbs./915 kg
Boxster S Manual transmissionPorsche Doppelkupplung
Empty weight (depending on equipment) 2987 lbs. to 3175 lbs. 3042 lbs. to 3241 lbs.
1355 kg to 1440 kg 1380 kg to 1470 kg
Maximum gross weight 3627 lbs./1645 kg 3693 lbs./1675 kg
Maximum axle load, front* 1731 lbs./785 kg1731 lbs./785 kg
Maximum axle load, rear* 2072 lbs./940 kg 2072 lbs./940 kg
*The maximum gross weight must not be exceeded. Note: If additional accessories are installed, the useful load will be correspondingly less.
BoxsterBoxster S
Length 172.1 in./4372 mm
172.1 in./4372 mm
Width 70.9 in./1801 mm
70.9 in./1801 mm
Width with door mirrors 76.9 in./1952 mm
76.9 in./1952 mm
Height 50.9 in./1292 mm, with PASM 50.5 in./1282 mm
50.9 in./1294 mm, with PASM 50.6 in./1284 mm
Wheelbase 95.1 in./2415 mm
95.1 in./2415 mm
Ground clearance 4.4 in./112 mm, with PASM 4.1 in./105 mm
4.3 in./109 mm, with PASM 4.0 in./101 mm
Tu r n i n g c i rc l e 36.4 ft./11.1 m
36.4 ft./11.1 m