2010 PORSCHE BOXSTER S driver seat adjustment
[x] Cancel search: driver seat adjustmentPage 31 of 294
Operation, Safety
29
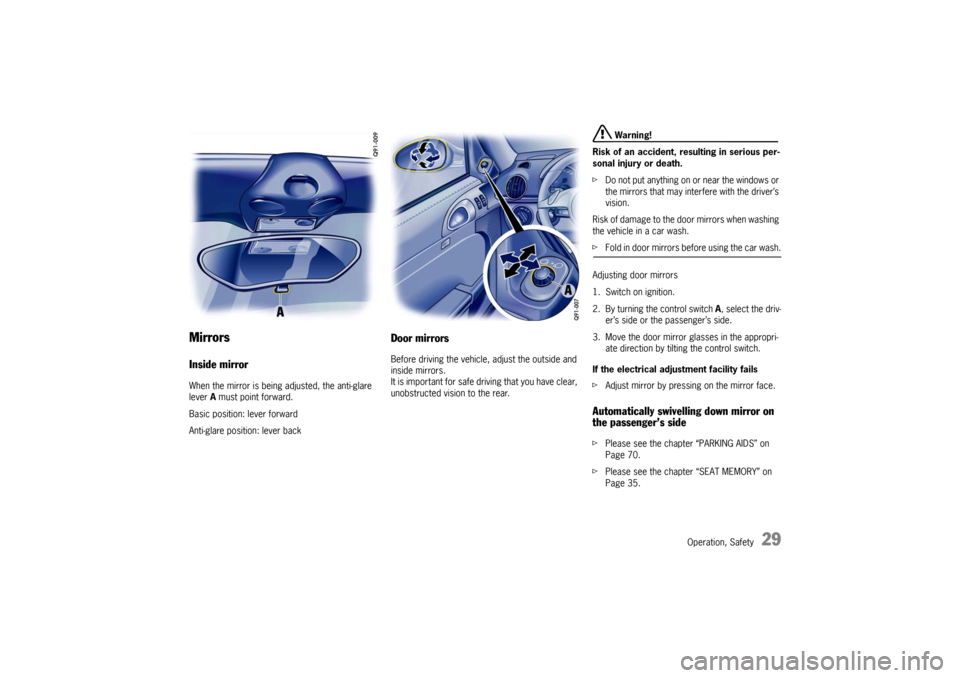
Mirrors Inside mirrorWhen the mirror is being adjusted, the anti-glare
lever A must point forward.
Basic position: lever forward
Anti-glare position: lever back
Door mirrorsBefore driving the vehicle, adjust the outside and
inside mirrors.
It is important for safe driving that you have clear,
unobstructed vision to the rear.
Warning!
Risk of an accident, resulting in serious per-
sonal injury or death.
f Do not put anything on or near the windows or
the mirrors that may interfere with the driver’s
vision.
Risk of damage to the door mirrors when washing
the vehicle in a car wash.
f Fold in door mirrors before using the car wash.
Adjusting door mirrors
1. Switch on ignition.
2. By turning the control switch A, select the driv-
er’s side or the passenger’s side.
3. Move the door mirror glasses in the appropri- ate direction by tilting the control switch.
If the electrical adjustment facility fails
f Adjust mirror by pressing on the mirror face.Automatically swivelling down mirror on
the passenger’s sidefPlease see the chapter “PARKING AIDS” on
Page 70.
f Please see the chapter “SEAT MEMORY” on
Page 35.
Page 34 of 294
32
Operation, Safety
Seat Adjustment and Head
Restraints
Warning!
The seat may move unexpectedly if you
attempt to adjust while driving. This could
cause sudden loss of control, resulting in se-
rious personal injury or death.
f Do not adjust seats while the vehicle is in mo-
tion.
The backrest locks must be engaged at all
times while the vehicle is in motion.
Safety belts only offer protection when the
backrest is upright and the belts are properly
positioned on the body.
Improperly positioned sa fety belts or safety
belts worn by passengers in an excessively
reclined position can cause serious personal
injury or death in an accident.
f Do not operate the car with the driver or
passenger backrests excessively reclined
(see “Seat position”).
Risk of injury if persons or animals are in the
movement range of the seat during seat
adjustment.
f Adjust the seat so that no-one is put at risk.
Caution!
Risk of damage to windshield, sun visor, etc.
when the seat is adjusted or folded back or
forward.
f Adjust the seat so that the s e a t b a c k re s t i s n o t in contact with any other object.
The driver and passenger seats provide
integrated head restraints in the backrests. The
head restraints are not adjustable. Warning!
All occupants, including the driver, should not
operate a vehicle or sit in a vehicle's seat until the
head restraints and backrests, respectively, are
placed in their proper posi tions so that the risk of
neck injuries is minimize d in the event of a crash.
For proper positioning of the head restraint, the
seatback's inclination should be adjusted such
that the head restraint is in an upright position.
Driver and passenger should be seated upright
and in the center of their seats.
Seat positionAn ergonomically correct sitting position is
important for safe and fatigue-free driving.
We recommend the following procedure for adjust-
ing the driver’s seat to suit individual
requirements:
1. Vehicles with manual transmission:
Adjust the seat until, with the clutch pedal fully
depressed, your leg remains at a slight angle.
Vehicles with Porsche Doppelkupplung
(PDK):
Adjust the seat until, with your left foot on the
footrest, your left leg remains at a slight angle.
2. Rest your outstretched arm on the steering wheel.
Set the backrest angle (not applicable for
Sports bucket seat) and the steering-wheel
position so that your wr ist rests on the outer
rim of the steering wheel. At the same time,
the shoulders must still be in noticeable
contact with the backrest.
3. Adjust the seat height (not applicable for
Sports bucket seat) to give yourself enough
headroom and a good overview of the vehicle.
4. Electrically adjustable seat: Adjust the seat angle until your thighs rest
lightly on the seat cushion.
Page 35 of 294
Operation, Safety
33
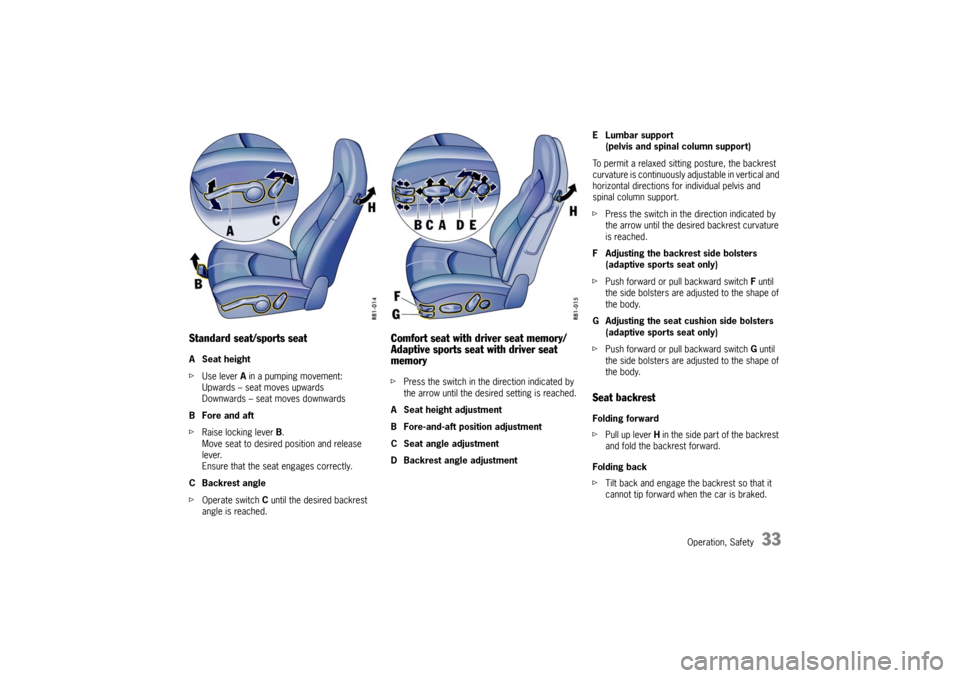
Standard seat/sports seatA Seat height
fUse lever A in a pumping movement:
Upwards – seat moves upwards
Downwards – seat moves downwards
B Fore and aft
f Raise locking lever B.
Move seat to desired position and release
lever.
Ensure that the seat engages correctly.
CBackrest angle
f Operate switch C until the desired backrest
angle is reached.
Comfort seat with driver seat memory/
Adaptive sports seat with driver seat
memoryf Press the switch in the direction indicated by
the arrow until the desired setting is reached.
A Seat height adjustment
B Fore-and-aft position adjustment
C Seat angle adjustment
D Backrest angle adjustment E Lumbar support
(pelvis and spinal column support)
To permit a relaxed sitting posture, the backrest
curvature is continuously adjustable in vertical and
horizontal directions for individual pelvis and
spinal column support.
f Press the switch in the direction indicated by
the arrow until the desired backrest curvature
is reached.
F Adjusting the backrest side bolsters (adaptive sports seat only)
f Push forward or pull backward switch F until
the side bolsters are adjusted to the shape of
the body.
G Adjusting the seat cushion side bolsters (adaptive sports seat only)
f Push forward or pull backward switch G until
the side bolsters are adjusted to the shape of
the body.
Seat backrestFolding forward
f Pull up lever H in the side part of the backrest
and fold the backrest forward.
Folding back
f Tilt back and engage the backrest so that it
cannot tip forward when the car is braked.
Page 37 of 294
Operation, Safety
35
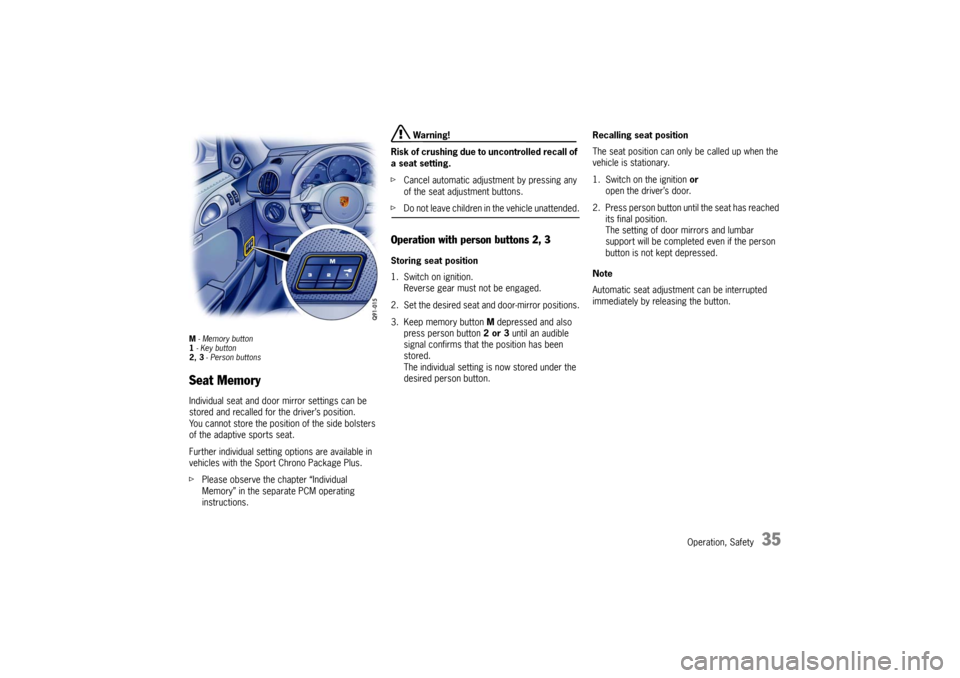
M - Memory button
1 - Key button
2, 3 - Person buttonsSeat MemoryIndividual seat and door mirror settings can be
stored and recalled for the driver’s position.
You cannot store the position of the side bolsters
of the adaptive sports seat.
Further individual setting options are available in
vehicles with the Sport Chrono Package Plus.
f Please observe the chapter “Individual
Memory” in the separate PCM operating
instructions.
Warning!
Risk of crushing due to uncontrolled recall of
a seat setting.
f Cancel automatic adjustment by pressing any
of the seat adjustment buttons.
fDo not leave children in the vehicle unattended.Operation with person buttons 2, 3Storing seat position
1. Switch on ignition.
Reverse gear must not be engaged.
2. Set the desired seat and door-mirror positions.
3. Keep memory button M depressed and also
press person button 2 or 3 until an audible
signal confirms that the position has been
stored.
The individual setting is now stored under the
desired person button. Recalling seat position
The seat position can only
be called up when the
vehicle is stationary.
1. Switch on the ignition or
open the driver’s door.
2. Press person button until the seat has reached its final position.
The setting of door mirrors and lumbar
support will be completed even if the person
button is not kept depressed.
Note
Automatic seat adjustment can be interrupted
immediately by releasing the button.
Page 38 of 294

36
Operation, Safety
Operating with the remote control of the
vehicle keyEach remote control (up to six) can be assigned an
individual seat and door mirror position.
The stored seat and door mirror position is set au-
tomatically when the vehicle is unlocked using the
corresponding remote control.
Storing seat position
1. Switch the ignition on with the desired car key.Reverse gear must not be engaged.
2. Set the desired seat and door-mirror positions.
3. Keep memory button M depressed and also
press key button 1 until an audible signal
confirms that the position has been stored.
The individual setting is now assigned to this
remote control and to the key button.
It is necessary to wait for at least 15 seconds
between locking and unlocking the door. Storing individual lowered position of the
passenger’s door mirror as a parking aid
Once the driver's seat setting has been stored, an
individual lowered position of the passenger's
door mirror may be stored for driving in reverse:
1. Apply the handbrake.
2. Switch the ignition on
with the desired car key.
3. Engage reverse gear.
4. Select passenger side with mirror switch. The passenger’s mirror swivels downwards.
5. Set passenger’s door mirror to desired final position.
6. Keep memory button M depressed and also
press key button 1 until an audible signal
confirms that the position has been stored.
The individual setting is now assigned to this
remote control and to the key button. Recalling seat position
f
Unlock the locked vehicle or the luggage
compartment with the remote control.
The stored seat position is automatically set.
The seat position assigned to a remote control
can also be recalled with the key button 1 if the
corresponding key was used to switch on the
ignition.
If no seat position has be en assigned to a remote
control, the key button will not work.
Note on operation
Automatic seat adjustment can be interrupted
immediately:
f by switching on the ignition,
f by pressing the central locking button,
f by pressing any memory or seat adjustment
button.
Clearing the stored seat position
1. Switch the ignition on with the desired car key.
2. Press memory button twice and key button 1
once consecutively.
Page 48 of 294
46
Operation, Safety
Seat adjustment for the passenger's seat Danger!
Safety belts only offer protection when the
backrest is upright and the belts are properly
positioned on the body. Improperly positio-
ned safety belts can cause serious personal
injury or death in an accident.
f Do not operate the car with the driver or pas-
senger backrest excessively reclined.
f Porsche recommends the use of L.A.T.C.H.
(L ower Ancorage and Tether for Ch ildren)
equipped Porsche child seat.
Do not install a child restraint system in
the Sports bucket seat.
The Sports bucket seat cannot be equipped with the LATCH system.
If the seat is in an extreme position (e.g., the back-
rest is in contact with the engine compartment
wall), the backrest can warp. Warping of the back-
rest can lead to malfunctions.
f Correct the seat adjustment.
Ensure that the seat is not jammed and is self-
supporting.
Ensure that the backrest is in the upright posi-
tion. f
Do not transport a load and objects behind and
under the passenger's seat.
If the load or objects ar e under the seat, it can
cause malfunctions.
If the weight on the passenger's seat is reduced
significantly, e.g., by supporting weight on the
armrest, the passenger's airbag can be switched
off.
f Select an upright seat position, and do not sup-
port weight on the armrests or lean out of the
window.
Always keep feet in the footwell while driving.
Do not put feet on the dashboard or the seat
area. Do not lean against the inside of the door
or outside the window while the vehicle is mo-
ving.
If the passenger's seat is warped significantly, a
message is displayed on the on-board computer:
f Correct the seat adjustment.
f Please see the chapter “WARNINGS ON THE
INSTRUMENT PANEL AND THE ON-BOARD
COMPUTER” on Page 162.
Vehicle modifications to accommodate
persons with disabilities
Because modifications to your vehicle could com-
promise your advanced airbag system, please call
1-800-PORSCHE prior to ha ving your vehicle modi-
fied. Automatic deactivation of the passenger’s
airbags
Danger!
The use of a child restraint system in the pas-
senger seat can result in serious personal
injury or death to the child from an airbag
deployment.
f Please see the chapter “PASSENGER AIRBAG
OFF INDICATOR LAMP DOES NOT LIGHT UP”
on Page 47.
f Before transporting a child on the passenger’s
seat:
Please see the chapter “CHILD RESTRAINT
SYSTEMS” on Page 50.
f Do not install a child restraint system in the Sports bucket seat.
– When an up to one-year old child is seated
in the child restraint system, the front airbag is
automatically deactivated on the passenger
side.
– When an adult is seated in the front seat the front airbag remains active on the passenger‘s
side.
Page 73 of 294

Operation, Safety
71
Limits of ultrasonic measurement
The parking assistant system cannot detect:
– sound-absorbing obstacles (e.g. powder snow),
– sound-reflecting obstacles (e.g. glass surfac- es, flat painted surfaces)
– and very thin obstacles.
– Other ultrasound sources (e.g. pneumatic brakes of other vehicles, jackhammers) can
interfere with detection of obstacles.
Fault indication
The parking assistant system indicates a fault in
two ways:
– After reverse gear has been selected, the short signal tone is followed by a continuous
tone of the same pitch:
This indicates that sensors are soiled or cov-
ered with ice.
– After reverse gear has been selected, the short signal tone is followed by a continuous
tone with a much lower pitch:
This indicates a general system fault.
Please have the fault remedied at an author-
ized Porsche dealer. A
- Control switch for door mirror adjustment Swivelling down mirror glass as a parking
aidf
Please see the chapter “SEAT MEMORY” on
Page 35.
– When reverse gear is engaged, the mirror glass on the passenger’s side swivels down
slightly to show the curb area. Preconditions
– Vehicle must be equipped with seat memory.
– Set the control switch
A to “passenger’s side”.
– Reverse gear must be engaged.
Returning mirror glass to its original position
f Drive forwards with a speed of over 4 mph
(6 km/h) or
f Set the control switch A to “driver’s side”.
Page 269 of 294

Practical Tips, Emergency Service
267
Adjusting HeadlightsfPlease see the chapter “LIGHTS, REPLACING
BULBS” on Page 257.
Adjustment
The adjustment is made wi th the vehicle ready to
drive and the fuel tank completely filled.
The driver’s seat must be loaded by a person or a
165 lbs. (75 kg) weight and the tire pressures
must meet the prescribed values.
After being loaded, the car must be rolled a few
meters so that the suspension can settle.
For checking the headlight adjustment, the verti-
cal position of the cutoff of the lowbeam (see fig.)
has to be projected on a ve rtical screen (wall) in
distance of 24.6 ft. (7.5 m) from the front lens of
the headlamp.
The correct position of the cutoff is 2.0 in. (5 cm)
at 24.6 ft. or 7.5 m (0.4 °) below a horizontal line,
x cm from ground to the center of the headlamp
lens. Lateral adjustment of the
headlights should be
carried out at a specialist workshop with an optical
adjustment unit.
Distance
Visual aim shall be perf ormed at not less than
24.6 ft./7.5 m (this value is a rounded down con-
version from the 25-foot distance typical of field
aim using a screen). The 24.6 ft./7.5 m distance
is measured from the headlamp lens to the view-
ing screen.