Page 17 of 28

15
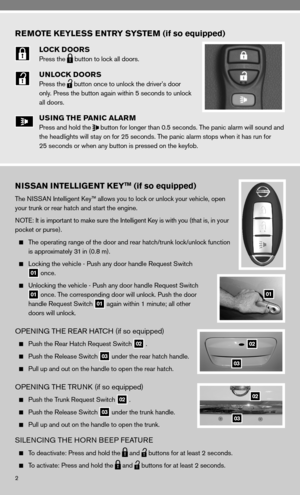
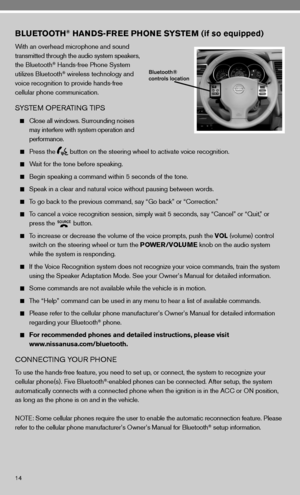
cOnnecTinG PROcedu Re
n OTe: The vehicle must be stationary when connecting the phone.
1. Press the
button on the steering wheel. The system announces the available commands.
2. Say “connect Phone.”
3. The system acknowledges the previous command and announces the next set of available
commands. Say “Add phone.”
4. initiate connecting from the phone.
The connecting procedure varies according to each cellular phone model. for detailed
connecting instructions and a list of compatible phones, please visit
www.nissanusa.com/bluetooth.
When prompted for a Passkey code, enter “1234” from the handset. (The Passkey code is
assigned by ni SSAn and cannot be changed.)
5. Say a name for the phone when the system asks you to provide one. You can give the phone
a name of your choice.
MAkin G A PHO ne cALL
1. Press the
button.
2. After the tone, do one of the following:
Say “call.” After the system responds, say the name of the person in the phonebook.
Say “ call Phone number.” After waiting for the tone, say [number]. for example, say
“call Phone number.” After waiting for the tone, say “123-456-7891.”
Say “Redial” to redial the previous phone number.
Say “ call Phone number.” After the system responds, say “Special number” to dial more
than 10 digits or special characters.
You can say all the digits of a 7- or 10-digit phone number at one time.
f or a 10-digit number, saying the phone number in groups of 3, 3 and 4 digits may improve
recognition for some speakers. To use this group dialing method, say only the first 3 digits
of the phone number. After the system recognizes the number, it will request the next 3
digits and finally the last 4 digits.
i f a phone number is incorrectly recognized, you can try entering the phone number again
using the 3–3–4 group dialing procedure by saying “correction.”
When you have finished speaking the phone number wait for the system to repeat it back to
you, then say “dial.”
ReceiVin G/endin G A PHO ne cALL
When you receive a phone call, a ring tone sounds through the audio syste\
m.
To accept the call, press the
button. To reject the call, press the
button.
To hang up the phone at the end of a call or to disconnect during call pl\
acement, press
the
button.
Page 18 of 28

16
HOW TO SAY nuMBeRS
ni SSAn voice recognition permits numbers to be spoken in a variety of ways.
Say “zero” or “oh” for “0.” example: 1-800-662-6200 – Say “one eight zero zero six six two
six two oh oh.”
Say “pound” for “#.” Say “star” for “*” (available when using the “ call Phone number” then
“Special number” command and the “Send” command during a call).
Say “plus” for “+” (available only when using the “ call Phone number” then “Special
number” command).
Say “pause” for a 2-second pause.
uSinG YOu R PHOneBOOk
When a phone is connected to the system, the phonebook is automatically d\
ownloaded. This
allows you to access your phonebook from the Bluetooth® system to call contacts by name.
up to 1,000 contacts will be transferred. To access your phonebook:
1. Press the
button and wait for the tone.
2. Say “Phonebook.”
3. Wait for the tone, then say [a name] or say “List names.” The name must be said exactly as
it is entered in your phonebook for the system to recognize it. for example, say “Phonebook”
then after the system responds, say “Michelle.”
The phonebook can transfer multiple numbers for each entry. if you select a name with multiple
numbers, the system will ask you which number you want to dial.
The system allows for up to 40 voice tags to be recorded. You can record a voice tag for phone-
book entries that the system has difficulty recognizing or to directly\
dial an entry with multiple
numbers. To record a voice tag:
1. Press the
button and wait for the tone.
2. Say “Phonebook.”
3. Wait for the tone, then say [a name] or say “List names.” Select the name for which you want
to record a voice tag.
4. Say “Record name.”
Page 19 of 28

GeTTin G STARTed
The navigation System begins when the ignition is placed in the A cc or O n position. Park the
vehicle in a safe location and")
17
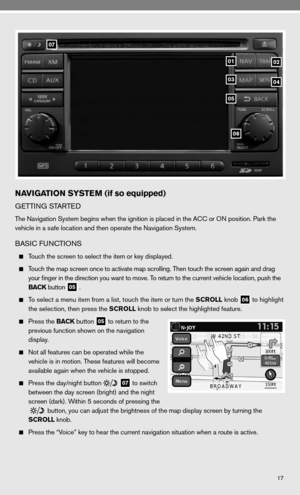
06
07
0102
05
0304
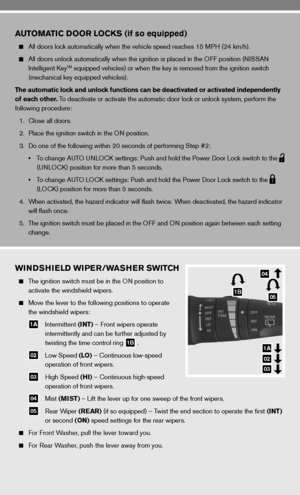
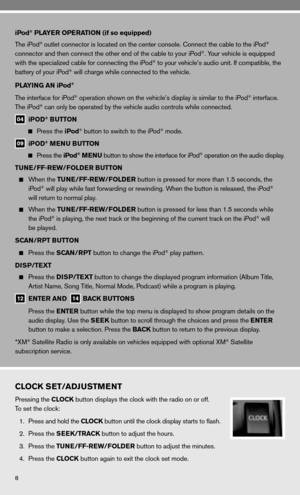
NAVIGATION SYSTEM (if so equipped)
GeTTin G STARTed
The navigation System begins when the ignition is placed in the A cc or O n position. Park the
vehicle in a safe location and then operate the navigation System.
BASic func TiOnS
Touch the screen to select the item or key displayed.
Touch the map screen once to activate map scrolling. Then touch the screen again and drag
your finger in the direction you want to move. To return to the current vehicle location, push the
BACK button
05 .
To select a menu item from a list, touch the item or turn the SCROLL knob
06 to highlight
the selection, then press the SCROLL knob to select the highlighted feature.
Press the BACK button
05 to return to the
previous function shown on the navigation
display.
not all features can be operated while the
vehicle is in motion. These features will become
available again when the vehicle is stopped.
Press the day/night button
07 to switch
between the day screen (bright) and the night
screen (dark). Within 5 seconds of pressing the
button, you can adjust the brightness of the map display screen by turning the
SCROLL knob.
Press the “Voice” key to hear the current navigation situation when a route is ac\
tive.
Page 20 of 28
18
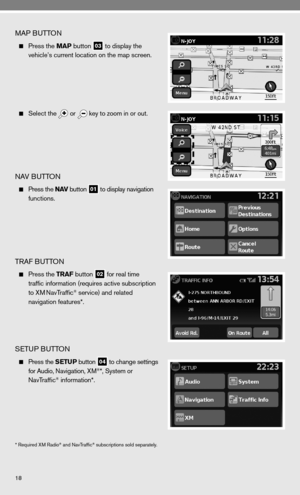
MAP BuTTOn
Press the MAP button
03 to display the
vehicle’s current location on the map screen.
Select the
or
key to zoom in or out.
nAV B
uTTOn
Press the N AV button
01 to display navigation
functions.
TRAf B uTTOn
Press the TRAF button
02 for real time
traffic information (requires active subscription
to XM
navTraffic® service) and related
navigation features*.
SeTu P BuTTO n
Press the SETUP button
04 to change settings
for Audio, navigation, XM®*, System or
navTraffic® information*.
* Required XM Radio® and navTraffic® subscriptions sold separately.
Page 21 of 28
19
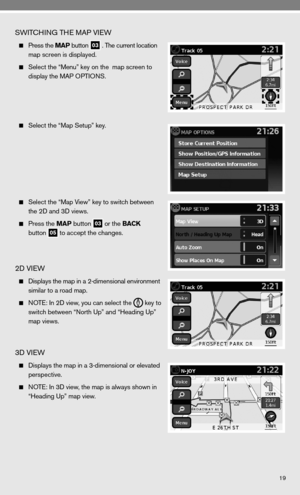
SWiTc Hin G TH e MAP VieW
Press the MAP button
03 . The current location
map screen is displayed.
Select the “Menu” key on the map screen to
display the MAP OPTi OnS.
Select the “Map Setup” key.
Select the “Map View” key to switch between
the 2d and 3d views.
Press the MAP button
03 or the BACK
button
05 to accept the changes.
2d VieW
displays the map in a 2-dimensional environment
similar to a road map.
nOTe: in 2d view, you can select the
key to
switch between “ north up” and “Heading up”
map views.
3d VieW
displays the map in a 3-dimensional or elevated
perspective.
nOT e: in 3 d view, the map is always shown in
“Heading up” map view.
Page 22 of 28
20
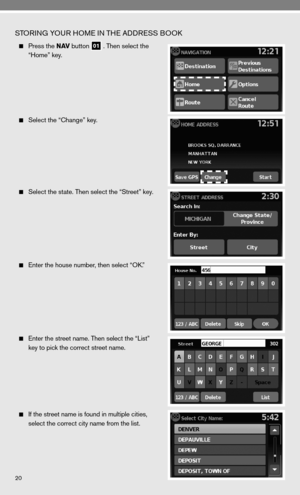
STORinG YO uR HOM e in TH e AddReSS BOO k
Press the N AV button
01 . Then select the
“Home” key.
Select the “change” key.
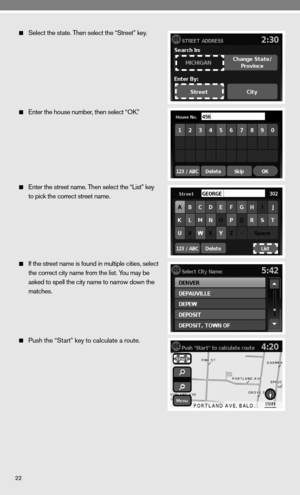
Select the state. Then select the “Street” key.
enter the house number, then select “O k.”
e nter the street name. Then select the “List”
key to pick the correct street name.
i f the street name is found in multiple cities,
select the correct city name from the list.
Page 23 of 28
21
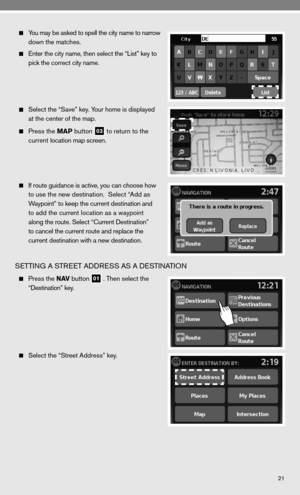
You may be asked to spell the city name to narrow
down the matches.
enter the city name, then select the “List” key to
pick the correct city name.
Select the “Save” key. Your home is displayed
at the center of the map.
Press the MAP button
03 to return to the
current location map screen.
i f route guidance is active, you can choose how
to use the new destination. Select “Add as
Waypoint” to keep the current destination and
to add the current location as a waypoint
along the route. Select “ current destination”
to cancel the current route and replace the
current destination with a new destination.
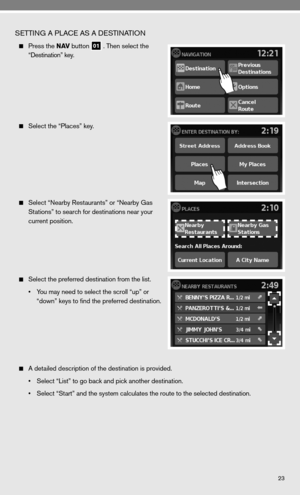
SeTTin G A STR eeT Add ReSS AS A de STinATiOn
Press the N AV button
01 . Then select the
“destination” key.
Select the “Street Address” key.
Page 24 of 28
22
Select the state. Then select the “Street” key.
enter the house number, then select “O k.”
e nter the street name. Then select the “List” key
to pick the correct street name.
if the street name is found in multiple cities, select
the correct city name from the list. You may be
asked to spell the city name to narrow down the
matches.
Push the “Start” key to calculate a route.