2010 NISSAN TIIDA timing
[x] Cancel search: timingPage 4 of 3745
2010
QUICK REFERENCE CHART: VERSA
QUICK REFERENCE CHART: VERSA
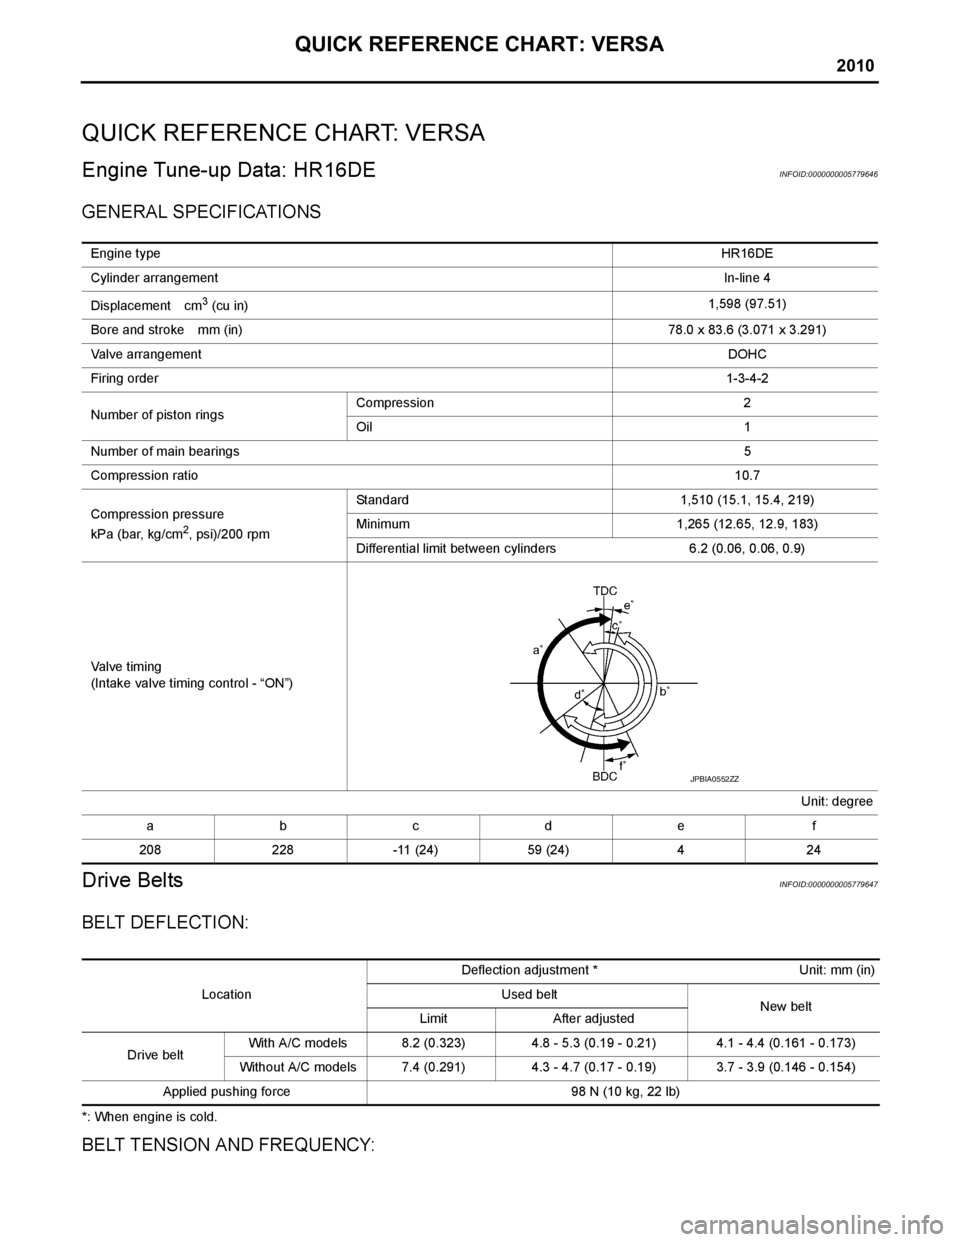
Engine Tune-up Data: HR16DEINFOID:0000000005779646
GENERAL SPECIFICATIONS
Drive BeltsINFOID:0000000005779647
BELT DEFLECTION:
*: When engine is cold.
BELT TENSION AND FREQUENCY:
Engine typeHR16DE
Cylinder arrangement In-line 4
Displacement cm
3 (cu in) 1,598 (97.51)
Bore and stroke mm (in) 78.0 x 83.6 (3.071 x 3.291)
Valve arrangement DOHC
Firing order 1-3-4-2
Number of piston rings Compression 2
Oil 1
Number of main bearings 5
Compression ratio 10.7
Compression pressure
kPa (bar, kg/cm
2, psi)/200 rpm Standard 1,510 (15.1, 15.4, 219)
Minimum 1,265 (12.65, 12.9, 183)
Differential limit between cylinders 6.2 (0.06, 0.06, 0.9)
Valve timing
(Intake valve timing control - “ON”) Unit: degree
abcde f
208 228 -11 (24) 59 (24) 4 24
JPBIA0552ZZ
Location Deflection adjustment * Unit: mm (in)
Used belt New belt
Limit After adjusted
Drive belt With A/C models 8.2 (0.323) 4.8 - 5.3 (0.19 - 0.21) 4.1 - 4.4 (0.161 - 0.173)
Without A/C models 7.4 (0.291) 4.3 - 4.7 (0.17 - 0.19) 3.7 - 3.9 (0.146 - 0.154)
Applied pushing force 98 N (10 kg, 22 lb)
Page 54 of 3745

A/T CONTROL SYSTEMAT-37
< SERVICE INFORMATION >
DE
F
G H
I
J
K L
M A
B
AT
N
O P
Control ValveINFOID:0000000005397228
FUNCTION OF CONTROL VALVES
Centrifugal Cancel MechanismINFOID:0000000005397229
FUNCTION
The centrifugal cancel mechanism is a mechanism to c ancel the centrifugal hydraulic pressure instead of the
conventional check balls. It cancels the centrifugal hy draulic pressure which is generated as high clutch drum
rotates, and it allows for preventing high clutch from dragging and for providing stable high clutch piston press-
ing force in all revolution speeds.
STRUCTURE/OPERATION
Valve name Function
Pressure regulator valve, plug and sleeve
plug Regulates oil discharged from the oil pump to provide optimum line pressure for all driving
conditions.
Pressure modifier valve and sleeve Used as a signal supplementary valve to the pressure regulator valve. Regulates pres- sure-modifier pressure (signal pressure) which controls optimum line pressure for all driv-
ing conditions.
Pilot valve Regulates line pressure to maintain a constant pilot pressure level which controls lock-up
mechanism, overrun clutch, shift timing.
Accumulator control valve Regulates accumulator back-pressure to pressure suited to driving conditions.
Manual valve Directs line pressure to oil circuits corresponding to select positions.
Hydraulic pressure drains when the shift lever is in Neutral.
Shift valve A Simultaneously switches three oil circuits using output pressure of shift solenoid valve A
to meet driving conditions (vehicle speed, throttle opening, etc.).
Provides automatic downshifting and upshifting (1GR → 2GR → 3GR → 4GR/4GR →
3GR → 2GR → 1GR) in combination with shift valve B.
Shift valve B Simultaneously switches two oil circuits using output pressure of shift solenoid valve B in
relation to driving conditions (vehicle speed, throttle opening, etc.).
Provides automatic downshifting and upshifting (1GR → 2GR → 3GR → 4GR/4GR →
3GR → 2GR → 1GR) in combination with shift valve A.
Overrun clutch control valve Switches hydraulic circuits to prevent engagement of the overrun clutch simultaneously
with application of the brake band in D
4. (Interlocking occurs if the overrun clutch engages
during D
4.)
1st reducing valve Reduces low & reverse brake pressure to dampen engine-brake shock when downshift-
ing from the 1st position 1
2 to 11.
Overrun clutch reducing valve Reduces oil pressure directed to the overrun clutch and prevents engine-brake shock.
In the 1st and 2nd positions, line pressure acts on the overrun clutch reducing valve to
increase the pressure-regulating point, with resultant engine brake capability.
Torque converter relief valve Prevents an excessive rise in torque converter pressure.
Torque converter clutch control valve, plug
and sleeve Activates or inactivates the lock-up function.
Also provides smooth lock-up through transient application and release of the lock-up
system.
1-2 accumulator valve and piston Lessens the shock find when the 2GR band servo contracts, and provides smooth shift-
ing.
3-2 timing valve Switches the pace that oil pressure is released depending on vehicle speed; maximizes
the high clutch release timing, and allows for soft downshifting.
Shuttle valve Determines if the overrun clutch solenoid valve should control the 3-2 timing valve or the
overrun clutch control valve and switches between the two.
Cooler check valve At low speeds and with a small load when a little heat is generated, saves the volume of
cooler flow, and stores the oil pressure for lock-up.
Revision: January 20102010 Versa
Page 84 of 3745
TROUBLE DIAGNOSISAT-67
< SERVICE INFORMATION >
DE
F
G H
I
J
K L
M A
B
AT
N
O P
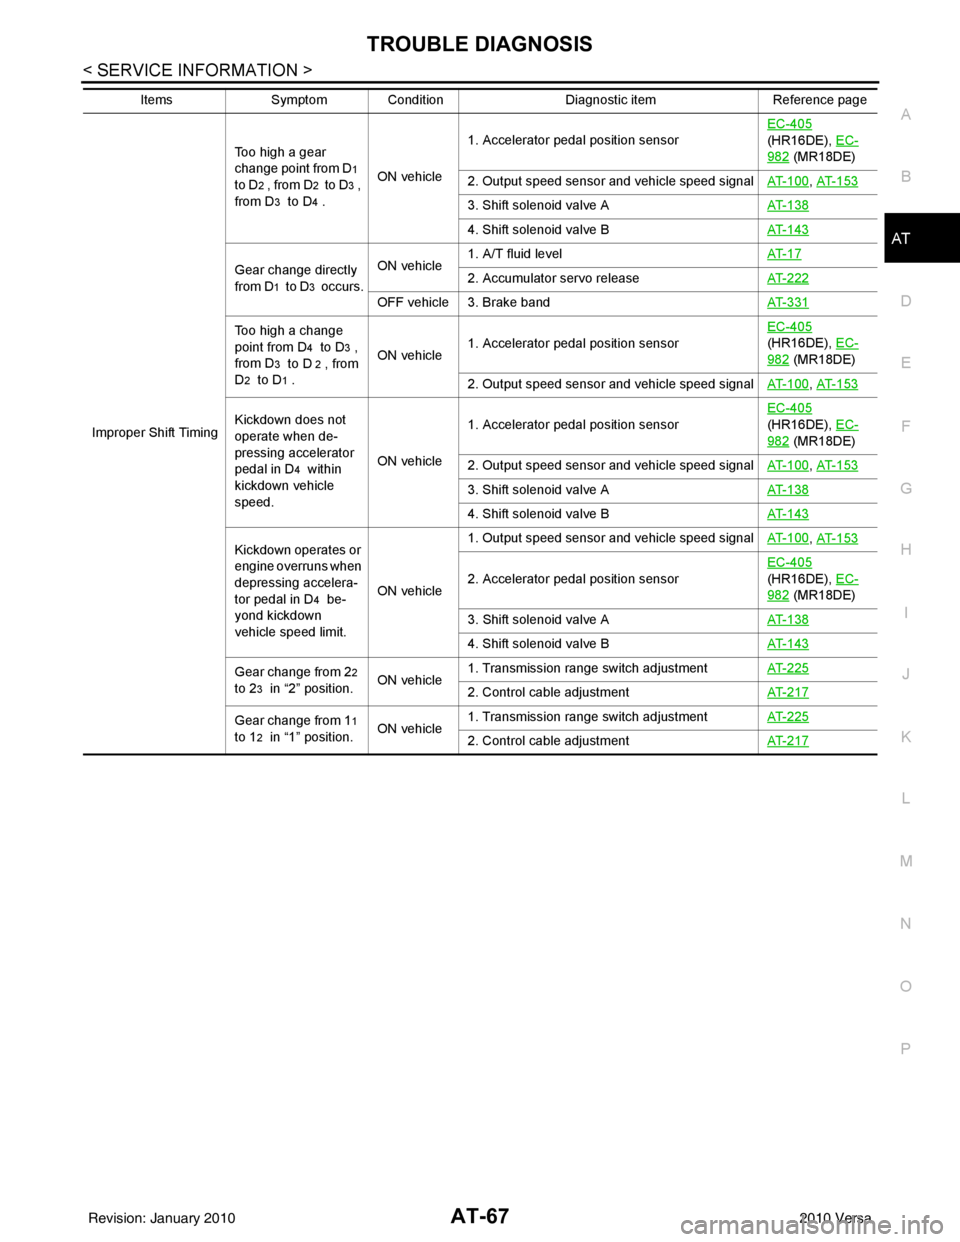
Improper Shift Timing Too high a gear
change point from D
1
to D
2 , from D2 to D3 ,
from D
3 to D4 . ON vehicle 1. Accelerator pedal position sensor
EC-405
(HR16DE), EC-
982 (MR18DE)
2. Output speed sensor and vehicle speed signal AT- 1 0 0
, AT- 1 5 3
3. Shift solenoid valve AAT- 1 3 8
4. Shift solenoid valve BAT- 1 4 3
Gear change directly
from D
1 to D3 occurs.ON vehicle
1. A/T fluid level
AT- 1 72. Accumulator servo releaseAT- 2 2 2
OFF vehicle 3. Brake band AT- 3 3 1
Too high a change
point from D
4 to D3 ,
from D
3 to D 2 , from
D
2 to D1 . ON vehicle
1. Accelerator pedal position sensor EC-405
(HR16DE), EC-
982 (MR18DE)
2. Output speed sensor and vehicle speed signal AT- 1 0 0
, AT- 1 5 3
Kickdown does not
operate when de-
pressing accelerator
pedal in D
4 within
kickdown vehicle
speed. ON vehicle
1. Accelerator pedal position sensor
EC-405
(HR16DE), EC-
982 (MR18DE)
2. Output speed sensor and vehicle speed signal AT- 1 0 0
, AT- 1 5 3
3. Shift solenoid valve AAT- 1 3 8
4. Shift solenoid valve BAT- 1 4 3
Kickdown operates or
engine overruns when
depressing accelera-
tor pedal in D
4 be-
yond kickdown
vehicle speed limit. ON vehicle1. Output speed sensor and vehicle speed signal
AT- 1 0 0
, AT- 1 5 3
2. Accelerator pedal position sensorEC-405
(HR16DE), EC-
982 (MR18DE)
3. Shift solenoid valve A AT- 1 3 8
4. Shift solenoid valve BAT- 1 4 3
Gear change from 22
to 2
3 in “2” position. ON vehicle1. Transmission range switch adjustment
AT- 2 2 52. Control cable adjustmentAT- 2 1 7
Gear change from 11
to 1
2 in “1” position. ON vehicle1. Transmission range switch adjustment
AT- 2 2 52. Control cable adjustmentAT- 2 1 7
ItemsSymptom Condition Diagnostic itemReference page
Revision: January 20102010 Versa
Page 94 of 3745
TROUBLE DIAGNOSISAT-77
< SERVICE INFORMATION >
DE
F
G H
I
J
K L
M A
B
AT
N
O P
*1: These terminals are connected to the data link connector.
*2: These terminals are connected to the ECM.
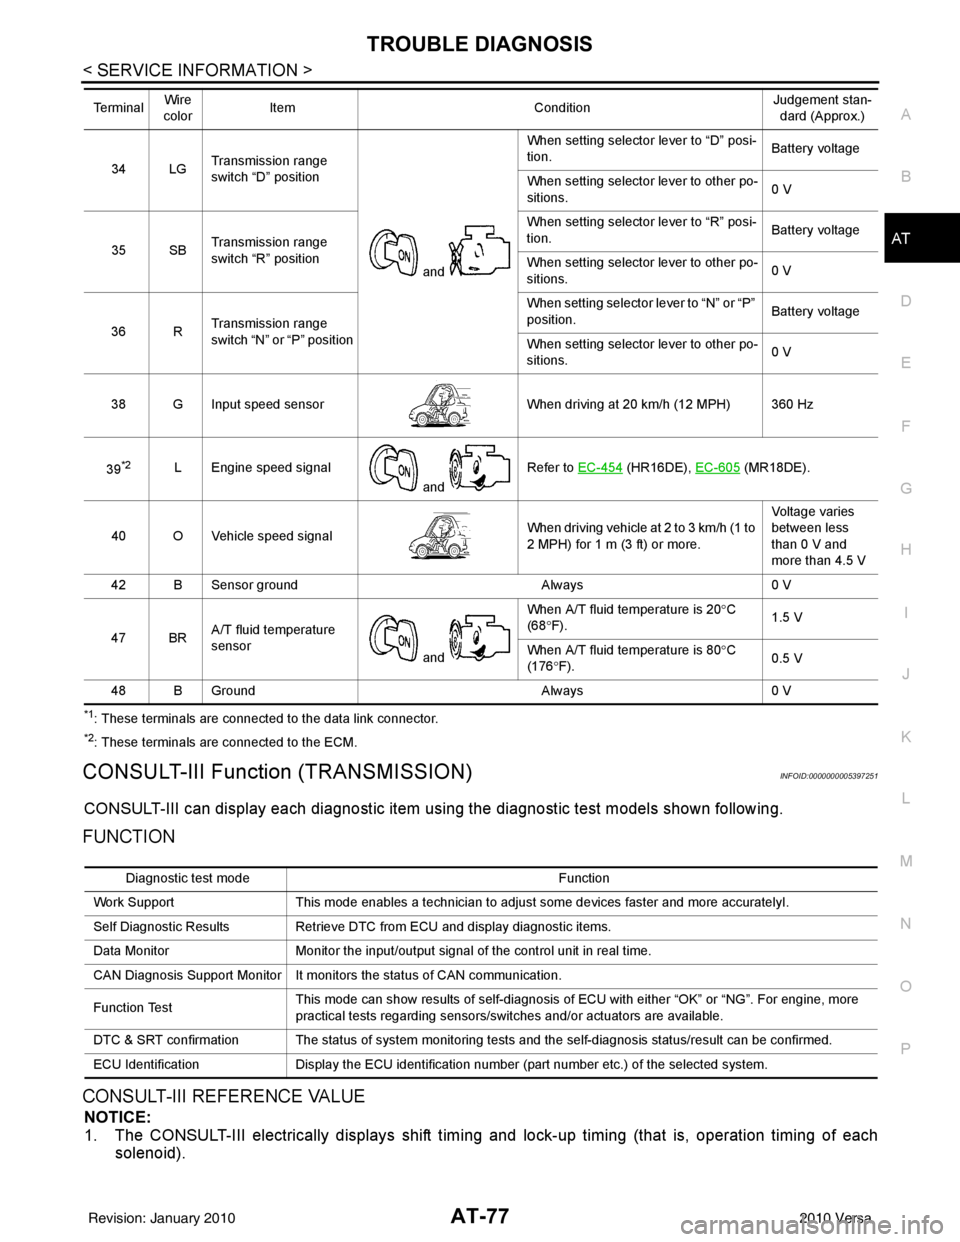
CONSULT-III Function (TRANSMISSION)INFOID:0000000005397251
CONSULT-III can display each diagnostic item using the diagnostic test models shown following.
FUNCTION
CONSULT-III REFERENCE VALUE
NOTICE:
1. The CONSULT-III electrically displays shift timi ng and lock-up timing (that is, operation timing of each
solenoid).
34 LG Transmission range
switch “D” position
and When setting selector lever to “D” posi-
tion.
Battery voltage
When setting selector lever to other po-
sitions. 0 V
35 SB Transmission range
switch “R” position When setting selector lever to “R” posi-
tion.
Battery voltage
When setting selector lever to other po-
sitions. 0 V
36 R Transmission range
switch “N” or “P” position When setting selector
lever to “N” or “P”
position. Battery voltage
When setting selector lever to other po-
sitions. 0 V
38 G Input speed sensor When driving at 20 km/h (12 MPH) 360 Hz
39
*2L Engine speed signal and Refer to EC-454 (HR16DE),
EC-605 (MR18DE).
40 O Vehicle speed signal When driving vehicle at 2 to 3 km/h (1 to
2 MPH) for 1 m (3 ft) or more.Voltage varies
between less
than 0 V and
more than 4.5 V
42 B Sensor ground Always0 V
47 BR A/T fluid temperature
sensor
and When A/T fluid temperature is 20°
C
(68 °F). 1.5 V
When A/T fluid temperature is 80° C
(176 °F). 0.5 V
48 B Ground Always0 V
Te r m i n a l
Wire
color Item
ConditionJudgement stan-
dard (Approx.)
Diagnostic test mode Function
Work Support This mode enables a technician to adjust some devices faster and more accuratelyI.
Self Diagnostic Results Retrieve DTC from ECU and display diagnostic items.
Data Monitor Monitor the input/output signal of the control unit in real time.
CAN Diagnosis Support Monitor It monitors the status of CAN communication.
Function Test This mode can show results of self-diagnosis of ECU with either “OK” or “NG”. For engine, more
practical tests regarding sensors/switches and/or actuators are available.
DTC & SRT confirmation The status of system monitoring tests and the self-diagnosis status/result can be confirmed.
ECU Identification Display the ECU identification number (part number etc.) of the selected system.
Revision: January 20102010 Versa
Page 95 of 3745

AT-78
< SERVICE INFORMATION >
TROUBLE DIAGNOSIS
Check for time difference between actual shift timing and the CONSULT-III display. If the difference is
noticeable, mechanical parts (except solenoids, sens ors, etc.) may be malfunctioning. Check mechanical
parts using applicable diagnostic procedures.
2. Shift schedule (which implies gear position) display ed on CONSULT-III and that indicated in Service Man-
ual may differ slightly. This occurs because of the following reasons:
- Actual shift schedule has more or less tolerance or allowance,
- Shift schedule indicated in Service Manual refers to the point where shifts start, and
- Gear position displayed on CONSULT-III indicates the point where shifts are completed.
3. Shift solenoid valve “A” or “B” is displayed on CONSUL T-III at the start of shifting. Gear position is dis-
played upon completion of shifting (which is computed by TCM).
Item name Condition Display value (Approx.)
VHCL/S SE-A/T During driving Approximately matches the speedometer
reading.
VHCL/S SE-MTR
THROTTLE POSI Released accelerator pedal.
0.0/8
Fully depressed accelerator pedal. 8.0/8
FLUID TEMP SE When A/T fluid temperature is 20
°C (68 °F). 1.5 V
When A/T fluid temperature is 80 °C (176 °F). 0.5 V
BATTERY VOLT When turning ignition switch to “ON”. Battery voltage
ENGINE SPEED Engine running Approximately matches the tachometer
reading.
INPUT SPEED During driving (lock-up ON) Approximately matche s the engine speed.
OVERDRIVE SW When overdrive control switch is depressed. ON
When overdrive control switch is released. OFF
PN POSI SW When setting selector lever
to “N” or “P” position. ON
When setting selector lever to other positions. OFF
R POSITION SW When setting selector lever to “R” position. ON
When setting selector lever to other positions. OFF
D POSITION SW When setting selector lever to “D” position. ON
When setting selector lever to other positions. OFF
2 POSITION SW When setting selector lever to “2” position. ON
When setting selector lever to other positions. OFF
1 POSITION SW When setting selector lever to “1” position. ON
When setting selector lever to other positions. OFF
CLOSED THL/SW Released accelerator pedal.
ON
Depressed accelerator pedal. OFF
W/O THRL/P-SW Fully depressed accelerator pedal.
ON
Released accelerator pedal. OFF
SHIFT S/V A When shift solenoid valve A operates.
(When driving in “D
1” or “D4”.)
ON
When shift solenoid valve A does not operate.
(When driving in “D
2” or “D3”.) OFF
SHIFT S/V B When shift solenoid valve B operates.
(When driving in “D
1” or “D2”.)
ON
When shift solenoid valve B does not operate.
(When driving in “D
3” or “D4”.) OFF
Revision: January 20102010 Versa
Page 179 of 3745
AT-162
< SERVICE INFORMATION >
INPUT SPEED SENSOR A
INPUT SPEED SENSOR A
DescriptionINFOID:0000000005397371
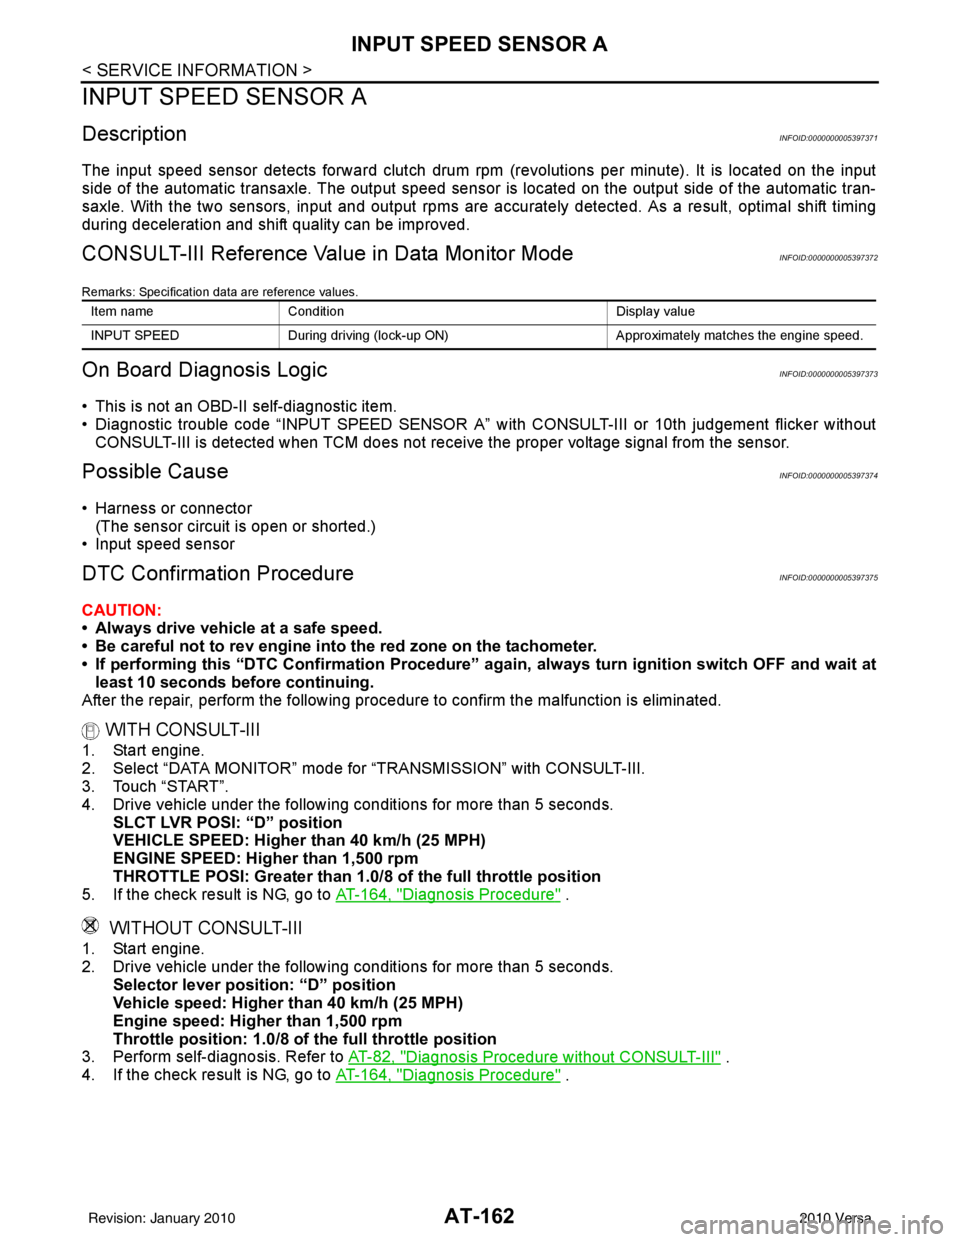
The input speed sensor detects forward clutch drum rpm (revolutions per minute). It is located on the input
side of the automatic transaxle. The output speed sensor is located on the output side of the automatic tran-
saxle. With the two sensors, input and output rpms are accurately detected. As a result, optimal shift timing
during deceleration and shift quality can be improved.
CONSULT-III Reference Value in Data Monitor ModeINFOID:0000000005397372
Remarks: Specification data are reference values.
On Board Diagn osis LogicINFOID:0000000005397373
• This is not an OBD-II self-diagnostic item.
• Diagnostic trouble code “INPUT SPEED SENSOR A” wi th CONSULT-III or 10th judgement flicker without
CONSULT-III is detected when TCM does not rece ive the proper voltage signal from the sensor.
Possible CauseINFOID:0000000005397374
• Harness or connector
(The sensor circuit is open or shorted.)
• Input speed sensor
DTC Confirmation ProcedureINFOID:0000000005397375
CAUTION:
• Always drive vehicle at a safe speed.
• Be careful not to rev engine into the red zone on the tachometer.
• If performing this “DTC Confirmation Procedure” again, always turn ignition switch OFF and wait at
least 10 seconds before continuing.
After the repair, perform the following proc edure to confirm the malfunction is eliminated.
WITH CONSULT-III
1. Start engine.
2. Select “DATA MONITOR” mode for “TRANSMISSION” with CONSULT-III.
3. Touch “START”.
4. Drive vehicle under the following conditions for more than 5 seconds.
SLCT LVR POSI: “D” position
VEHICLE SPEED: Higher than 40 km/h (25 MPH)
ENGINE SPEED: High er than 1,500 rpm
THROTTLE POSI: Greater than 1.0/ 8 of the full throttle position
5. If the check result is NG, go to AT-164, "
Diagnosis Procedure" .
WITHOUT CONSULT-III
1. Start engine.
2. Drive vehicle under the following conditions for more than 5 seconds.
Selector lever position: “D” position
Vehicle speed: Higher than 40 km/h (25 MPH)
Engine speed: Higher than 1,500 rpm
Throttle position: 1.0/8 of the full throttle position
3. Perform self-diagnosis. Refer to AT-82, "
Diagnosis Procedure without CONSULT-III" .
4. If the check result is NG, go to AT-164, "
Diagnosis Procedure" .
Item nameCondition Display value
INPUT SPEED During driving (lock-up ON) Approximately matches the en gine speed.
Revision: January 20102010 Versa
Page 309 of 3745
AT-292
< SERVICE INFORMATION >
REPAIR FOR COMPONENT PARTS
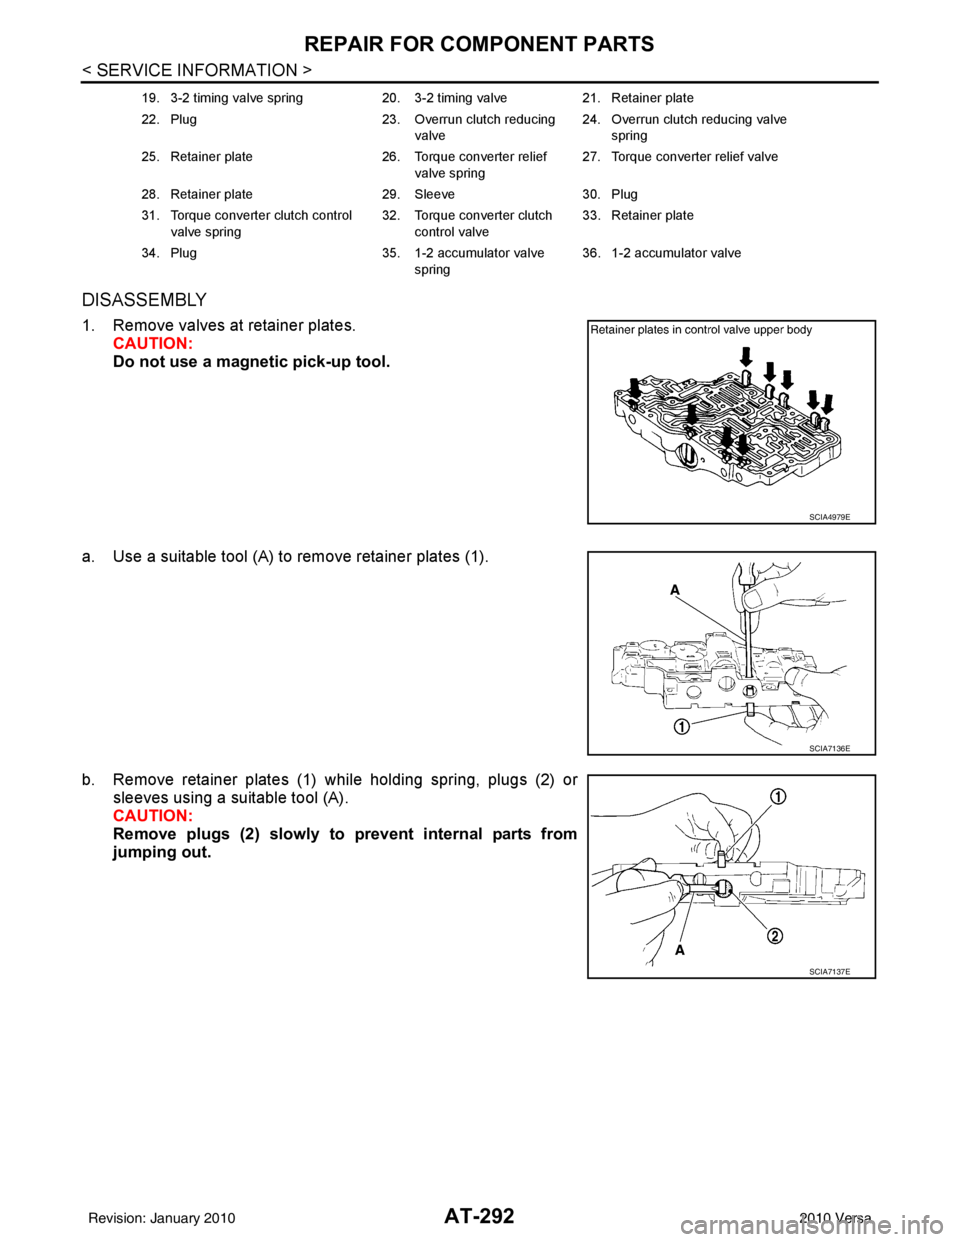
DISASSEMBLY
1. Remove valves at retainer plates.CAUTION:
Do not use a magnetic pick-up tool.
a. Use a suitable tool (A) to remove retainer plates (1).
b. Remove retainer plates (1) while holding spring, plugs (2) or sleeves using a suitable tool (A).
CAUTION:
Remove plugs (2) slowly to prevent internal parts from
jumping out.
19. 3-2 timing valve spring 20. 3-2 timing valve21. Retainer plate
22. Plug 23. Overrun clutch reducing
valve 24. Overrun clutch reducing valve
spring
25. Retainer plate 26. Torque converter relief
valve spring 27. Torque converter relief valve
28. Retainer plate 29. Sleeve30. Plug
31. Torque converter clutch control valve spring 32. Torque converter clutch
control valve 33. Retainer plate
34. Plug 35. 1-2 accumulator valve
spring 36. 1-2 accumulator valve
SCIA4979E
SCIA7136E
SCIA7137E
Revision: January 20102010 Versa
Page 311 of 3745
AT-294
< SERVICE INFORMATION >
REPAIR FOR COMPONENT PARTS
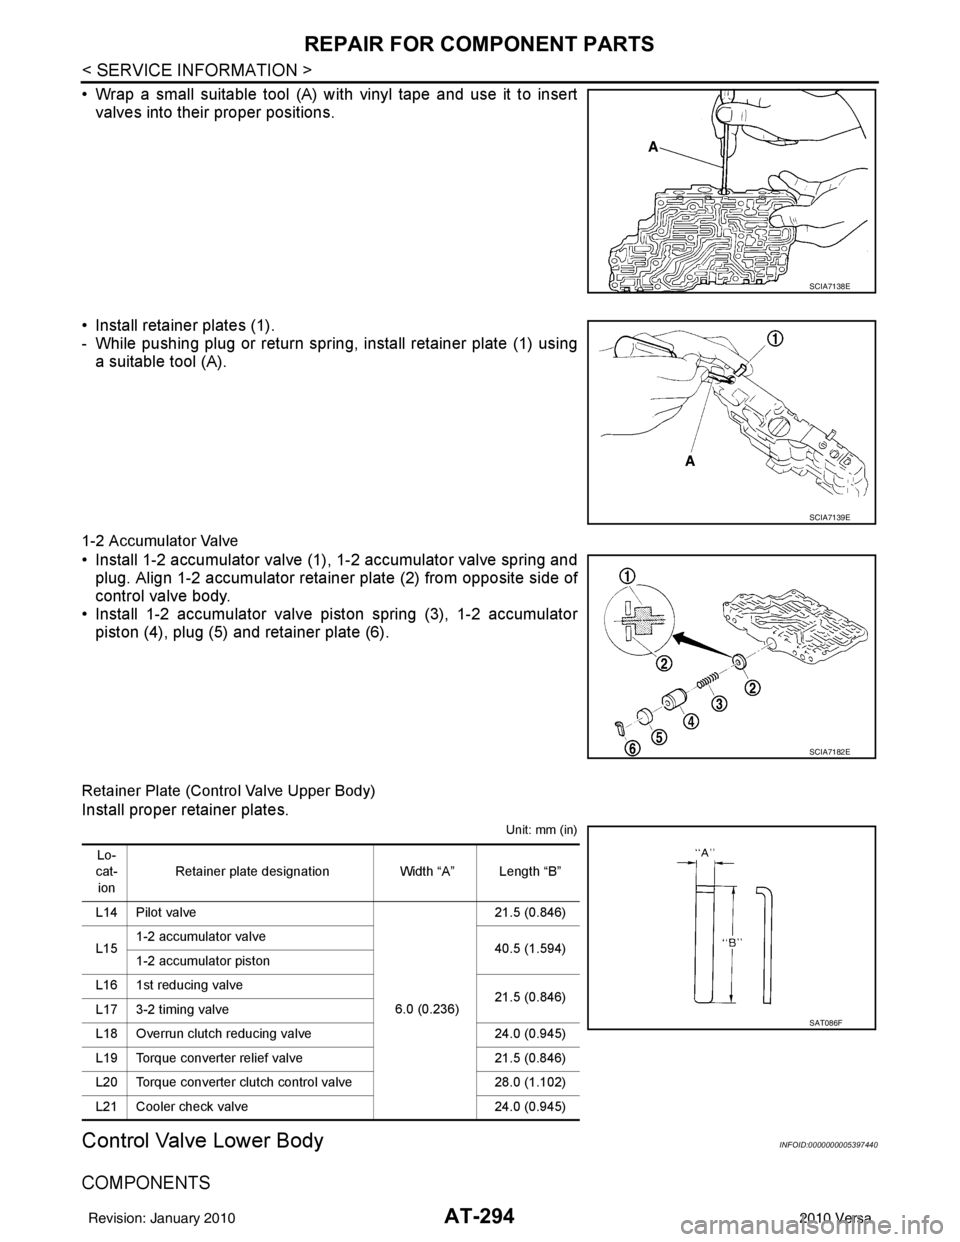
• Wrap a small suitable tool (A) with vinyl tape and use it to insertvalves into their proper positions.
• Install retainer plates (1).
- While pushing plug or return spring, install retainer plate (1) using a suitable tool (A).
1-2 Accumulator Valve
• Install 1-2 accumulator valve (1), 1-2 accumulator valve spring and
plug. Align 1-2 accumulator retainer plate (2) from opposite side of
control valve body.
• Install 1-2 accumulator valve piston spring (3), 1-2 accumulator
piston (4), plug (5) and retainer plate (6).
Retainer Plate (Control Valve Upper Body)
Install proper retainer plates.
Unit: mm (in)
Control Valve Lower BodyINFOID:0000000005397440
COMPONENTS
SCIA7138E
SCIA7139E
SCIA7182E
Lo-
cat-
ion Retainer plate designation
Width “A” Length “B”
L14 Pilot valve
6.0 (0.236)21.5 (0.846)
L15 1-2 accumulator valve
40.5 (1.594)
1-2 accumulator piston
L16 1st reducing valve 21.5 (0.846)
L17 3-2 timing valve
L18 Overrun clutch reducing valve 24.0 (0.945)
L19 Torque converter relief valve 21.5 (0.846)
L20 Torque converter clutch control valve 28.0 (1.102)
L21 Cooler check valve 24.0 (0.945)
SAT086F
Revision: January 20102010 Versa