2010 NISSAN QASHQAI check engine
[x] Cancel search: check enginePage 112 of 297
Downloaded from www.Manualslib.com manuals search engine Do not use the Around View Monitor with the
outside mirror in the stored position, and
make sure that the back door is securely
closed when operating the vehicle using the
Around View Monitor.
The distance between objects viewed on the
Around View Monitor differs from the actual
distance.
The cameras are installed above the front
grille, the outside mirrors and above the rear
number plate. Do not put anything on or cover
the cameras.
When washing the vehicle with high-pressure
water, be sure not to spray it around the cam-
eras. Otherwise, water may enter the camera
unit causing water condensation on the lens,
a malfunction, fire or an electric shock.
Do not strike the cameras. They are precision
instruments. Doing so could cause a malfunc-
tion or cause damage resulting in a fire or an
electric shock.
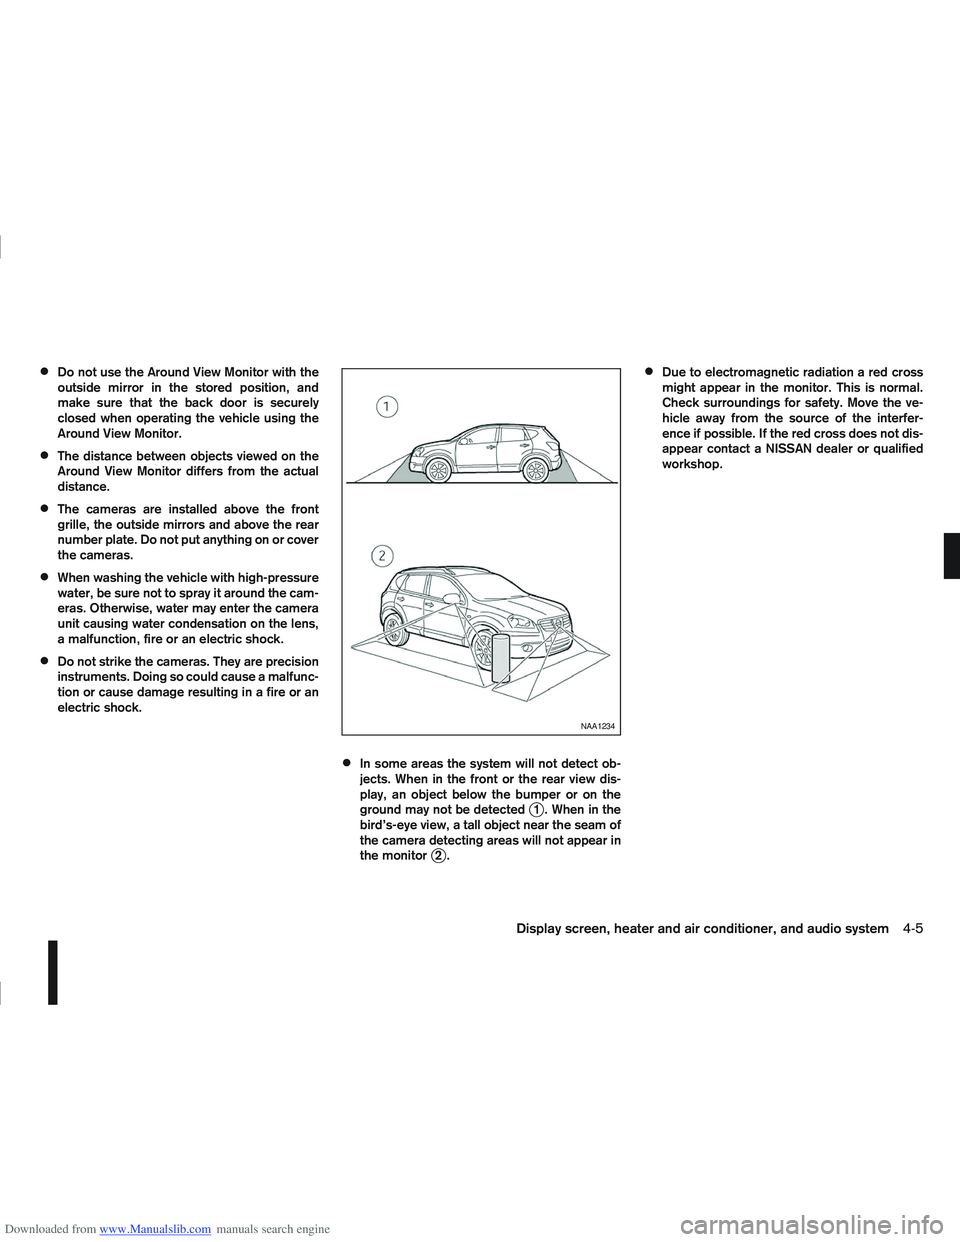
In some areas the system will not detect ob-
jects. When in the front or the rear view dis-
play, an object below the bumper or on the
ground may not be detected
j1 . When in the
bird’s-eye view, a tall object near the seam of
the camera detecting areas will not appear in
the monitor
j2.
Due to electromagnetic radiation a red cross
might appear in the monitor. This is normal.
Check surroundings for safety. Move the ve-
hicle away from the source of the interfer-
ence if possible. If the red cross does not dis-
appear contact a NISSAN dealer or qualified
workshop.
NAA1234
Display screen, heater and air conditioner, and audio system4-5
Page 136 of 297
Downloaded from www.Manualslib.com manuals search engine CD eject button
CD player:
Press the eject (
) button and the CD will be
ejected.
6 CD changer:
1. A CD can be ejected by:
Pressing the eject () button (the currently
played CD will be ejected).
Pressing a CD select button followed by the
eject () button.
Pressing the eject () button followed by a
CD select button.
2. After pressing the eject (
) button, a notifica-
tion message appears in the display.
3. When the CD slot door opens, the CD is ejected and the CD can now be removed.
4. If necessary, insert another CD into the respec- tive CD slot or wait to let the system close the
CD slot door.
To eject all the discs sequentially, press and hold
the eject (
) button for longer than 1.5 seconds.
The CD changer will start to eject from the current
or last used CD. After removing an ejected CD, the
next CD will be ejected. Ejecting CD (with ignition switch in “OFF” or
LOCK):
When the ignition switch is in the “OFF” or LOCK
position it is possible to eject the currently played
CD. However the audio unit will not be activated.
CD player:
Press the eject (
) button and the CD will be
ejected.
6 CD changer:
Press the eject () button less than 1.5 sec-
onds and the CD will be ejected.
To eject all CD’s in sequential order, keep the
eject () button pressed for longer than 1.5
seconds. The CD changer starts to eject from
the current or last used CD onwards. After re-
moving an ejected CD, the next one comes out.
NOTE
When the CD is ejected and not removed
within 15 seconds, it will automatically retract
into the slot to protect it from damage.
If an error message appears in the display,
press the eject () button to eject the faulty
CD and insert another CD or check if the
ejected CD is inserted upside down.
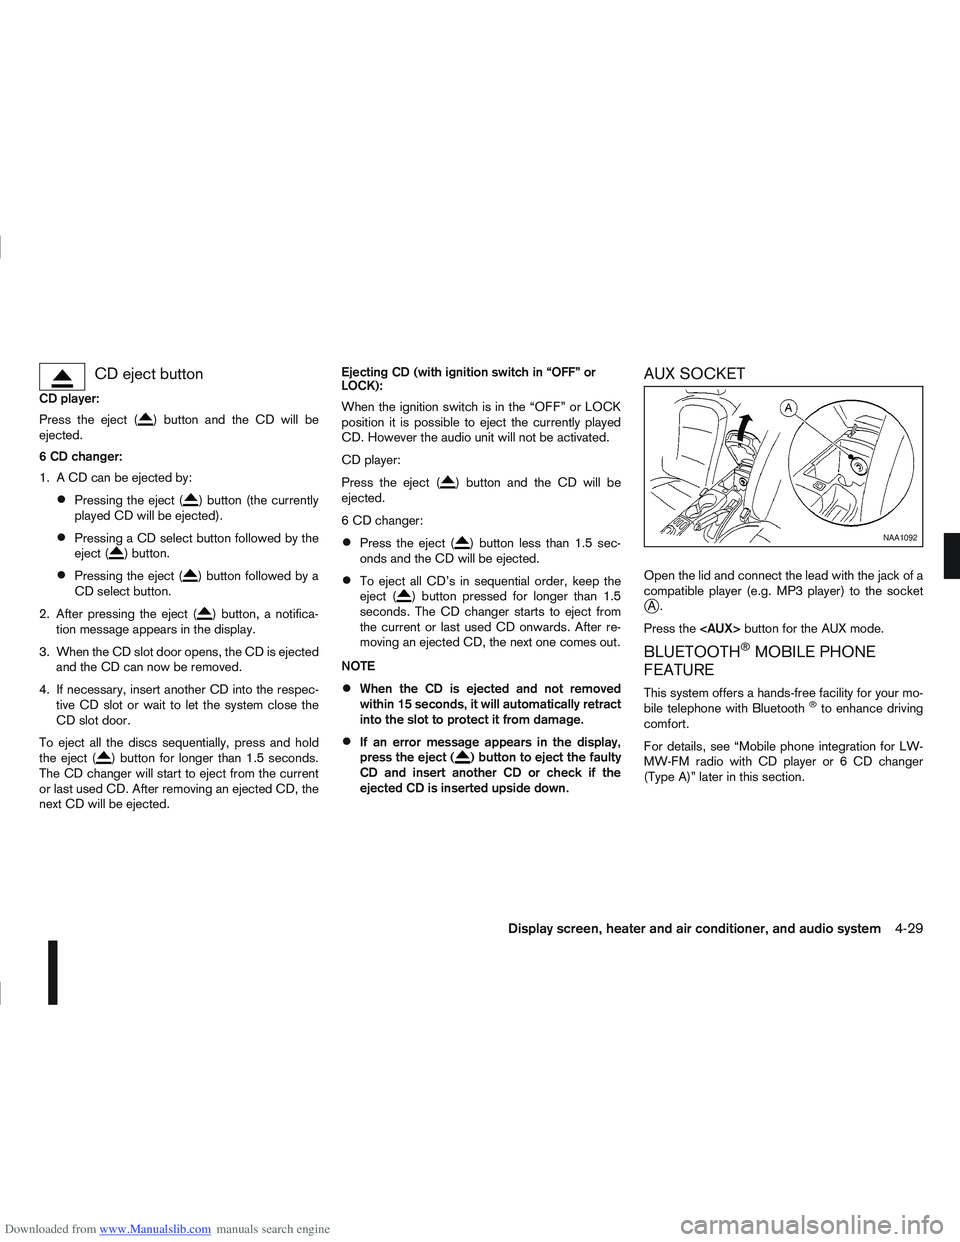
AUX SOCKET
Open the lid and connect the lead with the jack of a
compatible player (e.g. MP3 player) to the socket
jA.
Press the
BLUETOOTH®MOBILE PHONE
FEATURE
This system offers a hands-free facility for your mo-
bile telephone with Bluetooth®to enhance driving
comfort.
For details, see “Mobile phone integration for LW-
MW-FM radio with CD player or 6 CD changer
(Type A)” later in this section.
NAA1092
Display screen, heater and air conditioner, and audio system4-29
Page 143 of 297

Downloaded from www.Manualslib.com manuals search engine 3. Turn the
folder.
4. Press
turn the
If the current selected folder contains sub folders,
press
folders will be displayed. Turn the
dial for the sub folder then press
lect. Select the [Root] folder item when songs are
recorded additionally in the root folder.
To return to the previous folder screen, press
.
Repeat button:
Push the
j1 button and the current track will
be played continuously.
button:
Push the
j2 button and all the tracks will be
played in a random order.
mbutton:
While a CD with recorded music information tags
(CD-text/ID3–text tags) is being played, the title of
the played track is displayed. If the title information
is not provided then [Track] is displayed.
When the
j5 button is pressed repeatedly,
further information about the track can be displayed
along with the track title as follows:
CD: Track time
→Artist name→ Track title→Album
title→ Track time
CD with MP3/WMA:
Track time →Artist name→ Album title→Folder
name →Track time
Track details:
A long press on the
j5 button will turn the dis-
play into a detailed overview and after a few sec-
onds it returns to the main display, or press
j5
briefly.
CD eject button
CD player:
Press the
(eject) button and the CD will be
ejected.
Ejecting CD (with ignition switch in “OFF” or
LOCK):
When the ignition switch is in the “OFF” or LOCK
position it is possible to eject the currently played
CD. However the audio unit will not be activated.
Press the
button and the CD will be ejected.
NOTE
When the CD is ejected and not removed
within 8 seconds, it will automatically retract
into the slot to protect it from damage.
If an error message appears in the display,
pressto eject the faulty CD and insert an-
other CD or check if the ejected CD is in-
serted upside down.
AUX SOCKET
j
A AUX
jB USB (where fitted)
Audio main operation
Open the lid and connect the lead with the jack of a
compatible player (e.g. MP3 player) to the socket
jA.
Press the
NAA1214
4-36Display screen, heater and air conditioner, and audio system
Page 165 of 297
Downloaded from www.Manualslib.com manuals search engine During the first 1,600 km (1,000 miles), follow these
recommendations for the future reliability and
economy of your new vehicle. Failure to follow the
recommendations may result in shortened engine
life and reduced engine performance.
Avoid driving for long periods at a constant
speed, either fast or slow.
Do not accelerate at full throttle in any gear.
Avoid quick starts.
Avoid hard braking as much as possible.
Do not tow a trailer during the first 800 km (500
miles).
NOTE
Models with K9K diesel engine will achieve top
performance only after approximately 5,000 km
(3,000 miles).
WARNING
The driving characteristics of your vehicle can be
changed remarkably by any additional load and
its distribution as well as by adding optional
equipment (trailer couplings, roof racks, etc.).
Your driving style and speed have to be adjusted
accordingly. Especially when carrying heavy
loads, your speed must be reduced adequately.
Make sure the area around the vehicle is free of
obstacles.
Check fluid levels such as engine oil, coolant,
brake and clutch fluid, and window washer fluid
as frequently as possible, at least whenever you
refuel.
Visually inspect tyres for their appearance and
condition. Also check the tyre pressure for
proper inflation.
Maintenance items in the “8. Maintenance and
do-it-yourself” section should be checked peri-
odically.
Check that all windows and light lenses are
clean.
Check that all doors are closed.
Position the seat and adjust the head restraints.
Adjust the inside and outside mirrors.
Fasten your seat belt and ask all passengers to
do likewise.
Check the operation of the warning/indicator
lights when the ignition switch is turned to the
ON position.
Do not place hard or heavy objects on the dash-
board or rear parcel shelf in order to prevent
injury in the event of a sudden stop.
RUNNING-IN SCHEDULE BEFORE STARTING THE ENGINE
5-2Starting and driving
Page 171 of 297
Downloaded from www.Manualslib.com manuals search engine For additional information, see “NISSAN Anti-Theft
System (NATS)” in the “3. Pre-driving checks and
adjustments” section.
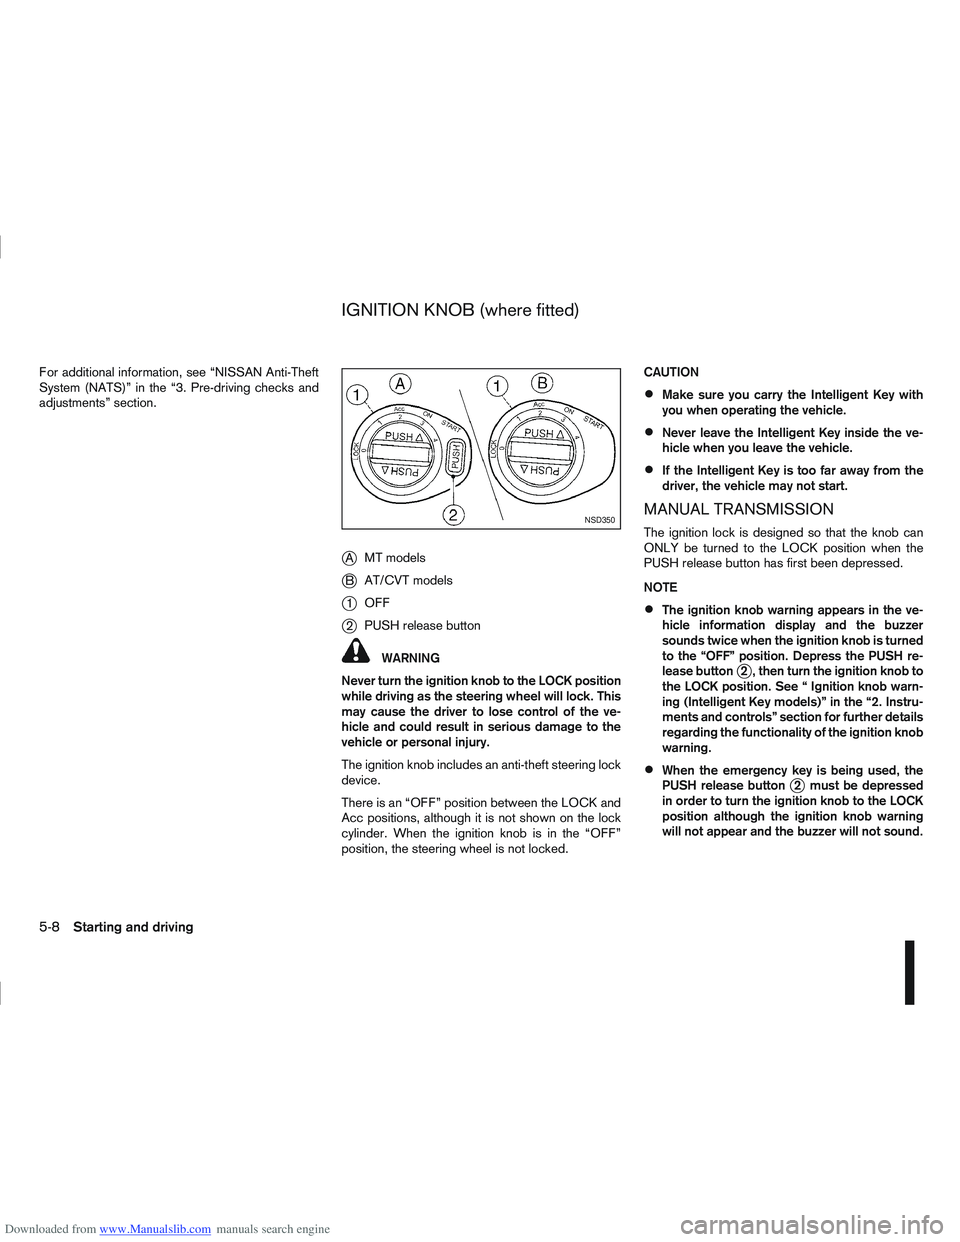
jAMT models
jB AT/CVT models
j1OFF
j2PUSH release button
WARNING
Never turn the ignition knob to the LOCK position
while driving as the steering wheel will lock. This
may cause the driver to lose control of the ve-
hicle and could result in serious damage to the
vehicle or personal injury.
The ignition knob includes an anti-theft steering lock
device.
There is an “OFF” position between the LOCK and
Acc positions, although it is not shown on the lock
cylinder. When the ignition knob is in the “OFF”
position, the steering wheel is not locked. CAUTION
Make sure you carry the Intelligent Key with
you when operating the vehicle.
Never leave the Intelligent Key inside the ve-
hicle when you leave the vehicle.
If the Intelligent Key is too far away from the
driver, the vehicle may not start.
MANUAL TRANSMISSION
The ignition lock is designed so that the knob can
ONLY be turned to the LOCK position when the
PUSH release button has first been depressed.
NOTE
The ignition knob warning appears in the ve-
hicle information display and the buzzer
sounds twice when the ignition knob is turned
to the “OFF” position. Depress the PUSH re-
lease button
j2 , then turn the ignition knob to
the LOCK position. See “ Ignition knob warn-
ing (Intelligent Key models)” in the “2. Instru-
ments and controls” section for further details
regarding the functionality of the ignition knob
warning.
When the emergency key is being used, the
PUSH release buttonj2 must be depressed
in order to turn the ignition knob to the LOCK
position although the ignition knob warning
will not appear and the buzzer will not sound.
NSD350
IGNITION KNOB (where fitted)
5-8Starting and driving
Page 174 of 297
Downloaded from www.Manualslib.com manuals search engine If you failed to start the engine using the NATS Intel-
ligent Key, turn the ignition knob to the LOCK posi-
tion, wait for 5 seconds and turn the knob to the
START position again to start the engine.
For additional information, see “NISSAN Anti-Theft
System (NATS)” in the “3. Pre-driving checks and
adjustments” section.1. Apply the handbrake.
2.
Manual transmission models:
Move the gear lever to N (Neutral) position, and
depress the clutch pedal to the floor while start-
ing the engine.
Automatic transmission or Continuously vari-
able transmission models:
Depress the brake pedal and move the selector
lever to the P (Park) or N (Neutral) position.
(P position is preferred). NOTE
The starter is designed not to operate if the
selector lever is out of the P (Park) or N (Neu-
tral) position.
3. Models without Intelligent Key: Rotate the steering wheel left to right to release
the ignition lock whilst turning the ignition switch
to the ON position.
Models with Intelligent key:
MT models – keep the clutch pedal
depressed and/or depress the brake pedal
then:
AT or CVT models – depress the brake pedal
then:
1) Push the ignition knob.
2) Rotate the steering wheel left to right to release the ignition lock whilst turning the
ignition knob to the ON position. CAUTION
Make sure you carry the Intelligent Key with
you when operating the vehicle.
If the Intelligent Key is too far away from
the driver, the vehicle may not start.
4. For diesel engine models: Wait until the glow indicator light
goes out.
5. Crank the engine with your foot on the brake pedal, not on the accelerator pedal , by turning
the ignition switch to START.
6. Release the ignition switch when the engine starts. If the engine starts, but fails to run, repeat
the above procedure.
For petrol engine models:
NOTE
Models with HR16DE engine:
If the engine is very hard to start because it is
flooded, depress the accelerator pedal all the
way to the floor and hold it. Crank the engine
for 5-6 seconds and stop. After cranking the
engine, release the accelerator pedal. Then
crank the engine with your foot off the accel-
erator pedal. Release the ignition switch when
the engine starts. If the engine starts, but fails
to run, repeat the above procedure.
Models with MR20DE engine:
If the engine is very hard to start in extremely
cold or hot weather, or when restarting, de-
press the accelerator pedal a little (approxi-
STARTING THE ENGINE
Starting and driving5-11
Page 177 of 297

Downloaded from www.Manualslib.com manuals search engine or the ultra sonic parking sensor (where fitted) will
be activated. For details, see “Rear-view monitor
(where fitted)” in the “4. Display screen, heater and
air conditioner, and audio system” section, “Around
view monitor (where fitted)” in the “4. Display
screen, heater and air conditioner, and audio
system” section or “Ultrasonic Parking Sensor
(where fitted)” later in this section.
If it is difficult to move the gear lever into R (Re-
verse) or 1st. Shift into N (Neutral), then release the
clutch pedal. Fully depress the clutch pedal again
and shift into R (Reverse) or 1st.
DRIVING WITH AUTOMATIC
TRANSMISSION OR WITH
CONTINUOUSLY VARIABLE
TRANSMISSION (Models with manual
shift)
CAUTION
The cold engine idle speed is high, so use
caution when shifting into a forward or re-
verse gear before the engine has warmed up.
Avoid revving up the engine while the vehicle
is stopped. This could cause unexpected ve-
hicle movement.
Driving precautions
Never shift to P (Park) or R (Reverse) while
the vehicle is moving, this could result in dam-
age to the transmission.
Start the engine in the P (Park) or N (Neutral)
position. The engine will not start in any otherselector position. If it does, have your vehicle
checked by a NISSAN dealer or qualified
workshop.
Do not depress the accelerator pedal while
shifting from P (Park) or N (Neutral) to R (Re-
verse), D (Drive) or Manual shift modes posi-
tion. Always depress the brake pedal until
shifting is completed.
On an uphill grade, do not hold the vehicle by
depressing the accelerator pedal. The foot-
brake should be used for this purpose, in or-
der to hold the vehicle in place and to prevent
overheating of the transmission.
Shift into the N (Neutral) position and apply
the handbrake when at a standstill for longer
than a short waiting period.
Keep the engine at idling speed while shifting
from the N (Neutral) position to any driving
position.
CAUTION (when starting the vehicle):
DEPRESS THE FOOTBRAKE PEDAL
When the engine is running, shifting the se-
lector lever into the R (Reverse), D (Drive) or
Manual shift mode position without depress-
ing the brake pedal causes the vehicle to
move slowly. Be sure the brake pedal is fully
depressed and the vehicle is stopped, before
shifting the selector lever.
BE AWARE OF THE SELECTOR LEVER POSI-
TION Make sure that the selector lever is in the
desired position. Use the D (Drive), or Manual
shift mode to move forwards and the R (Re-
verse) to move backwards. Release the hand-
brake lever and the footbrake pedal, then de-
press the accelerator pedal to start the vehicle
in motion and merge with traffic (avoid abrupt
starting and spinning the wheels).
Avoid revving up the engine while the vehicle
is stopped, this could cause unexpected ve-
hicle movement [if the selector lever is in the
R (Reverse), D (Drive), or Manual shift mode
position] or damage the engine [if the selec-
tor lever is in the N (Neutral) or P (Park) posi-
tion].
WARM THE ENGINE UP
Due to the higher idle speeds when the en-
gine is cold, extra caution must be taken when
shifting the selector lever into the driving po-
sition immediately after starting the engine.
PARKING THE VEHICLE
Depress the footbrake pedal and, once the
vehicle stops, move the selector lever into the
P (Park) position, pull the handbrake lever and
release the footbrake pedal.
Starting the vehicle
1. After starting the engine, fully depress the foot-
brake pedal before shifting the selector lever from
P (Park) to R (Reverse), D (Drive) or Manual shift
mode.
5-14Starting and driving
Page 179 of 297

Downloaded from www.Manualslib.com manuals search engine Manual shift mode
When the selector lever is shifted from D (Drive) to
the manual shift gate with the vehicle stopped or
while driving, the transmission enters manual shift
mode. Shift range can be selected manually.
In manual shift mode, the selected gear is displayed
on the position indicator in the combination meter.
Shift ranges up or down one by one as follows:
1st⇔2nd ⇔3rd ⇔4th ⇔5th ⇔6th
When shifting up, move the selector lever to the
+ (up) side. (Shifts to higher range).
When shifting down, move the selector lever to
the – (down) side. (Shifts to lower range).
Moving the selector lever rapidly to the same
side twice will shift the ranges in succession.
Use the 1st position when driving slowly on steep
hills, slow driving through deep snow, sand or
mud, or for maximum engine braking on steep
downhill grades.
Use the 2nd, 3rd or 4th position when driving
steep hills or for engine braking on steep down-
hill grades.
Use the 5th position for driving up or down long
slopes.
Use the 6th position for all normal forward driv-
ing. However, you need to shift down the gears
when accelerating or passing another vehicle.
When cancelling manual shift mode, return the
selector lever to the D (Drive) position. The trans-
mission returns to the normal driving mode.
In manual shift mode, the transmission may
not shift to the selected gear under certain
circumstances. This helps maintain driving
performance and reduces the chance of ve-
hicle damage or loss of control.
If the engine is revving up to a hazardous
speed in manual shift mode, the transmission
may shift up automatically. When the vehicle
speed decreases, the transmission automati-
cally shifts down and shifts to 1st gear before
the vehicle comes to a stop.
Accelerator downshift – In the D (Drive)
position
For rapid passing or driving uphill, fully depress the
accelerator pedal to the floor. This shifts the trans-
mission down into a lower gear, depending on the
vehicle speed.
Shift lock release
If the battery is discharged, the selector lever can-
not be moved from the P (Park) position even with
the brake pedal depressed and the ignition switch in
the ON position.
To move the selector lever, remove the cap
j1
(where fitted) then push the shift lock release button
jA with a suitable toolj2 (as illustrated) and press
the selector lever buttonj3 . It is now possible to
move the selector lever to the N (Neutral) position
j4.
For your safety, make sure the handbrake is applied
and the brake pedal is depressed during the opera-
tion.
If there is any problem moving the lever out of the P
(Park) position, have a NISSAN dealer or qualified
workshop to check the automatic transmission sys-
tem as soon as possible.
NSD347
Cap (where fitted)
5-16Starting and driving