2010 NISSAN QASHQAI check engine
[x] Cancel search: check enginePage 215 of 297
Downloaded from www.Manualslib.com manuals search engine CAUTION
Do not use the emergency tyre puncture repair
kit under the following conditions. Contact a
NISSAN dealer or qualified workshop or profes-
sional road assistance.
when the sealant has passed its expiration
date (shown on the label attached to the
bottle)
when the cut or the puncture is approximately
4 mm (0.16 in) or longer
when the side of the tyre is damaged
when the vehicle has been driven with a con-
siderable loss of air from the tyre
when the tyre is completely displaced inside
or outside the rim
when the tyre rim is damaged
when two or more tyres are flat
Getting emergency tyre puncture repair
kit
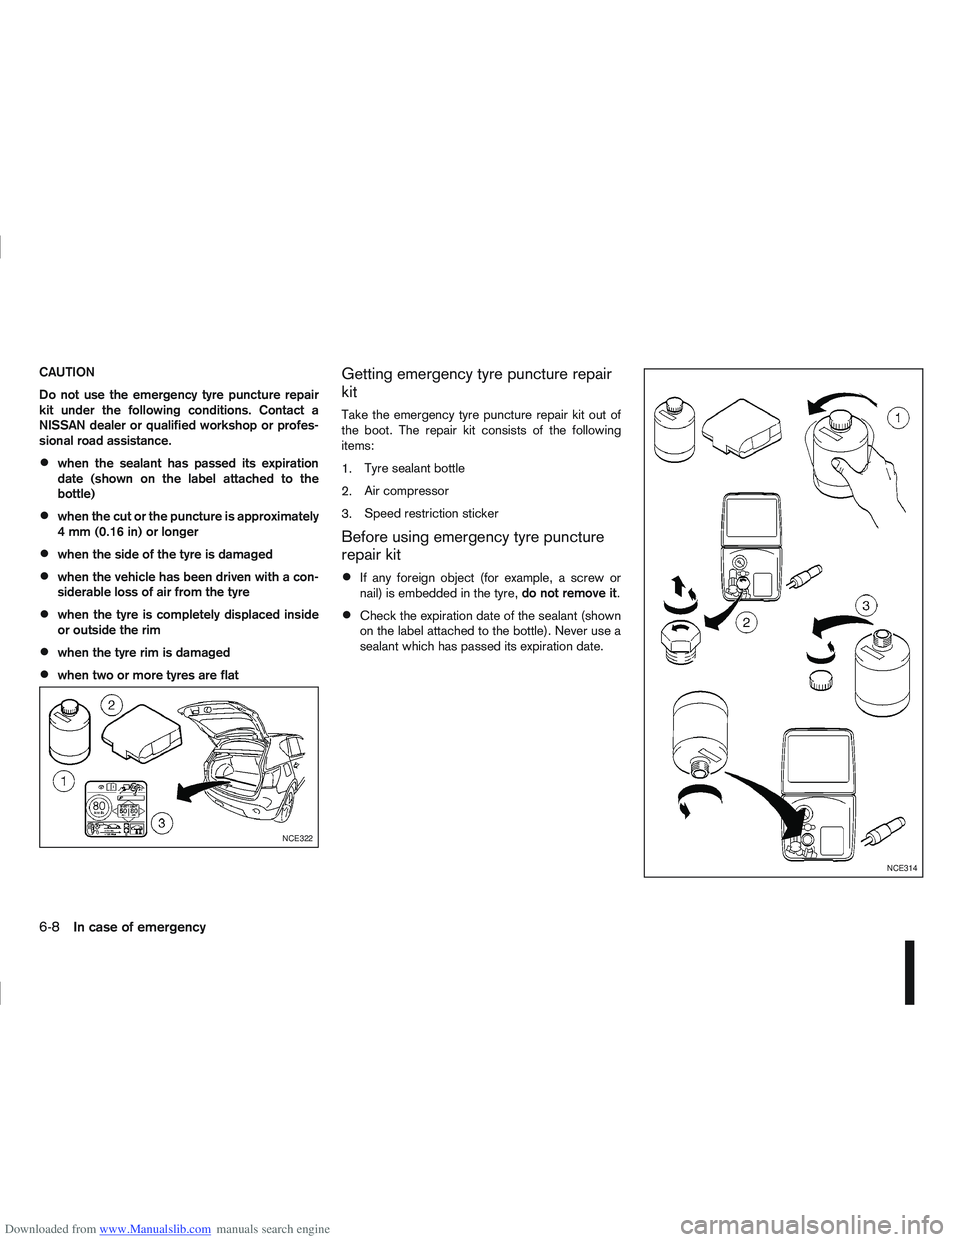
Take the emergency tyre puncture repair kit out of
the boot. The repair kit consists of the following
items:
1.Tyre sealant bottle
2. Air compressor
3. Speed restriction sticker
Before using emergency tyre puncture
repair kit
If any foreign object (for example, a screw or
nail) is embedded in the tyre,
do not remove it.
Check the expiration date of the sealant (shown
on the label attached to the bottle). Never use a
sealant which has passed its expiration date.
NCE322
NCE314
6-8In case of emergency
Page 216 of 297
Downloaded from www.Manualslib.com manuals search engine Repairing tyre
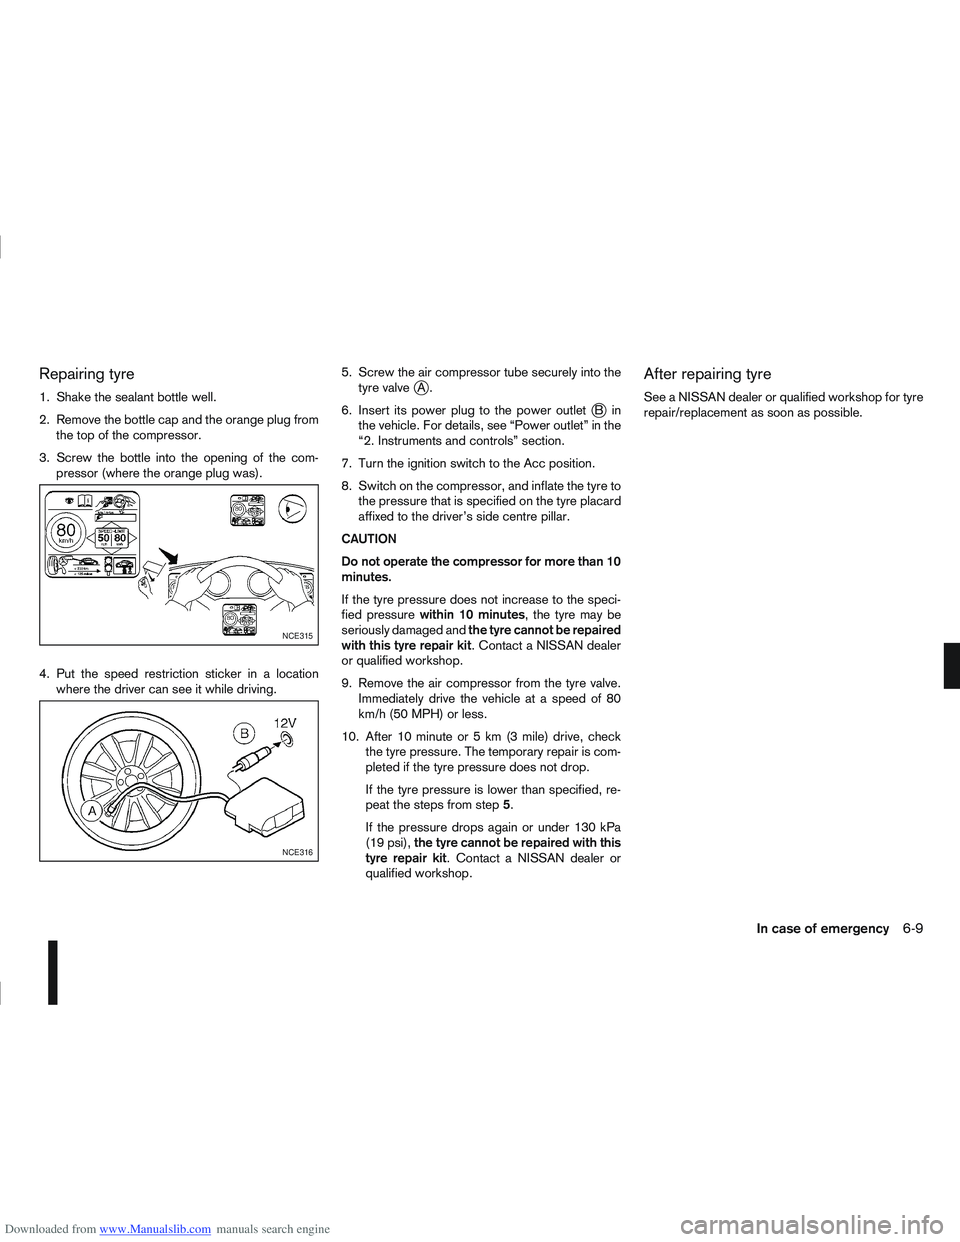
1. Shake the sealant bottle well.
2. Remove the bottle cap and the orange plug fromthe top of the compressor.
3. Screw the bottle into the opening of the com- pressor (where the orange plug was).
4. Put the speed restriction sticker in a location where the driver can see it while driving. 5. Screw the air compressor tube securely into the
tyre valvejA.
6. Insert its power plug to the power outlet
jBin
the vehicle. For details, see “Power outlet” in the
“2. Instruments and controls” section.
7. Turn the ignition switch to the Acc position.
8. Switch on the compressor, and inflate the tyre to the pressure that is specified on the tyre placard
affixed to the driver’s side centre pillar.
CAUTION
Do not operate the compressor for more than 10
minutes.
If the tyre pressure does not increase to the speci-
fied pressure within 10 minutes , the tyre may be
seriously damaged and the tyre cannot be repaired
with this tyre repair kit . Contact a NISSAN dealer
or qualified workshop.
9. Remove the air compressor from the tyre valve. Immediately drive the vehicle at a speed of 80
km/h (50 MPH) or less.
10. After 10 minute or 5 km (3 mile) drive, check the tyre pressure. The temporary repair is com-
pleted if the tyre pressure does not drop.
If the tyre pressure is lower than specified, re-
peat the steps from step 5.
If the pressure drops again or under 130 kPa
(19 psi), the tyre cannot be repaired with this
tyre repair kit. Contact a NISSAN dealer or
qualified workshop.
After repairing tyre
See a NISSAN dealer or qualified workshop for tyre
repair/replacement as soon as possible.
NCE315
NCE316
In case of emergency6-9
Page 218 of 297
Downloaded from www.Manualslib.com manuals search engine 6. Open the bonnet. For details, see “Bonnetrelease” in the “3. Pre-driving checks and
adjustments” section.
7. Remove the vent caps (where fitted) on the bat- tery and cover the battery with an old cloth.
8. Connect the jump leads in the sequence (
j1 →j2→j3→j4 ) as illustrated.
CAUTION
Always connect positivej+ to positivej+
and negativej- to body ground (for ex-
ample, engine lift bracket, etc.) – not to
the battery’s negative
j-.
An incorrect connection could damage the
charging system.
Be sure that the jumper cables do not
touch moving parts in the engine compart-
ment.
Be careful not to allow contact between
the positive jump lead connector and the
vehicle or the negative lead during con-
nection and disconnection.
9. Start the engine of the other vehicle
jA and let it
run for a few minutes. Keep the engine speed at
about 2,000 rpm.
10. Start the engine of your vehicle
jB in the nor-
mal way. CAUTION
Do not keep the starter motor engaged for
more than 10 seconds. If the engine does not
start immediately, turn the ignition switch to
“OFF” and wait 10 seconds before trying
again.
11. After starting the engine of your vehicle, care- fully disconnect the negative lead and then the
positive lead (
j4→j3→j2→j1).
12. Remove and dispose of the cloth that was used to cover the vent holes as it may be contami-
nated with corrosive acid.
13. Install the vent caps (where fitted).
14. Close the bonnet.
NOTE
For models which incorporate the Stop/Start
System:
Ensure that the battery fitted is the special
battery that is enhanced with regard to the
charge-discharge capacity and life perfor-
mance. Avoid using any other battery for the
Stop/Start System, as this may cause early
deterioration of the battery or a malfunction
of the Stop/Start System. It is recommended
that a Genuine NISSAN battery is fitted. For
more information, contact a NISSAN dealer or
qualified workshop
If the battery terminal is disconnected (for bat-
tery replacement, etc.) and then reconnected,
there may be some delay before the Stop/
Start System reactivates.
In case of emergency6-11
Page 219 of 297
Downloaded from www.Manualslib.com manuals search engine CAUTION
Three-way catalyst equipped models should
not be started by pushing the vehicle as the
three-way catalyst may be damaged.
Automatic transmission (AT) or continuously
variable transmission (CVT) models cannot be
started by pushing the vehicle. This may cause
transmission damage.
Never try to start the vehicle by towing it; when
the engine starts, the forward surge could
cause the vehicle to collide with the tow ve-
hicle.
WARNING
Never continue driving if the engine of your
vehicle overheats. Doing so could cause a ve-
hicle fire.
Never open the bonnet if steam is coming
out.
Never remove engine coolant reservoir cap
when the engine is hot. If the engine coolant
reservoir cap is removed while the engine is
hot, pressurised hot water will spurt out and
possibly cause burning, scalding or serious
injury.
If steam or coolant is coming out of the en-
gine, stand clear of the vehicle to prevent get-
ting injured.
The engine cooling fan will start whenever the
coolant temperature exceeds preset degrees.
Be careful not to allow your hands, hair, jewel-
lery or clothing to come into contact with, or
get caught in, the cooling fan or drive belts.
If the engine of your vehicle is overheating (indi-
cated by the engine coolant temperature gauge) or
if you feel a lack of engine power, detect unusual
noise, etc., proceed as follows:
1. Move and park the vehicle safely off the road and away from traffic.
2. Turn on the hazard warning flasher lights.
3. Apply the handbrake. 4. Shift the gear lever (MT models) into the N (Neu-
tral) position [AT or CVT models, move the se-
lector lever to the P (Park) position].
DO NOT STOP THE ENGINE.
5. Open all windows.
6. Switch off the air conditioner system (where fit- ted).
7. Set the heater or air conditioner temperature control to maximum “HOT” and fan speed con-
trol to maximum speed.
8. Exit the vehicle.
9. Visually inspect and listen for steam or coolant escaping from the radiator before opening the
bonnet. Wait until no steam or coolant can be
seen before proceeding.
10. Open the bonnet. For details, see “Bonnet release” in the “3. Pre-driving checks and
adjustments” section.
11. Visually check if the cooling fan is running.
12. Visually check the radiator and radiator hoses for leakage.
WARNING
If coolant is leaking, the cooling fan belt is
missing or loose or the cooling fan is not run-
ning, stop the engine.
13. After the engine cools down, check the coolant level in the engine coolant reservoir with the
engine running.
PUSH-STARTING ENGINE OVERHEAT
6-12In case of emergency
Page 226 of 297
Downloaded from www.Manualslib.com manuals search engine Always follow the manufacturer’s instructions
supplied with the wax.
Do not use a wax containing any abrasives,
cutting compounds or cleaners that may dam-
age the vehicle finish.
If the vehicle surface cannot polish easily, ap-
ply a road tar remover prior to waxing the ve-
hicle.
Machine compounding or aggressive polish-
ing on a base coat/clear coat paint finish may
dull the finish or leave swirl marks.
CLEANING GLASS
Use glass cleaner to remove smoke and dust film
from the glass surfaces. It is normal for glass to
become coated with a film after the vehicle is parked
in the hot sun. Glass cleaner and a soft cloth will
easily remove this film.
CLEANING REAR-VIEW CAMERA
(where fitted)
Clean the transparent camera cover regularly. If dirt,
rain or snow attaches to the cover, the monitor may
not display objects clearly.
CAUTION
Do not use alcohol, benzine or thinner to clean
the transparent camera cover. This will cause
discoloration. To clean the cover, first use a
cloth dampened with diluted mild cleaning
agent and then wipe with a dry cloth.
Do not use body wax on the transparent cam-
era cover.
When washing the vehicle with a high pres-
sure water spray, make sure not to spray it
around the transparent camera cover. Other-
wise, water may enter the camera unit caus-
ing water condensation on the lens and it may
result in a malfunction or an electric shock.
UNDERBODY
In areas where road salt is used in the winter, the
vehicle’s underbody must be cleaned regularly. This
will prevent dirt and salt from building up and caus-
ing underbody and suspension corrosion.
Before the winter period and again in the spring, the
underseal must be checked and, if necessary, re-
treated.
CARE OF WHEELS
Wash the wheels when washing the vehicle to
maintain their appearance.
Clean the inner side of the wheels when the
wheel is changed or the underside of the vehicle
is washed.
Do not use abrasive cleaners when washing the
wheels.
Inspect wheel rims regularly for dents or corro-
sion. This may cause loss of pressure or damage
the tyre bead.
NISSAN recommends that the road wheels be
waxed to protect against road salt in areas where
it is used during winter.
CLEANING ALLOY WHEELS
Wash the wheels regularly with a sponge damp-
ened in a mild soap solution, especially during win-
ter in areas where road salt is used. The salt residue
from road salt could discolour the wheels if it is not
washed off regularly.
CAUTION
Follow the directions as described below in order
to avoid staining or discolouring of the wheels.
Do not use a cleaner that contains strong con-
tents of acid or alkali to clean the wheels.
Do not apply wheel cleaner when the wheels
are hot. The wheel temperature should be the
same as ambient temperature.
Rinse the wheel to completely remove the
cleaner within 15 minutes after the cleaner
has been applied.
CHROME PARTS
Clean all chrome parts regularly with a nonabrasive
chrome polish to maintain the finish.
Appearance and care7-3
Page 228 of 297
Downloaded from www.Manualslib.com manuals search engine The seat belts can be cleaned by wiping them with
a sponge dampened in a mild soap solution.
Allow the belts to dry completely in the shade before
using them.MOST COMMON FACTORS
CONTRIBUTING TO VEHICLE
CORROSION
The accumulation of moisture-retaining dirt and
debris in body panel sections, cavities, and other
areas.
Damage to the paint surface and other protec-
tive coatings caused by gravel and stone chips
or minor traffic accidents.
ENVIRONMENTAL FACTORS
INFLUENCE THE RATE OF
CORROSION
Moisture
Accumulation of sand, dirt and water on the vehicle
body underside can accelerate corrosion. Wet floor
coverings will not dry completely inside the vehicle,
and should be removed for drying to avoid floor pan-
els corrosion.
Relative humidity
Corrosion will be accelerated in areas of high rela-
tive humidity, especially those areas where the tem-
peratures stay above freezing, where atmospheric
pollution exists and road salt is used.
Temperature
A temperature increase will accelerate the rate of
corrosion to those parts which are not well venti-
lated.Corrosion will also accelerate in areas where the
temperatures stay above freezing.
Air pollution
Industrial pollution, the presence of salt in the air in
coastal areas, or heavy road salt use will accelerate
the corrosion process. Road salt will also acceler-
ate the disintegration of paint surfaces.
TO PROTECT YOUR VEHICLE FROM
CORROSION
Wash and wax your vehicle often to keep the
vehicle clean.
Always check for minor damage to the paint sur-
face and if any exists, repair it as soon as pos-
sible.
Keep the drain holes at the bottom of the doors
and back door opened to avoid water accumula-
tion.
Check the vehicle underbody for accumulation
of sand, dirt or salt. If present, wash with water
as soon as possible.
CAUTION
Never remove dirt, sand or other debris from
the passenger compartment by washing it out
with a hose. Remove dirt with a vacuum
cleaner or broom.
Never allow water or other liquids to come in
contact with electronic components inside the
vehicle as this may damage them.
CORROSION PROTECTION
Appearance and care7-5
Page 231 of 297

Downloaded from www.Manualslib.com manuals search engine 8Maintenance and do-it-yourself
Maintenance and do-it-yourself
Maintenance requirements ....................................... 8-2
Scheduled maintenance...................................... 8-2
General maintenance .......................................... 8-2
Where to go for service ...................................... 8-2
General maintenance ............................................... 8-2 Explanation of general maintenance items ........... 8-2
Maintenance precautions ......................................... 8-4
Engine compartment ................................................ 8-5
Engine cooling system ............................................. 8-6 Checking engine coolant level............................. 8-6
Changing engine coolant .................................... 8-6
Engine oil................................................................. 8-8 Checking engine oil level .................................... 8-8
Changing engine oil ............................................ 8-9
Changing engine oil filter .................................... 8-11
Protect the environment ...................................... 8-13
Fuel filter (Diesel engine models) ............................. 8-13 Draining water .................................................... 8-13
Bleeding the fuel system ..................................... 8-14
Automatic transmission fluid (ATF) ........................... 8-14
Continuously variable transmission (CVT) fluid ......... 8-14
Brakes ..................................................................... 8-15 Checking brake pedal......................................... 8-15
Checking handbrake........................................... 8-15
Brake and clutch fluid .............................................. 8-15
Window washer fluid/headlight cleaner fluid
(where fitted) ........................................................... 8-16
Battery..................................................................... 8-17 Vehicle battery .................................................... 8-17
Jump-starting ...................................................... 8-19 Integrated keyfob/Intelligent Key battery
replacement........................................................ 8-19
Drive belts ............................................................... 8-21
Spark plugs (Petrol engine models).......................... 8-21
Air cleaner filter........................................................ 8-21 Viscous paper type ............................................. 8-22
Dry paper type (where fitted) .............................. 8-22
Wiper blades ........................................................... 8-22 Cleaning ............................................................. 8-22
Front window wiper replacement ........................ 8-22
Back door window wiper replacement ................ 8-23
Windscreen washer nozzle ................................. 8-23
Fuses ...................................................................... 8-23 Passenger compartment ..................................... 8-23
Engine compartment ........................................... 8-24
Lights ...................................................................... 8-25 Headlights .......................................................... 8-25
Exterior lights ...................................................... 8-27
Interior lights....................................................... 8-27
Light locations .................................................... 8-27
Wheels and tyres ..................................................... 8-31 Tyre inflation pressure......................................... 8-31
Types of tyres ..................................................... 8-31
Snow chains....................................................... 8-32
Tyre rotation ....................................................... 8-32
Tyre wear and damage ....................................... 8-33
Tyre age ............................................................. 8-33
Changing tyres and wheels ................................. 8-33
Four-wheel drive (4WD) models ......................... 8-33
Wheel balance.................................................... 8-33
Page 233 of 297
Downloaded from www.Manualslib.com manuals search engine Your new NISSAN has been designed to have mini-
mum maintenance requirements with longer service
intervals, to save you both time and money. How-
ever, some day-to-day and regular maintenance is
essential to maintain your NISSAN’s good mechani-
cal condition, as well as its emission and engine
performance.
It is the owner’s responsibility to make sure that the
specified maintenance, as well as general mainte-
nance, is performed.
As the vehicle owner, you are the only one who can
ensure that your vehicle receives the proper mainte-
nance care.
SCHEDULED MAINTENANCE
For your convenience, the required scheduled main-
tenance items are described and listed in the sepa-
rate Warranty Information and Maintenance book-
let. You must refer to that booklet to ensure that
necessary maintenance is performed on your
NISSAN vehicle at regular intervals.
GENERAL MAINTENANCE
General maintenance includes those items which
should be checked during normal day-to-day opera-
tion of the vehicle. They are essential if your vehicle
is to continue to operate properly. It is your respon-
sibility to perform these procedures regularly as pre-
scribed.
Performing general maintenance checks requires
minimal mechanical skill and a few general automo-
tive tools.These checks or inspections can be done by your-
self, a qualified technician or, if you prefer, your
NISSAN dealer or qualified workshop.
WHERE TO GO FOR SERVICE
If maintenance service is required or your vehicle
appears to malfunction, have the systems checked
and tuned by an authorised NISSAN dealer or quali-
fied workshop.
During the normal day-to-day operation of the ve-
hicle, general maintenance should be performed
regularly as prescribed in this section. If you detect
any unusual sounds, vibrations or smell, be sure to
check for the cause or have a NISSAN dealer or
qualified workshop do it promptly. In addition, you
should notify a NISSAN dealer or qualified work-
shop if repairs are required.
When performing any checks or maintenance work,
closely observe the “Maintenance precautions” later
in this section.
EXPLANATION OF GENERAL
MAINTENANCE ITEMS
Additional information on the following items with
an asterisk (*) is found later in this section.
The maintenance items listed here should be per-
formed from time to time, unless otherwise speci-
fied.
Outside the vehicle
Back door, doors and bonnet:
Check that the back door, all doors and the bonnet
operate properly. Also ensure that all latches lock
securely. Lubricate hinges and latches if necessary.
Make sure that the secondary latch keeps the bon-
net from opening when the primary latch is released.
When driving in areas using road salt or other cor-
rosive materials, check for lubrication frequently.
MAINTENANCE REQUIREMENTS
GENERAL MAINTENANCE
8-2Maintenance and do-it-yourself