2010 NISSAN QASHQAI check engine
[x] Cancel search: check enginePage 253 of 297
Downloaded from www.Manualslib.com manuals search engine Be careful when working on the engine with-
out the air cleaner filter.
VISCOUS PAPER TYPE
The filter elementjA should not be cleaned and
reused.
Replace it according to the maintenance schedule
shown in the separately provided Warranty Informa-
tion & Maintenance Booklet. When replacing the fil-
ter, wipe the inside of the air cleaner housing and
the cover with a damp cloth.
DRY PAPER TYPE (where fitted)
Check the filter elementjA to see if it is dirty. If it is
dirty, shake the element to remove dust.
Clean or replace it according to the maintenance
schedule shown in the separately provided War-
ranty Information & Maintenance Booklet. When
cleaning or replacing the filter, wipe the inside of the
air cleaner housing and the cover with a damp cloth.
CLEANING
If the windscreen or back door window is not clear
after using the window washer or if a wiper blade
chatters when running, wax or other material may be
on the blade or windscreen.
Clean the outside of the windscreen or back door
window with a washer solution or a mild detergent.
The windscreen or back door window is clean if
beads do not form when rinsing with clear water.
Clean the blade by wiping it with a cloth soaked in a
washer solution or a mild detergent. Then rinse the
blade with clear water. If the windscreen or back
door window is still not clear after cleaning the
blades and using the wiper, replace the blades.
CAUTION
After wiper blade replacement, return the
wiper arm to its original position. Otherwise it
may be damaged when the bonnet is opened.
Make sure the wiper blade contacts the glass.
Otherwise, the arm may be damaged from
wind pressure.
Do not open the bonnet when the front wiper
is in the servicing position other wise it can
damage the paint surface of the bonnet.
FRONT WINDOW WIPER
REPLACEMENT
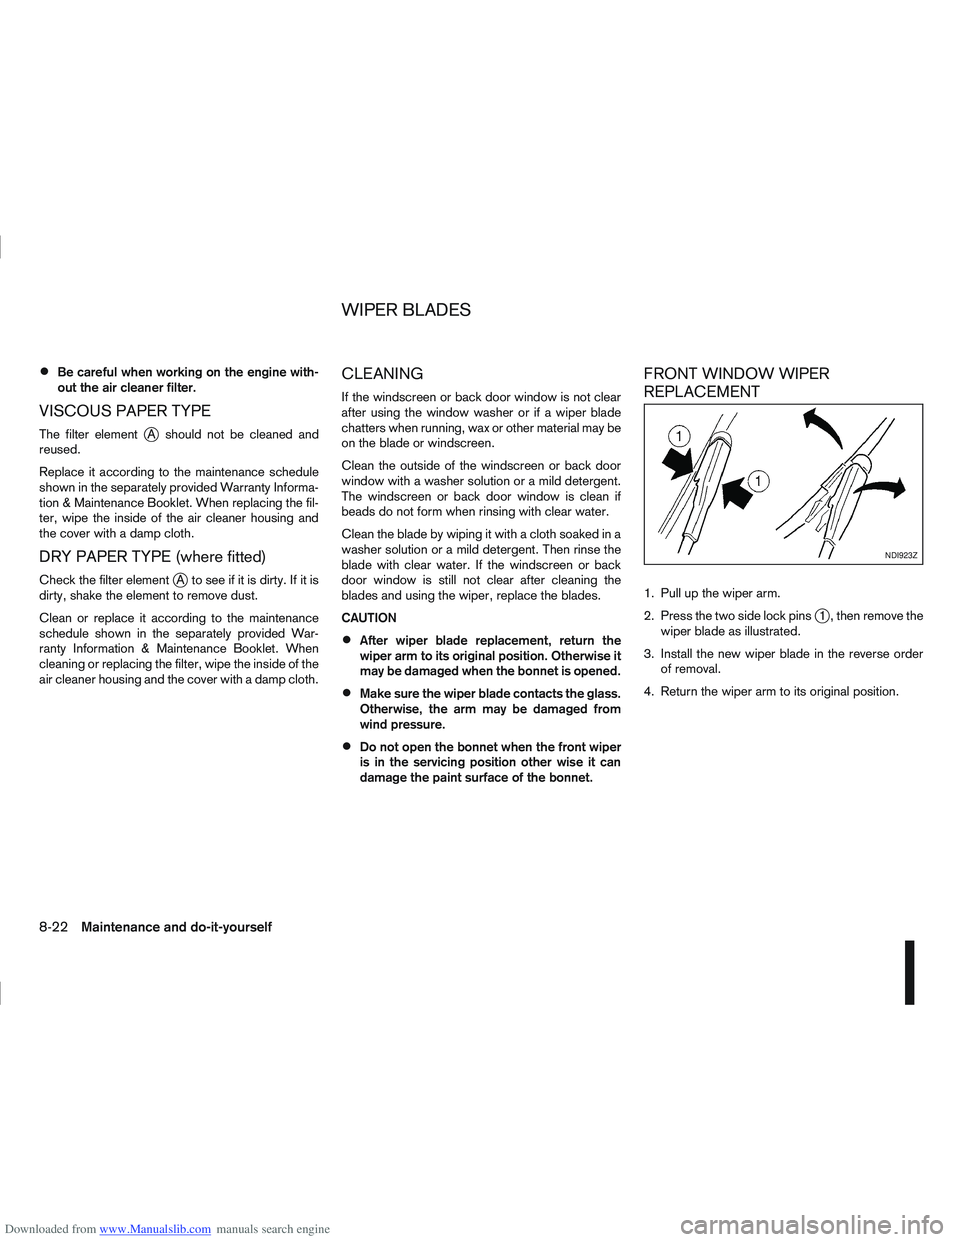
1. Pull up the wiper arm.
2. Press the two side lock pins
j1 , then remove the
wiper blade as illustrated.
3. Install the new wiper blade in the reverse order of removal.
4. Return the wiper arm to its original position.
NDI923Z
WIPER BLADES
8-22Maintenance and do-it-yourself
Page 255 of 297
Downloaded from www.Manualslib.com manuals search engine Be careful not to damage the connector sup-
port bracket when disconnecting the connec-
tor.
If any electrical equipment does not operate, check
for an open fuse.
The fuse box is located in the lower part of the
instrument panel at the driver’s side.
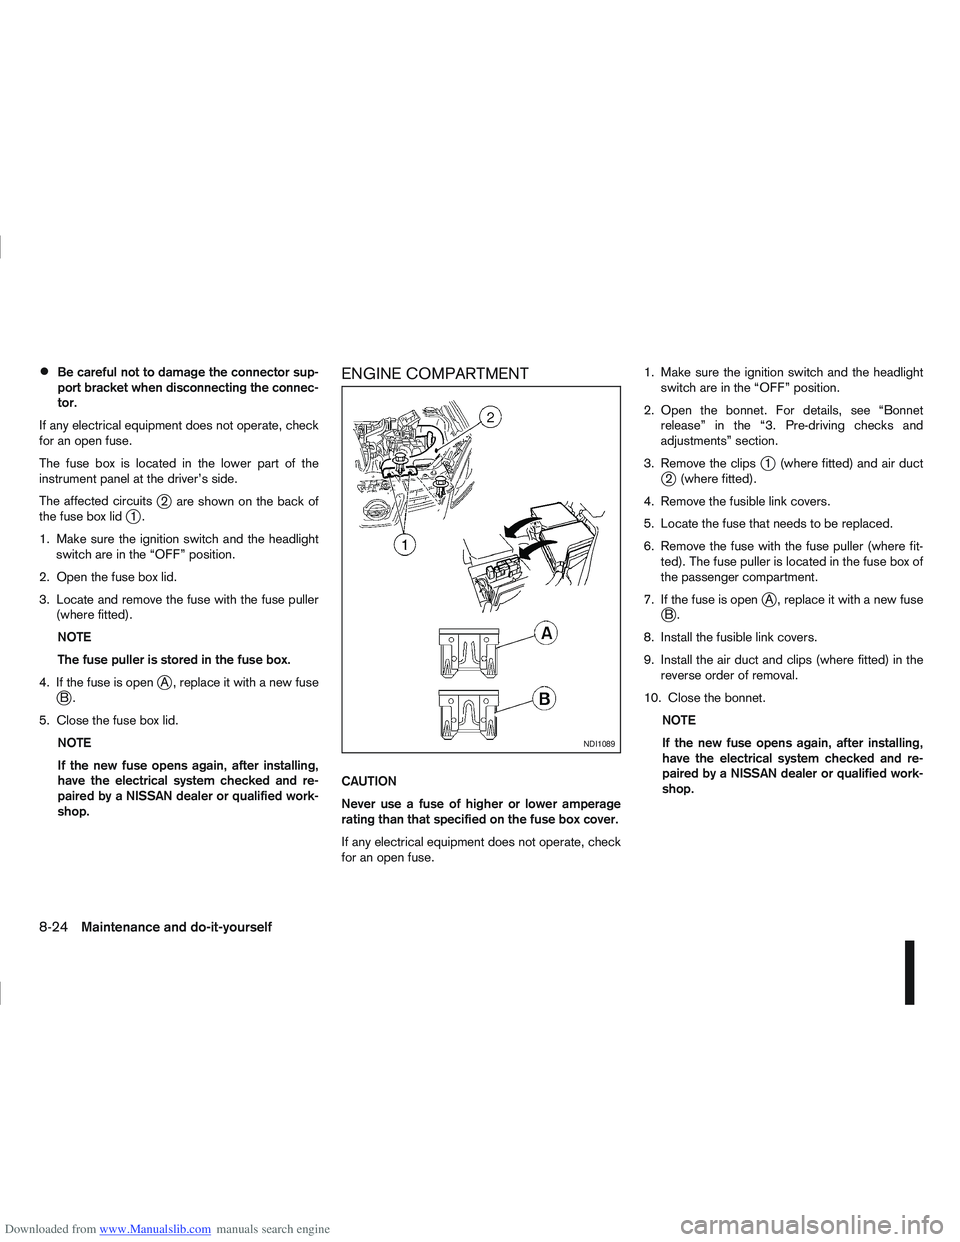
The affected circuits
j2 are shown on the back of
the fuse box lidj1.
1. Make sure the ignition switch and the headlight switch are in the “OFF” position.
2. Open the fuse box lid.
3. Locate and remove the fuse with the fuse puller (where fitted).
NOTE
The fuse puller is stored in the fuse box.
4. If the fuse is open
jA , replace it with a new fusejB.
5. Close the fuse box lid. NOTE
If the new fuse opens again, after installing,
have the electrical system checked and re-
paired by a NISSAN dealer or qualified work-
shop.
ENGINE COMPARTMENT
CAUTION
Never use a fuse of higher or lower amperage
rating than that specified on the fuse box cover.
If any electrical equipment does not operate, check
for an open fuse. 1. Make sure the ignition switch and the headlight
switch are in the “OFF” position.
2. Open the bonnet. For details, see “Bonnet release” in the “3. Pre-driving checks and
adjustments” section.
3. Remove the clips
j1 (where fitted) and air ductj2 (where fitted).
4. Remove the fusible link covers.
5. Locate the fuse that needs to be replaced.
6. Remove the fuse with the fuse puller (where fit- ted). The fuse puller is located in the fuse box of
the passenger compartment.
7. If the fuse is open
jA , replace it with a new fusejB.
8. Install the fusible link covers.
9. Install the air duct and clips (where fitted) in the reverse order of removal.
10. Close the bonnet. NOTE
If the new fuse opens again, after installing,
have the electrical system checked and re-
paired by a NISSAN dealer or qualified work-
shop.
NDI1089
8-24Maintenance and do-it-yourself
Page 257 of 297
Downloaded from www.Manualslib.com manuals search engine Only hold the xenon headlight bulb by the
base.
The bulb is manufactured from high-quality
quartz and is under high pressure.
Damage, soiling, and fingerprints should be
avoided and, if necessary, removed with alco-
hol before installing the bulb.
When the headlights are switched on, the
bulbs produce a certain amount of UV radia-
tion. In order to avoid any impairment of health
(burning and conjunctivitis), the bulb should
only be used in closed headlights with appro-
priate UV–absorbing front glass.
Due to the risk of burning, the bulb should be
left to cool down for 3 minutes after switching
off before touching.
Due to the use of mercury and various salts,
the bulb should be treated as special waste
when discarded.
The bulb may only be operated with a suitable
ballast which produces very high voltages
when switched on and during operation.
Contact with bulb and wires should therefore
be avoided and a safe distance of at least 30
mm should be maintained.
Replacing the halogen headlight bulb
CAUTION
High pressure halogen gas is sealed inside
the halogen bulb. The bulb may break if the
glass envelope is scratched or the bulb is
dropped.
When handling the bulb, DO NOT TOUCH THE
GLASS ENVELOPE.
Use the same number type and wattage as
originally installed.
Aiming is usually not necessary after replac-
ing the bulb. When aiming adjustment is nec-
essary, contact a NISSAN dealer or qualified
workshop.
Do not leave the bulb out of the headlight
reflector for a long period of time as dust,
moisture or smoke may enter the headlight
body and affect the performance of the head-
light.
The headlight is a semi-sealed beam type which
uses a replaceable headlight (halogen) bulb. A bulb
can be replaced from inside the engine compart-
ment without removing the headlight assembly.
Contact a NISSAN dealer or qualified workshop, if
you need assistance for bulb replacement.
1. Open the bonnet. For details, see “Bonnet release” in the “3. Pre-driving checks and
adjustments” section.
2. Disconnect the negative (—) battery cable. 3. When the broken bulb is located in the headlight
assembly under the air duct, carefully remove the
clips and rotate the air duct
jc clockwise a 1/4
of a turn.
4. Remove the cap (
jAorjB ) of the headlight as-
sembly.
5. Turn the connector 1/4 of a turn in the anti clock- wise direction and remove the headlight bulb.
6. Install the new bulb in the reverse order of re- moval and make sure that the cap is securely
sealed with the headlight body.
7. Where removed (step 3.), re-install the air duct
jc and clips in the order of removal.
8. Reconnect the negative (—) battery cable and close the bonnet.
NOTE
Fog may temporarily form inside the lens of the
exterior lights in the rain or in a car wash. The fog
is caused by a temperature difference between
the inside and the outside of the lens. This is not
a malfunction. If large droplets can be seen, then
contact a NISSAN dealer or qualified workshop.
8-26Maintenance and do-it-yourself
Page 262 of 297
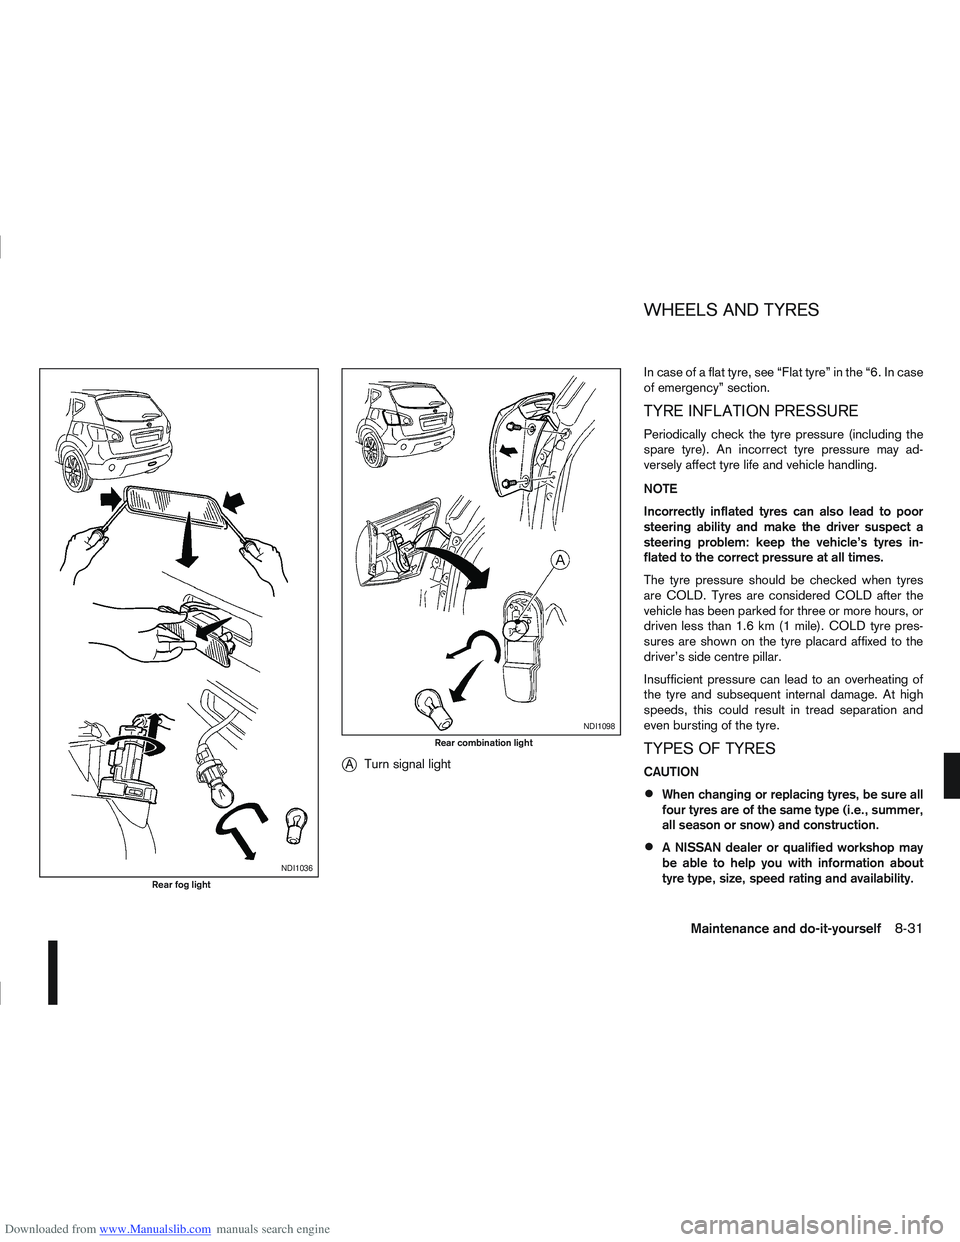
Downloaded from www.Manualslib.com manuals search engine jATurn signal light In case of a flat tyre, see “Flat tyre” in the “6. In case
of emergency” section.
TYRE INFLATION PRESSURE
Periodically check the tyre pressure (including the
spare tyre). An incorrect tyre pressure may ad-
versely affect tyre life and vehicle handling.
NOTE
Incorrectly inflated tyres can also lead to poor
steering ability and make the driver suspect a
steering problem: keep the vehicle’s tyres in-
flated to the correct pressure at all times.
The tyre pressure should be checked when tyres
are COLD. Tyres are considered COLD after the
vehicle has been parked for three or more hours, or
driven less than 1.6 km (1 mile). COLD tyre pres-
sures are shown on the tyre placard affixed to the
driver’s side centre pillar.
Insufficient pressure can lead to an overheating of
the tyre and subsequent internal damage. At high
speeds, this could result in tread separation and
even bursting of the tyre.
TYPES OF TYRES
CAUTION
When changing or replacing tyres, be sure all
four tyres are of the same type (i.e., summer,
all season or snow) and construction.
A NISSAN dealer or qualified workshop may
be able to help you with information about
tyre type, size, speed rating and availability.
NDI1036
Rear fog light
NDI1098
Rear combination light
WHEELS AND TYRES
Maintenance and do-it-yourself8-31
Page 263 of 297
Downloaded from www.Manualslib.com manuals search engine Replacement tyres may have a lower speed
rating than the factory equipped tyres, and
may not match the potential maximum vehicle
speed. Never exceed the maximum speed rat-
ing of the tyre.
All season tyres
NISSAN specifies all season tyres on some models
to provide good performance for use all year around,
including snowy and icy road conditions. All season
tyres are identified by ALL SEASON and/or M&S
on the tyre sidewall. Snow tyres have better snow
traction than all season tyres and may be more ap-
propriate in some areas.
Summer tyres
NISSAN specifies summer tyres as standard fit.
These tyres provide superior performance under
typical mild weather conditions.
If you plan to operate your vehicle in snowy or icy
conditions, NISSAN recommends the use of SNOW
or ALL SEASON tyres on all four wheels.
Snow tyres
If snow tyres are needed, it is necessary to select
tyres equivalent in size and load rating to the original
equipment tyres. If you do not, it can adversely af-
fect the safety and handling of your vehicle.
Generally, snow tyres will have lower speed ratings
than factory equipped tyres and may not match the
potential maximum vehicle speed. Never exceed the
maximum speed rating of the tyre.
For additional traction on icy roads, studded tyresmay be used. However, some provinces and states
prohibit their use. Check local, state and provincial
laws before installing studded tyres. Skid and trac-
tion capabilities of studded snow tyres, on wet or
dry surfaces, may be poorer than that of non-stud-
ded snow tyres.
SNOW CHAINS
Use of snow chains may be prohibited in some ar-
eas. Check the local laws before installing snow
chains. When installing snow chains, make sure they
are of proper size for the tyres on your vehicle and
are installed according to the chain manufacturer’s
suggestions. Use chain tensioners when recom-
mended by the snow chain manufacturer to ensure
a tight fit. Loose end links of the snow chain must be
secured or removed to prevent the possibility of
whipping action damage to the fenders or undercar-
riage.
In addition, drive at a reduced speed. Otherwise,
your vehicle can be damaged and/or vehicle han-
dling and performance may be adversely affected.
Snow chains must be installed only on the front
wheels and not on the rear wheels.
CAUTION
Never install snow chains on a temporary-use
or small size spare tyre.
Do not drive with snow chains on paved roads
which are clear of snow. Driving with chains in
such conditions can cause damage to the
various mechanisms of the vehicle due to
some overstress. When driving on clear paved
roads, be sure to change to 2WD mode, see
“Four-wheel Drive (4WD) (where fitted)” in the
“5. Starting and driving” section.
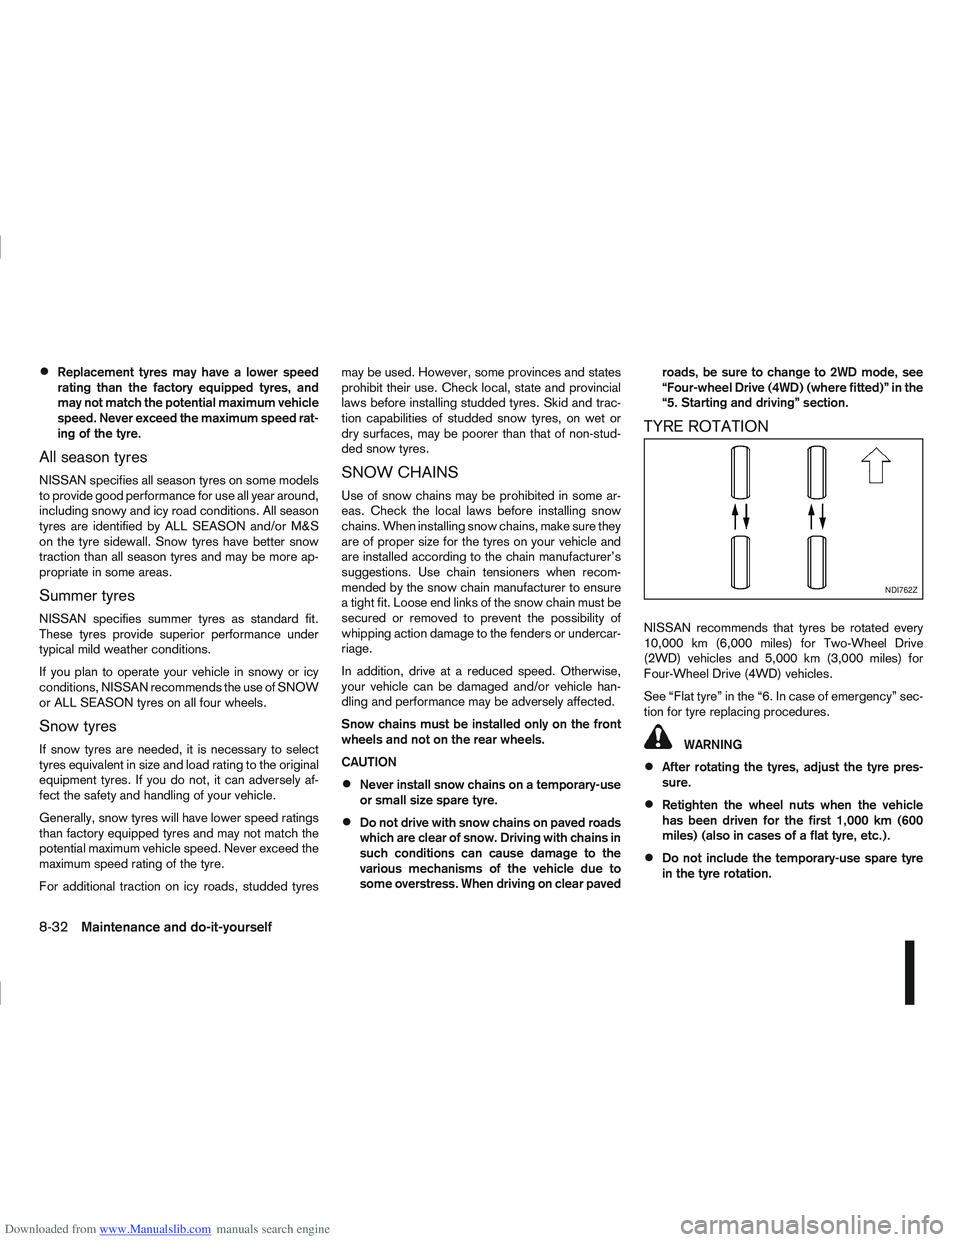
TYRE ROTATION
NISSAN recommends that tyres be rotated every
10,000 km (6,000 miles) for Two-Wheel Drive
(2WD) vehicles and 5,000 km (3,000 miles) for
Four-Wheel Drive (4WD) vehicles.
See “Flat tyre” in the “6. In case of emergency” sec-
tion for tyre replacing procedures.
WARNING
After rotating the tyres, adjust the tyre pres-
sure.
Retighten the wheel nuts when the vehicle
has been driven for the first 1,000 km (600
miles) (also in cases of a flat tyre, etc.).
Do not include the temporary-use spare tyre
in the tyre rotation.
NDI762Z
8-32Maintenance and do-it-yourself
Page 264 of 297
Downloaded from www.Manualslib.com manuals search engine Incorrect tyre selection, fitting, care or main-
tenance can affect vehicle safety with risk of
accident and injury. If in doubt, consult a
NISSAN dealer or the tyre manufacturer.
TYRE WEAR AND DAMAGE
Tyres should be periodically inspected for wear,
cracking, bulging or objects caught in the tread. If
excessive wear, cracks, bulging or deep cuts are
found, the tyre should be replaced.
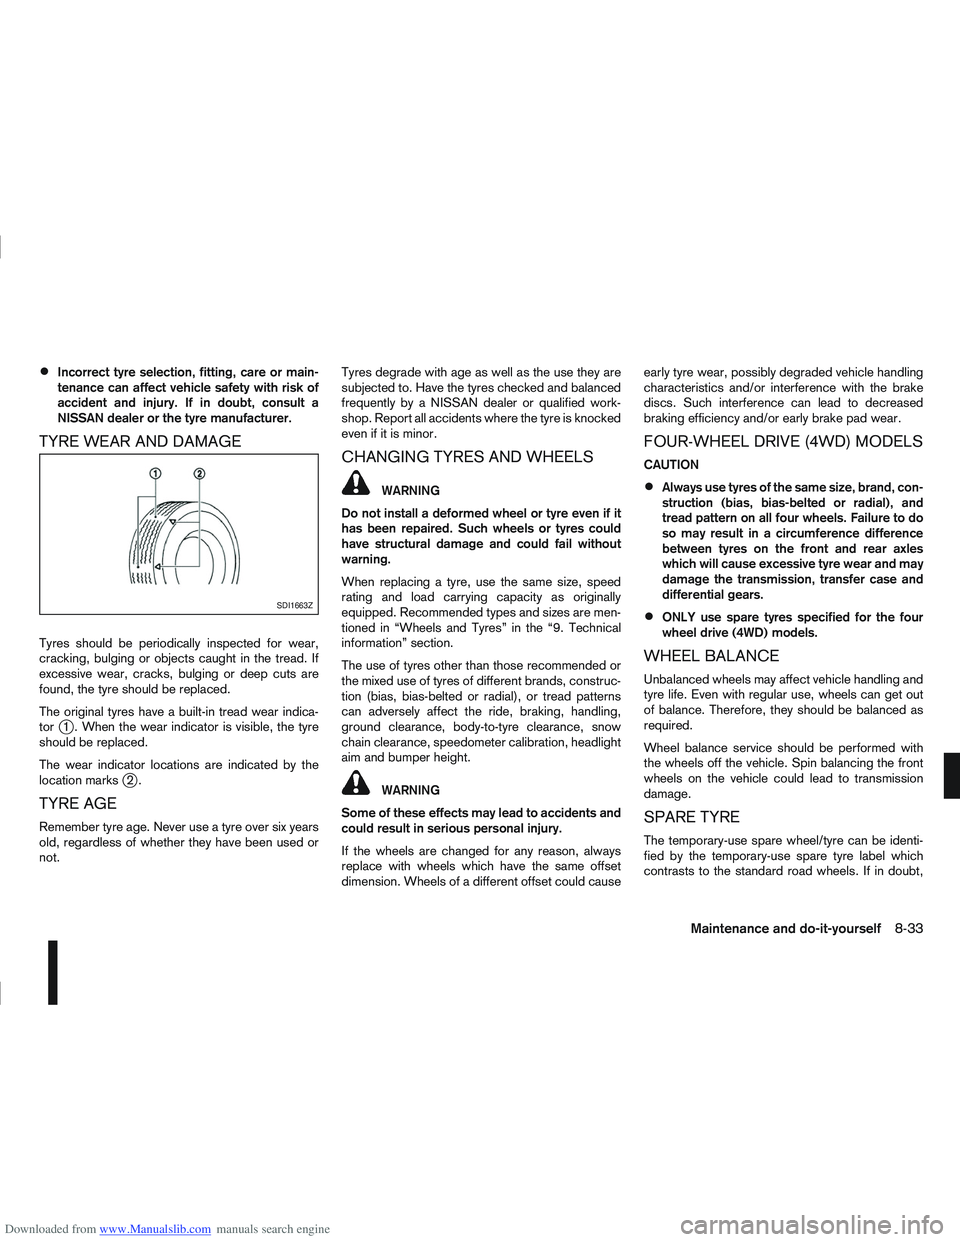
The original tyres have a built-in tread wear indica-
tor
j1 . When the wear indicator is visible, the tyre
should be replaced.
The wear indicator locations are indicated by the
location marks
j2.
TYRE AGE
Remember tyre age. Never use a tyre over six years
old, regardless of whether they have been used or
not. Tyres degrade with age as well as the use they are
subjected to. Have the tyres checked and balanced
frequently by a NISSAN dealer or qualified work-
shop. Report all accidents where the tyre is knocked
even if it is minor.
CHANGING TYRES AND WHEELS
WARNING
Do not install a deformed wheel or tyre even if it
has been repaired. Such wheels or tyres could
have structural damage and could fail without
warning.
When replacing a tyre, use the same size, speed
rating and load carrying capacity as originally
equipped. Recommended types and sizes are men-
tioned in “Wheels and Tyres” in the “9. Technical
information” section.
The use of tyres other than those recommended or
the mixed use of tyres of different brands, construc-
tion (bias, bias-belted or radial), or tread patterns
can adversely affect the ride, braking, handling,
ground clearance, body-to-tyre clearance, snow
chain clearance, speedometer calibration, headlight
aim and bumper height.
WARNING
Some of these effects may lead to accidents and
could result in serious personal injury.
If the wheels are changed for any reason, always
replace with wheels which have the same offset
dimension. Wheels of a different offset could cause early tyre wear, possibly degraded vehicle handling
characteristics and/or interference with the brake
discs. Such interference can lead to decreased
braking efficiency and/or early brake pad wear.
FOUR-WHEEL DRIVE (4WD) MODELS
CAUTION
Always use tyres of the same size, brand, con-
struction (bias, bias-belted or radial), and
tread pattern on all four wheels. Failure to do
so may result in a circumference difference
between tyres on the front and rear axles
which will cause excessive tyre wear and may
damage the transmission, transfer case and
differential gears.
ONLY use spare tyres specified for the four
wheel drive (4WD) models.
WHEEL BALANCE
Unbalanced wheels may affect vehicle handling and
tyre life. Even with regular use, wheels can get out
of balance. Therefore, they should be balanced as
required.
Wheel balance service should be performed with
the wheels off the vehicle. Spin balancing the front
wheels on the vehicle could lead to transmission
damage.
SPARE TYRE
The temporary-use spare wheel/tyre can be identi-
fied by the temporary-use spare tyre label which
contrasts to the standard road wheels. If in doubt,
SDI1663Z
Maintenance and do-it-yourself8-33
Page 273 of 297
Downloaded from www.Manualslib.com manuals search engine Unit: mm (in)
5–seater 7–seater
Overall length 4,332 (170.6) 4,542 (178.8)
Overall width 1,780 (70.1) 1,780 (70.1)
Overall height 1,605 (63.2) 1,645 (64.8) 1,622 (63.9)*
Front tread 1,540 (60.6) 1,540 (60.6)
Rear tread 1,545 (60.8) 1,550 (61)
Wheelbase 2,630 (103.5) 2,765 (108.9)
* : with roof rail When planning to travel in another country,
you
should first find out if the fuel available is suitable for
your vehicle’s engine.
Using fuel with too low octane/cetane rating may
cause engine damage. Therefore, avoid taking your
vehicle to areas where appropriate fuel is not avail-
able.
When transferring your vehicle registration to an-
other country, check with the appropriate authori-
ties that the vehicle complies with the requirements
as it may not be possible to adapt it. In some cases,
a vehicle cannot meet the legal requirements and in
other cases, it may be necessary to modify the ve-
hicle to meet specific laws and regulations.
The laws and regulations for motor vehicle emission
control and safety standards vary according to the
country; therefore, vehicle specifications may differ.
NISSAN is not responsible for any inconvenience
when the vehicle is taken and registered into an-
other country. The necessary modifications,
transportation and registration are the owner’s
responsibility.
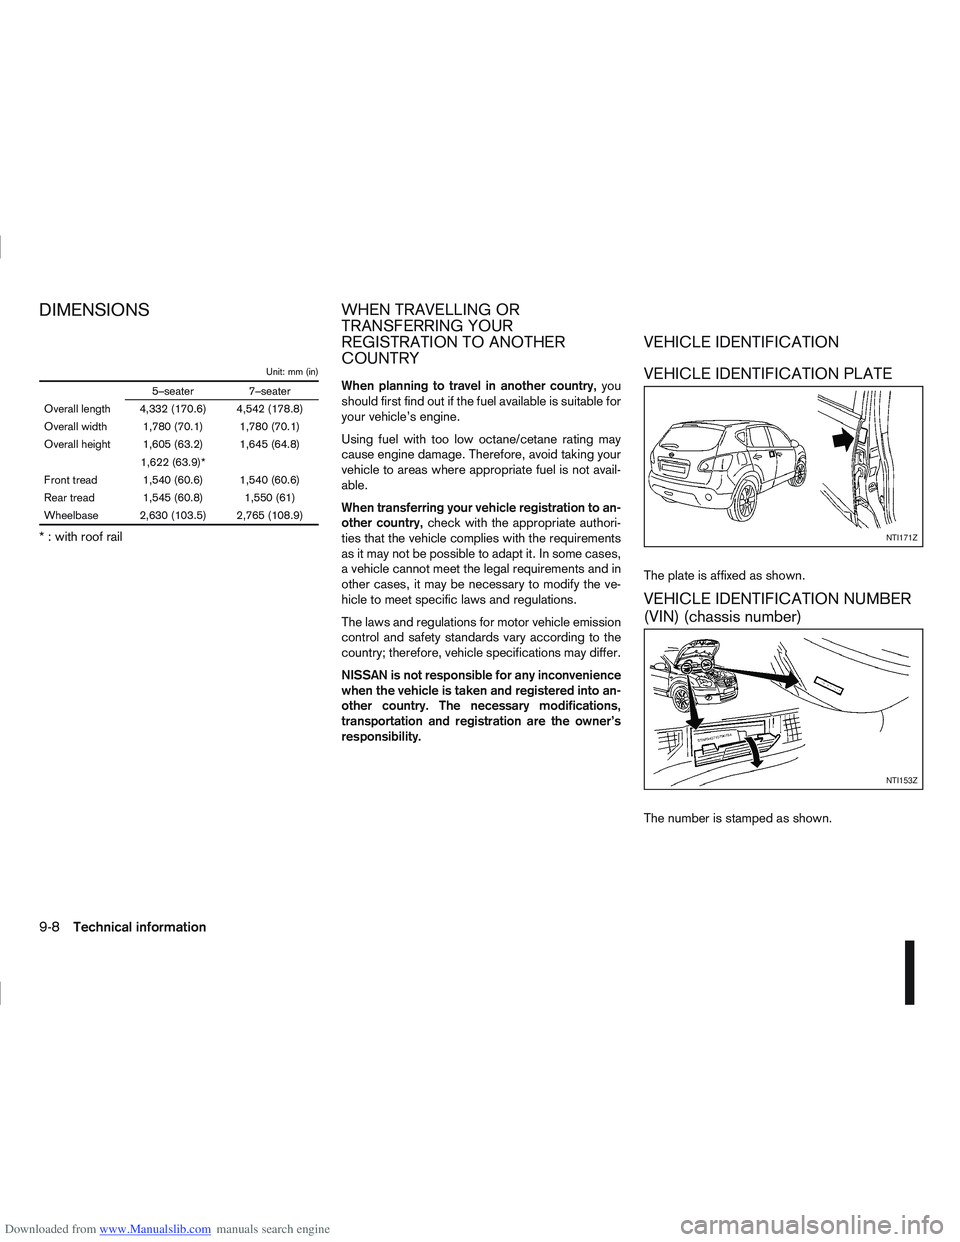
VEHICLE IDENTIFICATION PLATE
The plate is affixed as shown.
VEHICLE IDENTIFICATION NUMBER
(VIN) (chassis number)
The number is stamped as shown.
NTI171Z
NTI153Z
DIMENSIONSWHEN TRAVELLING OR
TRANSFERRING YOUR
REGISTRATION TO ANOTHER
COUNTRY VEHICLE IDENTIFICATION
9-8Technical information
Page 282 of 297

Downloaded from www.Manualslib.com manuals search engine 10 Index
A
Air bag system (Supplemental Restraint System) ................. 1-14
Air bag warning labels ......................................................... 1-16
Air bag warning light ............................................................ 1-16
Air cleaner filter ................................................................... 8-21
Air conditioner
– Air conditioner filter .............................................. 4-17, 4-21
– Air conditioning system refrigerant and lubricantrecommendations ............................................................ 9-6
– Automatic air conditioner ............................................... 4-18
– Heater and air conditioner .............................................. 4-12
– Manual air conditioner ................................................... 4-13
– Servicing air conditioner ....................................... 4-17, 4-21
Alarm system ...................................................................... 3-13
Anchor points
– Child restraints .............................................................. 1-28
Antenna ........................................................................\
...... 4-22
Anti-hijack – unlock mode ...................................................... 3-4
Anti-lock Braking System (ABS) .......................................... 5-39
Anti-Theft System (NISSAN) ................................................ 3-13
Approval numbers ............................................................... 9-10
Armrest ........................................................................\
......... 1-5
Around view monitor .............................................................. 4-4
Around view monitor operation .............................................. 4-6
Audible reminders, warning/indicator lights ............................ 2-3
Audio
– Anti-theft system ................................................... 4-24, 4-31
– Audio operation precautions .......................................... 4-21
– Audio system ................................................................. 4-21
– AUX socket .......................................................... 4-29, 4-36 – Bluetooth® audio streaming main operation ................... 4-40
– FM AM radio with CD player ......................................... 4-30
– iPod® player operation .................................................. 4-37
– LW-MW-FM radio with 6 CD changer ........................... 4-23
– LW-MW-FM radio with CD player ................................. 4-23
– NISSAN Connect .......................................................... 4-43
– Steering-wheel switch for audio control ......................... 4-43
– USB Memory operation ................................................. 4-37
Automatic transmission
– Automatic transmission fluid (ATF) ................................. 8-14
– Automatic transmission fluid label .................................. 9-10
– Driving with automatic transmission ............................... 5-14
B
Battery ....................................................................... 5-43, 8-17
– Caution label ................................................................. 8-17
– Integrated keyfob battery replacement ........................... 8-19
– Intelligent Key battery replacement ................................. 8-19
– Vehicle battery ............................................................... 8-17
Before starting the engine ..................................................... 5-2
Bluetooth® ........................................................................\
.. 4-44
– Bluetooth® mobile phone feature .................................. 4-52
– Bluetooth® operation .................................................... 4-39
– Bluetooth® settings ....................................................... 4-39
Bonnet release .................................................................... 3-14
Brake ........................................................................\
.......... 8-15
– Anti-lock Braking System (ABS) .................................... 5-39
– Brake fluid ..................................................................... 8-15
– Brake precautions ......................................................... 5-39
– Brake system ................................................................ 5-39
– Checking brake pedal ................................................... 8-15