Page 10 of 409
Black plate (6,1)
Model "Z34-D" EDITED: 2009/ 9/ 10
SSI0594
1. Hood (P.3-16)
2. Headlight and turn signal— Operation (P.2-29)
— Bulb replacement (P.8-24) 3. Windshield wiper and washer
— Operation (P.2-27)
— Maintenance (P.8-18)
4. Power windows (P.2-42) 5. Outside mirrors (P.3-38)
6. Recovery hook (P.6-22)
7. License plate installation (P.9-13)
8. Tires
— Wheels and tires (P.8-28, P.9-8)
— Flat tire (P.6-2)
— Tire Pressure Monitoring System (TPMS)
(P.2-10, P.5-3)
9. Doors — Keys (P.3-2)
— Door locks (P.3-4)
— Intelligent Key system (P.3-6)
— Remote keyless entry system (P.3-13)EXTERIOR FRONT0-4
Illustrated table of contents
Page 18 of 409
Black plate (14,1)
Model "Z34-D" EDITED: 2009/ 9/ 10
SSI0509
1. ENTER/NEXT switch (P.2-20)
2. Fuel gauge (P.2-6)
3. Warning/Indicator lights (P.2-8)
4. Tachometer (P.2-5)
5. Speedometer (P.2-5)
6. Instrument brightness control switch (P.2-32)7. Vehicle information display (P.2-16)
8. Engine coolant temperature gauge (P.2-6)
9. Transmission position indicator (if so equipped)
(P.2-12)
— SynchroRev Match mode (S-MODE) indicator
(if so equipped) (P.5-16)
SSI0521
10. Odometer/Twin trip odometer control knob (P.2-5)
11. Odometer/Twin trip odometer (P.2-5)
12. Engine oil temperature gauge (P.2-7)
13. Voltmeter (P.2-7)
14. Clock (P.2-7, P.2-23)
METERS AND GAUGES0-12
Illustrated table of contents
Page 20 of 409

Black plate (16,1)
Model "Z34-D" EDITED: 2009/ 9/ 10
Warninglight Name
Page
Anti-lock Braking System
(ABS) warning light 2-9Automatic Transmission (AT)
check warning light2-9Brake warning light
2-9Charge warning light2-10Engine oil pressure warning
light 2-10Intelligent Key system warning
light2-10Low tire pressure warning light 2-10Master warning light
2-11Seat belt warning light 2-11Supplemental air bag warning
light 2-12Indicator
light Name
Page
Cruise indicator light 2-12Front passenger air bag status
light 2-13High beam indicator light 2-13Malfunction Indicator Light
(MIL)2-13Rear fog light indicator light* 2-14Security indicator light
2-14Slip indicator light 2-14Small light indicator lights 2-14Soft top indicator light (Road-
ster models) 2-14SynchroRev Match mode (S-
MODE) indicator*2-15Transmission position indicator
light*2-12Turn signal/hazard indicator
lights2-15Indicator
light Name Page
Vehicle Dynamic Control (VDC)
off indicator light
2-15
*: if so equipped
WARNING AND INDICATOR LIGHTS0-14
Illustrated table of contents
Page 22 of 409

Black plate (20,1)
Model "Z34-D" EDITED: 2009/ 9/ 10
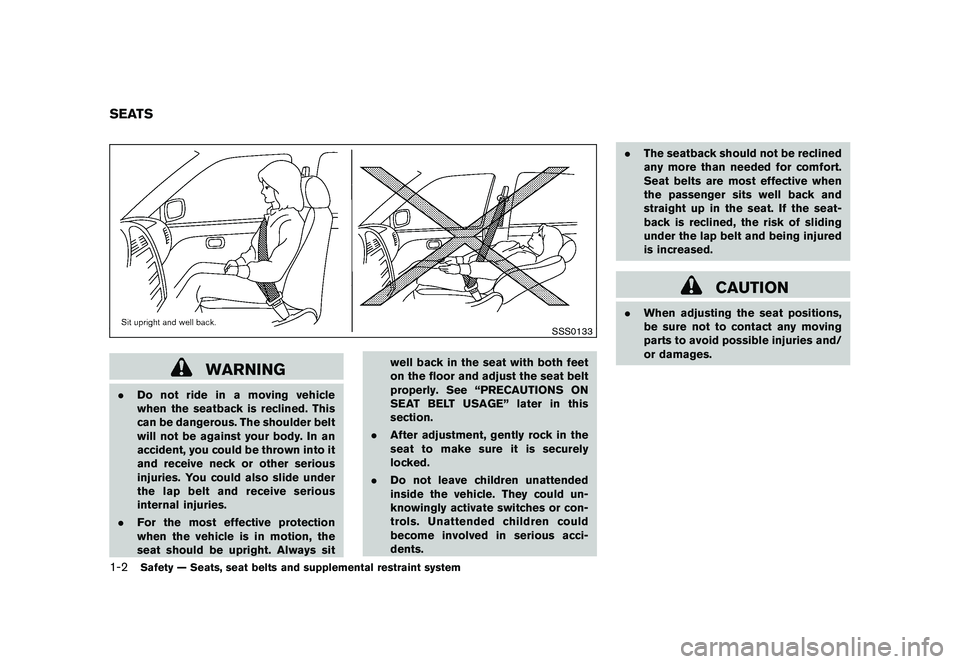
SSS0133
WARNING
.Do not ride in a moving vehicle
when the seatback is reclined. This
can be dangerous. The shoulder belt
will not be against your body. In an
accident, you could be thrown into it
and receive neck or other serious
injuries. You could also slide under
the lap belt and receive serious
internal injuries.
. For the most effective protection
when the vehicle is in motion, the
seat should be upright. Always sit well back in the seat with both feet
on the floor and adjust the seat belt
properly. See “PRECAUTIONS ON
SEAT BELT USAGE” later in this
section.
. After adjustment, gently rock in the
seat to make sure it is securely
locked.
. Do not leave children unattended
inside the vehicle. They could un-
knowingly activate switches or con-
trols. Unattended children could
become involved in serious acci-
dents. .
The seatback should not be reclined
any more than needed for comfort.
Seat belts are most effective when
the passenger sits well back and
straight up in the seat. If the seat-
back is reclined, the risk of sliding
under the lap belt and being injured
is increased.
CAUTION
.When adjusting the seat positions,
be sure not to contact any moving
parts to avoid possible injuries and/
or damages.
SEATS1-2
Safety — Seats, seat belts and supplemental restraint system
Page 24 of 409

Black plate (22,1)
Model "Z34-D" EDITED: 2009/ 9/ 10
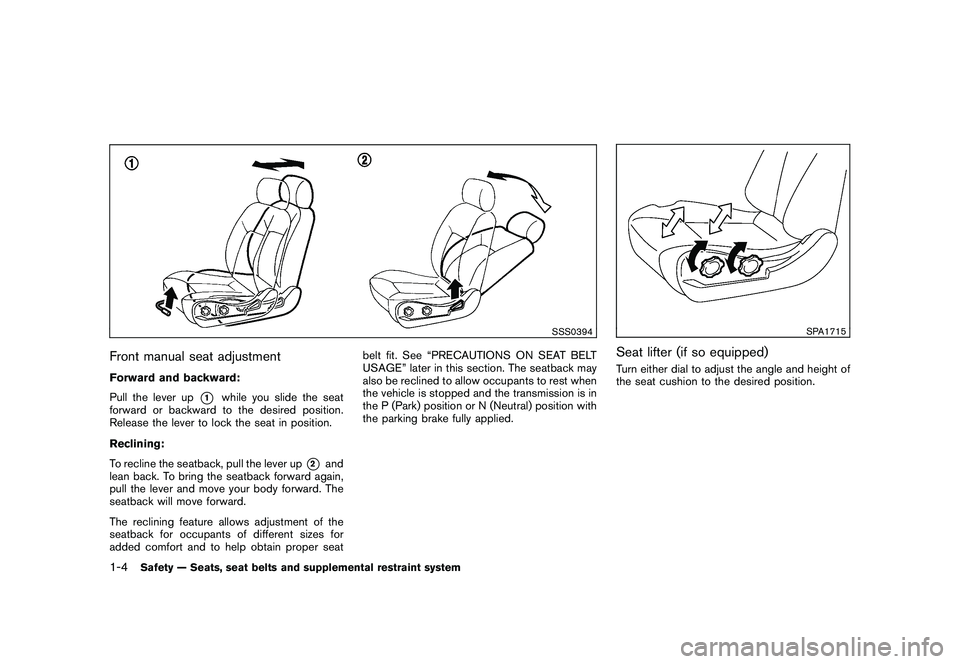
SSS0394
Front manual seat adjustmentForward and backward:
Pull the lever up
*1
while you slide the seat
forward or backward to the desired position.
Release the lever to lock the seat in position.
Reclining:
To recline the seatback, pull the lever up
*2
and
lean back. To bring the seatback forward again,
pull the lever and move your body forward. The
seatback will move forward.
The reclining feature allows adjustment of the
seatback for occupants of different sizes for
added comfort and to help obtain proper seat belt fit. See “PRECAUTIONS ON SEAT BELT
USAGE” later in this section. The seatback may
also be reclined to allow occupants to rest when
the vehicle is stopped and the transmission is in
the P (Park) position or N (Neutral) position with
the parking brake fully applied.
SPA1715
Seat lifter (if so equipped)Turn either dial to adjust the angle and height of
the seat cushion to the desired position.
1-4
Safety — Seats, seat belts and supplemental restraint system
Page 26 of 409
Black plate (24,1)
Model "Z34-D" EDITED: 2009/ 9/ 10
SSS0992
Components1. Head restraint
2. Adjustment notches
3. Lock knob
4. Stalks
SSS0997
AdjustmentAdjust the head restraint so the center is level
with the center of your ears.
SSS0993
To raise the head restraint, pull it up.
1-6
Safety — Seats, seat belts and supplemental restraint system
Page 27 of 409
Black plate (25,1)
Model "Z34-D" EDITED: 2009/ 9/ 10
SSS0994
To lower, push and hold the lock knob and push
the head restraint down.
SSS0995
RemovalUse the following procedure to remove the
adjustable head restraints.
1. Pull the head restraint up to the highestposition.
2. Push and hold the lock knob.
3. Remove the head restraint from the seat.
4. Store the head restraint properly in a secure place so it is not loose in the vehicle.
5. Install and properly adjust the head restraint before an occupant uses the seating posi-
tion.
CAUTION
Models with climate controlled seats
are designed so that the head restraint
cannot be removed. The head restraint
may be damaged if the head restraint is
forcibly pulled out.
Safety — Seats, seat belts and supplemental restraint system
1-7
Page 28 of 409

Black plate (26,1)
Model "Z34-D" EDITED: 2009/ 9/ 10
SSS0996
Install1. Align the head restraint stalks with the holesin the seat. Make sure that the head restraint
is facing the correct direction. The stalk with
the adjustment notches
*1
must be in-
stalled in the hole with the lock knob
*2.
2. Push and hold the lock knob and push the head restraint down.
3. Properly adjust the head restraint before an occupant uses the seating position.
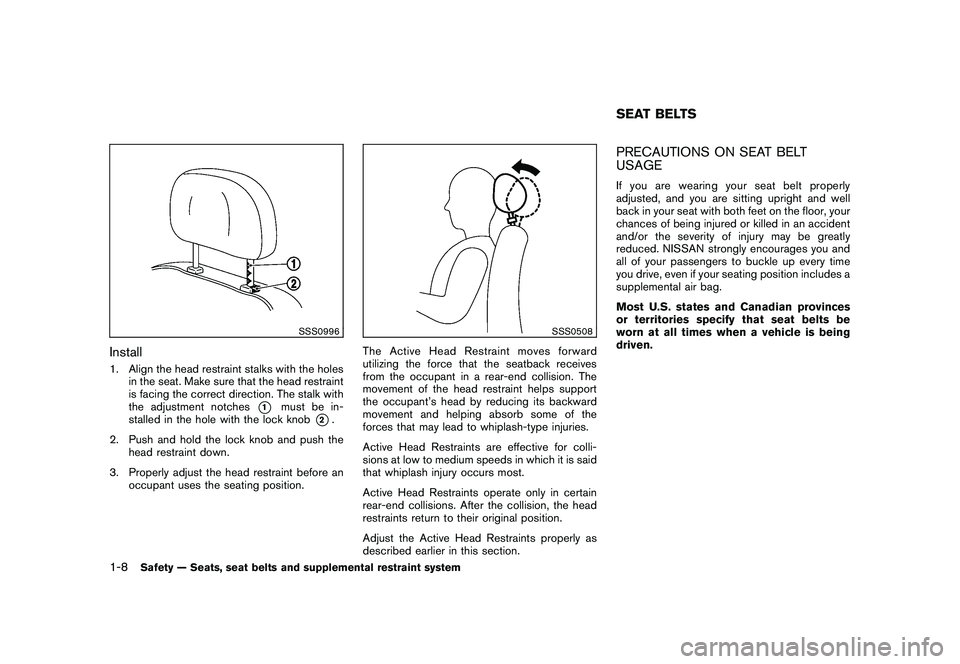
SSS0508
The Active Head Restraint moves forward
utilizing the force that the seatback receives
from the occupant in a rear-end collision. The
movement of the head restraint helps support
the occupant’s head by reducing its backward
movement and helping absorb some of the
forces that may lead to whiplash-type injuries.
Active Head Restraints are effective for colli-
sions at low to medium speeds in which it is said
that whiplash injury occurs most.
Active Head Restraints operate only in certain
rear-end collisions. After the collision, the head
restraints return to their original position.
Adjust the Active Head Restraints properly as
described earlier in this section.
PRECAUTIONS ON SEAT BELT
USAGEIf you are wearing your seat belt properly
adjusted, and you are sitting upright and well
back in your seat with both feet on the floor, your
chances of being injured or killed in an accident
and/or the severity of injury may be greatly
reduced. NISSAN strongly encourages you and
all of your passengers to buckle up every time
you drive, even if your seating position includes a
supplemental air bag.
Most U.S. states and Canadian provinces
or territories specify that seat belts be
worn at all times when a vehicle is being
driven.SEAT BELTS
1-8
Safety — Seats, seat belts and supplemental restraint system