2010 NISSAN 370Z COUPE lock
[x] Cancel search: lockPage 33 of 409
Black plate (31,1)
Model "Z34-D" EDITED: 2009/ 9/ 10
front-facing child restraint ride in
this vehicle. Do not attempt to hold
a child in your lap or arms.
. Roadster models do not have an
anchor for a top tether strap re-
quired for most child restraints.
Never let children who require the
use of rear or front-facing child
restraints ride in this vehicle.
. Larger children need special protec-
tion. The vehicle’s seat belts may
not fit them properly. The shoulder
belt may come too close to the face
or neck. The lap belt may not fit over
their small hip bones. In an acci-
dent, an improperly fitting seat belt
could cause serious or fatal injury.
Always use appropriate child re-
straints.
PREGNANT WOMENNISSAN recommends that pregnant women use
seat belts. The seat belt should be worn snug,
and always position the lap belt as low as
possible around the hips, not the waist, and
place the shoulder belt over your shoulder and
across your chest. Never run the lap/shoulder
belt over your abdominal area. Contact your
doctor for specific recommendations.
INJURED PERSONSNISSAN recommends that injured persons use
seat belts, depending on the injury. Check with
your doctor for specific recommendations.THREE-POINT TYPE SEAT BELT
WARNING
.Every person who drives or rides in
this vehicle should use a seat belt at
all times.
. Do not ride in a moving vehicle
when the seatback is reclined. This
can be dangerous. The shoulder belt
will not be against your body. In an
accident, you could be thrown into it
and receive neck or other serious
injuries. You could also slide under
the lap belt and receive serious
internal injuries.
. For the most effective protection
when the vehicle is in motion, the
seat should be upright. Always sit
well back in the seat with both feet
on the floor and adjust the seat belt
properly.
SSS0292
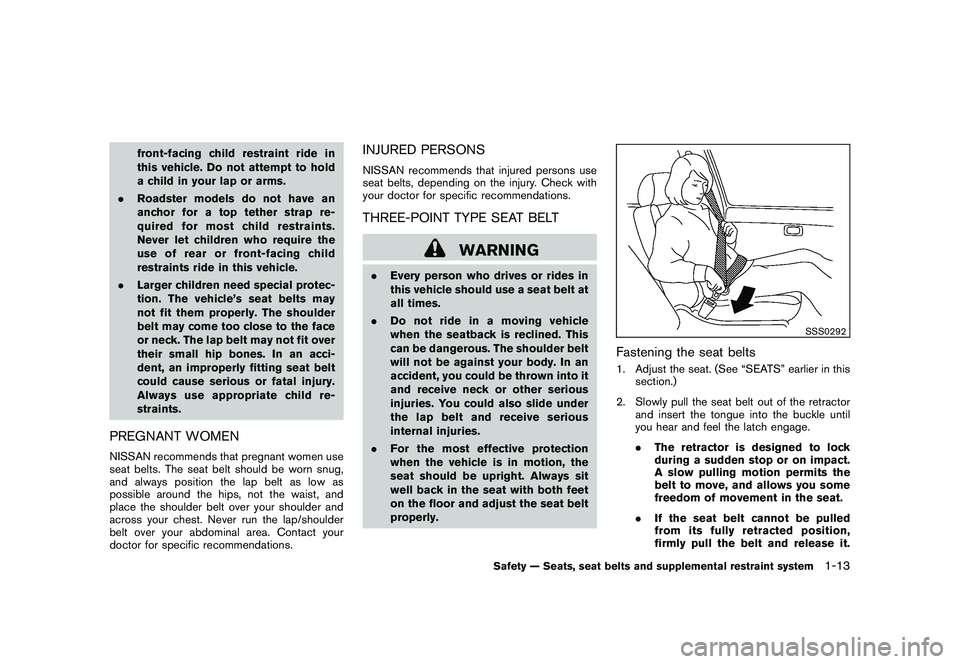
Fastening the seat belts1. Adjust the seat. (See “SEATS” earlier in this
section.)
2. Slowly pull the seat belt out of the retractor and insert the tongue into the buckle until
you hear and feel the latch engage.
.The retractor is designed to lock
during a sudden stop or on impact.
A slow pulling motion permits the
belt to move, and allows you some
freedom of movement in the seat.
. If the seat belt cannot be pulled
from its fully retracted position,
firmly pull the belt and release it.
Safety — Seats, seat belts and supplemental restraint system
1-13
Page 34 of 409
Black plate (32,1)
Model "Z34-D" EDITED: 2009/ 9/ 10
Then smoothly pull the belt out of
the retractor.
SSS0290
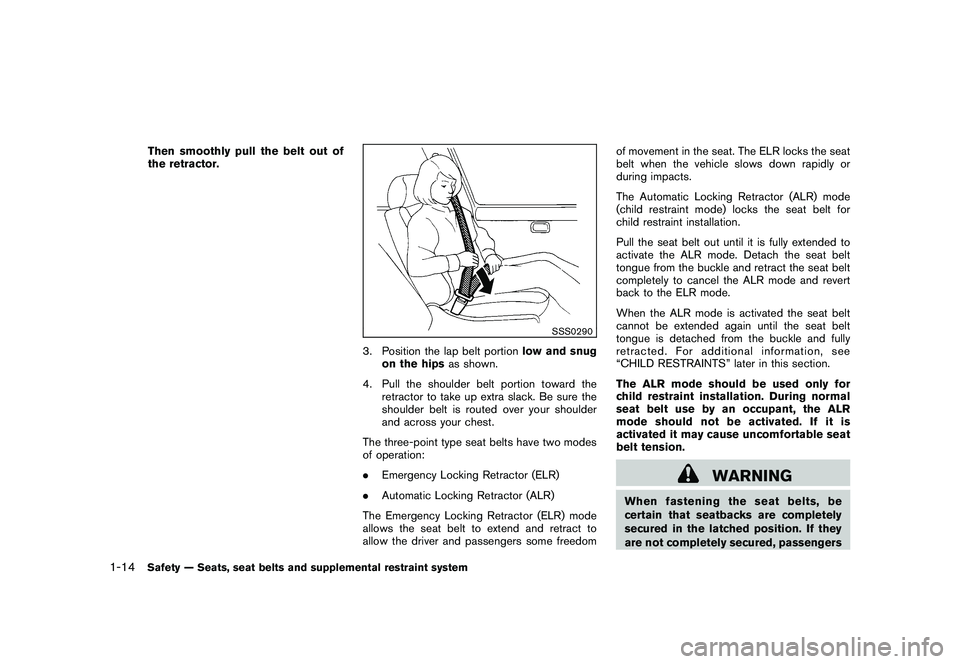
3. Position the lap belt portionlow and snug
on the hips as shown.
4. Pull the shoulder belt portion toward the retractor to take up extra slack. Be sure the
shoulder belt is routed over your shoulder
and across your chest.
The three-point type seat belts have two modes
of operation:
. Emergency Locking Retractor (ELR)
. Automatic Locking Retractor (ALR)
The Emergency Locking Retractor (ELR) mode
allows the seat belt to extend and retract to
allow the driver and passengers some freedom of movement in the seat. The ELR locks the seat
belt when the vehicle slows down rapidly or
during impacts.
The Automatic Locking Retractor (ALR) mode
(child restraint mode) locks the seat belt for
child restraint installation.
Pull the seat belt out until it is fully extended to
activate the ALR mode. Detach the seat belt
tongue from the buckle and retract the seat belt
completely to cancel the ALR mode and revert
back to the ELR mode.
When the ALR mode is activated the seat belt
cannot be extended again until the seat belt
tongue is detached from the buckle and fully
retracted. For additional information, see
“CHILD RESTRAINTS” later in this section.
The ALR mode should be used only for
child restraint installation. During normal
seat belt use by an occupant, the ALR
mode should not be activated. If it is
activated it may cause uncomfortable seat
belt tension.
WARNING
When fastening the seat belts, be
certain that seatbacks are completely
secured in the latched position. If they
are not completely secured, passengers
1-14
Safety — Seats, seat belts and supplemental restraint system
Page 35 of 409
Black plate (33,1)
Model "Z34-D" EDITED: 2009/ 9/ 10
may be injured in an accident or sudden
stop.
SSS0326
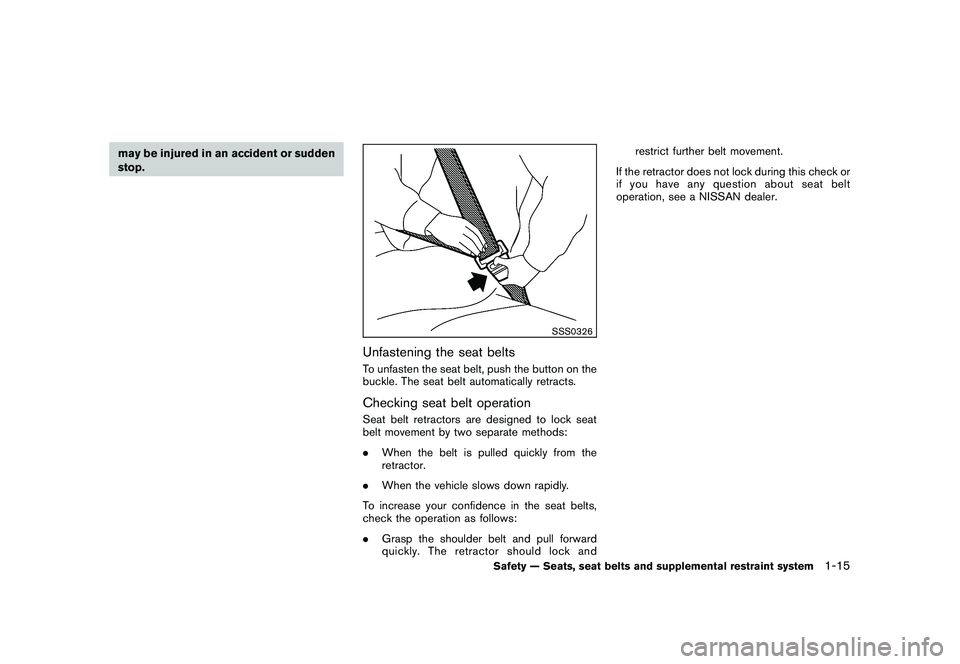
Unfastening the seat beltsTo unfasten the seat belt, push the button on the
buckle. The seat belt automatically retracts.Checking seat belt operationSeat belt retractors are designed to lock seat
belt movement by two separate methods:
.When the belt is pulled quickly from the
retractor.
. When the vehicle slows down rapidly.
To increase your confidence in the seat belts,
check the operation as follows:
. Grasp the shoulder belt and pull forward
quickly. The retractor should lock and restrict further belt movement.
If the retractor does not lock during this check or
if you have any question about seat belt
operation, see a NISSAN dealer.
Safety — Seats, seat belts and supplemental restraint system
1-15
Page 40 of 409
Black plate (38,1)
Model "Z34-D" EDITED: 2009/ 9/ 10
.The three-point seat belt in your
vehicle is equipped with an Auto-
matic Locking Retractor (ALR) which
must be used when installing a child
restraint.
. Failure to use the ALR will result in
the child restraint not being prop-
erly secured. The restraint could tip
over or otherwise be unsecured and
cause injury to the child in a sudden
stop or collision.
The instructions in this section apply to child
restraint installation using the vehicle seat belts
in the front passenger seat.
SSS0640
Front-facing (front passenger seat) — step 1
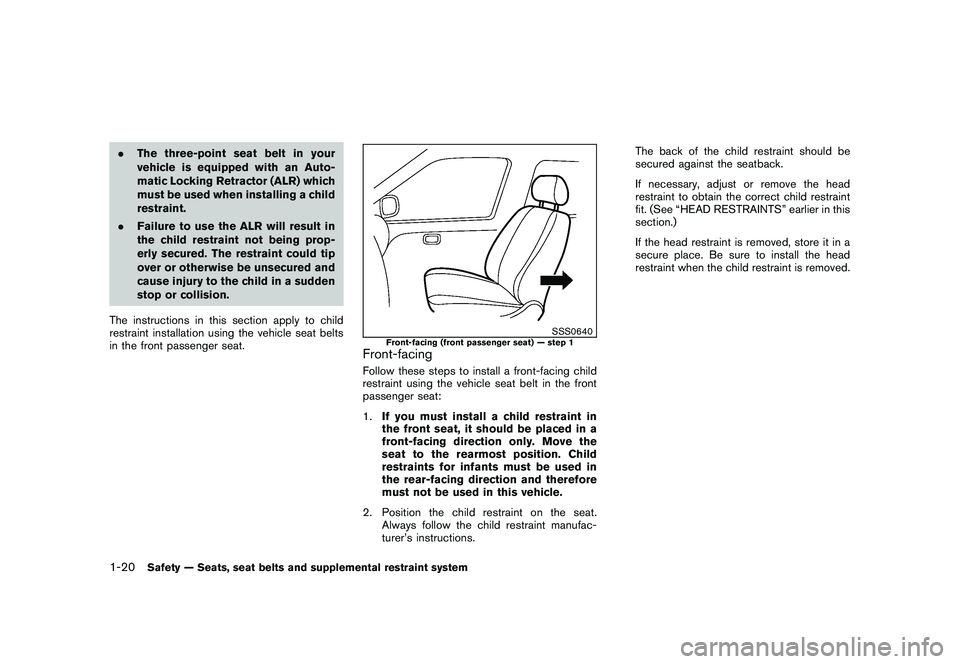
Front-facingFollow these steps to install a front-facing child
restraint using the vehicle seat belt in the front
passenger seat:
1. If you must install a child restraint in
the front seat, it should be placed in a
front-facing direction only. Move the
seat to the rearmost position. Child
restraints for infants must be used in
the rear-facing direction and therefore
must not be used in this vehicle.
2. Position the child restraint on the seat. Always follow the child restraint manufac-
turer’s instructions. The back of the child restraint should be
secured against the seatback.
If necessary, adjust or remove the head
restraint to obtain the correct child restraint
fit. (See “HEAD RESTRAINTS” earlier in this
section.)
If the head restraint is removed, store it in a
secure place. Be sure to install the head
restraint when the child restraint is removed.
1-20
Safety — Seats, seat belts and supplemental restraint system
Page 41 of 409
Black plate (39,1)
Model "Z34-D" EDITED: 2009/ 9/ 10
SSS0360B
Front-facing — step 3
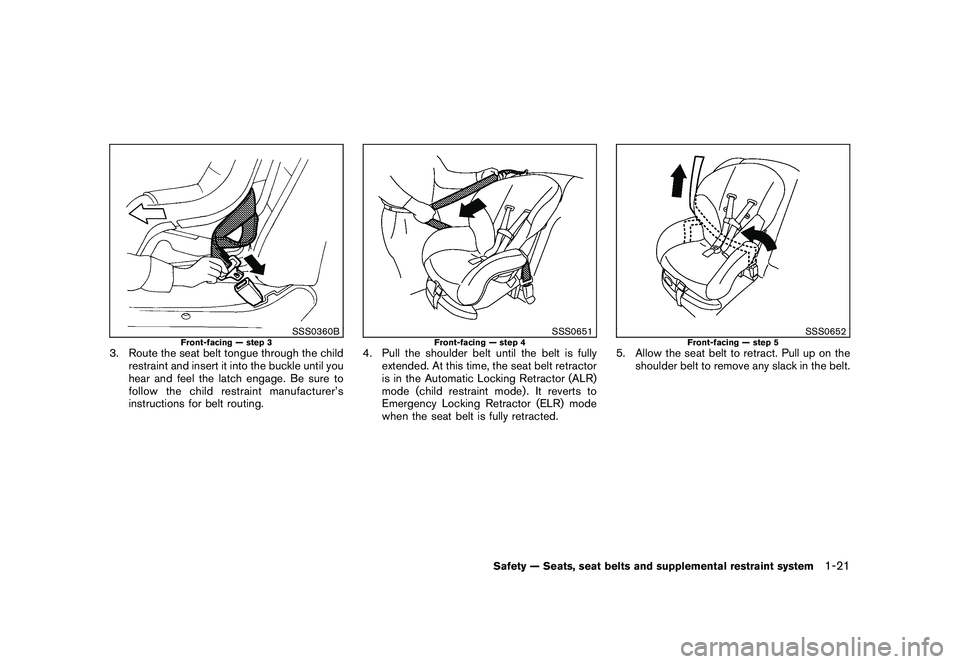
3. Route the seat belt tongue through the childrestraint and insert it into the buckle until you
hear and feel the latch engage. Be sure to
follow the child restraint manufacturer’s
instructions for belt routing.
SSS0651
Front-facing — step 4
4. Pull the shoulder belt until the belt is fullyextended. At this time, the seat belt retractor
is in the Automatic Locking Retractor (ALR)
mode (child restraint mode) . It reverts to
Emergency Locking Retractor (ELR) mode
when the seat belt is fully retracted.
SSS0652
Front-facing — step 5
5. Allow the seat belt to retract. Pull up on theshoulder belt to remove any slack in the belt.
Safety — Seats, seat belts and supplemental restraint system
1-21
Page 42 of 409
Black plate (40,1)
Model "Z34-D" EDITED: 2009/ 9/ 10
SSS0653
Front-facing — step 6
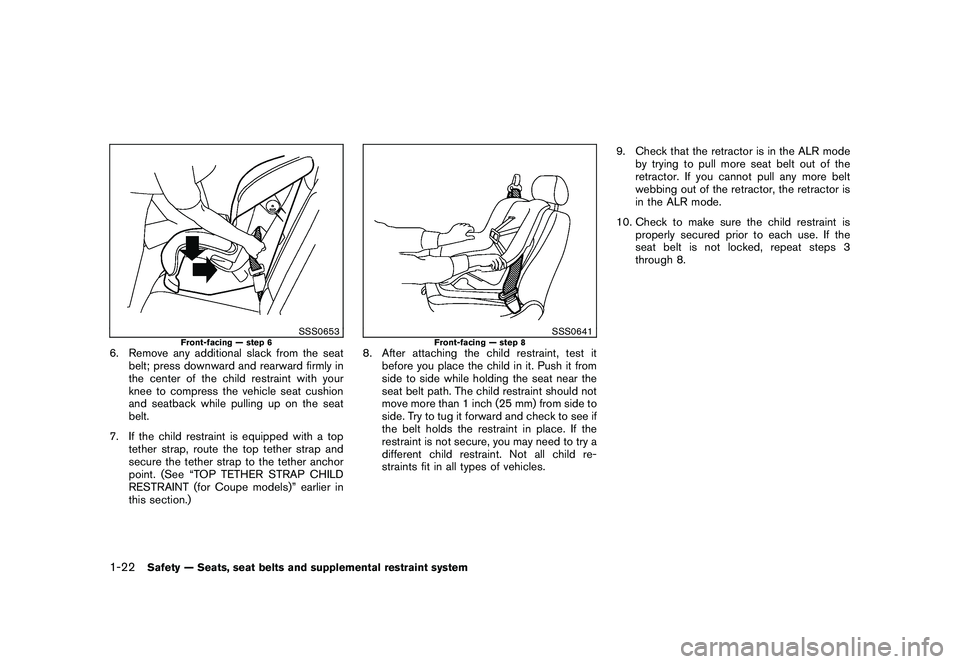
6. Remove any additional slack from the seatbelt; press downward and rearward firmly in
the center of the child restraint with your
knee to compress the vehicle seat cushion
and seatback while pulling up on the seat
belt.
7. If the child restraint is equipped with a top tether strap, route the top tether strap and
secure the tether strap to the tether anchor
point. (See “TOP TETHER STRAP CHILD
RESTRAINT (for Coupe models)” earlier in
this section.)
SSS0641
Front-facing — step 8
8. After attaching the child restraint, test itbefore you place the child in it. Push it from
side to side while holding the seat near the
seat belt path. The child restraint should not
move more than 1 inch (25 mm) from side to
side. Try to tug it forward and check to see if
the belt holds the restraint in place. If the
restraint is not secure, you may need to try a
different child restraint. Not all child re-
straints fit in all types of vehicles. 9. Check that the retractor is in the ALR mode
by trying to pull more seat belt out of the
retractor. If you cannot pull any more belt
webbing out of the retractor, the retractor is
in the ALR mode.
10. Check to make sure the child restraint is properly secured prior to each use. If the
seat belt is not locked, repeat steps 3
through 8.
1-22
Safety — Seats, seat belts and supplemental restraint system
Page 45 of 409
Black plate (43,1)
Model "Z34-D" EDITED: 2009/ 9/ 10
SSS0363
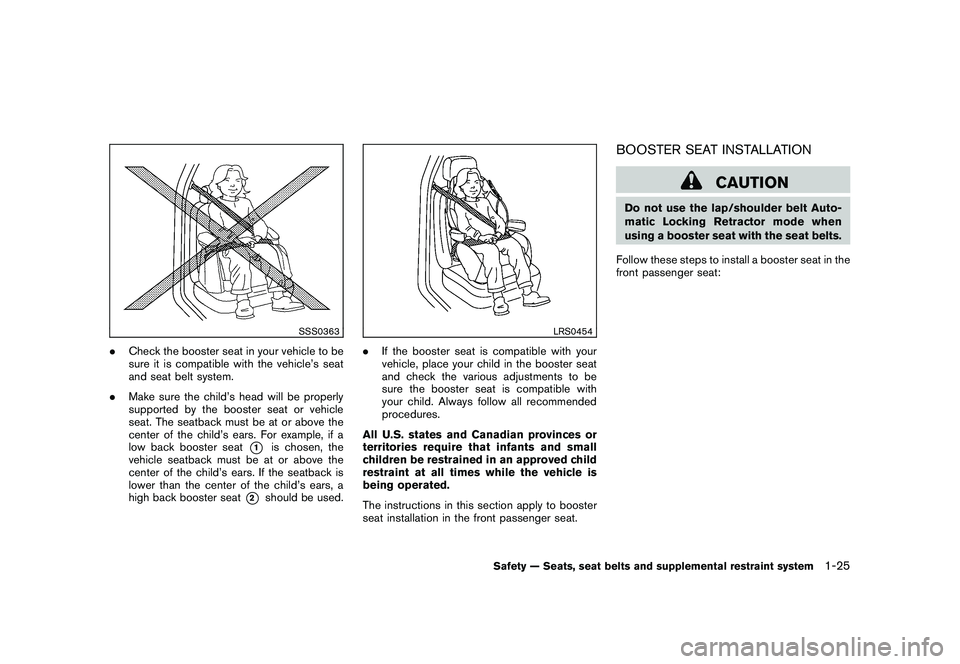
.Check the booster seat in your vehicle to be
sure it is compatible with the vehicle’s seat
and seat belt system.
. Make sure the child’s head will be properly
supported by the booster seat or vehicle
seat. The seatback must be at or above the
center of the child’s ears. For example, if a
low back booster seat
*1
is chosen, the
vehicle seatback must be at or above the
center of the child’s ears. If the seatback is
lower than the center of the child’s ears, a
high back booster seat
*2
should be used.
LRS0454
. If the booster seat is compatible with your
vehicle, place your child in the booster seat
and check the various adjustments to be
sure the booster seat is compatible with
your child. Always follow all recommended
procedures.
All U.S. states and Canadian provinces or
territories require that infants and small
children be restrained in an approved child
restraint at all times while the vehicle is
being operated.
The instructions in this section apply to booster
seat installation in the front passenger seat.
BOOSTER SEAT INSTALLATION
CAUTION
Do not use the lap/shoulder belt Auto-
matic Locking Retractor mode when
using a booster seat with the seat belts.
Follow these steps to install a booster seat in the
front passenger seat:
Safety — Seats, seat belts and supplemental restraint system
1-25
Page 60 of 409

Black plate (58,1)
Model "Z34-D" EDITED: 2009/ 9/ 10
vehicle checked by a NISSAN dealer as
soon as possible.REPAIR AND REPLACEMENT PRO-
CEDUREThe front air bags, side air bags, curtain air bags
and pretensioners are designed to activate on a
one-time-only basis. As a reminder, unless it is
damaged, the supplemental air bag warning light
will remain illuminated after inflation has oc-
curred. Repair and replacement of these sys-
tems should be done only by a NISSAN dealer.
When maintenance work is required on the
vehicle, the front air bags, side air bags, curtain
air bags, pretensioners and related parts should
be pointed out to the person conducting the
maintenance. The ignition switch should always
be in the LOCK position when working under
the hood or inside the vehicle.
WARNING
.Once a front air bag, side air bag, or
curtain air bag has inflated, the air
bag module will not function again
and must be replaced. Additionally,
if any of the front air bags inflate,
the activated pretensioner must
also be replaced. The air bag mod-
ule and pretensioner system should be replaced by a NISSAN dealer.
The air bag module and preten-
sioner system cannot be repaired.
. The front air bag, side air bag and
curtain air bag systems and the
pretensioner system should be in-
spected by a NISSAN dealer if there
is any damage to the front end or
side portion of the vehicle.
. Ifyouneedtodisposeofthe
supplemental air bag or preten-
sioner systems or scrap the vehicle,
contact a NISSAN dealer. Correct
supplemental air bag and seat belt
pretensioner system disposal pro-
cedures are set forth in the appro-
priate NISSAN Service Manual.
Incorrect disposal procedures could
cause personal injury.1-40
Safety — Seats, seat belts and supplemental restraint system