Page 105 of 409

Black plate (103,1)
Model "Z34-D" EDITED: 2009/ 9/ 10
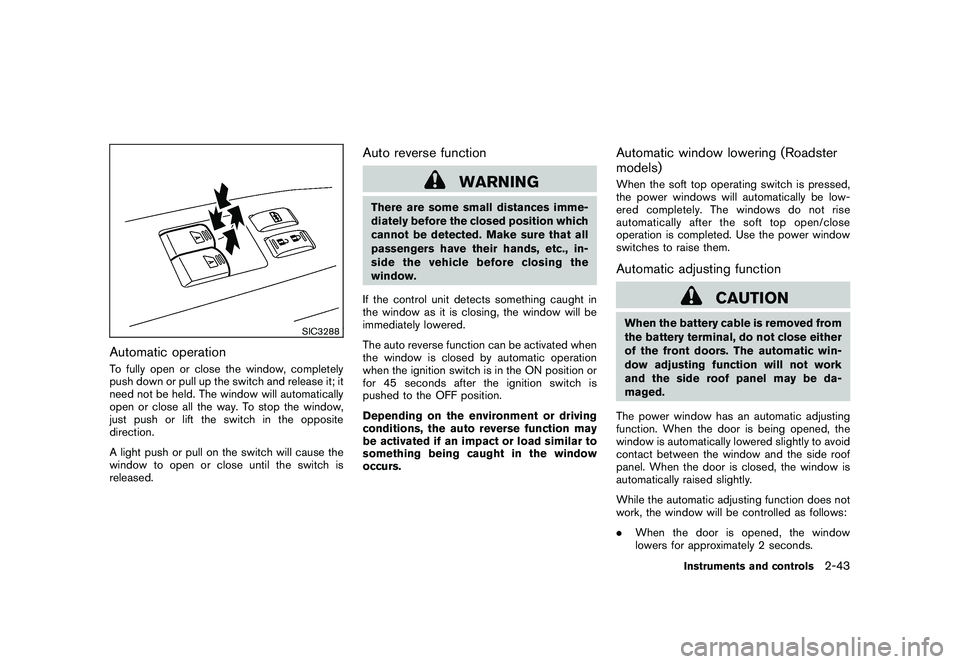
SIC3288
Automatic operationTo fully open or close the window, completely
push down or pull up the switch and release it; it
need not be held. The window will automatically
open or close all the way. To stop the window,
just push or lift the switch in the opposite
direction.
A light push or pull on the switch will cause the
window to open or close until the switch is
released.
Auto reverse function
WARNING
There are some small distances imme-
diately before the closed position which
cannot be detected. Make sure that all
passengers have their hands, etc., in-
side the vehicle before closing the
window.
If the control unit detects something caught in
the window as it is closing, the window will be
immediately lowered.
The auto reverse function can be activated when
the window is closed by automatic operation
when the ignition switch is in the ON position or
for 45 seconds after the ignition switch is
pushed to the OFF position.
Depending on the environment or driving
conditions, the auto reverse function may
be activated if an impact or load similar to
something being caught in the window
occurs.
Automatic window lowering (Roadster
models)When the soft top operating switch is pressed,
the power windows will automatically be low-
ered completely. The windows do not rise
automatically after the soft top open/close
operation is completed. Use the power window
switches to raise them.Automatic adjusting function
CAUTION
When the battery cable is removed from
the battery terminal, do not close either
of the front doors. The automatic win-
dow adjusting function will not work
and the side roof panel may be da-
maged.
The power window has an automatic adjusting
function. When the door is being opened, the
window is automatically lowered slightly to avoid
contact between the window and the side roof
panel. When the door is closed, the window is
automatically raised slightly.
While the automatic adjusting function does not
work, the window will be controlled as follows:
. When the door is opened, the window
lowers for approximately 2 seconds.
Instruments and controls
2-43
Page 106 of 409

Black plate (104,1)
Model "Z34-D" EDITED: 2010/ 3/ 25
.While the door is open, the window cannot
be raised.If the windows do not close automaticallyIf the power window automatic function (closing
only) does not operate properly, perform the
following procedure to initialize the power
window system.
1. Push the ignition switch to the ON position.
2. Close the door and soft top (Roadster
models) .
3. Open the window completely by operating the power window switch.
4. Pull the power window switch and hold it to close the window, and then hold the switch
more than 3 seconds after the window is
closed completely.
5. Release the power window switch. Operate the window by the automatic function to
confirm the initialization is complete.
6. Perform steps 2 through 5 above for other windows.
If the power window automatic function does
not operate properly after performing the pro-
cedure above, have your vehicle checked by a
NISSAN dealer.
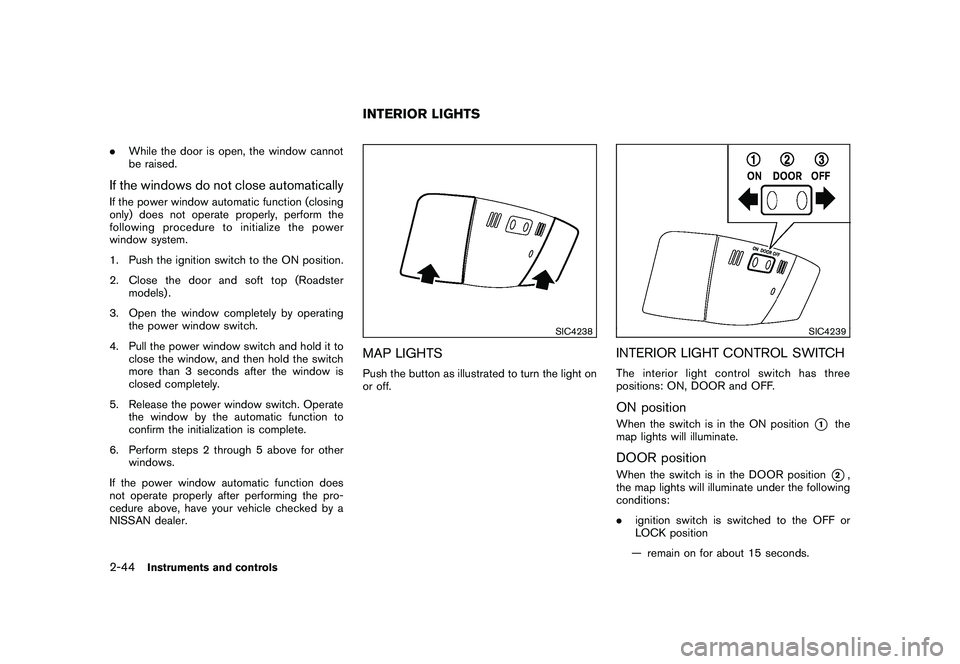
SIC4238
MAP LIGHTSPush the button as illustrated to turn the light on
or off.
SIC4239
INTERIOR LIGHT CONTROL SWITCHThe interior light control switch has three
positions: ON, DOOR and OFF.ON positionWhen the switch is in the ON position
*1
the
map lights will illuminate.
DOOR positionWhen the switch is in the DOOR position
*2,
the map lights will illuminate under the following
conditions:
. ignition switch is switched to the OFF or
LOCK position
— remain on for about 15 seconds.
INTERIOR LIGHTS
2-44
Instruments and controls
Page 107 of 409

Black plate (105,1)
Model "Z34-D" EDITED: 2009/ 9/ 10
.doors are unlocked by pushing the UN-
LOCK button on the Intelligent Key or door
handle request switch with the ignition
switch in the LOCK position
— remain on for about 15 seconds.
. any door is opened and then closed with the
ignition switch in the LOCK position
— remain on for about 15 seconds.
. any door is opened with the ignition switch
in the ACC or ON position
— remain on while the door is opened. When the door is closed, the lights go off.
The lights will also turn off after 30
minutes when the lights remain illumi-
nated after the ignition switch has been
pushed to the OFF or LOCK position to
prevent the battery from becoming dis-
charged.
When the auto interior illumination is set to the
OFF position (see “VEHICLE INFORMATION
AND SETTINGS (models with navigation sys-
tem)” in the “4. Center display, heater, air
conditioner, audio, phone and voice recognition
systems” section) , the lights will illuminate under
the following condition:
. any door is opened with the ignition switch
in any position — remain on while the door is opened.
When the door is closed, the lights go off.
OFF positionWhen the switch is in the OFF position
*3, the
lights will not illuminate, regardless of the
condition.
CAUTION
Do not use for extended periods of time
with the engine stopped. This could
result in a discharged battery.
SIC3869
The light on the vanity mirror will turn on when
the cover on the vanity mirror is opened.
When the cover is closed, the light will turn off.
The lights will also turn off after 30
minutes when the lights remain illumi-
nated to prevent the battery from becom-
ing discharged.VANITY MIRROR LIGHTS
Instruments and controls
2-45
Page 108 of 409
Black plate (106,1)
Model "Z34-D" EDITED: 2009/ 9/ 10
The light illuminates simultaneously with the map
light. See “INTERIOR LIGHTS” earlier in this
section.The light illuminates when the rear hatch is
opened. When the rear hatch is closed, the light
will turn off.
The light will also turn off after 30 minutes
when the light remains illuminated after
the ignition switch has been pushed to the
OFF or LOCK position to prevent the
battery from becoming discharged.The light illuminates when the trunk lid is
opened. When the trunk lid is closed, the light
turns off.CARGO AREA COURTESY LIGHT
(Roadster models)
CARGO LIGHT (Coupe models) TRUNK LIGHT (Roadster models)2-46
Instruments and controls
Page 109 of 409

Black plate (107,1)
Model "Z34-D" EDITED: 2009/ 9/ 10
HomeLink
®Universal Transceiver provides a
convenient way to consolidate the functions of
up to three individual hand-held transmitters into
one built-in device.
HomeLink®Universal Transceiver:
. Will operate most Radio Frequency (RF)
devices such as garage doors, gates, home
and office lighting, entry door locks and
security systems.
. Is powered by your vehicle’s battery. No
separate batteries are required. If the
vehicle’s battery is discharged or is dis-
connected, HomeLink
®will retain all pro-
gramming.
Once HomeLink
®Universal Transceiver is
programmed, retain the original transmit-
ter for future programming procedures
(Example: new vehicle purchases) . Upon
sale of the vehicle, the programmed
HomeLink
®Universal Transceiver buttons
should be erased for security purposes.
For additional information, see “PRO-
GRAMMING HomeLink
®” later in this sec-
tion.
WARNING
. Do not use HomeLink
®Universal
Transceiver with any garage door
opener that lacks safety stop and reverse features as required by
federal safety standards. (These
standards became effective for
opener models manufactured after
April 1, 1982.) A garage door opener
which cannot detect an object in the
path of a closing garage door and
then automatically stop and reverse,
does not meet current federal safety
standards. Using a garage door
opener without these features in-
creases the risk of serious injury or
death.
. During programming procedure,
your garage door or security gate
may open or close. Make sure that
people and objects are clear of the
garage door, gate, etc. that you are
programming.
. Your vehicle’s engine should be
turned off while programming
HomeLink
®Universal Transceiver.
PROGRAMMING HomeLink
®
To program your HomeLink
®Transceiver to
operate a garage door, gate, or entry door
opener, home or office lighting, you need to be
at the same location as the device. Note:
Garage door openers (manufactured after 1996) have “rolling code protection”. To pro-
gram a garage door opener equipped with
“rolling code protection”; you will need to use
a ladder to get up to the garage door opener
motor to be able to access the “smart or learn”
program button.
HomeLink
®UNIVERSAL
TRANSCEIVER (if so equipped)
Instruments and controls
2-47
Page 110 of 409

Black plate (108,1)
Model "Z34-D" EDITED: 2009/ 9/ 10
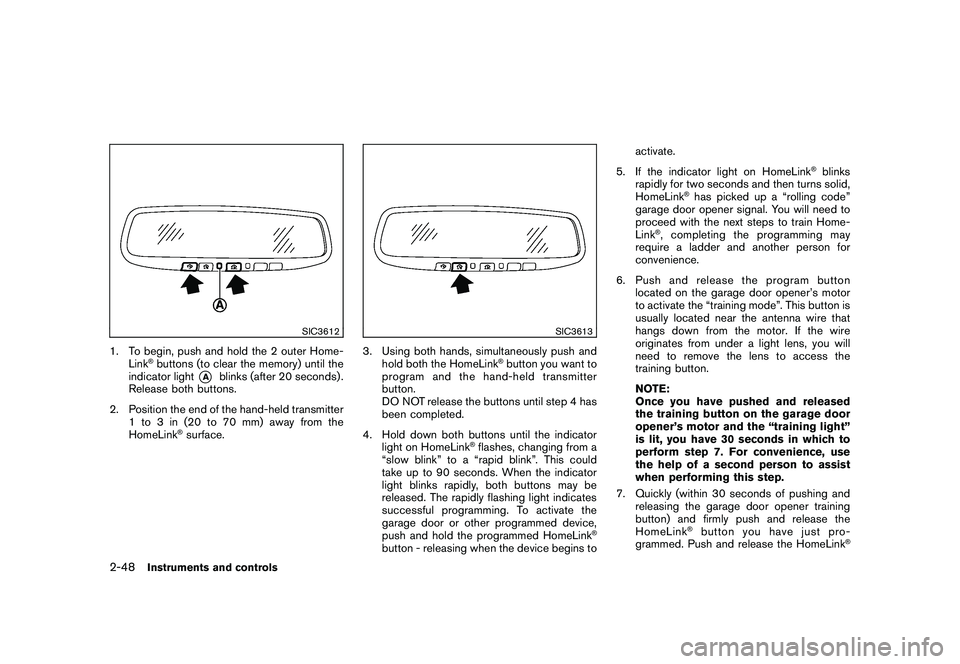
SIC3612
1. To begin, push and hold the 2 outer Home-Link
®buttons (to clear the memory) until the
indicator light
*A
blinks (after 20 seconds) .
Release both buttons.
2. Position the end of the hand-held transmitter 1 to 3 in (20 to 70 mm) away from the
HomeLink
®surface.
SIC3613
3. Using both hands, simultaneously push andhold both the HomeLink
®button you want to
program and the hand-held transmitter
button.
DO NOT release the buttons until step 4 has
been completed.
4. Hold down both buttons until the indicator light on HomeLink
®flashes, changing from a
“slow blink” to a “rapid blink”. This could
take up to 90 seconds. When the indicator
light blinks rapidly, both buttons may be
released. The rapidly flashing light indicates
successful programming. To activate the
garage door or other programmed device,
push and hold the programmed HomeLink
®
button - releasing when the device begins to activate.
5. If the indicator light on HomeLink
®blinks
rapidly for two seconds and then turns solid,
HomeLink
®has picked up a “rolling code”
garage door opener signal. You will need to
proceed with the next steps to train Home-
Link
®, completing the programming may
require a ladder and another person for
convenience.
6. Push and release the program button located on the garage door opener’s motor
to activate the “training mode”. This button is
usually located near the antenna wire that
hangs down from the motor. If the wire
originates from under a light lens, you will
need to remove the lens to access the
training button.
NOTE:
Once you have pushed and released
the training button on the garage door
opener’s motor and the “training light”
is lit, you have 30 seconds in which to
perform step 7. For convenience, use
the help of a second person to assist
when performing this step.
7. Quickly (within 30 seconds of pushing and releasing the garage door opener training
button) and firmly push and release the
HomeLink
®buttonyouhavejustpro-
grammed. Push and release the HomeLink
®
2-48
Instruments and controls
Page 111 of 409

Black plate (109,1)
Model "Z34-D" EDITED: 2009/ 9/ 10
button up to three times to complete the
training.
8. Your HomeLink
®button should now be
programmed. To prog ram the remaining
HomeLink
®buttons for additional door or
gate openers, follow steps 2 through 8 only.
NOTE:
Do not repeat step 1 unless you want to
“clear” all previously programmed Home-
Link
®buttons.
If you have any questions or are having difficulty
programming your HomeLink
®buttons, please
refer to the HomeLink
®web site at: www.
homelink.com or call 1-800-355-3515.
PROGRAMMING HomeLink
®FOR CA-
NADIAN CUSTOMERS
Prior to 1992, D.O.C. regulations required
hand-held transmitters to stop transmitting after
2 seconds. To program your hand-held trans-
mitter to HomeLink
®, continue to push and hold
the HomeLink
®button (note steps 2 through 4
under “Programming HomeLink
®”) while you
push and re-push (“cycle”) your hand-held
transmitter every 2 seconds until the indicator
light flashes rapidly (indicating successful pro-
gramming) . NOTE:
If programming a garage door opener, etc.,
it is advised to unplug the device during
the “cycling” process to prevent possible
damage to the garage door opener com-
ponents.
OPERATING THE HomeLink
®UNIVER-
SAL TRANSCEIVER
HomeLink
®Universal Transceiver (once pro-
grammed) may now be used to activate the
garage door, etc. To operate, simply push the
appropriate programmed HomeLink
®Universal
Transceiver button. The red indicator light will
illuminate while the signal is being transmitted.
PROGRAMMING TROUBLE-DIAGNO-
SISIf HomeLink
®does not quickly learn the hand-
held transmitter information:
. replace the hand-held transmitter batteries
with new batteries.
. position the hand-held transmitter with its
battery area facing away from the Home-
Link
®surface.
. push and hold both the HomeLink
®and
hand-held transmitter buttons without inter-
ruption. .
position the hand-held transmitter 2 to 5 in
(50 to 127 mm) away from the HomeLink
®
surface. Hold the transmitter in that position
for up to 15 seconds. If HomeLink
®is not
programmed within that time, try holding the
transmitter in another position - keeping the
indicator light in view at all times.
If you continue to have programming difficulties,
please contact the NISSAN Consumer Affairs
Department. The phone numbers are located in
the Foreword of this Owner’s Manual.
CLEARING THE PROGRAMMED IN-
FORMATIONIndividual buttons cannot be cleared, however to
clear all programming, push and hold the two
outside buttons and release when the indicator
light begins to flash (in approximately 20
seconds) .REPROGRAMMING A SINGLE Home-
Link
®BUTTON
To reprogram a HomeLink
®Universal Transcei-
ver button, complete the following.
1. PushandholdthedesiredHomeLink
®
button. Do not release the button until step
4 has been completed.
2. When the indicator light begins to flash slowly (after 20 seconds), position the
hand-held transmitter 2 to 5 in (50 to 127
Instruments and controls
2-49
Page 112 of 409

Black plate (110,1)
Model "Z34-D" EDITED: 2009/ 9/ 10
mm) away from the HomeLink
®surface.
3. Push and hold the hand-held transmitter button.
4. The HomeLink
®indicator light will flash, first
slowly and then rapidly. When the indicator
light begins to flash rapidly, release both
buttons.
The HomeLink
®Universal Transceiver button has
now been reprogrammed. The new device can
be activated by pushing the HomeLink
®button
that was just programmed. This procedure will
not affect any other programmed HomeLink
®
buttons.IF YOUR VEHICLE IS STOLENIf your vehicle is stolen, you should change the
codes of any non-rolling code device that has
been programmed into HomeLink
®. Consult the
Owner’s Manual of each device or call the
manufacturer or dealer of those devices for
additional information.
When your vehicle is recovered, you will
need to reprogram the HomeLink
®Univer-
sal Transceiver with your new transmitter
information. FCC Notice:
This device complies with FCC rules part
15. Operation is subject to the following
two conditions: (1) This device may not
cause harmful interference and (2) This
device must accept any interference that
may be received, including interference
that may cause undesired operation.
The transmitter has been tested and
complies with FCC and DOC/MDC rules.
Changes or modifications not expressly
approved by the party responsible for
compliance could void the user’s authority
to operate the device.
DOC: ISTC 1763K1313
FCC I.D.: CB2V67690
2-50
Instruments and controls