Page 472 of 658
Comfort controls
5-65
5
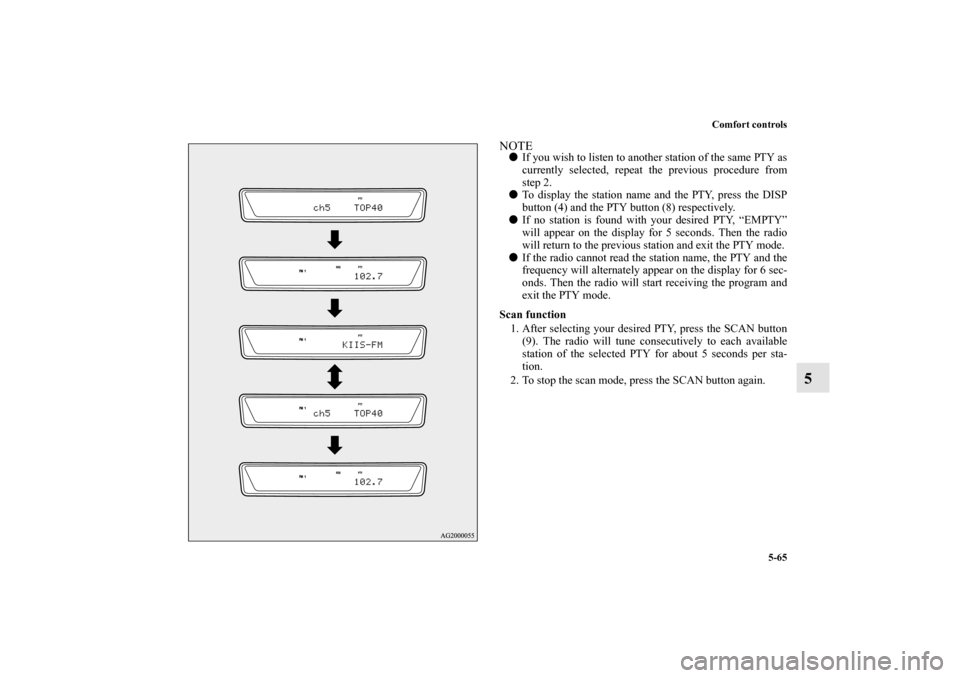
NOTE�
If you wish to listen to another station of the same PTY as
currently selected, repeat the previous procedure from
step 2.
�
To display the station name and the PTY, press the DISP
button (4) and the PTY button (8) respectively.
�
If no station is found with your desired PTY, “EMPTY”
will appear on the display for 5 seconds. Then the radio
will return to the previous station and exit the PTY mode.
�
If the radio cannot read the station name, the PTY and the
frequency will alternately appear on the display for 6 sec-
onds. Then the radio will start receiving the program and
exit the PTY mode.
Scan function
1. After selecting your desired PTY, press the SCAN button
(9). The radio will tune consecutively to each available
station of the selected PTY for about 5 seconds per sta-
tion.
2. To stop the scan mode, press the SCAN button again.
BK0103001US.book 65 ページ 2009年8月20日 木曜日 午前10時45分
Page 478 of 658
 for")
Comfort controls
5-71
5
To skip a desired channelYou can set any channel to be skipped during channel selec-
tion.
1. Select the channel that you want to skip.
2. Press the TUNE/SOUND switch (7) for about 2 seconds
or longer to enter the MENU mode. Then select the SKIP
setting mode.
3. In the SKIP setting mode, turn the TUNE/SOUND switch
(7) and select “SKIP CH.”
4. Press the TUNE/SOUND switch (7). “STORED” will be
shown for 2 seconds and then the channel that is currently
being received will be set to be skipped.
5. After the skip setting is made, the radio will tune into the
next channel after the channel that was set to be skipped.
If you want to this channel to be skipped as well, press the
TUNE/SOUND switch (7) again.NOTE�
The channel that was set to be skipped will be skipped
automatically during channel selection.
�
Channels that are stored in the preset memory can also be
set to be skipped. When the corresponding memory select
button (10) is pushed to call up the channel, “SKIP
CHANNEL” will appear on the display and the audio will
be muted.
To cancel skip settingsYou can cancel skip settings on channels.
1. Press the TUNE/SOUND switch (7) for about 2 seconds
or longer to enter the MENU mode. Then select the SKIP
setting mode.
2. In the SKIP setting mode, turn the TUNE/SOUND switch
(7) and select “UNSKIP ALL.”
3. Press the TUNE/SOUND switch (7). “STORED” will be
shown for 2 seconds and then skip settings on all channels
will be cancelled. After you cancel the setting, the satellite
radio will return to the SKIP setting mode. (The display
will show “SKIP SETTING.”)To lock a desired channelYou can lock any channel of your choice.
1. Select the channel that you want to lock.
2. Press the TUNE/SOUND switch (7) for about 2 seconds
or longer to enter the MENU mode. Then select the
LOCK setting mode.
3. In the LOCK setting mode, turn the TUNE/SOUND
switch (7) and select “LOCK CH.”
4. Press the TUNE/SOUND switch (7). “LOCKED” will be
displayed for 2 seconds and then the channel that is cur-
rently being received will be locked. The satellite radio
then returns to the LOCK setting mode.NOTE�
If you attempt to select a locked channel, the display will
show “LOCKED” or “PARENTAL LOCK.”
�
Channels that are stored in the preset memory can also be
locked.
BK0103001US.book 71 ページ 2009年8月20日 木曜日 午前10時45分
Page 508 of 658
Comfort controls
5-101
5
Cross modulationIf one listens to a weak station and is in the vicinity of another
strong station, both stations might be received simultaneously.FM stereo receptionStereo reception requires a high quality broadcast signal. This
means that types of disturbances mentioned previously become
more marked and the reception range is somewhat diminished
during stereo reception.
Causes of disturbancesFM reception is affected by the electrical systems of vehicles in
the vicinity, especially those without an electronic noise sup-
pression device. The disturbance is even greater if the station is
weak or poorly tuned.
FM reception is not as sensitive to electrical disturbances as
AM. AM reception is sensitive to electrical disturbances such
as power lines, lightning and other types of similar electrical
phenomena.
BK0103001US.book 101 ページ 2009年8月20日 木曜日 午前10時45分
Page 531 of 658
6-22 For emergencies
6
On a bumpy or rutted road�
Drive as slow as possible when driving on bumpy, rutted
roads or over potholes.
CAUTION
!�
Driving on bumpy, rutted roads or over potholes can
damage the tires and wheels.
Wheels with low-profiles tires or under-inflated tires
are especially at risk for damage.
BK0103001US.book 22 ページ 2009年8月20日 木曜日 午前10時45分
Page 533 of 658

7-2 Vehicle care and maintenance
7Service precautions
N00937300299
Taking regular care of your vehicle will preserve its value and
appearance as long as possible.
You can do some of the maintenance work yourself, and the
rest should only be performed by an authorized Mitsubishi
Motors dealer or a repair facility of your choice.
If you discover a malfunction or other problem, have it cor-
rected by an authorized Mitsubishi Motors dealer or a repair
facility of your choice.
This section describes the maintenance inspections that you
can do yourself, if you so desire. Follow the instructions and
precautions for each procedure.
Have you purchased the Mitsubishi Motors Diamond Care Pro-
tection Plan? The Plan supplements your new vehicle warran-
ties. See your authorized Mitsubishi Motors dealer for details.
WA R N I N G
!�
When checking or servicing the inside of the engine
compartment, be sure the engine is stopped and has
had a chance to cool down.
�
If you need to work in the engine compartment with
the engine running, be especially careful that your
clothing, hair, etc. does not get caught in the fan,
drive belts, or other moving parts.
�
The fan can turn on automatically even if the engine
is not running. Turn the ignition switch to the
“LOCK” position to be safe while you work in the
engine compartment.
�
Do not smoke or allow open flames around fuel or
the battery. The fumes are flammable.
�
Be extremely careful when working around the bat-
tery. It contains poisonous and corrosive sulfuric
acid.
�
Do not get under your vehicle while it is on a jack.
Always use properly rated automotive jack stands.
�
Handling your vehicle’s parts and materials in the
wrong way can injure you. Ask an authorized Mit-
subishi Motors dealer or a repair facility of your
choice if you have questions. WA R N I N G
!
BK0103001US.book 2 ページ 2009年8月20日 木曜日 午前10時45分
Page 556 of 658
 on
top of the battery. If the indicator is blue when looking")
Vehicle care and maintenance
7-25
7
To check the battery indicator
N00901400042
To see the charge of only one cell, check the indicator (A) on
top of the battery. If the indicator is blue when looking from
above, that cell is okay suggesting the battery is okay. This is
not conclusive and if battery performance is suspect, have the
battery and charging system tested by an authorized Mitsubishi
Motors dealer or a repair facility of your choice. If it is white,
that cell is low on charge and the battery may only need charg-
ing.
CAUTION
!�
Be sure to install the battery upper cover. Other-
wise, the battery electrolyte may spill and cause a
malfunction.
�
When installing the battery upper cover, plastic
nuts, and air duct, do not touch the cooling fan or
other moving parts in the engine compartment. Be
especially careful that the cables, your clothing or
hair, etc., do not get caught in the cooling fan or
other moving parts.
Except for vehicles with turbochargerVehicles with turbocharger
BK0103001US.book 25 ページ 2009年8月20日 木曜日 午前10時45分
Page 558 of 658

Vehicle care and maintenance
7-27
7
During cold weather
N00901600028
The battery is weaker in cold temperatures. This has to do with
its chemical and physical properties and is why a very cold bat-
tery, especially one with a low charge, will have a hard time
starting your vehicle.
It is recommended that you have your battery and charging sys-
tem checked by an authorized Mitsubishi Motors dealer or a
repair facility of your choice before the start of cold weather. If
necessary, have it charged. This will guarantee more reliable
starting, and longer battery life.
Disconnection and connection
N00901700029
To disconnect the battery cable, stop the engine. Disconnect the
negative (-) terminal first, then the positive (+) terminal. To
reconnect the battery, first connect the positive (+) terminal and
then the negative (-) terminal, before starting the vehicle. NOTE�
For vehicles equipped with turbocharger, remove the bat-
tery upper cover before disconnecting the terminal of bat-
tery. Refer to “Removing and installing the battery upper
cover” on page 7-23.
BK0103001US.book 27 ページ 2009年8月20日 木曜日 午前10時45分
Page 562 of 658

Vehicle care and maintenance
7-31
7
Size DesignationEXAMPLE: P215/65R15
NOTE�
European/Japanese metric tire sizing is based on Euro-
pean/Japanese design standards. Tires designed to these
standards have the tire size molded into the sidewall
beginning with the section width. The letter “P” is
absent from this tire size designation. Example:
215/65R15 96H.
�
LT (Light Truck) -metric tire sizing is based on U.S.A.
design standards. The size designation for LT-metric
tires is the same as for P-metric tires except for the let-
ters “LT” that are molded into the sidewall preceding
the size designation. Example: LT235/85R16.
�
Temporary spare tires are high pressure compact spares
designed for temporary emergency use only. Tires
designed to this standard have the letter “T” molded
into the sidewall preceding the size designation. Exam-
ple: T145/80D18 103M.
Service DescriptionEXAMPLE: 95H
Maximum LoadMaximum load indicates the maximum load this tire is
designed to carry.Maximum PressureMaximum Pressure indicates the maximum permissible
cold tire inflation pressure for this tire. PPassenger car tire size based on U.S.A. design
standards
215 Section width in millimeters (mm.)
65Aspect ratio in percent (%)
Ratio of section height to section width of tire.
RConstruction code
“R” means radial construction.
“D” means diagonal or bias construction.
15 Rim diameter in inches (in)95Load index
A numerical code associated with the maximum
load a tire can carry.
HSpeed symbol
A symbol indicating the range of speeds at
which a tire can carry a load corresponding to its
load index under certain operating conditions.
The maximum speed corresponding to the speed
symbol should only be achieved under specified
operating conditions. (i.e. tire pressure, vehicle
loading, road conditions and posted speed limits)
WA R N I N G
!�
Overloading of your tire is dangerous. Overload-
ing can cause tire failure, affect vehicle handling,
and increase your stopping distance. Use tires of
the recommended load capacity for your vehicle.
Never overload them.
BK0103001US.book 31 ページ 2009年8月20日 木曜日 午前10時45分