Page 473 of 670
5-84 Comfort controls
5
2. Turn the SOUND switch (4) either clockwise or counter-
clockwise to change the tone/balance setting.
The status will be displayed in the display (3).A- Adjust mode
B- Adjust level
Adjust
Mode
Adjust
Level
Sound control switch operationCounterclock-
wise turn
Clockwise turn
SUB
PUNCH1 to 6 Weaker Stronger
TYPENORMAL ↔ POP ↔ ROCK ↔ HIP-HOP ↔
COUNTRY
FIELD NORMAL ↔ STAGE ↔ LIVE ↔ HALL
BASS
-6 to 6 Weaker Stronger MID
TREBLE
FADERF11 to
R11R
(Rear) increasesF
(Front) increases
BALANCEL11 to
R11L
(Left) increasesR
(Right) increases
BK0102103US.book 84 ページ 2009年10月26日 月曜日 午後1時38分
Page 475 of 670
To balance the volume from the L (left) and the R (right)
speakers.NOTE�When set to “0”, it will beep.
�When PUNCH LEVEL, MUSIC TYPE or")
5-86 Comfort controls
5
BALANCE (Left/Right balance control)To balance the volume from the L (left) and the R (right)
speakers.NOTE�When set to “0”, it will beep.
�When PUNCH LEVEL, MUSIC TYPE or SOUND
FIELD is changed, the sound will cut out briefly, but this
does not indicate a malfunction.
�The audio adjust mode will automatically shut off when
either the radio or CD is selected, or if no adjustment is
made within about 10 seconds.
�If the SOUND switch (4) is pushed and held for more than
2 seconds during the audio adjust mode, it will change to
“Hold” mode. The selected audio mode will be held until
the SOUND switch (4) is pushed for more than 2 seconds
again.Speed Compensated Volume function
N00752200167
Speed Compensated Volume function is a feature that automat-
ically adjusts the VOLUME, BASS, MIDDLE, and TREBLE
settings in accordance with the vehicle speed. It is possible to
turn this function ON-OFF using the following methods:
1. If you are presently pushing the SOUND switch (4) and
making a tone adjustment, finish making the tone adjust-
ment.2. Push the SOUND switch for at least about 2 seconds. The
system will switch to MENU mode and the characters
“SCV ON” will be shown on the display.
NOTE�When you enter the MENU mode while listening to satel-
lite radio (if so equipped), “SKIP SETTING” will be
shown on the display and you will enter the satellite radio
setting mode. Every time you press the SOUND switch
(4), the display will change in the following order: “SKIP
SETTING” → “LOCK SETTING” → “SCV ON.” Press
the SOUND switch (4) until “SCV ON” is shown on the
display, to switch to the setting mode for the Speed Com-
pensated Volume function.
3. Turn the SOUND switch (4) clockwise to the turn the
function ON. Turn it counterclockwise to turn the function
OFF.NOTE�The factory setting for the Speed Compensated Volume
function is ON.
�The MENU mode will automatically shut off when either
the radio or CD is selected or the user does not move any
of the switches for 10 seconds.
BK0102103US.book 86 ページ 2009年10月26日 月曜日 午後1時38分
Page 495 of 670
You can select your desired folder by turning the FOLDER
switch (17).
Folder up
Turn the FOLDER switch (17) clockwise until the desire")
5-106 Comfort controls
5
To select a desired folder (MP3 CDs only)You can select your desired folder by turning the FOLDER
switch (17).
Folder up
Turn the FOLDER switch (17) clockwise until the desired
folder number appears on the display.
Folder down
Turn the FOLDER switch (17) counterclockwise until the
desired folder number appears on the display.
To select a desired trackYou can select your desired track by using the TRACK button
(18).
Tr a c k u p
Press the side of the TRACK button (18) repeatedly until
the desired track number appears on the display.
When listening to a MP3 CD, keep pressing the button to con-
tinue to move up tracks.
Tr a c k d o w n
Press the side of the TRACK button (18) repeatedly until
the desired track number appears on the display.
When listening to a MP3 CD, keep pressing the button to con-
tinue to move down tracks.NOTE�Pressing the side of the TRACK button (18) once dur-
ing the song will cause the player to restart playback from
the beginning of the song.To repeat a trackTo repeat a track
Press the RPT button (8) briefly while the track is playing.
“RPT” will appear on the display. To exit the repeat mode,
press the RPT button again.
To repeat a disc (music CDs only)
While a song is playing, press the RPT button (8) for 2 second
or longer (until you hear a beep). “D-RPT” will appear on the
display. You can listen to the music CD repeatedly. To exit the
repeat mode, briefly press the RPT button again.
BK0102103US.book 106 ページ 2009年10月26日 月曜日 午後1時38分
Page 511 of 670
5-122 Comfort controls
5Antenna
N00734200396
Roof antenna (except for vehicles with SIRIUS
satellite radio)When listening to the radio, fold the antenna toward the rear of
the vehicle until you hear it click.
To removeTurn the pole (A) counterclockwise.To i n s t a l lScrew the pole (A) clockwise into the base (B) until it is
securely retained.NOTE�Be sure to remove the roof antenna in the following cases:
• When using an automatic car wash
• When covering your vehicle with a car cover
�Before driving into a structure that has a low ceiling, fold
down the antenna toward the front of the vehicle to pre-
vent it from hitting the ceiling.
BK0102103US.book 122 ページ 2009年10月26日 月曜日 午後1時38分
Page 512 of 670
Comfort controls
5-123
5
Roof antenna (for vehicles with SIRIUS satellite
radio)For securing the best satellite reception, the angle of the
antenna is fixed.
To r e m o v eTurn the pole (A) counterclockwise.To i n s t a l lScrew the pole (A) clockwise into the base (B) until it is
securely retained.NOTE�Be sure to remove the roof antenna in the following cases:
• When entering a place with low clearance
• When using an automatic car wash
• When covering your vehicle with a car cover
BK0102103US.book 123 ページ 2009年10月26日 月曜日 午後1時38分
Page 513 of 670

5-124 Comfort controls
5Digital clock
N00755000065
The time is displayed when the ignition switch is in the “ON”
or “ACC” position.To set the time1. Press and hold the CLOCK button and the clock display
flashes.
2. Press the various buttons to adjust.3. When the time is set, press the DISP button to stop the
clock display from flashing. After time signal setting,
however, the clock display automatically stops flashing.
NOTE�Reset the time after the battery terminals are disconnected
and reconnected.
�Seconds do not appear in the clock display, but after
adjusting the “Minutes” setting and time signal setting,
the clock begins to operate from 0 seconds.
H — “Hour” setting
Press this button to fast-forward the “hours”.
M — “Minutes” setting
Press this button to fast-forward the “minutes”.
CLOCK DISP H M :00
:00 — Time signal setting
At the same time the button is pressed, the fol-
lowing modifications are made.
10:00 - 10:29 ......Change to 10:00
10:30 - 10:59 ......Change to 11:00
BK0102103US.book 124 ページ 2009年10月26日 月曜日 午後1時38分
Page 523 of 670

6-6 For emergencies
6
5. If you do not see steam or spray coming from under the
hood, leave the engine on until the bar graph for the
engine coolant temperature warning display on the multi-
information display goes down. When it is in the middle
of the normal zone, you can start driving again. If the bar
graph stays in the red zone, turn off the engine.
6. When you do not see any more steam or spray, open the
hood. Look for obvious leaks, such as a split radiator
hose. Be careful as components will be hot. Any leak
source must be repaired.
7. If there is no obvious leak source, check the coolant level
in the reserve tank. If there is none, or if it is too low,
slowly add coolant.8. If the reserve tank needs coolant, you will probably also
need to add coolant to the radiator. Do not loosen or
remove the radiator cap until the engine has cooled down.
9. Start the engine, and slowly add coolant, up to the bottom
of the filler neck. Use plain water if you have to (and
replace it with the right coolant as soon as possible).
10. Replace the radiator cap and tighten it fully. Check the
engine coolant temperature display on the multi-informa-
tion display. You can start driving again when the bar
graph for the engine coolant temperature display returns
to the normal zone.
11. Have your vehicle checked by your authorized Mitsubishi
Motors dealer or a repair facility of your choice.
WARNING
!�Before raising the engine hood, check to see if there
is steam or spray coming from under the hood.
Steam or spray coming from an overheated engine
could seriously scald you.
Do not open the hood until there is no steam or
spray.
WARNING
!�Removing the radiator cap could scald you with
escaping hot water or steam. When checking the
radiator level, cover the cap with a cloth before try-
ing to remove it. Turn it slowly counterclockwise,
without pressing down, to the first notch. The pres-
sure in the system will then be let out. When the
pressure is COMPLETELY LET OUT, press down
and keep turning the cap counterclockwise until it
will come off.
BK0102103US.book 6 ページ 2009年10月26日 月曜日 午後1時38分
Page 529 of 670
6-12 For emergencies
6
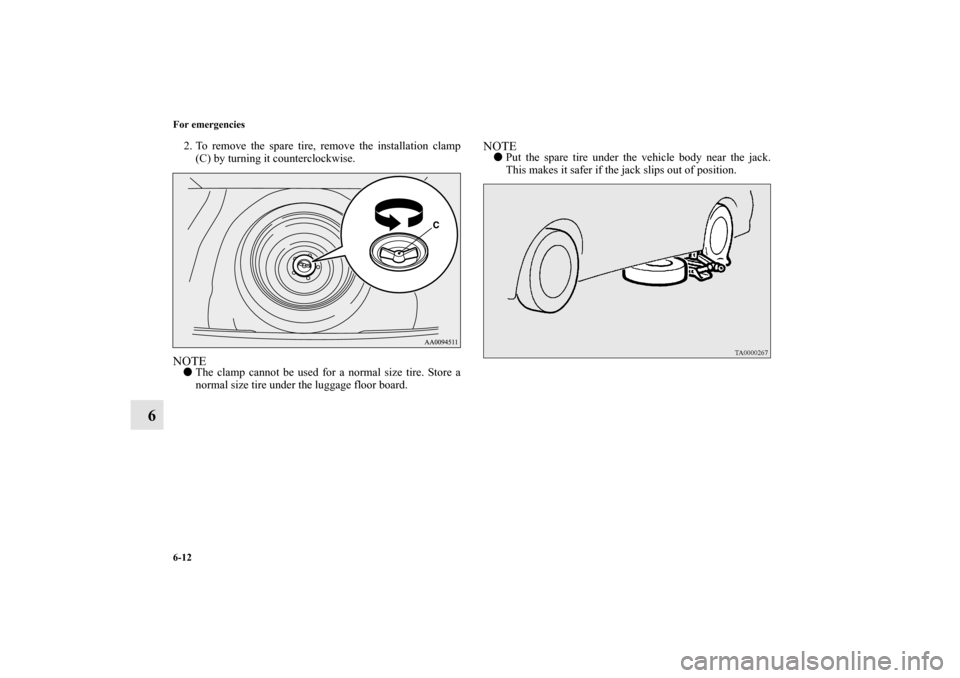
2. To remove the spare tire, remove the installation clamp
(C) by turning it counterclockwise.NOTE�The clamp cannot be used for a normal size tire. Store a
normal size tire under the luggage floor board.
NOTE�Put the spare tire under the vehicle body near the jack.
This makes it safer if the jack slips out of position.
BK0102103US.book 12 ページ 2009年10月26日 月曜日 午後1時38分
 either clockwise or counter-
clockwise to change the tone/balance setting.
The status will be displayed in the display (3).A- Adjust mode
B- Adjust")
When listening to the radio, fold the antenna toward the rear of
the vehicle until you hear")
For securing the best satellite reception, the angle of the
antenna is fixed.
To r e m o v eTurn the pole (A) counterc")