Page 535 of 670
6-18 For emergencies
6
8. Lower the vehicle slowly by rotating the wheel nut
wrench counterclockwise until the tire touches the
ground.9. Tighten the nuts in the order shown in the illustration until
each nut has been tightened to the torque listed here.
65 to 80 ft-lb (88 to 108 N•m)
10. Lower the jack all the way and remove it.
CAUTION
!�Never use your foot or a pipe extension to apply
added force to the wheel nut wrench when tighten-
ing the wheel nuts. If you do so, you can over-tighten
the wheel nuts and damage the wheel, wheel nuts
and hub bolts.
BK0102103US.book 18 ページ 2009年10月26日 月曜日 午後1時38分
Page 567 of 670
7-24 Vehicle care and maintenance
7
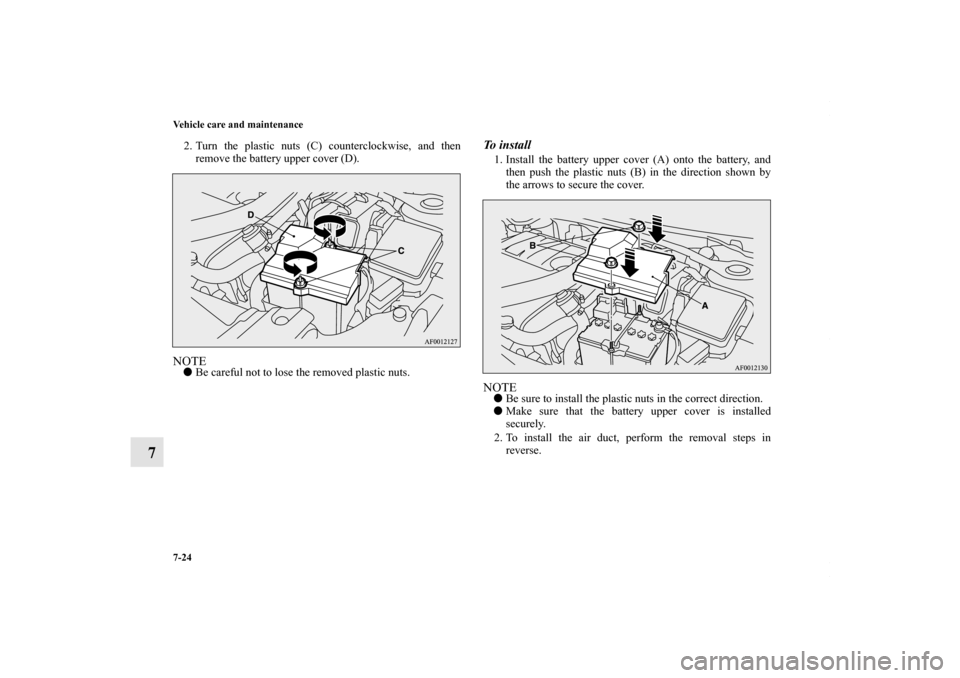
2. Turn the plastic nuts (C) counterclockwise, and then
remove the battery upper cover (D).NOTE�Be careful not to lose the removed plastic nuts.
To i n s t a l l1. Install the battery upper cover (A) onto the battery, and
then push the plastic nuts (B) in the direction shown by
the arrows to secure the cover. NOTE�Be sure to install the plastic nuts in the correct direction.
�Make sure that the battery upper cover is installed
securely.
2. To install the air duct, perform the removal steps in
reverse.
BK0102103US.book 24 ページ 2009年10月26日 月曜日 午後1時38分
Page 603 of 670
7-60 Vehicle care and maintenance
7
2. For vehicles equipped with turbocharger, when replacing
the bulb on the passenger’s side, lift up the engine coolant
reservoir (B).3. Turn the bulb (C) counterclockwise, and then remove the
headlight bulb with holder.*- Front of the vehicle
*- Front of the vehicle
BK0102103US.book 60 ページ 2009年10月26日 月曜日 午後1時38分
Page 605 of 670
7-62 Vehicle care and maintenance
7
Headlights (high beam, except for vehicles with
high intensity discharge headlights)
N00943100843
1. When replacing the bulb on the front passenger’s side,
remove the bolt (A) holding down the washer tank spout
and move the spout toward the rear of the vehicle.2. Turn the cap (B) counterclockwise to remove it.*- Front of the vehicle
*- Front of the vehicle
BK0102103US.book 62 ページ 2009年10月26日 月曜日 午後1時38分
Page 606 of 670
Vehicle care and maintenance
7-63
7
3. Turn the bulb (C) counterclockwise to remove it. 4. While holding down the tab (D), pull out the bulb (E).
5. To install the bulb, perform the removal steps in reverse.*- Front of the vehicle
BK0102103US.book 63 ページ 2009年10月26日 月曜日 午後1時38分
Page 608 of 670
Vehicle care and maintenance
7-65
7
2. Turn the cap (B) counterclockwise to remove it. 3. Turn the socket (C) counterclockwise to remove it.*- Front of the vehicle
*- Front of the vehicle
BK0102103US.book 65 ページ 2009年10月26日 月曜日 午後1時38分
Page 609 of 670
7-66 Vehicle care and maintenance
7
4. Turn the bulb counterclockwise while pressing it and pull
it out of the socket.
5. To install a bulb, perform the removal steps in reverse.
Headlights (low/high beam, for vehicles with high
intensity discharge lights)
N00943100625
Do not attempt to disassemble or repair headlights, and do not
attempt to replace their bulbs.Adjustment of headlight aim
N00943200121
The alignment of the headlights should be checked by an
authorized Mitsubishi Motors dealer or a repair facility of your
choice.
WARNING
!�A high voltage is present in the power circuit and in
the bulbs and bulb terminals. To avoid the risk of an
electric shock, contact an authorized Mitsubishi
dealer whenever repair or replacement is necessary.
BK0102103US.book 66 ページ 2009年10月26日 月曜日 午後1時38分
Page 611 of 670
7-68 Vehicle care and maintenance
7
3. Turn the socket (C) counterclockwise to remove it. 4. Pull the bulb out of the socket.
5. To install the bulb, perform the removal steps in reverse.*- Front of the vehicle
BK0102103US.book 68 ページ 2009年10月26日 月曜日 午後1時38分

.3. Turn the bulb (C) counter")

N00943100843
1. When replacing the bulb on the front passenger’s side,
remov")
 counterclockwise to remove it. 4. While holding down the tab (D), pull out the bulb (E).
5. To install the bulb, perform the removal steps in r")
 counterclockwise to remove it. 3. Turn the socket (C) counterclockwise to remove it.*- Front of the vehicle
*- Front of the vehicle
BK0102103US.")

 counterclockwise to remove it. 4. Pull the bulb out of the socket.
5. To install the bulb, perform the removal steps in reverse.*- Front of t")