Page 81 of 230
 MOBILITYAT A GLANCE CONTROLS DRIVING TIPS ENTERTAINMENT
79
NAVIGATION REFERENCE
System limitations
The Flat Tire Monitor is unable to warn the driver
of sudden, severe tire damage caused by exter-
n")
MOBILITYAT A GLANCE CONTROLS DRIVING TIPS ENTERTAINMENT
79
NAVIGATION REFERENCE
System limitations
The Flat Tire Monitor is unable to warn the driver
of sudden, severe tire damage caused by exter-
nal factors, nor can it identify the gradual loss of
pressure that will inevitably occur in all four tires
over a lengthy period of time.
In the following situations, the system could be
delayed or malfunction:
>System has not been initialized
>Driving on snowy or slippery road surface
>Performance-oriented style of driving: slip in
the drive wheels, high lateral acceleration
>Snow chains are attached
When the vehicle is driven with a space-saver
spare tire
*, page193, the Flat Tire Monitor can-
not function.
Initializing the system
The initialization is completed during driv-
ing, which can be interrupted at any time.
When driving resumes, the initialization is con-
tinued automatically.
Do not initialize the system if you are driving
with snow chains or a space-saver spare tire
*.<
Using the onboard monitor
Onboard monitor, for operating principle refer
to page16.
1.Press the button.
This opens the start menu.
2.Move the MINI joystick to highlight "Setup"
and press the MINI joystick.
3.Select "Settings".
4.Select "Vehicle and tires".5.If necessary, move the highlight marker to
the uppermost field. Select "FTM".
6.Start the engine, but do not start driving.
7.Select "Reset".
8.Select "Yes".
9.Start driving.
The initialization is completed during
driving.
Indication of a flat tire
The warning lamps come on in yellow
and red. A message appears on the
Control Display. An acoustic signal also
sounds. There is a flat tire or substantial
loss of tire pressure.
1.Reduce speed and stop the vehicle with cau-
tion. Avoid sudden braking and steering
maneuvers.
2.Check whether your vehicle is equipped
with normal tires or run-flat tires.
The symbol identifying run-flat tires is
a circle with the letters RSC on the
sidewall, refer to run-flat tires, page174.<
Page 82 of 230
 Technology for driving comfort and safety
80
Normal tires
1.Determine which tire is damaged.
If this cannot be determined, contact
your MINI dealer.<
2.Repair the flat tire, refer to page190, or
cha")
Technology for driving comfort and safety
80
Normal tires
1.Determine which tire is damaged.
If this cannot be determined, contact
your MINI dealer.<
2.Repair the flat tire, refer to page190, or
change the damaged tire, refer to page192.
Run-flat tires*
1.Cautiously reduce speed to below 50 mph
or 80 km/h. Avoid sudden braking and
steering maneuvers. Do not exceed a speed
of 50 mph or 80 km/h.
Do not continue driving if the vehicle is
not equipped with run-flat tires,
page174; otherwise, a serious accident
could result.<
2.At the next opportunity, check the air pres-
sure in all four tires.
If all four tires are inflated to the cor-
rect pressures, the Flat Tire Monitor
might not have been initialized. The system
must then be initialized.<
3.In the event of complete tire pressure loss,
0 psi/0 kPa, you can estimate the possible
distance for continued driving on the basis
of the following guidelines:
>With a light load:
1 to 2 persons without luggage:
approx. 155 miles/250 km
>With a medium load:
2 persons, cargo bay full, or 4 persons
without luggage:
approx. 94 miles/150 km
>With a full load:
4 persons, load compartment full:
approx. 30 miles/50 km
Drive cautiously and do not exceed a
speed of 50 mph or 80 km/h; otherwise,
an accident may occur. In the event of pressure
loss, vehicle handling changes. This includes
reduced tracking stability in braking, extended
braking distance and altered natural steering
characteristics. If unusual vibration or loud noises occur during
the journey, this may be an indication that the
damaged tire has finally failed. Reduce the vehi-
cle speed and stop as soon as possible. Other-
wise, sections of the tire may come loose and
cause accidents. Do not continue driving and
contact your MINI dealer.
Monitor TPM*
The concept
TPM checks the inflation pressures of the four
mounted tires during a trip. The system notifies
you if there is a significant loss of pressure in one
or more tires.
Functional requirement
In order to assure the reliable reporting of a flat
tire, the system must be reset while all tire infla-
tion pressures are correct.
Always use wheels with TPM electronics. Other-
wise, the system may malfunction.
Each time a tire inflation pressure has
been corrected or a wheel or tire has been
changed, reset the system.<
System limitations
TPM cannot warn you in advance of sud-
d e n s e v e r e t i r e d a m a g e c a u s e d b y o u t s i d e
influences.<
The system does not work correctly if it has not
been reset; for example, a flat tire may be indi-
cated even though the tire inflation pressures
are correct.
The system is inactive and cannot indicate a flat
tire if a wheel without TPM electronics, such as a
compact spare wheel
*, has been mounted, or if
TPM is temporarily malfunctioning due to other
systems or devices using the same radio fre-
quency.
Page 83 of 230
 MOBILITYAT A GLANCE CONTROLS DRIVING TIPS ENTERTAINMENT
81
NAVIGATION REFERENCE
Status indicator on the onboard monitor
The tire and system condition is indicated by the
color of the tires.
TPM take")
MOBILITYAT A GLANCE CONTROLS DRIVING TIPS ENTERTAINMENT
81
NAVIGATION REFERENCE
Status indicator on the onboard monitor
The tire and system condition is indicated by the
color of the tires.
TPM takes into account the fact that tire pres-
sure changes while the vehicle is being driven.
The tire pressure does not need to be corrected
unless the TPM instructs you to do so by means
of color indicators.
Green
The tire inflation pressure corresponds to the
established target value.
"TPM active" is displayed on the onboard
monitor.
One wheel yellow
There is a flat tire or substantial loss of tire pres-
sure in the indicated tire. A message appears on
the onboard monitor.
All wheels yellow
There is a flat tire or substantial loss of tire pres-
sure in several tires. A message appears on the
onboard monitor.
Gray
The system cannot detect a puncture.
Possible reasons for this:
>TPM is being reset
>Temporary malfunction caused by systems
or devices using the same radio frequency
>Malfunction
Resetting the system
Each time a tire inflation pressure has
been corrected or a wheel or tire has been
changed, reset the system.<
Using the onboard monitor
Onboard monitor, for operating principle refer
to page16.
1.Press the button.
This opens the start menu.
2.Move the MINI joystick to highlight "Setup"
and press the MINI joystick.3.Select "Settings" and press the MINI joystick.
4.Select "Vehicle and tires" and press the MINI
joystick.
5.If necessary, move the highlight marker to
the uppermost field. Select "TPM" and press
the MINI joystick.
6.Start the engine, but do not start driving.
7.Select "Reset" and press the MINI joystick.
8.Select "Yes" and press the MINI joystick.
9.Start driving.
The tires are shown in gray and "Resetting
TPM..." is displayed.
Page 84 of 230
 Technology for driving comfort and safety
82
After driving a few minutes, the set inflation
pressures in the tires are accepted as the target
values to be monitored. The system reset is
completed d")
Technology for driving comfort and safety
82
After driving a few minutes, the set inflation
pressures in the tires are accepted as the target
values to be monitored. The system reset is
completed during your drive, and can be inter-
rupted at any time. When driving resumes, the
reset is continued automatically. On the
onboard monitor, the tires are shown in green
and "Status: TPM active" is displayed again.
If a flat tire is detected while the system is
being reset and while it is determining the
inflation pressures, all tires on the onboard mon-
itor are displayed in yellow. The message "Tire
low!" is shown.<
Message for low tire inflation pressure
The warning lamps come on in yellow
and red. A message appears on the
onboard monitor. An acoustic signal
also sounds. There is a flat tire or sub-
stantial loss of tire pressure.
1.Reduce speed and stop the vehicle with cau-
tion. Avoid sudden braking and steering
maneuvers.
2.Check whether your vehicle is equipped
with normal tires or run-flat tires.
The symbol identifying run-flat tires is
a circle with the letters RSC on the
sidewall, page174.<
Normal tires
1.Determine which tire is damaged.
If this cannot be determined, contact
your MINI dealer.<
2.Repair the flat tire or change the damaged
tire, refer to page192.
Run-flat tires*
1.Cautiously reduce speed to below 50 mph/
80 km/h. Avoid sudden braking and steering
maneuvers. Do not exceed a speed of
50 mph/80 km/h.
Do not continue driving if the vehicle is
not equipped with run-flat tires; oth-
erwise, a serious accident could result.<
2.In the event of complete tire pressure loss,
0 psi/0 kPa, you can estimate the possible distance for continued driving on the basis
of the following guidelines:
>With a light load:
1 to 2 persons without luggage:
approx. 155 miles/250 km
>With a medium load:
2 persons, cargo bay full, or 4 persons
without luggage:
approx. 94 miles/150 km
>With a full load:
4 persons, load compartment full:
approx. 30 miles/50 km
Drive cautiously and do not exceed a
speed of 50 mph/80 km/h; otherwise, an
accident may occur. In the event of pressure
loss, vehicle handling changes. This includes
reduced tracking stability in braking, extended
braking distance and altered natural steering
characteristics.
If unusual vibration or loud noises occur during
the journey, this may be an indication that the
damaged tire has finally failed. Reduce the vehi-
cle speed and stop as soon as possible. Other-
wise, sections of the tire may come loose and
cause accidents. Do not continue driving and
contact your MINI dealer.<
Malfunction
The small warning lamp flashes in yel-
low and then lights up continuously;
the larger warning lamp comes on in
yellow.
On the onboard monitor, the tires are shown in
gray and a message appears. No punctures can
be detected.
This type of message is shown in the following
situations:
>If there is a malfunction.
Have the system checked.
>If a wheel without TPM electronics has been
mounted.
>If TPM is temporarily malfunctioning due to
other systems or devices using the same
radio frequency.
Page 85 of 230
 MOBILITYAT A GLANCE CONTROLS DRIVING TIPS ENTERTAINMENT
83
NAVIGATION REFERENCE
Message for unsuccessful system reset
Both warning lamps come on in yellow.
A message appears on the onboard
monitor.")
MOBILITYAT A GLANCE CONTROLS DRIVING TIPS ENTERTAINMENT
83
NAVIGATION REFERENCE
Message for unsuccessful system reset
Both warning lamps come on in yellow.
A message appears on the onboard
monitor. The system is not reset after a
tire has been changed, for example.
Check the tire inflation pressure and reset the
system, page81.
Declaration according to NHTSA/
FMVSS 138 Tire Pressure Monitoring
Systems
Each tire, including the spare, should be che-
cked monthly when cold and inflated to the
inflation pressure recommended by the vehicle
manufacturer on the vehicle placard or tire infla-
tion pressure label. If your vehicle has tires of a
different size than the size indicated on the vehi-
cle placard or tire inflation pressure label, you
should determine the proper tire inflation pres-
sure for those tires. As an added safety feature,
your vehicle has been equipped with a tire pres-
sure monitoring system TPMS that illuminates a
low tire pressure telltale when one or more of
your tires are significantly under-inflated.
Accordingly, when the low tire pressure telltale
illuminates, you should stop and check your tires
as soon as possible, and inflate them to the
proper pressure. Driving on a significantly
under-inflated tire causes the tire to overheat
and can lead to tire failure. Underinflation also
reduces fuel efficiency and tire tread life, and
may affect the vehicle's handling and stopping
ability. Please note that the TPMS is not a substi-
tute for proper tire maintenance, and it is the
driver's responsibility to maintain correct tire
pressure, even if underinflation has not reached
the level at which the TPMS low tire pressure tell-
tale illuminates.
The TPMS malfunction indicator is combined
with the low tire pressure telltale. When the sys-
tem detects a malfunction, the telltale will flash
for approximately one minute and then remain
continuously lit. This sequence will continue
upon subsequent vehicle startups as long as the
malfunction exists. When the malfunction indi-
cator is illuminated, the system may not be able
to detect or signal low tire pressure as intended.
TPMS malfunctions may occur for a variety of reasons, including the installation of replace-
ment or alternate tires or wheels on the vehicle
that prevent the TPMS from functioning prop-
erly. Always check the TPMS malfunction telltale
after replacing one or more tires or wheels on
your vehicle to ensure that the replacement or
alternate tires and wheels allow the TPMS to
continue to function properly.
Page 86 of 230
 Technology for driving comfort and safety
84
Airbags
The following airbags are located under the
marked covers:
MINI:
1Front airbags
2Side airbags in backrests
3Head airbags at the front and rearMINI")
Technology for driving comfort and safety
84
Airbags
The following airbags are located under the
marked covers:
MINI:
1Front airbags
2Side airbags in backrests
3Head airbags at the front and rearMINI Convertible:
1Front airbags
2Side/head airbags in the backrests
Protective effect
Observe the instructions on page42 to
ensure the best possible personal pro-
tection.<
The front airbags help protect the driver and
front passenger by responding to frontal
impacts in which safety belts alone cannot pro-
vide adequate restraint. When needed, the head
and side airbags help provide protection in the
event of side impact. The relevant side airbag
supports the side upper body area. The head air
bag supports the head.
The side/head airbag in the MINI Convertible
protects the head during impact.
The airbags are designed to not be triggered in
every type of collision, e.g. not in minor acci-
dents, certain rollover situations or rear impacts.
Do not apply adhesive materials to the
cover panels of the airbags, cover them or
modify them in any other way.
Keep the dashboard and window on the passen-
ger side free from obstruction, i.e. do not cover it
with adhesive film or coverings, and do not affix
any holders such as for a navigation device or a
mobile phone.
Do not attach seat covers, cushions or other
objects not specifically approved for seats with
integral side airbags to the front seats. Do not hang items of clothing such as coats or jackets
over the backrests. Do not attempt to remove
the airbag retention system from the vehicle. Do
not modify the individual components of the
system or its wiring in any way. This includes the
upholstered covers on the steering wheel,
instrument panel, seats and roof posts, as well as
the sides of the roof lining. Do not attempt to
remove or dismantle the steering wheel.
Do not touch the individual components imme-
diately after the system has been triggered,
because there is a danger of burns.
In the event of malfunctions, deactivation, or
triggering of the airbag restraint system, have
the testing, repair, removal, and disposal of air-
bag generators executed only by a MINI dealer
or a workshop that works according to repair
procedures of the manufacturer of your MINI
with correspondingly trained personnel and has
the required explosives licenses. Otherwise,
unprofessional attempts to service the system
could lead to failure in an emergency or undes-
ired airbag activation, either of which could
result in personal injury.<
Warning notices and information about the air-
bags can also be found on the sun visors.
Page 87 of 230
 MOBILITYAT A GLANCE CONTROLS DRIVING TIPS ENTERTAINMENT
85
NAVIGATION REFERENCE
Automatic deactivation of the front
passenger airbags
An analysis of the impression in the front pas-
senger seat cush")
MOBILITYAT A GLANCE CONTROLS DRIVING TIPS ENTERTAINMENT
85
NAVIGATION REFERENCE
Automatic deactivation of the front
passenger airbags
An analysis of the impression in the front pas-
senger seat cushion determines whether and
how the seat is occupied. The front and side air-
bags for the front passenger are activated or
deactivated by the system accordingly.
The indicator lamp above the interior rear-
view mirror shows the current status of
the front passenger airbags, deactivated or acti-
vated, refer to Status of front passenger airbags
below.<
Before transporting a child on the front
passenger seat, read the safety precau-
tions and handling instructions under Transport-
ing children safely, page48.
The front and side airbags can also be deacti-
vated by adolescents and adults sitting in certain
positions; the indicator lamp for the front pas-
senger airbags comes on. In such cases, the pas-
senger should change his or her sitting position
so that the front passenger airbags are activated
and the indicator lamp goes out. If the desired
airbag status cannot be achieved by changing
the sitting position, transport the relevant pas-
senger on a rear seat. Do not attach covers,
cushions, ball mats or other items to the front
passenger seat unless they are specifically rec-
ommended by the manufacturer of your MINI.
Do not place any items under the seat which
could press against the seat from below. Other-
wise, a correct analysis of the seat cushion is not
ensured.<
Status of front passenger airbags
MINI:MINI Convertible:
The indicator lamp for the front passenger air-
bags shows the functional status of the front
passenger's front and side airbags in accordance
with whether and how the front passenger seat
is occupied. The indicator lamp shows whether
the front passenger airbags are activated or
deactivated.
>The indicator lamp comes on as intended
when a child in a specially designated child
restraint system is detected on the seat.
The front and side airbags for the front pas-
senger are not activated.
Most child seats are detected by the
system. This particularly applies to
child seats that were required by the NHTSA
at the time of manufacture of the vehicle.
After installing a child seat, check that the in-
dicator lamp for the front passenger airbags
comes on. It indicates that the child seat has
been detected and that the front passenger
airbags are deactivated.<
>T h e i n d i c a t o r l a m p d o e s n o t c o m e o n a s l o n g
as a person of sufficient size and in a correct
sitting position is detected on the seat.
The front and side airbags for the front pas-
senger are activated.
>The indicator lamp does not come on if the
seat is empty.
The front and side airbags for the front pas-
senger are not activated.
Page 88 of 230
 Technology for driving comfort and safety
86
Operational readiness of airbag system
As of radio readiness, page51, the warning
lamp comes on briefly to indicate that the entire
airbag system and the")
Technology for driving comfort and safety
86
Operational readiness of airbag system
As of radio readiness, page51, the warning
lamp comes on briefly to indicate that the entire
airbag system and the belt tensioners are oper-
ational.
Airbag system malfunction
>The warning lamp does not come on
when radio readiness or the ignition is
switched on.
>The warning lamp stays lit continuously.
In the event of a fault in the airbag system,
have it checked without delay; otherwise,
there is the risk that the system will not function
as intended even if a severe accident occurs.<
MINI Convertible:
Rollover protection
system
The rollover system is automatically activated
during an accident or dangerous driving situa-
tion, during extreme tilt of the longitudinal axis,
or during loss of ground contact. The roll bar
located behind the rear seat headrest is pro-
jected within a fraction of a second.
In addition to the reinforced windshield frame,
the rollover protection system ensures the nec-
essary head clearance for all occupants of the
vehicle.
Never block the travel path of the rollover
protection system with any objects.
Always wear your safety belt, it protects you in a
minor car accident and, depending on the
severity of the accident, the seat belt tensioner and the multilevel airbag system will
protect you.<
Lowering
If the rollover protection system releases acci-
dentally, have your MINI Service check it.
If the rollover protective system is
extended, do not operate the conver-
tible top.
Never attempt to modify the individual compo-
nents or the electrical wiring of the rollover pro-
tective system.
Have the necessary work on the rollover protec-
tion system of your MINI only carried out by an
authorized MINI dealer.
Faulty repair may lead to the failure of the sys-
tem or malfunctions.
Check the system regularly and in order to
ensure a long service life of all functions, it is
mandatory to maintain the service intervals,
refer to page65.<
 1
1 2
2 3
3 4
4 5
5 6
6 7
7 8
8 9
9 10
10 11
11 12
12 13
13 14
14 15
15 16
16 17
17 18
18 19
19 20
20 21
21 22
22 23
23 24
24 25
25 26
26 27
27 28
28 29
29 30
30 31
31 32
32 33
33 34
34 35
35 36
36 37
37 38
38 39
39 40
40 41
41 42
42 43
43 44
44 45
45 46
46 47
47 48
48 49
49 50
50 51
51 52
52 53
53 54
54 55
55 56
56 57
57 58
58 59
59 60
60 61
61 62
62 63
63 64
64 65
65 66
66 67
67 68
68 69
69 70
70 71
71 72
72 73
73 74
74 75
75 76
76 77
77 78
78 79
79 80
80 81
81 82
82 83
83 84
84 85
85 86
86 87
87 88
88 89
89 90
90 91
91 92
92 93
93 94
94 95
95 96
96 97
97 98
98 99
99 100
100 101
101 102
102 103
103 104
104 105
105 106
106 107
107 108
108 109
109 110
110 111
111 112
112 113
113 114
114 115
115 116
116 117
117 118
118 119
119 120
120 121
121 122
122 123
123 124
124 125
125 126
126 127
127 128
128 129
129 130
130 131
131 132
132 133
133 134
134 135
135 136
136 137
137 138
138 139
139 140
140 141
141 142
142 143
143 144
144 145
145 146
146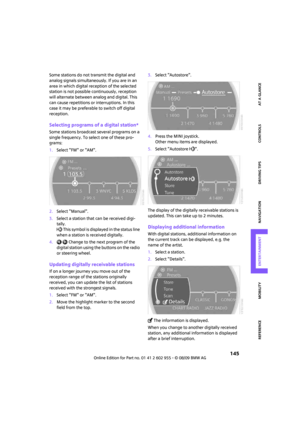 147
147 148
148 149
149 150
150 151
151 152
152 153
153 154
154 155
155 156
156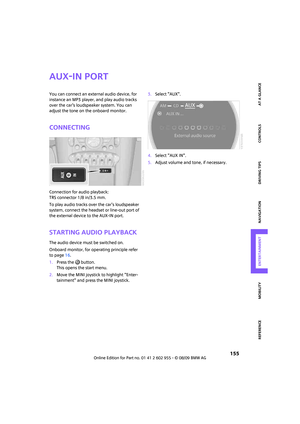 157
157 158
158 159
159 160
160 161
161 162
162 163
163 164
164 165
165 166
166 167
167 168
168 169
169 170
170 171
171 172
172 173
173 174
174 175
175 176
176 177
177 178
178 179
179 180
180 181
181 182
182 183
183 184
184 185
185 186
186 187
187 188
188 189
189 190
190 191
191 192
192 193
193 194
194 195
195 196
196 197
197 198
198 199
199 200
200 201
201 202
202 203
203 204
204 205
205 206
206 207
207 208
208 209
209 210
210 211
211 212
212 213
213 214
214 215
215 216
216 217
217 218
218 219
219 220
220 221
221 222
222 223
223 224
224 225
225 226
226 227
227 228
228 229
229