2010 MINI Hardtop 2 Door Owner's Manual (Mini Connected)
-
 1
1 -
 2
2 -
 3
3 -
 4
4 -
 5
5 -
 6
6 -
 7
7 -
 8
8 -
 9
9 -
 10
10 -
 11
11 -
 12
12 -
 13
13 -
 14
14 -
 15
15 -
 16
16 -
 17
17 -
 18
18 -
 19
19 -
 20
20 -
 21
21 -
 22
22 -
 23
23 -
 24
24 -
 25
25 -
 26
26 -
 27
27 -
 28
28 -
 29
29 -
 30
30 -
 31
31 -
 32
32 -
 33
33 -
 34
34 -
 35
35 -
 36
36 -
 37
37 -
 38
38 -
 39
39 -
 40
40 -
 41
41 -
 42
42 -
 43
43 -
 44
44 -
 45
45 -
 46
46 -
 47
47 -
 48
48 -
 49
49 -
 50
50 -
 51
51 -
 52
52 -
 53
53 -
 54
54 -
 55
55 -
 56
56 -
 57
57 -
 58
58 -
 59
59 -
 60
60 -
 61
61 -
 62
62 -
 63
63 -
 64
64 -
 65
65 -
 66
66 -
 67
67 -
 68
68 -
 69
69 -
 70
70 -
 71
71 -
 72
72 -
 73
73 -
 74
74 -
 75
75 -
 76
76 -
 77
77 -
 78
78 -
 79
79 -
 80
80 -
 81
81 -
 82
82 -
 83
83 -
 84
84 -
 85
85 -
 86
86 -
 87
87 -
 88
88 -
 89
89 -
 90
90 -
 91
91 -
 92
92 -
 93
93 -
 94
94 -
 95
95 -
 96
96 -
 97
97 -
 98
98 -
 99
99 -
 100
100 -
 101
101 -
 102
102 -
 103
103 -
 104
104 -
 105
105 -
 106
106 -
 107
107 -
 108
108 -
 109
109 -
 110
110 -
 111
111 -
 112
112 -
 113
113 -
 114
114 -
 115
115 -
 116
116 -
 117
117 -
 118
118 -
 119
119 -
 120
120 -
 121
121 -
 122
122 -
 123
123 -
 124
124 -
 125
125 -
 126
126 -
 127
127 -
 128
128 -
 129
129 -
 130
130 -
 131
131 -
 132
132 -
 133
133 -
 134
134 -
 135
135 -
 136
136 -
 137
137 -
 138
138 -
 139
139 -
 140
140 -
 141
141 -
 142
142 -
 143
143 -
 144
144 -
 145
145 -
 146
146 -
 147
147 -
 148
148 -
 149
149 -
 150
150 -
 151
151 -
 152
152 -
 153
153 -
 154
154 -
 155
155 -
 156
156 -
 157
157 -
 158
158 -
 159
159 -
 160
160 -
 161
161 -
 162
162 -
 163
163 -
 164
164 -
 165
165 -
 166
166 -
 167
167 -
 168
168 -
 169
169 -
 170
170 -
 171
171 -
 172
172 -
 173
173 -
 174
174 -
 175
175 -
 176
176 -
 177
177 -
 178
178 -
 179
179 -
 180
180 -
 181
181 -
 182
182 -
 183
183 -
 184
184 -
 185
185 -
 186
186 -
 187
187 -
 188
188 -
 189
189 -
 190
190 -
 191
191 -
 192
192 -
 193
193 -
 194
194 -
 195
195 -
 196
196 -
 197
197 -
 198
198 -
 199
199 -
 200
200 -
 201
201 -
 202
202 -
 203
203 -
 204
204 -
 205
205 -
 206
206 -
 207
207 -
 208
208 -
 209
209 -
 210
210 -
 211
211 -
 212
212 -
 213
213 -
 214
214 -
 215
215 -
 216
216 -
 217
217 -
 218
218 -
 219
219 -
 220
220 -
 221
221 -
 222
222 -
 223
223 -
 224
224 -
 225
225 -
 226
226 -
 227
227 -
 228
228 -
 229
229
 MOBILITYAT A GLANCE CONTROLS DRIVING TIPS ENTERTAINMENT
151
NAVIGATION REFERENCE
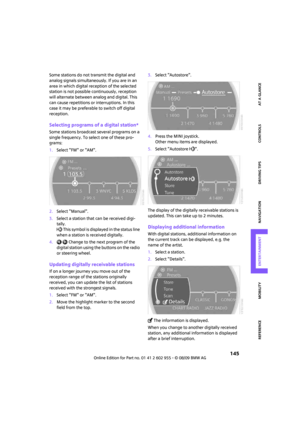
Sampling tracks, Scan
All tracks on the current CD are automatically
sampled once in succession.
1.Select a track.
2.")
 CD player and CD changer
152
3.Select \"Repeat\".
The current track on the CD is repeated.
Stop repeating
1.Press the MINI joystick again.
2.Select \"Repeat\".
Compressed audio files*
1.Select the current")
 MOBILITYAT A GLANCE CONTROLS DRIVING TIPS ENTERTAINMENT
153
NAVIGATION REFERENCE
When loading CDs into or removing them
from the CD changer, hold them at their
edges and do not touch the reflective")
 CD player and CD changer
154
Malfunction
If all LEDs on the CD changer are flashing rapidly,
there is a malfunction.
To solve the problem:
1.Press button or .
The CD inserted last is ejected.
2.Re")
 MOBILITYAT A GLANCE CONTROLS DRIVING TIPS ENTERTAINMENT
155
NAVIGATION REFERENCE
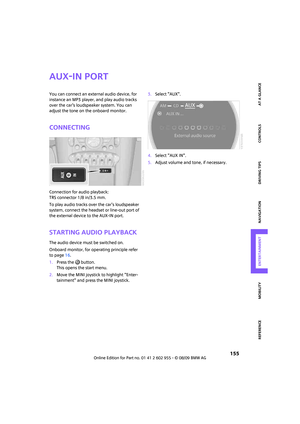
AUX-IN port
You can connect an external audio device, for
instance an MP3 player, and play audio tracks
over the car")
 USB audio interface
156
USB audio interface
Connections for external
devices
An external audio device or USB device can
be connected to the USB audio interface, for
example:
>MP3 player
>USB memory")
 MOBILITYAT A GLANCE CONTROLS DRIVING TIPS ENTERTAINMENT
157
NAVIGATION REFERENCE
Starting audio playback
1.Press the button.
This opens the start menu.
2.Move the MINI joystick to highlight \"Enter-")
 USB audio interface
158
Random play sequence
You can play the tracks in the selected list in ran-
dom order, e. g. all tracks of a single artist.
1.Select a current track and press the MINI joy-
stick")