2010 MINI Hardtop 2 Door CD changer
[x] Cancel search: CD changerPage 5 of 230

MOBILITYAT A GLANCE CONTROLS DRIVING TIPS ENTERTAINMENT
3
NAVIGATION REFERENCE
CONTENTS
The fastest way to find information on a particu-
lar topic or item is by using the index, refer to
page212.
Using this Owner's Manual
4Notes
6Reporting safety defects
AT A GLANCE
10Cockpit
16Onboard monitor
21Voice activation system
CONTROLS
26Opening and closing
42Adjustments
48Transporting children safely
51Driving
60Controls overview
75Technology for driving comfort and safety
87Lamps
91Climate
94Practical interior accessories
DRIVING TIPS
102Things to remember when driving
NAVIGATION
112Starting the navigation system
114Destination entry
126Destination guidance
135What to do if …
ENTERTAINMENT
138On/off and settings
141Radio
149CD player and CD changer
155AUX-IN port
156USB audio interface
MOBILITY
162Refueling
164Wheels and tires
176Under the bonnet
179Maintenance
181Care
185Replacing components
196Giving and receiving assistance
REFERENCE
202Technical data
207Short commands for the voice activation
system
212From A to Z
Page 18 of 230

Onboard monitor
16
Onboard monitor
The onboard monitor integrates the functions of
a large number of switches. This allows these
functions to be operated from a single central
position. The following section provides an introduction to basic menu navigation. The con-
trol of the individual functions is described in
connection with the relevant equipment.
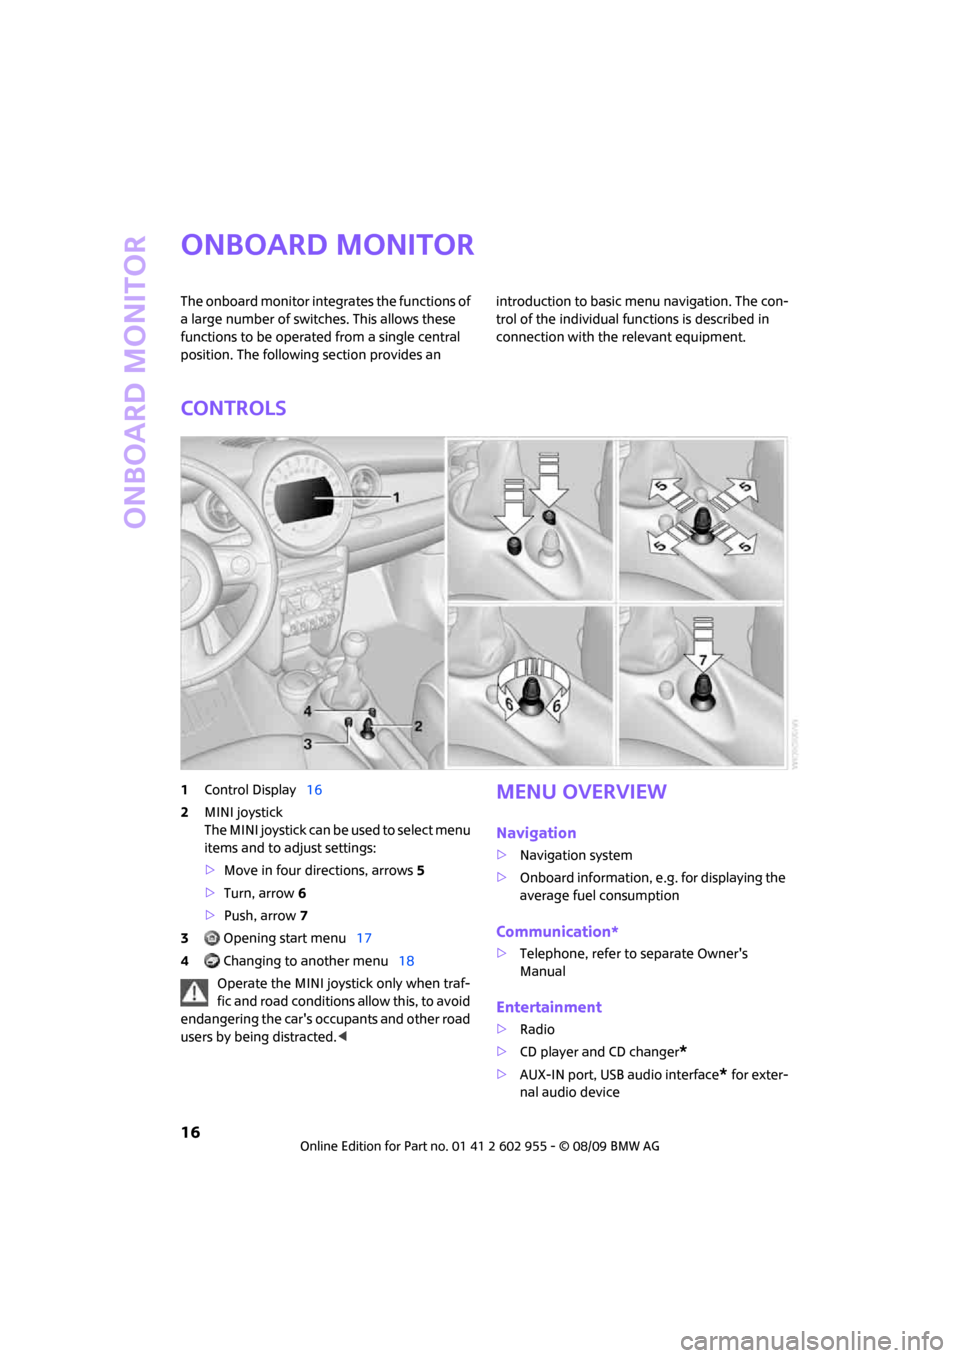
Controls
1Control Display16
2MINI joystick
The MINI joystick can be used to select menu
items and to adjust settings:
>Move in four directions, arrows5
>Turn, arrow 6
>Push, arrow 7
3 Opening start menu17
4 Changing to another menu18
Operate the MINI joystick only when traf-
fic and road conditions allow this, to avoid
endangering the car's occupants and other road
users by being distracted.
>Navigation system
>Onboard information, e.g. for displaying the
average fuel consumption
Communication*
>Telephone, refer to separate Owner's
Manual
Entertainment
>Radio
>CD player and CD changer
*
>AUX-IN port, USB audio interface* for exter-
nal audio device
Page 24 of 230

Voice activation system
22
Having the possible commands read aloud:
For instance, if you have selected "CD", the com-
mands available for operating the CD player and
CD changer are read out.
Opening help
Using alternative commands
There are often a number of commands to run a
function, e.g.:
Calling up functions immediately via
short commands
Short commands enable you to perform certain
functions immediately, irrespective of which
menu item is selected, page207.
Opening the start menu
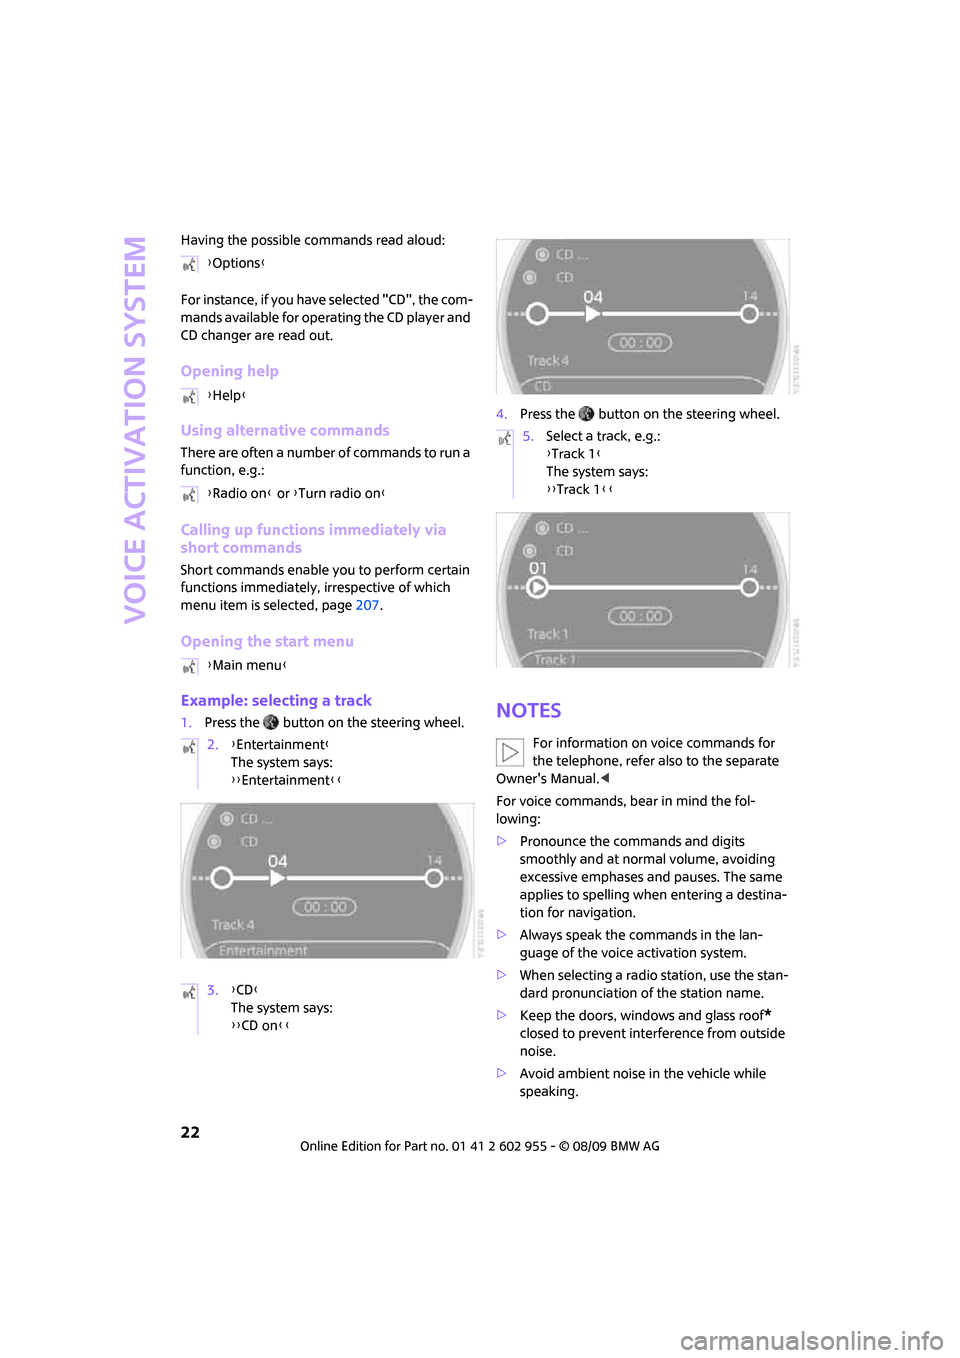
Example: selecting a track
1.Press the button on the steering wheel.4.Press the button on the steering wheel.Notes
For information on voice commands for
the telephone, refer also to the separate
Owner's Manual.<
For voice commands, bear in mind the fol-
lowing:
>Pronounce the commands and digits
smoothly and at normal volume, avoiding
excessive emphases and pauses. The same
applies to spelling when entering a destina-
tion for navigation.
>Always speak the commands in the lan-
guage of the voice activation system.
>When selecting a radio station, use the stan-
dard pronunciation of the station name.
>Keep the doors, windows and glass roof
*
closed to prevent interference from outside
noise.
>Avoid ambient noise in the vehicle while
speaking. {Options}
{Help}
{Radio on} or {Turn radio on}
{Main menu}
2.{Entertainment}
The system says:
{{Entertainment}}
3.{CD}
The system says:
{{CD on}}
5.Select a track, e.g.:
{Track 1}
The system says:
{{Track 1}}
Page 140 of 230

On/off and settings
138
On/off and settings
The following audio sources have shared con-
trols and settings options:
>Radio
>CD player
>CD changer
*
Controls
The audio sources can be operated using:
>Buttons near the CD player
>Onboard monitor
>Buttons
on steering wheel, page11
Buttons near the CD player
1Drive for audio CDs
2Eject CD
3Station scan/track search
>Change radio station.
>Select track for CD player and CD
changer.
4Sound output for entertainment on/off,
volume
>Press: switch on/off.
When you switch on the unit, the radio
station or track set most recently is
played.
>Turn: adjust volume.
5Change audio source
6Change FM/AM frequency
Operation via onboard monitor
Onboard monitor, for operating principle refer
to page16.
1.Press the button.
This opens the start menu.
2.Move the MINI joystick to highlight "Enter-
tainment" and press the MINI joystick.
You have the following choices:
>"FM" and "AM": radio reception
>"HD radio": High Definition Radio
*
>"SAT": satellite radio*
>"CD": CD player or changer
>"AUX": AUX-IN port, USB audio interface
*
The selected audio source is stored for the
remote control currently in use, refer to Personal
Profile, page26.
Switching on/off
Entertainment audio output
Press the button.
Page 151 of 230

MOBILITYAT A GLANCE CONTROLS DRIVING TIPS ENTERTAINMENT
149
NAVIGATION REFERENCE
CD player and CD changer
Listening to CDs
Compressed audio files*
CDs with compressed audio files, MP3s, can be
played by the CD player and CD changer.
Starting the CD player
The upper drive is for audio CDs.
Insert the CD into the drive with the labeled
side up.
The CD is drawn in automatically. Playback starts
automatically if the sound output is on. When
playing CDs with compressed audio files, it can
take the CD player approx. 1 minute to read in
the data, depending on the directory structure.
Starting playback of an inserted CD
Onboard monitor, for operating principle refer
to page16.
1.Press the button.
This opens the start menu.
2.Move the MINI joystick to highlight "Enter-
tainment" and press the MINI joystick.
3.If necessary, move the highlight marker to
the uppermost field. Select "CD".
4.If necessary, move the highlight marker to
the second field from the top. In cars with a CD changer, select "CD" to start the CD
player.
Playback starts automatically if the sound out-
put is switched on.
Starting the CD changer
1.Fill the CD changer, page152.
2.Press the button.
This opens the start menu.
3.Move the MINI joystick to highlight "Enter-
tainment" and press the MINI joystick.
4.If necessary, move the highlight marker to
the uppermost field. Select "CD".
5.If necessary, move the highlight marker to
the second field from the top. Select the
desired CD.
At the end of the last track, the next CD is
selected and played.
If new CDs have been placed in the CD changer,
playback starts with the lowest CD, e.g. CD 1,
track 1.
The CD changer's load status is indicated on the
Control Display.
*
Page 152 of 230

CD player and CD changer
150
Selecting a track
Buttons on the CD player
Press the button for the desired direction
repeatedly until the desired track on the current
CD is reached.
Playback of the CD starts at the beginning of
the track. The track is displayed on the Control
Display.
You can also change the track using the buttons
on the steering wheel, page11.
Using the onboard monitor
Turn the MINI joystick to select a track.
Compressed audio files*
1.Select the directory if necessary.2.Select a track and press the MINI joystick.
To change the directory:
Select a directory and press the MINI joystick.
Exit the menu:
Select the arrow.Displaying information about the track*
With compressed audio files, any information
about the current track that has been recorded
can be displayed, e.g. the name of the artist.
1.Press the MINI joystick.
2.Select "Details".
The information is shown for the current track.
The setting is stored for the remote control cur-
rently in use, refer to Personal Profile, page26.
Page 154 of 230

CD player and CD changer
152
3.Select "Repeat".
The current track on the CD is repeated.
Stop repeating
1.Press the MINI joystick again.
2.Select "Repeat".
Compressed audio files*
1.Select the current track.
2.Select the desired menu item:
>To repeat the selected track: Select
"Repeat track".
>To repeat all tracks in the current direc-
tory: Select "Repeat directory".
Stop repeating
1.Press the MINI joystick.
2.Select "Repeat track" or "Repeat directory".
Random play sequence
The tracks on the current CD are played once
each in random order.
1.Select a track.
2.Press the MINI joystick.
Other menu items are displayed.3.Select "Random".
Stop random function
1.Press the MINI joystick.
2.Select "Random".
Compressed audio files*
1.Select the current track.
2.Select the desired menu item:
>To play back the tracks in the current
directory in random order: Select "Ran-
dom directory".
>To play back all tracks on the CD in ran-
dom order: Select "Random all".
Stop random function
1.Press the MINI joystick.
2.Select "Random directory" or "Random all".
Fast forward/reverse
Buttons on the CD player:
Press and hold the button for the corre-
sponding direction.
The tracks can be heard, but reproduction is dis-
torted.
CD changer
The MINI CD changer for 6 CDs is installed in the
dashboard.
Page 155 of 230

MOBILITYAT A GLANCE CONTROLS DRIVING TIPS ENTERTAINMENT
153
NAVIGATION REFERENCE
When loading CDs into or removing them
from the CD changer, hold them at their
edges and do not touch the reflective signal-
sensing area.<
Opening
Briefly press the bottom edge of the cover.
Closing
Push the cover back into its original position.
To prevent injury in the event of an acci-
dent, close the cover after use while the
vehicle is being driven.<
Controls and displays
1LEDs at the CD slot
LEDs flash when a CD can be inserted.
2Buttons for CD compartments
LED is lit when a CD is in the compartment.
Filling the CD changer
1.Press the button.
The LED on the first empty compartment
flashes.
2.To select another compartment if necessary:
... Press the button.
3.When the LEDs 1 next to the CD slot flash,
insert a single CD.
The CD is drawn in automatically and is
placed in the selected CD compartment.
Only insert the CD when the LEDs1
next to the CD slot are flashing;
otherwise, the CD or CD changer may be
damaged.
Do not push the CD while it is being drawn in
as this may cause it to jam and become
impossible to eject.<4.To fill additional CD compartments:
Repeat steps 1-3.
5.Close the cover after the CDs have been fully
drawn in.
Filling empty CD compartments
1.Press the button for a longer period.
The LEDs on the empty CD compartments
flash.
2.When the LEDs 1 next to the CD slot flash,
insert a single CD.
The CD is drawn in automatically and is
placed in the first vacant CD compartment.
Only insert the CD when the LEDs1
next to the CD slot are flashing;
otherwise, the CD or CD changer may be
damaged.
Do not push the CD while it is being drawn in
as this may cause it to jam and become
impossible to eject.<
3.Wait for the CD to be drawn in.
4.To fill additional CD compartments:
Repeat steps 2 and 3.
5.Close the cover after the CDs have been fully
drawn in.
Removing CDs from the CD changer
1.Press the button.
2. ... Press the button to select a CD
compartment.
The CD is partially ejected from the CD
changer.
3.Remove the CD.
4.Close the cover after the CDs have been
removed.
Removing all CDs from the CD changer
1.Press the button for a longer period.
The CDs are partially ejected from the CD
changer one after the other.
2.Remove the CDs.
3.Close the cover after the CDs have been
removed.