Page 33 of 174

REFERENCEAT A GLANCE CONTROLS DRIVING TIPS MOBILITY
31
If the temperature drops below +10 7/
–12 6, do not operate the convertible
top; otherwise, damage may occur.
Do not leave a wet convertible top open for
more than one day, since the humidity may
cause damages.
Do not place any objects on the convertible top,
as they could otherwise fall off while the con-
vertible top is being operated and result in prop-
erty damage or personal injury.
If the rollover protective system is extended, do
not operate the convertible top.
Always completely finish the operation of the
convertible top. Driving off before an opening or
closing procedure is completely finished can
lead to property damage or personal injury.
Do not reach into the moving parts during the
opening and closing procedure. Keep children
away from the pivoting range of the convertible
top.
For safety reasons, only operate the convertible
top while the vehicle is standing.<
While opening and closing, the convertible
top pivots upward. If operating the con-
vertible top inside a garage or under a bridge, or
similar low structure, ensure the minimum clear-
ance is 7 ft/2 m; otherwise, the vehicle may be
damaged.<
Before opening and closing
>Please observe the previous safety instruc-
tions.
>Please ensure the luggage compartment
roller cover is in its lowest position, refer to
page95; otherwise, the convertible top can-
not be opened.
>Ensure the cargo does not push against the
luggage compartment roller cover from
below.
>Ensure that the liftgate is closed.
Opening and closing the convertible top
To open:
Press the switch backward in order to open the
sliding/tilting sunroof. Pressing the button again
opens the convertible top.
To close:
Press the switch forward
Operating while driving
The convertible top may be opened or closed
while driving not faster than 20 mph/30 km/h.
While operating the convertible top, pay
close attention to the surrounding traffic;
otherwise, an accident may happen. Try to avoid
operating the convertible top while reversing
the vehicle since the rear view is very limited
during the convertible top's movement. Do not
operate the convertible top when driving on
winding and rough roads or during windy condi-
tions.<
For better control
>The LED lights up during convertible top
operation until the opening or closing pro-
cedure is completely finished.
>The LED flashes after releasing the switch.
The opening or closing procedure has not
yet been completed. The procedure can be
continued in the desired direction by press-
ing the appropriate button.
>The indicator lamp Convertible top not
locked, refer to page141, lights up.
Page 34 of 174

Opening and closing
32
Interruption
A convertible top which is not completely
open or closed is hazardous.<
The automatic movement is immediately inter-
rupted when the button for the convertible top
operation is released. The procedure can be
continued in the desired direction by pressing
the appropriate button.
If the opening or closing procedure is inter-
rupted by releasing the respective button, the
convertible top stays in its current position for
several seconds before it slowly moves into a
more stable position. The procedure can be con-
tinued by pressing the appropriate button.
The opening and closing procedure is also inter-
rupted in case of a mechanical blockage. In this
case, in order to operate the convertible top
again:
1.Turn off the ignition and then switch it on
again.
2.Press the button to continue the procedure
in the desired direction.
Opening and closing procedure
Do not interrupt and restart the closing
procedure several times one after
another, or the convertible top mechanism
could be damaged.<
If the convertible top can be moved in only
one direction after several consecutive
attempts to operate it, the convertible top sys-
tem has overheated. Allow the system to cool
down for approx. 4 minutes.<
If the battery was disconnected, e.g. for
changing batteries or vehicle storage,
reinitialize the power windows, refer to page29.
Otherwise, the windows cannot be lowered or
the convertible top cannot be opened.<
Convenient operation
For convenient operation using the remote con-
trol, refer to page19; for operation via the door
lock, refer to page22.
Manual closing in the event of an
electrical malfunction
Only close the convertible top manually if
it is absolutely necessary. Never open it
manually. Improper handling of the convertible
top can result in damage. The closing procedure
must be completely finished. Otherwise, dam-
age or injury could result.<
Before closing
1.Remove allen key and screwdriver from
vehicle tools, refer to page125.
2.Pry out luggage compartment lamp from
the left side trim using the screwdriver.
3.Use the screwdriver and turn the gold-col-
ored screw, see arrow, one and a half turns
in the direction of the arrow.
Releasing the convertible top
1.Push cover panel forward, see arrow1.
2.In order to unlock the convertible top use
the allen key to loosen the screws of the
locking devices, see arrows 2.
3.Release the second side frame.
Page 35 of 174

REFERENCEAT A GLANCE CONTROLS DRIVING TIPS MOBILITY
33
Closing the convertible top
1.Place both hands on the convertible top on
the respective side frame.
2.Lift out both sides at the same time, and
swing the convertible top forward onto the
cowl.
3.Inside the vehicle, use a screwdriver to pry
out the cover in the center of the roof.
To close the sliding sunroof
1.Insert the hexagon wrench into the recess in
the center of the roof and push upward, see
arrow1.
2.Turn the hexagon wrench in the direction of
arrow 2.
3.Open both locking mechanisms and remove
the locking pieces.4.Insert the pins into the respective recess in
the cowl, see arrow.
To lock the convertible top
Turn hexagon wrench in the opposite direction
of arrow 2 until the convertible top is securely
locked.
Please contact your MINI dealer to have
the electrical malfunction repaired.<
Wind deflector*
With the convertible top open, the wind deflec-
tor keeps air movement in the passenger com-
partment to a minimum, thus providing you with
a more pleasant drive, even at higher speeds.
Do not let the wind deflector come into
contact with pointy objects as these may
damage the net. Do not place objects on the
installed wind deflector. When stowing the wind
deflector, ensure that it is not damaged by
objects.<
Before installing
1.Take the wind deflector out of the pouch.
2.Unfold the wind deflector, see arrows 1.
Page 36 of 174
Opening and closing
34
3.Press the locking device together until it
engages, see arrow 2.
Installing and folding up
1.Push out retaining pin 2 on one side until it
engages.
2.Insert wind deflector with retaining pins into
the openings 1 and 2 on that side of the
vehicle.
3.On the opposite side of the vehicle, insert
the retaining pin 1 into the opening, pushing
against the spring load.
4.Push out retaining pin 2 on one side until it
engages.
5.Fold up the upper part of the wind deflector.
If a seat is in its rearmost position, do not
recline the backrest too far; otherwise, the
wind deflector could be damaged.<
Removing and folding
Remove the deflector following the reverse
sequence.
Push the release lever towards the center of the
wind deflector and fold both halves together.
Page 37 of 174

REFERENCEAT A GLANCE CONTROLS DRIVING TIPS MOBILITY
35
Adjustments
Sitting safely
The ideal sitting position can make a vital contri-
bution to relaxed, fatigue-free driving. In con-
junction with the safety belts, the head restraints
and the airbags, the seated position has a major
influence on your safety in the event of an acci-
dent. To ensure that the safety systems operate
with optimal efficiency, we strongly urge you to
observe the instructions contained in the follow-
ing section.
For additional information on transporting chil-
dren safely, refer to page41.
Airbags
Always maintain an adequate distance
between yourself and the airbags. Always
grip the steering wheel on the rim, with your
hands in the 3 o'clock and 9 o'clock positions, to
minimize the risk of injury to the hands or arms
in the event of the airbag being triggered off.
No one and nothing should come between the
airbags and the seat occupant.
Do not use the cover of the front airbag on the
front passenger side as a storage area. Ensure
that the front passenger is correctly seated, e.g.
that no feet or legs are propped against the
dashboard. Otherwise, leg injury could result if
the front airbag suddenly deployed.
Make sure that occupants keep their heads
away from the side airbag and do not lean
against the head-level airbag in the MINI; other-
wise injuries can occur when the airbag is trig-
gered.<
Even if you follow all the instructions, injuries
resulting from contact with airbags cannot be
fully excluded, depending on the circumstances.
The ignition and inflation noise may provoke a
mild hearing loss in extremely sensitive individ-
uals. This effect is usually only temporary.
For airbag locations and additional information
on airbags, refer to page71.
Head restraint
A correctly adjusted head restraint reduces the
risk of neck injury in the event of an accident.
Adjust the head restraint in such a way
that its center is at approx. ear level. Oth-
erwise, there is an increased risk of injury in the
event of an accident.<
Head restraints, refer to page37.
Safety belt
Before every drive, make sure that all occupants
wear their safety belts. Airbags complement the
safety belt as an additional safety device, but
they do not represent a substitute.
Number of safety belts
Never allow more than one person to
wear a single safety belt. Never allow
infants or small children to ride in a passenger's
lap.
Make sure that the belt in the lap area sits low
across the hips and does not press against the
abdomen. The safety belt must not rest against
the throat, run across sharp edges, pass over
hard or fragile objects or be pinched. Fasten the
safety belt so that it is pulled taut across the lap
and shoulder, fitting the body snugly without
any twists. Otherwise, the belt could slide over
the hips in the event of a frontal collision and
injure the abdomen. Avoid wearing bulky cloth-
ing and regularly pull the belt in the upper-body
area taut; otherwise, its restraining effect could
be impaired.<
Safety belts, refer to page38.
Seats
Note before adjusting
Never attempt to adjust your seat while
the vehicle is moving. The seat could
respond with unexpected movement, and the
ensuing loss of vehicle control could lead to an
accident.
Page 38 of 174

Adjustments
36
On the front passenger seat as well, do not
incline the backrest too far to the rear while the
vehicle is being driven; otherwise, there is a dan-
ger in the event of an accident of sliding under
the safety belt, eliminating the protection nor-
mally provided by the belt.<
Comply with the instructions on head restraint
height on page37 and on damaged safety belts
on page39.
Seat adjustment
Observe the instructions on page35 to
ensure the best possible personal protec-
tion.<
Longitudinal adjustment
Pull the lever, arrow1, and slide the seat into the
desired position, arrows2.
After releasing the lever, move the seat slightly
forward or back so that it engages properly.
Height
Pull up or push down the lever repeatedly,
arrows 1, until the desired height is reached,
arrows 2.
Backrest
Pull the lever, arrow 1, and apply your weight to
the backrest or lift it off, as necessary, arrows 2.
Lumbar support*
You can also adjust the contour of the backrest
to obtain additional support in the lumbar
region.
The upper hips and spinal column receive sup-
plementary support to help you maintain a
relaxed, upright sitting position.
Turn the wheel to increase or decrease the cur-
vature.
Entry to the rear
Easy entry on the driver's side
The easy entry feature includes a mechanical
memory function for the longitudinal adjust-
ment and backrest angle.
Page 39 of 174

REFERENCEAT A GLANCE CONTROLS DRIVING TIPS MOBILITY
37
1.Pull up the lever on the seat backrest,
arrow1.
The backrest folds forward.
2.Move the seat forward by pushing on the
backrest, arrow2.
Previous position
1.Push the seat back into its previous position.
Do not fold the backrest up until the
seat is in its previous position. Other-
wise, the seat will engage in its current posi-
tion. In this case, adjust the longitudinal
position manually, page36.<
2.Fold the backrest back up to lock the seat.
When moving the seat backwards, ensure
that you do not cause personal injury or
property damage.
Before driving off, engage the front seats and
seat backrests. Otherwise, there is a risk of acci-
dent due to unexpected movement.<
Head restraints
Correctly adjusted head restraint
A correctly adjusted head restraint reduces the
risk of neck injury in the event of an accident.
Correctly adjust the head restraints of all
occupied seats; otherwise, there is an
increased risk of injury in an accident.<
Height
Adjust the head restraint so that its center is
approximately at ear level.
Distance
Adjust the distance so that the head restraint is
as close as possible to the back of the head.
Height adjustment
To raise: pull up.
To lower: press the button, arrow1, and slide
the head restraint down.
Removing
Only remove a head restraint if no one will be
sitting on the seat in question.
Reinstall the head restraint before trans-
porting passengers, as otherwise the head
restraint cannot provide its protective func-
tion.<
MINI: front
1.Pull up as far as it will go.
2.Fold the backrest forward slightly.
3.Press button1 and pull the head restraint
out as far as it will go.
4.Fold back the backrest.
Page 40 of 174

Adjustments
38
MINI Convertible: front
1.Pull up as far as it will go.
2.Fold the backrest forward slightly.
3.Press button1 and pull the head restraint
out as far as it will go.
4.Additionally press button 2 and pull the
head restraint out completely.
5.Fold back the backrest.
Rear
1.Pull up as far as it will go.
2.Press button1 and pull the head restraint
out completely.
Seat heating*
Switching on
Press once for each temperature level.
Three LEDs indicate the highest temperature.
If you continue driving within the next 15 min-
utes, the seat heating is automatically activated
at the previously set temperature.
The temperature is lowered or the heating is
switched off entirely to save on battery power.
The LEDs stay lit.
Switching off
Press button longer.
Safety belts
Observe the instructions on page35 to
ensure the best possible personal protec-
tion.<
Before every drive, make sure that all occupants
wear their safety belts. Airbags complement the
safety belt as an additional safety device, but
they do not represent a substitute.
Front and rear seats
Closing
Make sure you hear the lock engage in the belt
buckle.
The upper belt anchor is suitable for adults of
any stature as long as the seat is adjusted prop-
erly, page35.
Opening
1.Grasp the belt firmly.
2.Press the red button in the buckle.
3.Guide the belt into its reel.
MINI Convertible: rear belt guide
Please ensure that the belt guide loop,
arrow, is locked when putting on the rear
seat belts.<
 1
1 2
2 3
3 4
4 5
5 6
6 7
7 8
8 9
9 10
10 11
11 12
12 13
13 14
14 15
15 16
16 17
17 18
18 19
19 20
20 21
21 22
22 23
23 24
24 25
25 26
26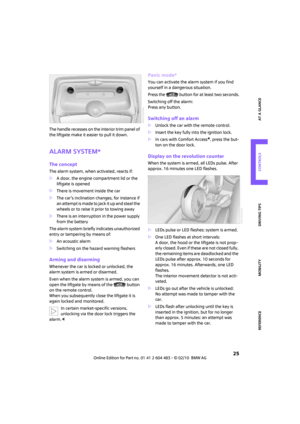 27
27 28
28 29
29 30
30 31
31 32
32 33
33 34
34 35
35 36
36 37
37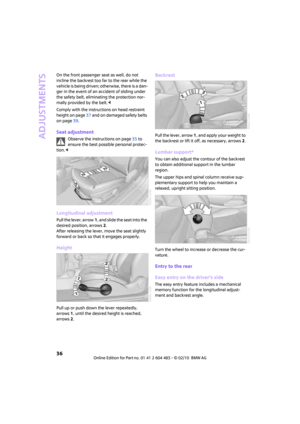 38
38 39
39 40
40 41
41 42
42 43
43 44
44 45
45 46
46 47
47 48
48 49
49 50
50 51
51 52
52 53
53 54
54 55
55 56
56 57
57 58
58 59
59 60
60 61
61 62
62 63
63 64
64 65
65 66
66 67
67 68
68 69
69 70
70 71
71 72
72 73
73 74
74 75
75 76
76 77
77 78
78 79
79 80
80 81
81 82
82 83
83 84
84 85
85 86
86 87
87 88
88 89
89 90
90 91
91 92
92 93
93 94
94 95
95 96
96 97
97 98
98 99
99 100
100 101
101 102
102 103
103 104
104 105
105 106
106 107
107 108
108 109
109 110
110 111
111 112
112 113
113 114
114 115
115 116
116 117
117 118
118 119
119 120
120 121
121 122
122 123
123 124
124 125
125 126
126 127
127 128
128 129
129 130
130 131
131 132
132 133
133 134
134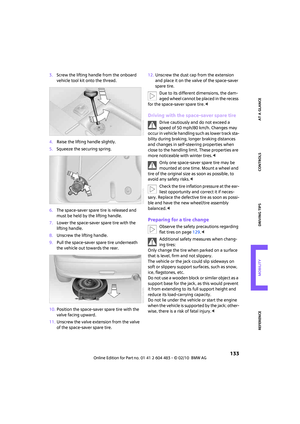 135
135 136
136 137
137 138
138 139
139 140
140 141
141 142
142 143
143 144
144 145
145 146
146 147
147 148
148 149
149 150
150 151
151 152
152 153
153 154
154 155
155 156
156 157
157 158
158 159
159 160
160 161
161 162
162 163
163 164
164 165
165 166
166 167
167 168
168 169
169 170
170 171
171 172
172 173
173